VKBOTS Library
VKBOTSLibrary

VKH6 Humanoid Robot

The VKBOTS Library: everything you need to unbox, operate, program and extend the VKH6, organised as a book you can read front to back or dip into by chapter.

31Degrees of freedom
1450mmHeight
~38kgWeight
518WhHot-swap battery
1kHz+Whole-body control
ROS 2Ubuntu 22.04 SDK

How this book is organised

Start here

  1. Read the safety guidelinesWhat to check before the robot powers on and stands.
  2. Follow the operation guideCharge, power up and drive the VKH6 with the gamepad.
  3. Set up your workstationNetwork, SSH access, joint IDs and the software layout.
  4. Run the minimal 31-DoF exampleSend your first joint commands through the SDK.
  5. Explore the robot in 3DPose the real VKH6 model, check joint ranges, frames and link names.

VKH6

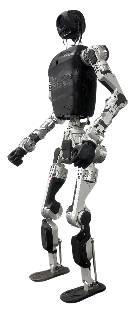
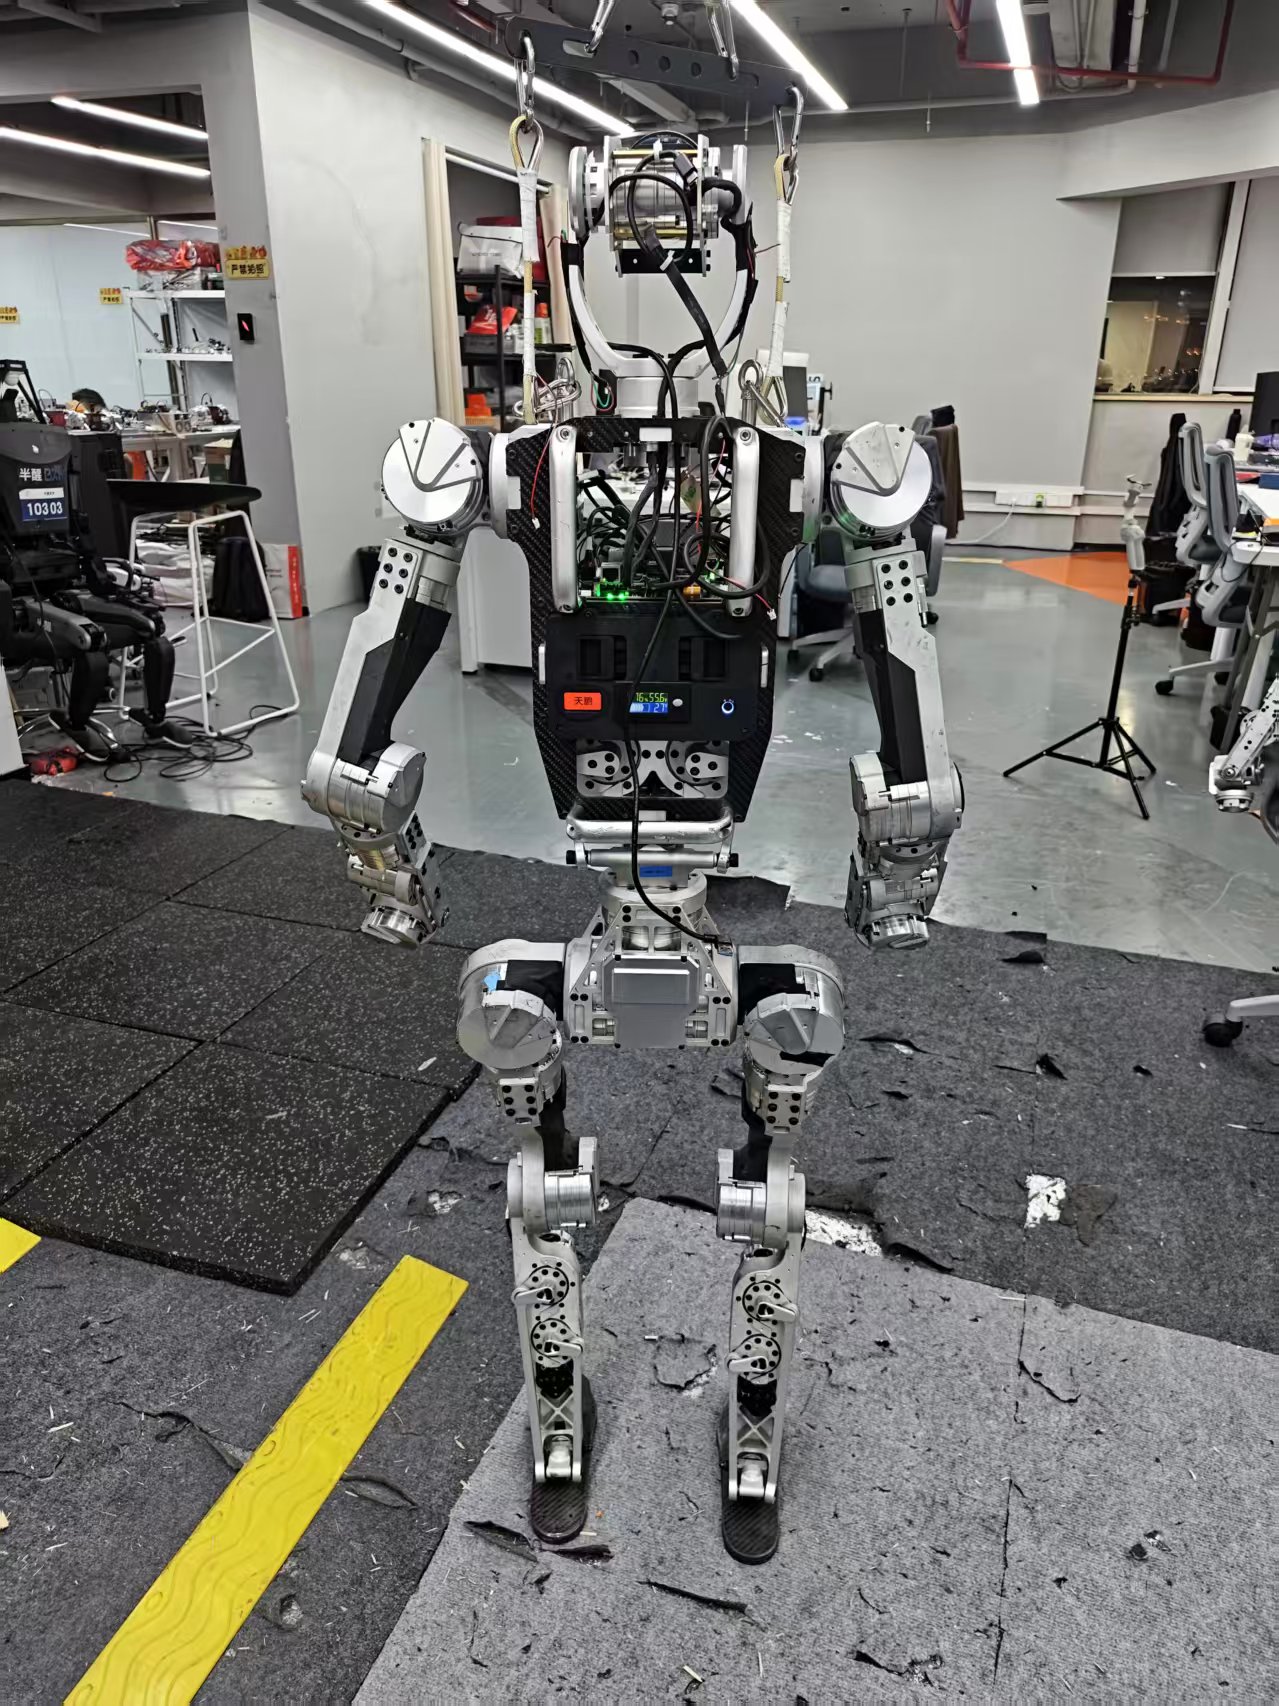
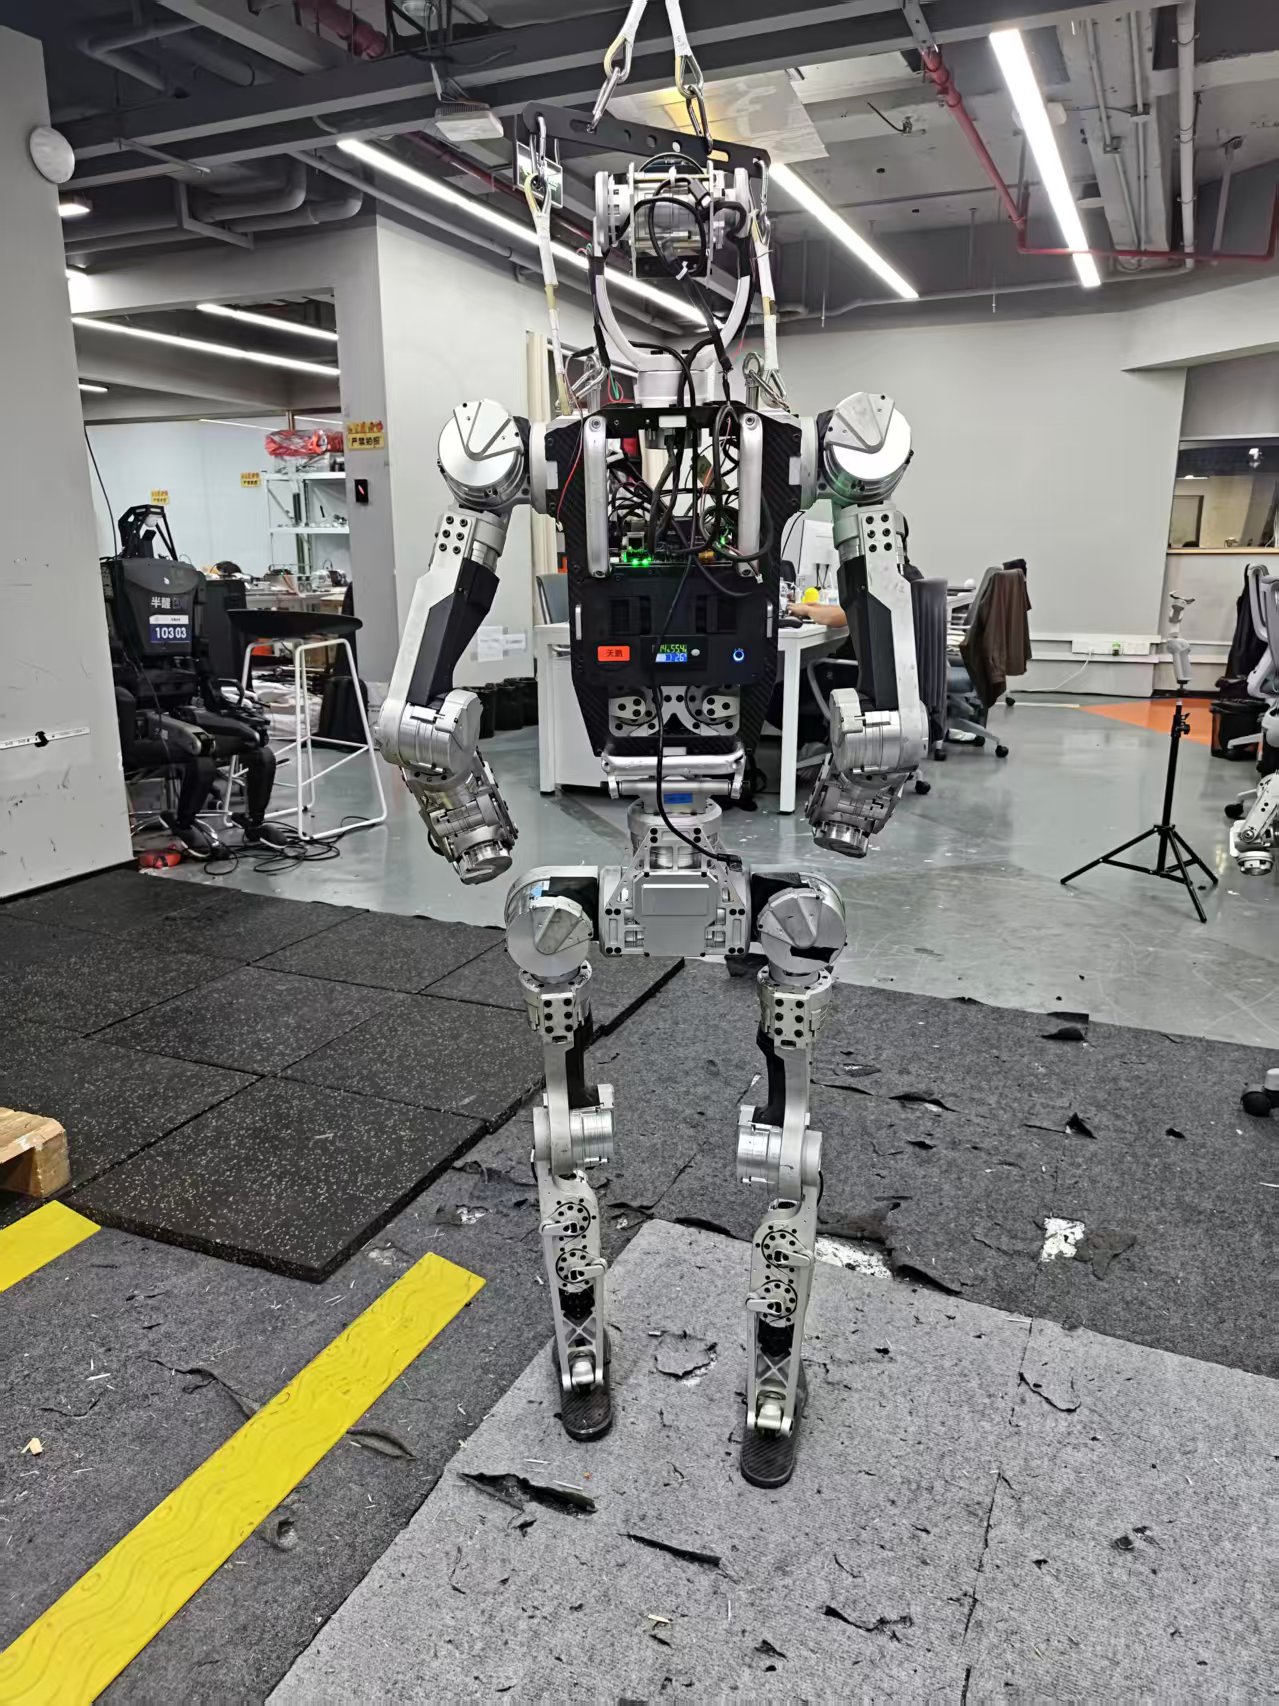
VKH6 is a medium-sized humanoid robot developed in-house by VKBOTS, standing 1.45 m tall with motion parameters comparable to a human of similar height. It is designed for high-dynamic movement and open-platform development.

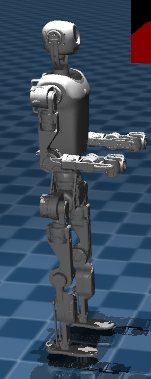
VKH6 Front View VKH6 Side View
Front View Side View

Key Highlights

  • High-Dynamic Motion: 31 VKBOTS hollow planetary joint motors across the body, enabling running, jumping, backflips, and parkour
  • Skeletal Lightweight Design: Minimized weight; custom shells can be attached to change appearance and mount additional devices
  • High Reliability: Hollow cable routing greatly reduces the wiring harness; built-in fall-resistant design
  • High-Speed Bus: PCIE-CANFD with full-body control frequency > 1000 Hz
  • Hot-Swap Battery: Replace batteries without powering off, ensuring continuous operation
  • Open Development Interface: CANFD MIT protocol for direct motor control + ROS2 SDK + one-click MuJoCo simulation deployment

Full Specifications

Appearance & Motion Performance

Item Specification
Height 1450 mm
Width 450 mm
Depth 280 mm
Thigh Length 320 mm
Shin Length 320 mm
Upper Arm Length 240 mm
Forearm Length 240 mm
Total Weight ~38 kg
Arm Payload 5 kg extended (10 continuous cycles); 10 kg elbow-supported (10 continuous cycles)
Max Speed > 4 m/s (~13 km/h)

Full-Body Joint Parameters

Detailed motor specifications can be found in Joint Actuator Modules.

Joint Motor Min (rad) Max (rad) Peak Torque (Nm) Peak Speed (rad/s) Inertia (kg*m^2)
waist_y_joint VKBOTS7010-19 x 2 -0.5236 0.5236 90 20 0.0274702
waist_x_joint VKBOTS7010-19 x 2 -0.2618 0.2618 100 20 0.0412054
waist_z_joint VKBOTS8515-19 -2.8798 2.8798 150 20 0.044688
l_hip_y_joint VKBOTS8515-19 -2.8798 2.8798 150 20 0.044688
l_hip_x_joint VKBOTS8515-19 -0.48869 3.0543 150 20 0.044688
l_hip_z_joint VKBOTS7010-19 -2.8798 2.8798 45 20 0.0137351
l_knee_y_joint VKBOTS8515-19 -0.087266 2.618 150 20 0.044688
l_ankle_y_joint VKBOTS5018-19 x 2 -0.87266 0.7854 40 20 0.00848397
l_ankle_x_joint VKBOTS5018-19 x 2 -0.34907 0.34907 15 20 0.00551458
r_hip_y_joint VKBOTS8515-19 -2.8798 2.8798 150 20 0.044688
r_hip_x_joint VKBOTS8515-19 -3.0543 0.48869 150 20 0.044688
r_hip_z_joint VKBOTS7010-19 -2.8798 2.8798 45 20 0.0137351
r_knee_y_joint VKBOTS8515-19 -0.087266 2.618 150 20 0.044688
r_ankle_y_joint VKBOTS5018-19 x 2 -0.87266 0.7854 40 20 0.00848397
r_ankle_x_joint VKBOTS5018-19 x 2 -0.34907 0.34907 15 20 0.00551458
l_shoulder_y_joint VKBOTS7010-19 -2.8798 2.8798 45 20 0.0137351
l_shoulder_x_joint VKBOTS7010-19 -0.34907 3.0543 45 20 0.0137351
l_shoulder_z_joint VKBOTS5014-19 -2.8798 2.8798 21 20 0.00424198
l_elbow_y_joint VKBOTS7010-19 -0.95993 1.6581 45 20 0.0137351
l_wrist_x_joint VKBOTS5014-19 -2.8798 2.8798 21 20 0.00424198
l_wrist_y_joint VKBOTS5014-19 -1.309 1.309 21 20 0.00424198
l_wrist_z_joint VKBOTS5014-19 -0.7854 0.7854 21 20 0.00424198
r_shoulder_y_joint VKBOTS7010-19 -2.8798 2.8798 45 20 0.0137351
r_shoulder_x_joint VKBOTS7010-19 -3.0543 0.34907 45 20 0.0137351
r_shoulder_z_joint VKBOTS5014-19 -2.8798 2.8798 21 20 0.00424198
r_elbow_y_joint VKBOTS7010-19 -0.95993 1.6581 45 20 0.0137351
r_wrist_x_joint VKBOTS5014-19 -2.8798 2.8798 21 20 0.00424198
r_wrist_y_joint VKBOTS5014-19 -1.309 1.309 21 20 0.00424198
r_wrist_z_joint VKBOTS5014-19 -0.7854 0.7854 21 20 0.00424198
neck_z_joint VKBOTS5014-19 -1.57 1.57 21 20 0.00424198
neck_y_joint VKBOTS5014-19 -0.7854 0.7854 21 20 0.00424198

Mechanical Structure

Degrees of Freedom

Item Specification
Total DOF 31 (including 2-DOF neck)
DOF per Leg 6 (Hip XYZ x 3 + Knee Y x 1 + Ankle XY x 2)
DOF per Arm 7 (Shoulder YXZ x 3 + Elbow Y x 1 + Wrist XYZ x 3)
Motor Series VKBOTS Hollow Planetary

Electrical System

Item Specification
Max Voltage 58.8 V
Rated Current 50 A
Max Current > 100 A
Battery Capacity 518 Wh, lithium
Battery Life ~1 hour walking
Hot-Swap Supported

Control Communication Architecture

Item Specification
Control Communication Architecture PCIE-CANFD, FPGA
System Control Frequency >1000 Hz

Computing & Perception

Computing Unit - CPU

Item Specification
CPU 13th Gen Intel Core i7-1370P
Cores 14 (6 P-cores + 8 E-cores)
Threads 20
Max Turbo Frequency 5.20 GHz
Processor Base Power 28 W
Max Turbo Power 64 W
Memory 16 GB DDR4 3200 MHz
Storage 512 GB
GPU Intel Iris Xe Graphics (96 EU)
GPU Max Dynamic Frequency 1.50 GHz
Instruction Set 64-bit (SSE4.1 / SSE4.2 / AVX2)

Computing Unit - GPU

Item Specification
NPU/GPU NVIDIA Jetson series supported (optional or user-installed)

IMU

Item Specification
Operating Voltage 3.3 ~ 5.5 V
Operating Temperature -40 ~ 85 C
Interface UART / CAN
Accelerometer Range +/-12 g
Accelerometer Resolution 0.001 g
Gyroscope Range +/-2000 deg/s
Gyroscope Resolution 0.001 deg/s
Magnetometer Range +/-8 Gs
Magnetometer Resolution 0.25 mg
Barometer Range 300 ~ 1100 hPa
Barometer Resolution 0.06 Pa

Sensors & Peripherals

Item Specification
Depth Camera Intel RealSense D435i
LiDAR Optional (Livox Mid360s)
Microphone HAOKAI 8-array omnidirectional microphone
Speaker Yuexin active speaker (DC 5V)
Wi-Fi / Bluetooth Onboard

Software Ecosystem

Item Specification
OS Ubuntu 22.04
Motor Interface CANFD SDK, MIT protocol (torque / position / velocity / temperature)
Robot Framework ROS2-based hardware control node SDK
Simulation MuJoCo-based RL training and deployment framework
Pre-installed Algorithm Flat-ground walking and running
URDF Provided

Accessories

Item Notes
Dexterous Hand Paid add-on (independent unit)
Xbox-compatible Gamepad Included
Tablet Control App Included

Explore the VKH6 in 3D

Turn, zoom and pose the real VKH6 robot model right here in the page. Every joint can be dragged, so you can check ranges of motion, link names and frames before you write a line of control code.

Model
Open full screen ↗

Loading the 3D model…

Drag to rotate · right-drag to pan · scroll to zoom · click a part of the robot and drag to move that joint.

What you can do

  • Joints: Move every joint with sliders or by dragging the robot itself. Switch between radians and degrees, toggle limits, and Reset to the zero pose.
  • Collision, Inertia, COM: Show the collision geometry, inertia boxes and the centre of mass of each link.
  • Axes and Joint Axes: Display link frames and the rotation axis of each joint, to match the joint IDs used in the SDK.
  • Structure: A graph of the link/joint tree. Click a node to highlight it on the robot.
  • Edit: Read and edit the URDF; changes apply to the model immediately and Download saves your edited file.
  • Measure: Ctrl+click two points on the robot to measure the distance between them.
  • Animation: Key-frame joint poses on a timeline and play them back.

Models

31 DoFThe standard VKH6, including the 2-DoF head (yaw and pitch).
31 DoF + handsThe 31-DoF robot fitted with hands.
29 DoFVKH6 with the head locked, as used by the 29-joint policies in Part V.
29 DoF + handsThe 29-DoF robot fitted with hands.

Notes

  • Meshes are lightened for the web so the model loads quickly on phones. The joint tree, limits, inertias and frames are the same as in the robot's original URDF.
  • The full-resolution URDF and meshes ship with the RL controller repository, under resources/elf3_dof29, resources/elf3_dof31 and the _hand variants (see Part V).
  • You can also drop your own URDF, Xacro or MJCF folder onto the full-screen viewer to inspect it.
  • The viewer is built on the open-source Robot Viewer by Ziqi Fan (Apache-2.0).

Operation Guide

This document contains instructions for unboxing, basic operations, safety precautions, and secondary development for the VKH6 robot.
Please read and follow the Robot Safety Instructions and Safety Guidelines before operating the robot


Unboxing Instructions

  1. Placement and Unboxing: Open the box face up, remove the surrounding foam, and lift the robot out with at least two people.

    • Pay strict attention to the cable positions during extraction to avoid crushing or tearing.
    • After taking it out, it is recommended to suspend the robot using a hanger or lay it flat on the ground.
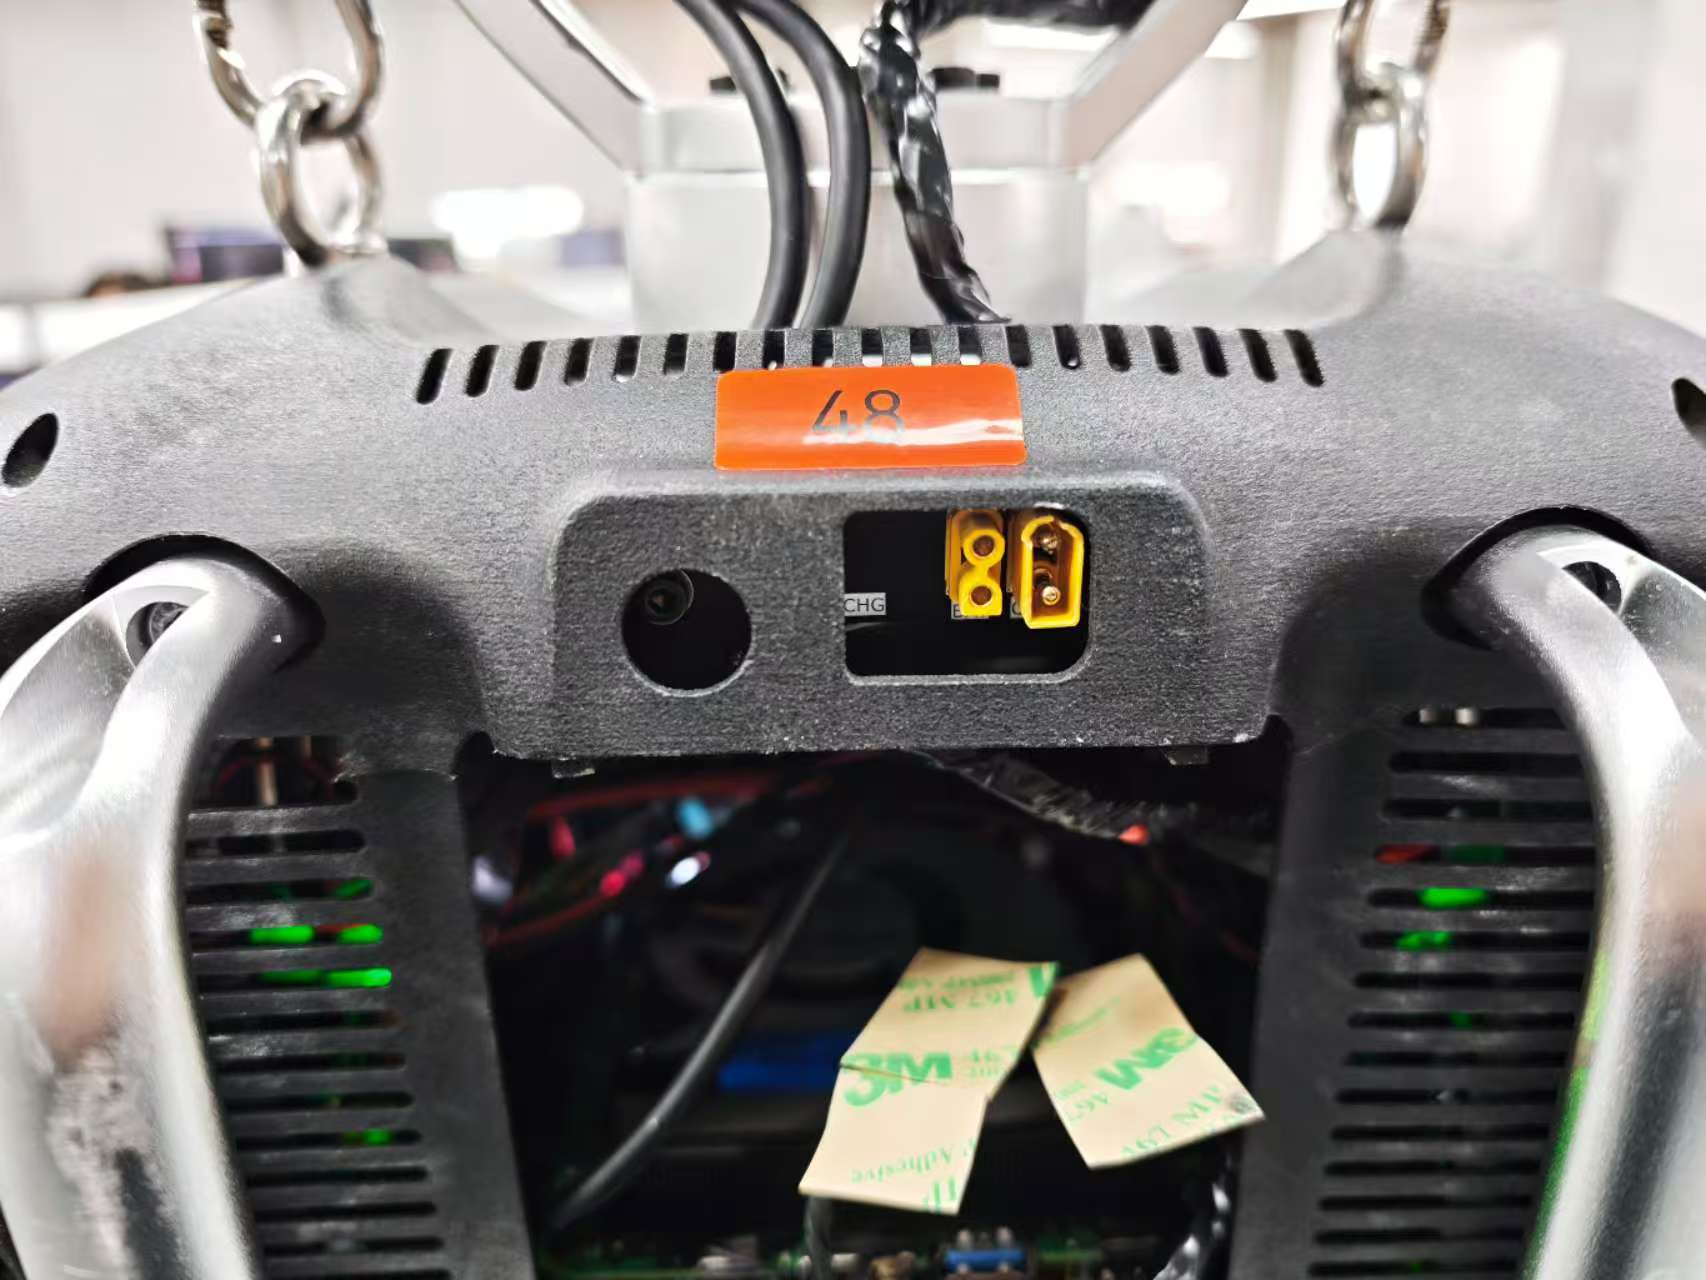
  2. Backplate Structure Introduction:

    • The following figure shows the robot backplate structure ((backplate and charging-port photo pending)).
    • Upper Display Screen: Shows voltage, reference battery level, and temperature. Press the button on the right side of the screen to wake it up; it will automatically turn off after 10 seconds.
      • Use the voltage value as the main battery-state reference. The percentage / battery bars are for reference only and may not match the actual remaining capacity.
    • Lower Right: The power switch button for the main battery.
    • Upper Body: Charging port.
  3. Host System Information:

    • The host operating system of the robot is Ubuntu 22.
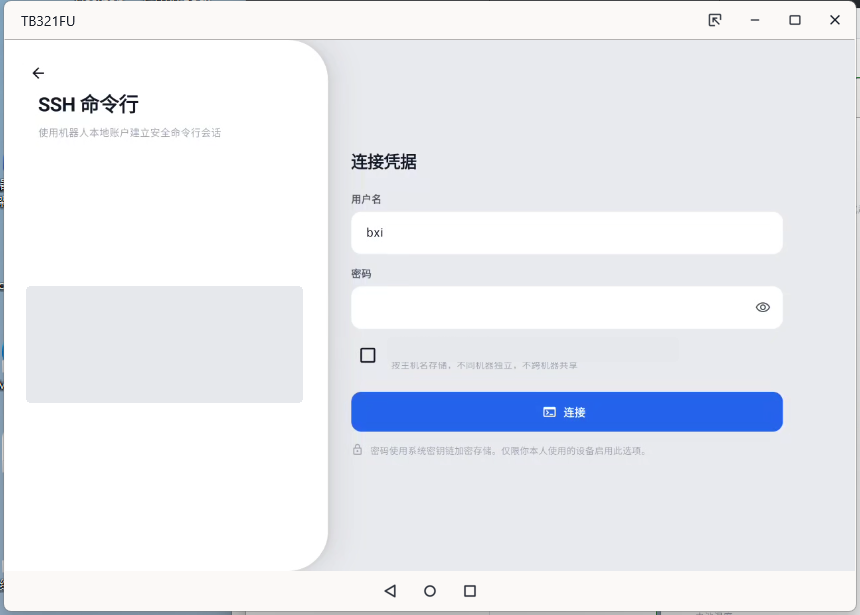
    • Username: bxi
    • Password: Contact the supplier to obtain

Power-on and Operation Steps

1. Turn on Battery Power & Host Power

  • Press the battery power button. The battery will supply power normally, and the host will also power on simultaneously. Check the voltage value on the backplate display. The percentage / battery bars may be inaccurate, so use the voltage value as the reference.
  • Voltage note:
    1. New 58V machines: The backplate display shows the current battery-pack voltage. When fully charged, the voltage is about 58.8V. The voltage gradually decreases during use. If the voltage is clearly low (below 50V), stop and charge the robot first.
    2. Older 48V machines: The backplate display shows the current battery-pack voltage. When fully charged, the voltage is about 48.8V. The voltage gradually decreases during use. If the voltage is clearly low (below 40V), stop and charge the robot first.

Charging Notes

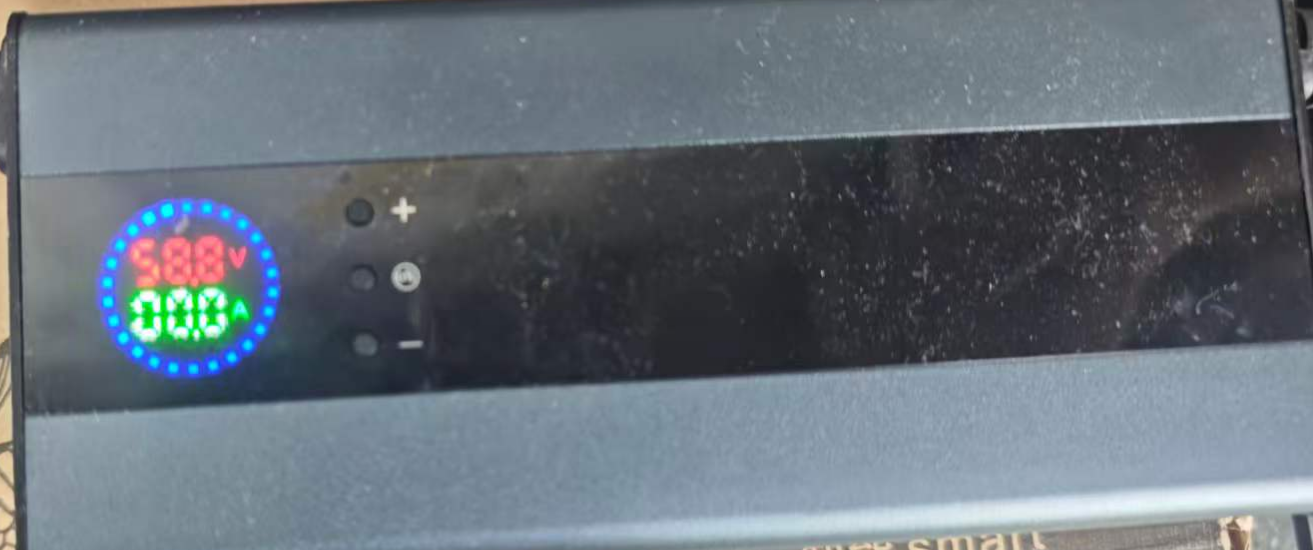
Verify charger output voltage: Connect the charger directly to a power source (without connecting to the robot) and check that the charger display is within the supplier-specified range:

  1. Older machines with 48V batteries: The recommended voltage is 48.8V. If it is different, adjust it before connecting the robot.
  2. New machines with 58V batteries: The recommended voltage is 58.8V. If it is different, adjust it before connecting the robot.

Note: The percentage / battery bars may be inaccurate. Before powering on or moving the robot, use the voltage value as the primary battery-state reference.

Robot Backplate Charging Port Charger Diagram

2. Connect Remote Controller

Connect the remote controller to the robot PC via Bluetooth. The controller is pre-paired at the factory. - Long press the Xbox button directly. - Wait for the indicator light below the button to stay solid, which means the controller has successfully connected to the robot PC.

3. Run the Control Program

Watch the operation instruction video carefully. The built-in control program of the robot has multiple modes: Walking, Zero Torque, Initial Posture, Zero-position, High-speed Run, Medium-speed Run, Dance, Recovery, Front Flip (run without dummy hands installed), Clap, Wave, etc., and will be continuously updated.

Important: Pre-Movement Preparation

  • To prevent accidental falls, ensure the robot is hung on a gantry crane using a lanyard, sitting on a chair, or sitting upright on the ground. It is highly recommended to use a hanger and suspend the robot at an appropriate height.
  • Remove all cables from the body (such as charging cables) to prevent tangling during movement.
  • Make sure the battery voltage is sufficient (55V or above is recommended; use the backplate display voltage, not the percentage / battery bars) so the robot does not fall because it cannot complete certain motions due to insufficient power.
  • Always prioritize safety during operation. No one should enter the robot's motion range, and avoid getting hit by the swinging joints of the robot.

3.1 Start the Program

Important: Pre-Initial-Posture Check

  • Ensure the robot’s limbs are not in a posture that may cause motor stalling when switching to the initial posture.

(It is recommended to remain suspended): After the robot powers on, wait about 30 seconds for the system to finish starting up, then press the Right Stick (RS/R3) to start the robot. Observe the chest light of the robot; if it lights up, the control program has started running. It enters Zero Torque mode by default. After the chest light turns on, wait about 10 seconds for self-check to complete before switching the robot to Initial Posture, Walking, or other modes.

3.2 Initial Posture Initialization

(It is recommended to remain suspended): - Press RB + B simultaneously to make the robot enter the initial posture. - Check if the robot is normal: Briefly observe if the motors have any anomalies (such as no response or abnormal noises). - Stand the robot up: If everything is normal, stand the robot up in this state, with both feet touching the ground. The operator should assist in maintaining the initial-posture standing state to prevent external forces from disrupting the posture initialization.

3.3 Switch to Motion State

(At this point, initial-posture initialization is complete, it is still recommended to remain suspended, and you can release the lanyard after a successful and stable switch): - Walking State: Press RB + X simultaneously. The robot enters the walking state, where it can move omnidirectionally on flat ground.


Shutdown and De-energization

4.1 Termination Shutdown (De-Energization Button)

  • Press Start, the control program will exit automatically, and the robot motors will immediately de-energize. The robot will naturally fall due to gravity. > Note: Before shutdown, place a chair under the robot or hang it on a hanger to ensure it does not fall hard onto the ground.
  • Restart: Return to Section 3.1 to restart the program.

Gamepad Motion Control

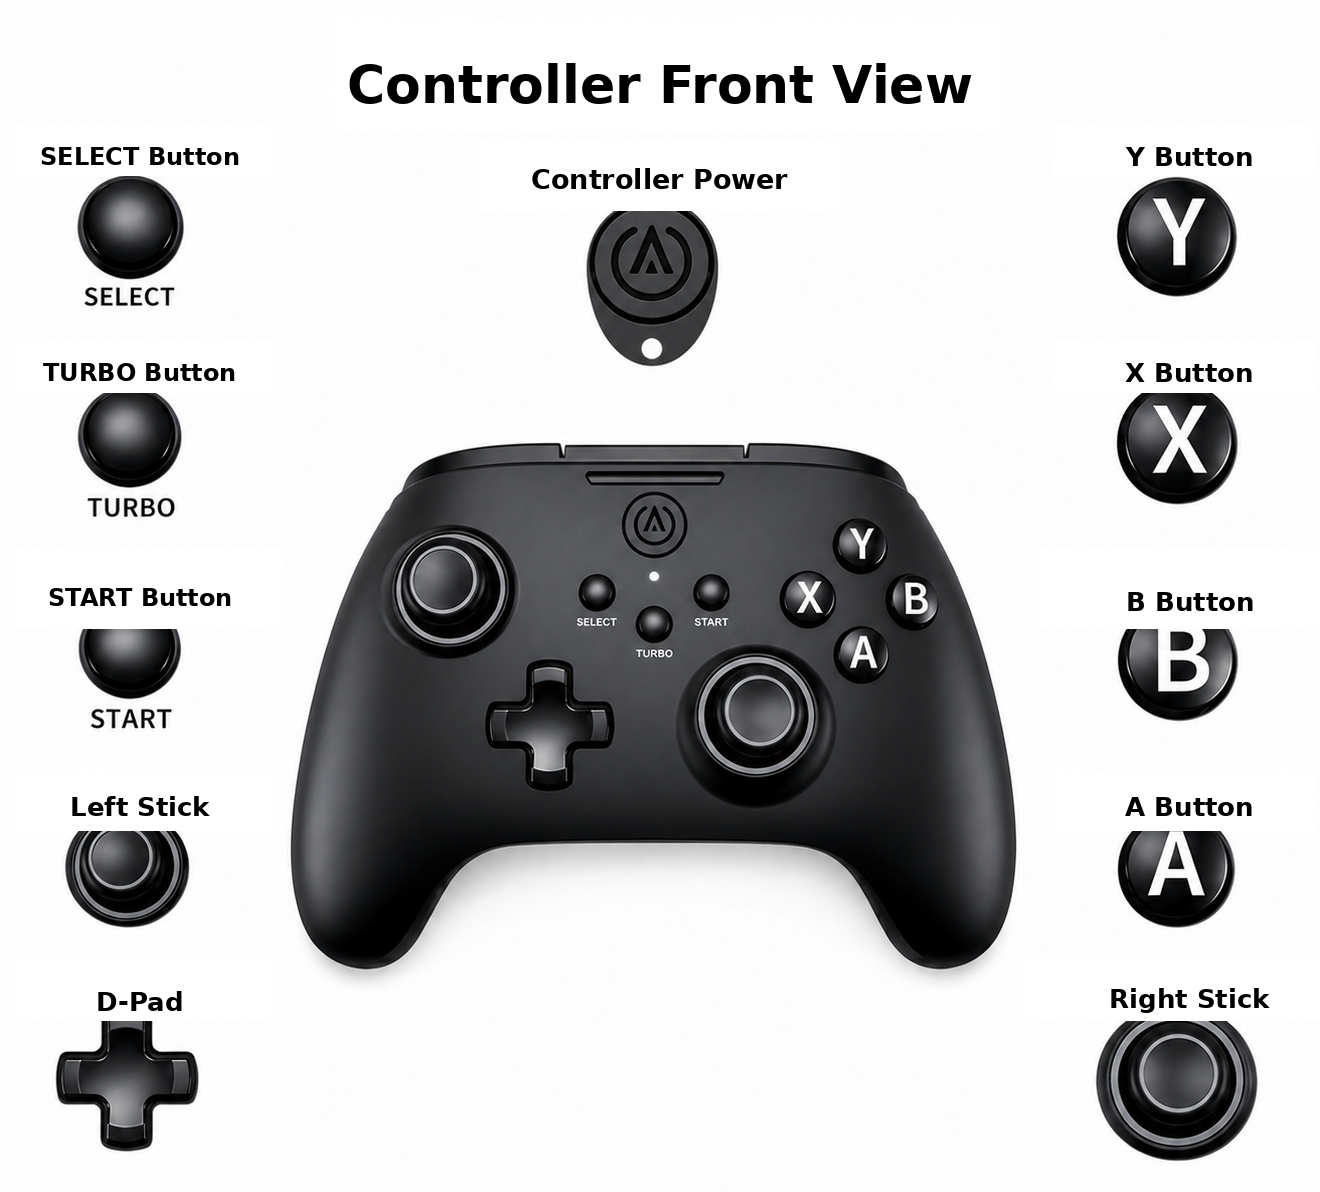
Remote Controller Front View

Remote controller power indicator colors: A solid light means the controller is connected successfully. White indicates 2.4G wireless connection, blue indicates Bluetooth connection, and green indicates USB wired connection. A flashing red battery indicator means the battery is low.

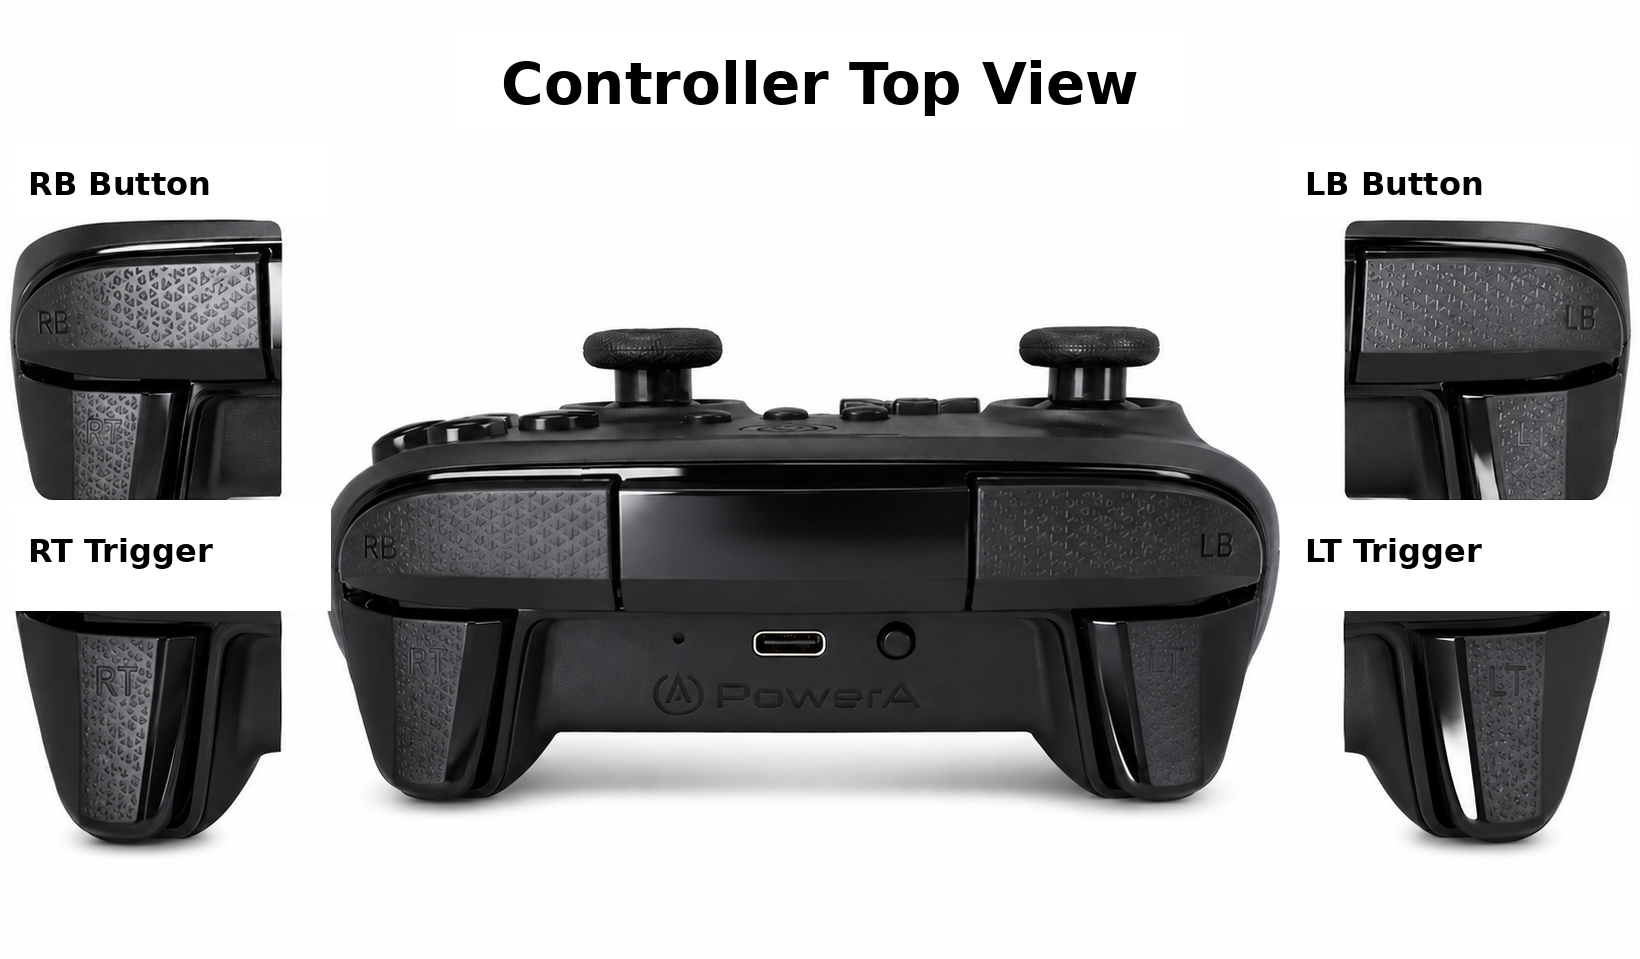
Remote controller mode switch: The mode switch is located on the bottom/back of the controller near the USB-C port. It has three positions: USB, BT, and RF.

  • USB: USB wired connection mode, using a USB-C data cable to connect to the PC.
  • BT: Bluetooth connection mode, used to connect to the robot PC via Bluetooth.
  • RF: 2.4G wireless connection mode, used with a 2.4G USB receiver. The 2.4G USB receiver is located in the controller box by default.

Remote Controller Top View

Movement Direction Control

In Walking, High-speed Run, and Medium-speed Run modes, use the following inputs to move the robot:

Control Operation Effect
Right stick Push forward or backward Forward / Backward
Left stick Push left or right Left translation / Right translation
D-pad Press ← or → Turn left / Turn right

Speed

The robot speed depends on how far the stick is pushed: a larger stick input produces faster movement, and a smaller stick input produces slower movement.

Mode Level Mode Name Button Combination Switchable Modes Notes
Normal Walking RB + X All modes except Recovery Omnidirectional movement, with some obstacle-crossing ability (10-15 cm steps)
Normal Zero Torque RB + A Initial Posture / Zero-position Joints output no torque and can be rotated freely
Normal Initial Posture RB + B Walking / Zero Torque / Zero-position / Recovery Joints hold the initial posture
Normal Zero-position RB + Y Initial Posture / Zero Torque All joints hold the zero position
Advanced Dance LB + X Walking / Zero Torque / press X to pause or resume Automatically returns to Walking after completion. While paused, the robot may move to maintain balance (Make sure there are no obstacles within 1 m around the robot)
Advanced Recovery LB + A Zero Torque Use only when the robot is lying face down or on its back. After standing up, it automatically returns to Walking (Make sure there are no obstacles within 1 m around the robot)
Advanced High-speed Run LB + Y Walking Up to about 4 m/s, with no obstacle-crossing ability
Advanced Medium-speed Run LB + B Walking Up to about 2 m/s, with no obstacle-crossing ability
Advanced Front Flip LT + Y Zero Torque Keep the front 3 m clear of obstacles. After completion, it automatically returns to Walking. Run without dummy hands installed
Normal Clap RT + B Walking / press X to pause or resume Automatically returns to Walking after completion
Normal Wave RT + A Walking / press X to pause or resume Does not automatically return to Walking

Advice for Beginners

When operating for the first time, hold the lanyard at all times to prevent falls. Be familiar with the controller button positions before operation. Press the stop button immediately if any anomaly occurs.


Custom Program (SDK) Control

For developers who wish to control the robot via custom algorithms, ROS, or other programs.

The operating environment and low-level programs are pre-configured, fully supporting out-of-the-box usage. - SDK and ROS2 example: https://github.com/bxirobotics/bxi_rl_controller_ros2_example


Packing and Transportation

[To be added: insert packing guide images here]

  • Avoid Limits: Do not leave joints in mechanical dead zones or extreme limit positions.
  • Isolation Protection: Insert original foam cushioning to prevent direct contact between metal casings, especially between two motor housings, during transportation.

Safety Notice and Safety Guidelines

I. Safety Notice

  1. Familiarize Yourself with Product Features: Before operating the robot for the first time, thoroughly review all relevant documentation to fully understand its functional parameters, operating procedures, range limitations, and safety precautions.

  2. Operating Environment Requirements: Place the robot on flat, dry, stable, and obstruction-free surfaces. Do NOT operate in the following environments: high or low temperatures exceeding the product's rated range, humid or dusty areas, surfaces with excessive slope, significant elevation changes, ground prone to collapse or slipping, fragile load-bearing surfaces, or areas with strong vibrations.

  3. Regular Maintenance: Conduct regular status checks on the robot, focusing on critical components such as joint motors, sensors, and power systems. If you detect aging, loosening, damage, or abnormal operation of any components, immediately shut down the robot for repair or replacement. Operating the equipment with known faults is strictly prohibited.

  4. Master Emergency Stop Operation: Before use, confirm and familiarize yourself with the emergency stop activation method to quickly halt the robot in emergency situations. When emergency stop is triggered, all joints will lose support and the robot will collapse to the ground. Therefore, pay special attention to site safety, and use protective frames throughout the post-emergency stop period. Do not activate the emergency stop unless absolutely necessary.

  5. Maintain Safe Operating Area: During robot operation, ensure adequate clearance around the robot (recommended radius >6.5 feet), maintain safe distances from walls, fixed obstacles, personnel, and valuable items, and avoid narrow enclosed spaces, high-traffic areas, and cluttered zones to effectively reduce risks of collision, pinching, and scraping.

  6. Electrical Safety: Before powering on, carefully inspect power cables, plugs, outlets, and equipment power interfaces to ensure they are intact with no damage, short circuits, or loose connections. During operation, if the robot exhibits abnormal heating, hot cables, unusual odors, or strange sounds, immediately disconnect the main power supply. Only restart the equipment after identifying and resolving the issue.

  7. Avoid Improper Use: Ensure the robot is used only for compliant and reasonable applications. Do not deploy it for dangerous, non-compliant, or legally prohibited purposes.

II. Safety Guidelines

1. Pre-Operation Inspection

  • Before powering on or executing motion commands, thoroughly clear the work area of all unauthorized personnel, debris, and obstacles. Pay special attention to areas surrounding the robotic arm, moving joints, and end effectors to ensure no interference or obstruction exists, preventing collisions, personnel injury, or equipment damage during operation.

  • Before starting the equipment, verify the robot's status and confirm that all power-on self-check procedures have completed successfully with no fault error messages.

2. Operating Procedures and Training

All operators must receive necessary training in advance, becoming familiar with the robot's usage specifications, operating methods, and emergency response procedures to reduce safety risks caused by improper operation.

3. Maintain Safe Distance

During robot operation, do not manually interfere with its movements. All personnel must maintain a minimum distance of 3 feet from the robot's operating area. When the robot executes rapid movements or heavy-load operations, personnel are strictly prohibited from remaining within the equipment's projected motion trajectory. Do not observe closely or reach out to touch moving components.

When adjusting, servicing, or manually handling the robot, you must first ensure the robot has completely stopped and is in a powered-off state before proceeding.

4. Rated Load and Accessory Use

  • Operate the robot within its rated load capacity. Do not perform operations exceeding its design capabilities.

  • When using end effectors, gripping mechanisms, or other functional components, ensure they are compatible with the target objects to avoid additional compression, abnormal stress, or component damage caused by incompatibility.

5. Emergency Response Procedures

If the robot experiences stuttering, abnormal movements, loss of control, unusual sounds or odors, system errors, or other sudden hazardous conditions, immediately execute the emergency stop operation via the remote control to terminate equipment motion as quickly as possible.

6. Remote Control Safety Guidelines

  • If the robot has or is using remote control functionality, operate under reliable and secure network conditions whenever possible to avoid control instability caused by network interruption, latency, or external intrusion.

  • During remote control operations, operators must have real-time monitoring capabilities to continuously track the robot's operating status and on-site environmental conditions, thereby enhancing remote operation safety.

III. Disclaimer

  1. Violation of this Safety Notice and Safety Guidelines resulting in personal injury, equipment damage, property loss, or other safety incidents shall be the full responsibility of the liable party.

  2. These safety specifications will be revised as needed in accordance with product upgrades, scenario expansion, and regulatory updates for the semi-awake robot.

Control System Architecture

VKBOTS provides a full-stack open architecture:

  • CANFD-based motor hardware control and debugging interfaces
  • MuJoCo-based simulation environments, robot URDF/XML resources, and related assets
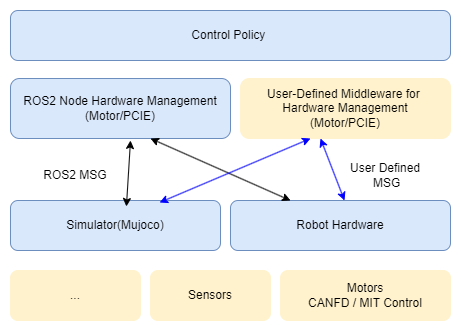
  • ROS2-based hardware management nodes, allowing control policies to be deployed seamlessly to simulation and real hardware
  • Reinforcement-learning-based motion control training example code

System Architecture

CAN Bus & CAN ID

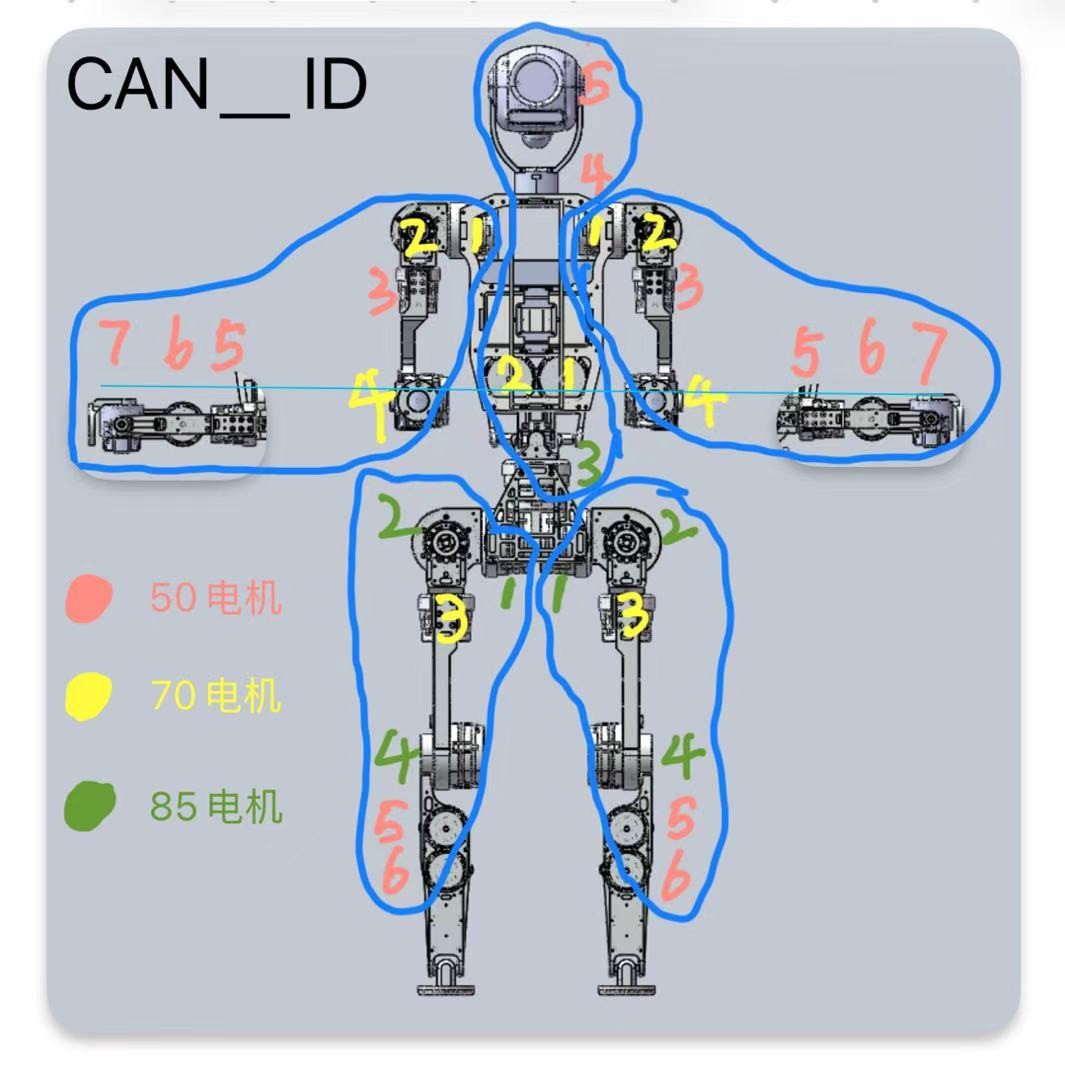
The robot has a total of 31 joint motors, distributed across 5 CANFD buses. Each bus corresponds to one body part:

CAN Bus Interface Body Part Motor Count
0 CANFD_0 Waist & Neck 5
1 CANFD_1 Left Leg (L_leg) 6
2 CANFD_2 Right Leg (R_leg) 6
3 CANFD_3 Left Arm (L_arm) 7
4 CANFD_4 Right Arm (R_arm) 7

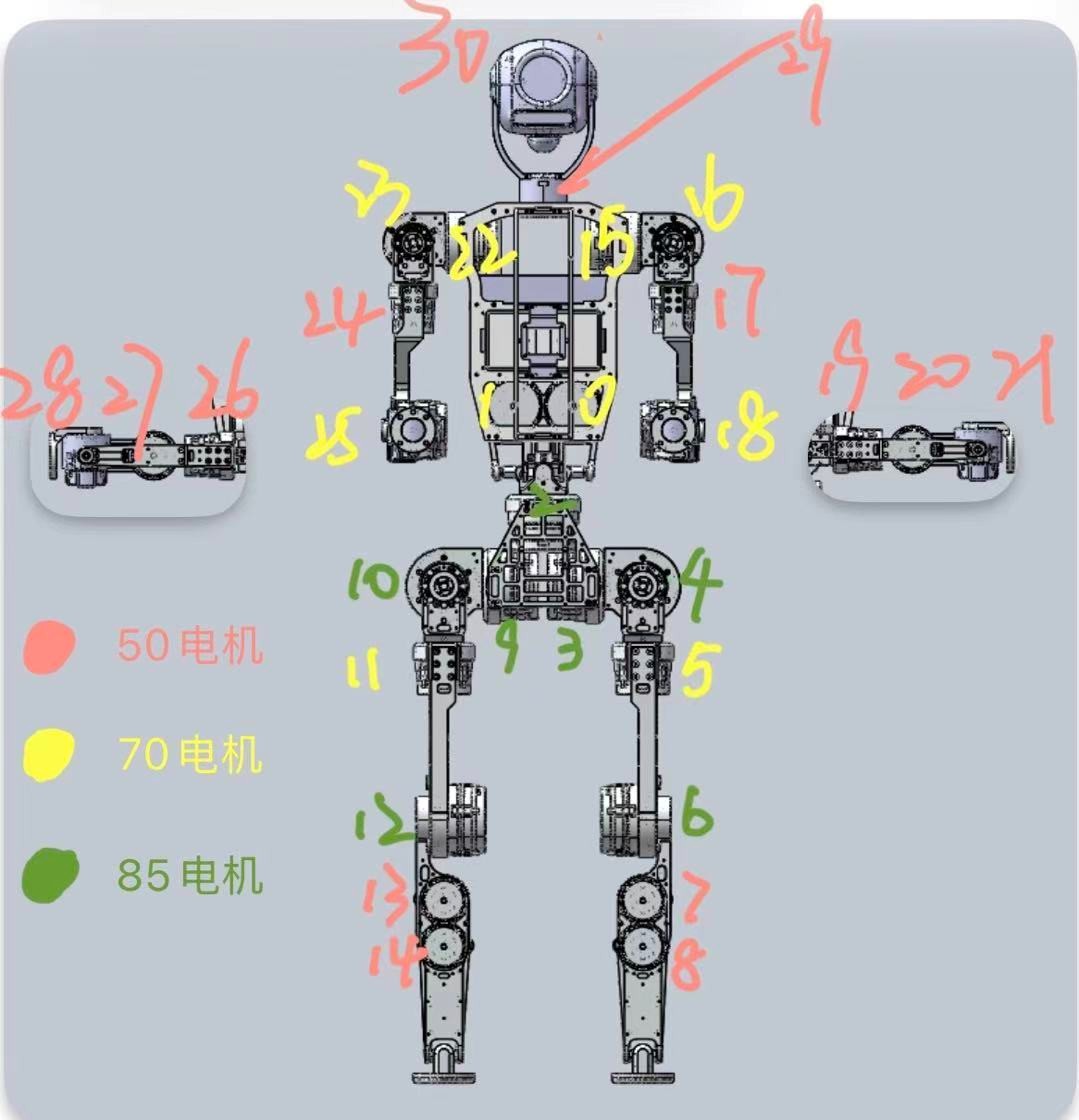
The figure below is the URDF visualization of the robot, with each joint index annotated:

[Pending: insert the URDF visualization image with joint indices annotated here]

The table below lists the joint index, joint name, CAN bus, and CAN ID for every motor. Note that:

  • The Joint Index is the index of the joint in the control program's joint/motor array, numbered continuously across the whole body starting from 0.
  • The CAN ID is the motor's address on its bus; it increments independently within each bus, starting from 1.
Joint Index Joint Name CAN Bus CAN ID
0 waist_y_joint 0 1
1 waist_x_joint 0 2
2 waist_z_joint 0 3
3 l_hip_y_joint 1 1
4 l_hip_x_joint 1 2
5 l_hip_z_joint 1 3
6 l_knee_y_joint 1 4
7 l_ankle_y_joint 1 5
8 l_ankle_x_joint 1 6
9 r_hip_y_joint 2 1
10 r_hip_x_joint 2 2
11 r_hip_z_joint 2 3
12 r_knee_y_joint 2 4
13 r_ankle_y_joint 2 5
14 r_ankle_x_joint 2 6
15 l_shoulder_y_joint 3 1
16 l_shoulder_x_joint 3 2
17 l_shoulder_z_joint 3 3
18 l_elbow_y_joint 3 4
19 l_wrist_x_joint 3 5
20 l_wrist_y_joint 3 6
21 l_wrist_z_joint 3 7
22 r_shoulder_y_joint 4 1
23 r_shoulder_x_joint 4 2
24 r_shoulder_z_joint 4 3
25 r_elbow_y_joint 4 4
26 r_wrist_x_joint 4 5
27 r_wrist_y_joint 4 6
28 r_wrist_z_joint 4 7
29 neck_z_joint 0 4
30 neck_y_joint 0 5
Joint indices and motor models CAN ID allocation

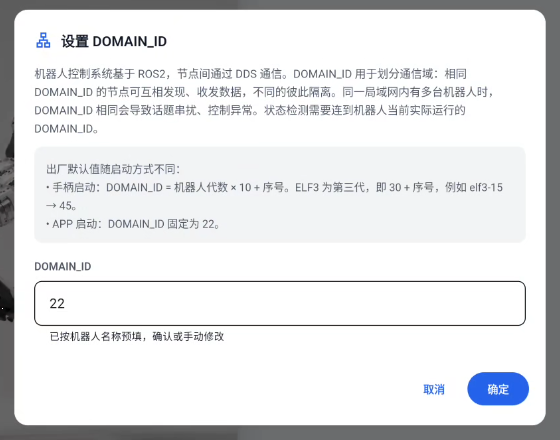
Domain ID

Purpose

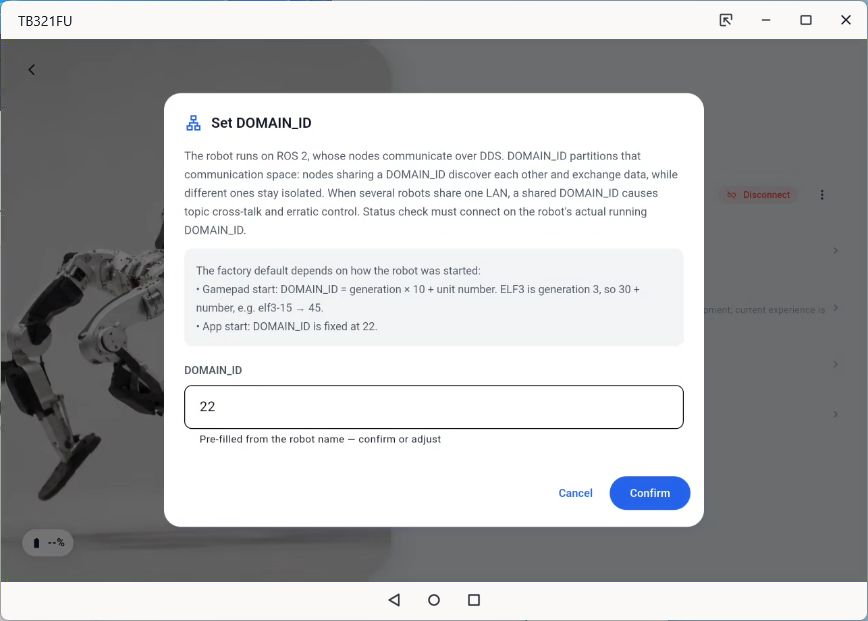
The robot control system is built on ROS2, which uses DDS for inter-node communication at its core. ROS_DOMAIN_ID partitions the communication domain:

  • Nodes with the same Domain ID can discover each other and exchange topics/services.
  • Nodes with different Domain IDs are isolated from each other and do not interfere.

When multiple robots exist on the same local network, or multiple debugging hosts are connected at once, using the same Domain ID causes topic data to cross-talk and leads to abnormal control behavior. Assigning each robot a unique Domain ID isolates each robot's ROS2 communication network from the others.

Default Domain ID

Each robot is configured with a default Domain ID at the factory according to the following rules. The value depends on how the robot is started:

  • Gamepad startup: ROS_DOMAIN_ID = generation × 10 + robot serial number. VKH6 is a third-generation product, so the generation number is 3, and the Domain ID is 30 + serial number.
    • Example: elf3-15 → 3 × 10 + 15 = 45
    • Example: elf3-20 → 3 × 10 + 20 = 50
  • APP startup: ROS_DOMAIN_ID is fixed at 22.

How to Configure

The Domain ID is set via an environment variable. Run the following in a terminal on the robot host or development host:

export ROS_DOMAIN_ID=45

To apply it automatically on every boot, add the command to ~/.bashrc:

echo "export ROS_DOMAIN_ID=45" >> ~/.bashrc
source ~/.bashrc

Notes

  • The recommended range for ROS_DOMAIN_ID is 0–101.
  • The host (development machine) must be set to the same Domain ID as the target robot in order to communicate with it.
  • Restart the relevant ROS2 nodes after changing the value for it to take effect.

Documentation Directory

Motion Control Development Guide

This document provides motion control development instructions for the VKH6 robot.

Project repository (please read the README carefully): bxi_rl_controller_ros2_example

The bxi_ws folder in the robot controller's root directory contains the motion control program.


Launching the Robot Program

Auto-Start Logic

After the robot controller powers on, the systemd service ros_elf_launch.service automatically starts the robot program. The startup chain has two stages:

  1. Auto-start service: ros_elf_launch.service is the boot entry point, responsible for starting the remote controller program remote_controller/remote_conroller_launch.py in the background.
  2. Real robot program: The remote controller launch file remote_conroller_launch.py includes the logic to start the real robot program (triggered by pressing the right joystick on the controller). The auto-started real robot program is located by default in ~/bxi_ws/bxi_rl_controller_ros2_example.

Tip: Before debugging a single launch file or custom node, stop ros_elf_launch.service first to avoid conflicts between the background default nodes and your manually started nodes.

Managing the Auto-Start Service

If you are not the root user, prepend sudo to systemctl commands.

# Check service status
systemctl status ros_elf_launch.service

# Start the service
systemctl start ros_elf_launch.service

# Restart the service
systemctl restart ros_elf_launch.service

# Stop the service
systemctl stop ros_elf_launch.service

# Enable auto-start on boot
systemctl enable ros_elf_launch.service

# Disable auto-start on boot
systemctl disable ros_elf_launch.service

Manually Launching a Launch File or Node

Before manually debugging, stop the default service first:

systemctl stop ros_elf_launch.service

Start Simulation Program

source /opt/bxi/bxi_ros2_pkg/setup.bash
cd bxi_ws/bxi_rl_controller_ros2_example
source install/setup.bash
ros2 launch bxi_example_py_elf3 example_demo.launch.py

Start Real Robot Program (⚠️ Pay Attention to Safety)

Programs that interact with the robot's motors require root privileges:

sudo su
source /opt/bxi/bxi_ros2_pkg/setup.bash
cd /home/bxi/bxi_ws/bxi_rl_controller_ros2_example
source install/setup.bash
ros2 launch bxi_example_py_elf3 example_demo_hw.launch.py

Motor status after startup

After startup, the motors will power on and all motor indicator LEDs will turn green. The robot enters a self-check routine. If the green lights remain on after approximately 6 seconds, the self-check has passed.

Start Remote Controller Program

# Real robot
sudo su
source /opt/bxi/bxi_ros2_pkg/setup.bash
cd /home/bxi/bxi_ws/bxi_rl_controller_ros2_example
source install/setup.bash
ros2 launch remote_controller remote_controller_launch.py

# Simulation
source /opt/bxi/bxi_ros2_pkg/setup.bash
cd ~/bxi_ws/bxi_rl_controller_ros2_example
source install/setup.bash
ros2 launch remote_controller remote_controller_launch.py

To start a single node, after sourcing the environment:

ros2 run <package_name> <executable_name>

Secondary Development Guide

Choosing the Right Modification Level

Goal Recommended Approach
Control robot movement with custom logic Add a custom control node that publishes to /motion_commands
Modify the robot's motion control model Modify bxi_example_demo.py and example_demo_hw.launch.py

Start from Level 1: Keep the official motion control program intact and only replace the node that publishes /motion_commands. Only modify the auto-start service or its startup script if you need to change the default boot behavior.

Notes per level:

  1. Custom control node: Stop ros_elf_launch.service or the default remote controller node before debugging to avoid multiple nodes publishing control commands simultaneously.
  2. Modify launch files and main program: The default programs are located in ~/bxi_ws/bxi_rl_controller_ros2_example/src/bxi_example_py_elf3. After modifying, rebuild, re-source the workspace, and verify with ros2 launch or by restarting the service.

Adding a Custom Controller Node

Step 1: Stop the auto-start service

systemctl stop ros_elf_launch.service
# or
killall remote_controller

Message Type

Once started, the robot subscribes to the /motion_commands topic. The message type is a custom message defined in bxi_ros2_pkg: communication/msg/MotionCommands.

std_msgs/Header header
    builtin_interfaces/Time stamp
        int32 sec
        uint32 nanosec
    string frame_id
geometry_msgs/Vector3 vel_des
    float64 x
    float64 y
    float64 z
float32 height_des
float32 yawdot_des
int32 mode
int32 btn_1  ... int32 btn_10
int32 axis_1 ... int32 axis_10

Step 2: Create a Publisher

C++ Example

1. Create a Package

# Replace my_cpp_pkg with your package name
ros2 pkg create my_cpp_pkg --build-type ament_cmake --dependencies rclcpp std_msgs

2. Write the Node

Create main.cpp under src/:

#include "rclcpp/rclcpp.hpp"
#include "std_msgs/msg/string.hpp"
#include <communication/msg/motion_commands.hpp>

using namespace std::chrono_literals;

class MotionCtrl : public rclcpp::Node
{
public:
    MotionCtrl() : Node("motion_ctrl")
    {
        publisher_ = this->create_publisher<communication::msg::MotionCommands>("/motion_commands", 20);
        timer_ = this->create_wall_timer(500ms, std::bind(&MotionCtrl::timer_callback, this));
    }

private:
    void timer_callback()
    {
        auto message = communication::msg::MotionCommands();
        message.header.stamp = this->get_clock()->now();
        message.header.frame_id = "";
        message.vel_des.x = 0.5;  // forward/backward velocity
        message.yawdot_des = 0.5; // yaw rotation velocity
        publisher_->publish(message);
    }

    rclcpp::Publisher<communication::msg::MotionCommands>::SharedPtr publisher_;
    rclcpp::TimerBase::SharedPtr timer_;
};

int main(int argc, char **argv)
{
    rclcpp::init(argc, argv);
    rclcpp::spin(std::make_shared<MotionCtrl>());
    rclcpp::shutdown();
    return 0;
}

Add the following to CMakeLists.txt:

find_package(communication REQUIRED)
add_executable(cpp_node src/main.cpp)
ament_target_dependencies(cpp_node rclcpp std_msgs communication)

install(TARGETS
  cpp_node
  DESTINATION lib/${PROJECT_NAME}
)

3. Build and Run

colcon build
source install/setup.bash
ros2 run my_cpp_pkg cpp_node

Python Example

1. Create a Package

# Replace my_py_pkg with your package name
ros2 pkg create my_py_pkg --build-type ament_python --dependencies rclpy std_msgs

2. Write the Node

Create my_py_pkg/motion_ctrl.py:

import rclpy
from rclpy.node import Node
from communication.msg import MotionCommands


class MotionCtrl(Node):
    def __init__(self):
        super().__init__('motion_ctrl')
        self.publisher_ = self.create_publisher(MotionCommands, '/motion_commands', 20)
        self.timer = self.create_timer(0.5, self.timer_callback)

    def timer_callback(self):
        message = MotionCommands()
        message.header.stamp = self.get_clock().now().to_msg()
        message.header.frame_id = ''
        message.vel_des.x = 0.5   # forward/backward velocity
        message.yawdot_des = 0.5  # yaw rotation velocity
        self.publisher_.publish(message)


def main(args=None):
    rclpy.init(args=args)
    node = MotionCtrl()
    try:
        rclpy.spin(node)
    finally:
        node.destroy_node()
        rclpy.shutdown()


if __name__ == '__main__':
    main()

Add the dependency in package.xml:

<depend>communication</depend>

Register the entry point in setup.py:

entry_points={
    'console_scripts': [
        'motion_ctrl = my_py_pkg.motion_ctrl:main',
    ],
},

3. Build and Run

colcon build
source install/setup.bash
ros2 run my_py_pkg motion_ctrl

FAQ

1. How to View Logs When the Real Robot Program Fails to Start

Official program logs are stored in /var/log/bxi_log/, sorted by time. Find the latest log file for details.

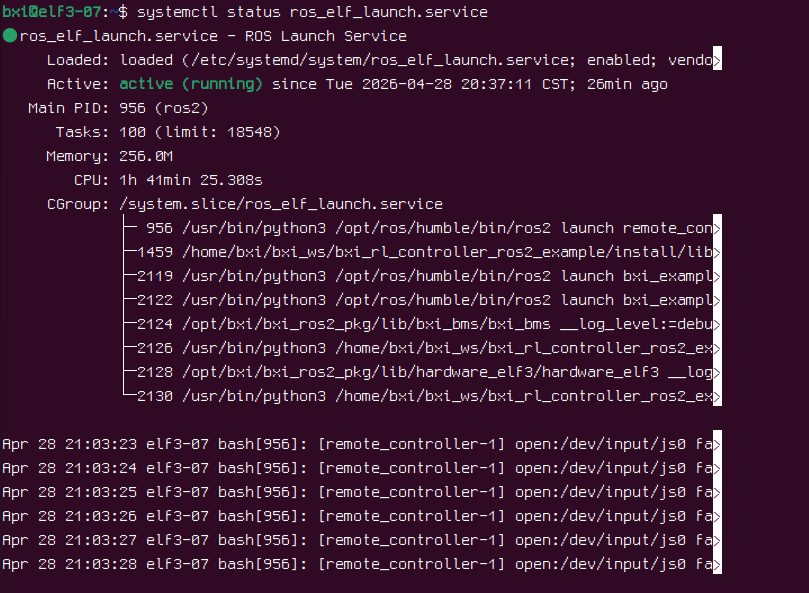
2. Checking the Auto-Start Service Status

systemctl status ros_elf_launch.service

Service status example

Minimal 31-DoF VKH6 Control

This guide presents two joint-control paths. To control only the head, publish named joint commands directly to actuators_cmds_override without writing code. For complete 31-DoF control, create a Mod containing only state.py and mod.yaml and generate the trajectory directly in on_update().

The example targets Mod API 4.0:

Run the commands below from the framework repository root.

Before you start: hardware defaults to 29 DoF

The hardware launch uses enable_head:=auto by default and reads the robot module configuration from /opt/bxi/robot_config.yaml. Both of the following conditions must be satisfied before the two head joints and the complete 31-DoF hardware are enabled:

  1. /opt/bxi/robot_config.yaml exists and can be read successfully;
  2. the configuration contains modules.head.enabled: true.

The minimum configuration structure is shown below. Production configuration should be generated with bxi_robot_config_tool:

modules:
  head:
    enabled: true

Any of the following cases falls back to the built-in 29-DoF configuration without the head motors:

  • /opt/bxi/robot_config.yaml is missing, unreadable, or malformed;
  • modules.head.enabled is absent;
  • modules.head.enabled is false.

The current implementation uses the same hardware_elf3 package whether or not the head is enabled. Inspect the motor_disable mask in the startup log to determine whether the head motors are enabled:

# Head enabled; no other motor-disable bits are set in this example
[bxi hardware config] package=hardware_elf3, motor_disable=0x00000000, ...

# Head disabled; no other motor-disable bits are set in this example
[bxi hardware config] package=hardware_elf3, motor_disable=0x60000000, ...

If other motors are also disabled, the complete motor_disable value may differ from the examples above. Check only the head mask: motor_disable & 0x60000000 == 0 means that the head is enabled, while motor_disable & 0x60000000 == 0x60000000 means that it is disabled. Do not infer the DoF mode from hardware_elf3_head versus hardware_elf3 package names.

In 29-DoF mode, the runtime joint layout does not contain head_z_joint or head_y_joint, so the head-override command below is rejected as containing unknown joint names. Generate a valid /opt/bxi/robot_config.yaml and restart the hardware program first. The simulation VKH6 model already contains both head joints and is not controlled by this hardware configuration.

Manual overrides are for debugging

The hardware launch also accepts enable_head:=true or enable_head:=false to override automatic detection. Standard deployments should use /opt/bxi/robot_config.yaml so the software configuration cannot silently disagree with the physical hardware.

Validate in simulation and choose the correct test setup

Both joint overrides and custom Mods produce motor commands directly. Before testing on hardware, clear all people and obstacles, keep the emergency stop ready, and validate joint directions with small angles and low gains.

When the robot is standing on the ground, arm or hand overrides require a model that does not rely on the arms for balance, such as com.bxi.basic_actions/hello or com.bxi.basic_actions/applause. The alternative is to suspend the robot securely. During a suspended actuators_cmds_override test, the underlying state may be only zero-position mode (initial_pos) or PD mode (pd_brake); do not enter walking, hello, applause, dance, or any other mode.

1. No-code head-joint override

At the final output stage, the controller reads override commands of type communication/msg/ActuatorCmds and replaces only the joints listed in actuators_name. All other joints remain controlled by the current state or policy, so head-only control does not require a Mod or a complete 31-element command.

Prepare the underlying model before overriding an arm or hand

actuators_cmds_override replaces only the selected joints; it cannot make the original balance model adapt automatically to a new arm motion. With the robot standing on the ground, enter the arm-independent hello or applause state before publishing arm or hand overrides. When the robot is suspended, do not enter those actions; remain in initial_pos or pd_brake only.

The override topic includes the launch-time topic_prefix:

Environment Topic
Simulation /simulation/actuators_cmds_override
Hardware /hardware/actuators_cmds_override

Overrides are disabled in zero-torque mode by default. After starting the robot and waiting for the joint layout to initialize, enter zero-position mode or another actively controlled state. For example, enter zero-position mode with:

ros2 topic pub --once /motion_commands \
  communication/msg/MotionCommands "{btn_4: 1}"

ros2 topic pub --once /motion_commands \
  communication/msg/MotionCommands "{btn_4: 0}"

Reset every button event to 0

MotionCommands button events use rising-edge detection, and the program retains the last value received for each event. After manually publishing any nonzero button value over ROS, publish 0 to the same button slot to return it to the released state. Otherwise, the next action using that button slot may not produce a new rising edge.

The command below overrides both head joints at 20 Hz. The targets for head_z_joint and head_y_joint are 0.20 rad and -0.10 rad, respectively:

# Simulation
ros2 topic pub -r 20 \
  /simulation/actuators_cmds_override \
  communication/msg/ActuatorCmds \
  '{
    actuators_name: ["head_z_joint", "head_y_joint"],
    pos: [0.20, -0.10],
    kp: [16.747, 16.747],
    kd: [1.066, 1.066]
  }'

Use the same message on hardware and change only the topic:

# Hardware; suspend the robot and prepare the emergency stop first
ros2 topic pub -r 20 \
  /hardware/actuators_cmds_override \
  communication/msg/ActuatorCmds \
  '{
    actuators_name: ["head_z_joint", "head_y_joint"],
    pos: [0.20, -0.10],
    kp: [16.747, 16.747],
    kd: [1.066, 1.066]
  }'

actuators_name defines the joint order for every command array. The lengths of pos, kp, and kd must match the number of joint names. Omitted vel and torque fields are treated as zero.

The default override timeout is 0.2 s, so --once cannot hold a target. After the 20 Hz publisher stops, the command expires automatically and blends back to the current state's output over 0.2 s. An empty message explicitly requests release:

# Simulation; replace simulation with hardware on the robot
ros2 topic pub --once \
  /simulation/actuators_cmds_override \
  communication/msg/ActuatorCmds '{}'

To generate a time-varying head trajectory, continuously publish the same message type from a ROS node; each new message atomically replaces the previous override. Use the Mod approach below when state-machine integration, a whole-body trajectory, or more complex control logic is required.

2. The 31-joint order

The qpos, kp, and kd arrays in a MotorFrame must use the same joint layout. The formula arrays in this example use the order below; position values are in radians.

Index Joint Index Joint
0 waist_y_joint 16 l_shoulder_x_joint
1 waist_x_joint 17 l_shoulder_z_joint
2 waist_z_joint 18 l_elbow_y_joint
3 l_hip_y_joint 19 l_wrist_x_joint
4 l_hip_x_joint 20 l_wrist_y_joint
5 l_hip_z_joint 21 l_wrist_z_joint
6 l_knee_y_joint 22 r_shoulder_y_joint
7 l_ankle_y_joint 23 r_shoulder_x_joint
8 l_ankle_x_joint 24 r_shoulder_z_joint
9 r_hip_y_joint 25 r_elbow_y_joint
10 r_hip_x_joint 26 r_wrist_x_joint
11 r_hip_z_joint 27 r_wrist_y_joint
12 r_knee_y_joint 28 r_wrist_z_joint
13 r_ankle_y_joint 29 head_z_joint
14 r_ankle_x_joint 30 head_y_joint
15 l_shoulder_y_joint

The example explicitly binds this layout to its MotorFrame. The runtime layout may use a different order as long as it contains the same 31 named joints; the framework maps commands to the actual order by joint name.

3. Create the Mod

This Mod has no balance capability

The example on_update() produces only joint positions and gains. It does not use the IMU, foot contacts, or a balance policy, and it provides no standing stabilization, disturbance rejection, or fall protection. It can only move joints according to the hard-coded formulas; it cannot keep the robot standing.

To avoid mixing an unbalanced state with the rule that a suspended robot must remain in zero-position or PD mode, this tutorial runs the formula Mod in simulation only. To verify joint motion on hardware, use actuators_cmds_override from the previous section, suspend the robot, and keep the underlying state in initial_pos or pd_brake throughout the test.

cd ~/bxi_ws/bxi_rl_controller_ros2_example
mkdir -p src/bxi_example_py_elf3/mods/com.example.elf3_31dof

Only two files are required:

src/bxi_example_py_elf3/mods/com.example.elf3_31dof/
├── mod.yaml
└── state.py

4. Write state.py

import math

import numpy as np

from bxi_example_py_elf3.framework.mod_api import JointLayout, RobotControlState


ELF3_JOINT_NAMES = (
    "waist_y_joint", "waist_x_joint", "waist_z_joint",
    "l_hip_y_joint", "l_hip_x_joint", "l_hip_z_joint",
    "l_knee_y_joint", "l_ankle_y_joint", "l_ankle_x_joint",
    "r_hip_y_joint", "r_hip_x_joint", "r_hip_z_joint",
    "r_knee_y_joint", "r_ankle_y_joint", "r_ankle_x_joint",
    "l_shoulder_y_joint", "l_shoulder_x_joint", "l_shoulder_z_joint",
    "l_elbow_y_joint", "l_wrist_x_joint", "l_wrist_y_joint",
    "l_wrist_z_joint", "r_shoulder_y_joint", "r_shoulder_x_joint",
    "r_shoulder_z_joint", "r_elbow_y_joint", "r_wrist_x_joint",
    "r_wrist_y_joint", "r_wrist_z_joint", "head_z_joint",
    "head_y_joint",
)
ELF3_LAYOUT = JointLayout(ELF3_JOINT_NAMES, label="ELF3 31-DoF")


class Elf31DofState(RobotControlState):
    # The order exactly matches ELF3_JOINT_NAMES. The first 29 entries use
    # zero-position-mode gains; the final two entries are the head gains.
    KP = np.array([
        500, 500, 300,
        300, 100, 100, 300, 50, 50,
        300, 100, 100, 300, 50, 50,
        100, 80, 80, 100, 20, 20, 20,
        100, 80, 80, 100, 20, 20, 20,
        16.747, 16.747,
    ], dtype=np.float32)
    KD = np.array([
        3, 3, 3,
        2.5, 2, 2, 2.5, 2, 2,
        2.5, 2, 2, 2.5, 2, 2,
        2.5, 2, 2, 2.5, 1, 1, 1,
        2.5, 2, 2, 2.5, 1, 1, 1,
        1.066, 1.066,
    ], dtype=np.float32)

    def __init__(self, name, state_id):
        super().__init__(name, state_id)
        self.elapsed = 0.0
        self.qpos = np.zeros(31, dtype=np.float32)

    def on_enter(self, ctx):
        if frozenset(ctx.robot_layout.names) != frozenset(ELF3_JOINT_NAMES):
            raise RuntimeError(
                "ELF3 joint set mismatch: "
                f"expected={ELF3_JOINT_NAMES}, actual={ctx.robot_layout.names}"
            )
        self.elapsed = 0.0

    def on_update(self, ctx, dt):
        # Regenerate the target from zero every cycle; do not accumulate offsets.
        self.qpos.fill(0.0)
        phase = 2.0 * math.pi * 0.25 * self.elapsed

        # Hard-coded 31-DoF example: hold the waist and legs at zero while
        # moving both arms and the head through small sinusoidal trajectories.
        self.qpos[15] = 0.15 * math.sin(phase)        # left shoulder y
        self.qpos[18] = 0.12 * math.sin(phase)        # left elbow y
        self.qpos[22] = -0.15 * math.sin(phase)       # right shoulder y
        self.qpos[25] = -0.12 * math.sin(phase)       # right elbow y
        self.qpos[29] = 0.10 * math.sin(phase)        # head z
        self.qpos[30] = 0.06 * math.sin(2.0 * phase)  # head y

        frame = self._motor_frame(
            ctx, self.qpos, self.KP, self.KD, layout=ELF3_LAYOUT
        )
        self._apply_frame(ctx, frame)
        self.elapsed += dt

There are four essential points:

  1. qpos, KP, and KD are all 31-element float32 arrays interpreted using ELF3_LAYOUT, so the state commands the complete robot layout every cycle.
  2. phase advances using the framework-provided dt, rather than assuming an exact number of loop iterations.
  3. _motor_frame() reuses the state's internal MotorFrame buffer, and _apply_frame() submits it to the framework.
  4. Neither EntryFrameProvider nor RunningFrameProvider is implemented; the trajectory is produced exclusively by on_update().

The current MotorFrame also supports the MIT vel and torque fields. This example omits both when calling _motor_frame(), so the framework explicitly fills them with zero.

Only six joints move in this formula, but the other 25 joints are still actively controlled by qpos=0 and their corresponding kp/kd. To change the motion, edit the formulas for the relevant indices in on_update() without changing the array order.

5. Write mod.yaml

schema: 1
id: com.example.elf3_31dof
name: ELF3 31-DoF Formula Trajectory
version: 1.0.0
api: ">=4,<5"
enable: true
entrypoint: null
visibility: public
requires:
  - id: com.bxi.basic_actions
    version: ">=1,<2"
conflicts: []
python_exports: []
runtime_requirements:
  python: []
  ros: []
  system: []

events:
  activate:
    slot: btn_10
    value: 99

states:
  formula_31dof:
    factory: state:Elf31DofState
    label: 31-DoF Formula Trajectory
    priority: 100
    group: Customer
    icon: waves
    confirm: true
    confirm_message: This unbalanced example is for simulation only

routes:
  - from: com.bxi.basic_actions/initial_pos
    event: activate
    to: formula_31dof

  - from: formula_31dof
    event: com.bxi.basic_actions/initial_pos
    to: com.bxi.basic_actions/initial_pos

Both routes intentionally omit transition. The project's elf3_state_machine.yaml sets default_transition to instant, so the state changes immediately and the target state's on_update() starts on the next control cycle. This is what “no transition” means in this example. If the system default has been changed, add transition: instant explicitly to both routes.

The example can only be entered from com.bxi.basic_actions/initial_pos (zero-position mode). This both reduces the target discontinuity during an instant switch and reflects the fact that the formula trajectory has no balance capability. Do not add routes from normal, walking, or other action states. Send btn_10=99 to enter and use the zero-position-mode command to return. This example does not use btn_10=10 because that binding is already owned by com.bxi.any_motion/activate.

6. Build and run

colcon build --packages-select bxi_example_py_elf3 \
  --symlink-install --merge-install
source install/setup.bash

Start in simulation:

ros2 launch bxi_example_py_elf3 example_demo.launch.py

First send the zero-position-mode command:

ros2 topic pub --once /motion_commands \
  communication/msg/MotionCommands "{btn_4: 1}"

ros2 topic pub --once /motion_commands \
  communication/msg/MotionCommands "{btn_4: 0}"

After the robot enters zero-position mode, send btn_10=99 to enter the formula-trajectory state:

ros2 topic pub --once /motion_commands \
  communication/msg/MotionCommands "{btn_10: 99}"

# Releasing btn_10 is required so later btn_10 actions can trigger
ros2 topic pub --once /motion_commands \
  communication/msg/MotionCommands "{btn_10: 0}"

Publishing btn_10=0 only restores the released button state; it does not exit the formula-trajectory state that was just entered.

A successful load includes this log entry:

[com.example.elf3_31dof]: loaded v1.0.0: .../com.example.elf3_31dof

The fully qualified state name is com.example.elf3_31dof/formula_31dof.

The formula-trajectory Mod in this tutorial is for simulation only and must not be treated as a hardware standing controller. To verify joint motion on hardware, use actuators_cmds_override; after suspension, keep the underlying state in initial_pos or pd_brake only. Hardware control requires root privileges. Stop the background autostart service first so two controllers cannot command the motors concurrently. See the Motion Control Development Guide for startup instructions.

Troubleshooting

Joint layout mismatch

Inspect the actual ctx.robot_layout.names. A different order does not affect control because the framework maps the names from ELF3_LAYOUT automatically. Update the layout and all three 31-element arrays only when joints are missing or the hardware uses different joint names.

The state loads but the robot does not move

Make sure the latest workspace has been loaded with source install/setup.bash, and confirm that the startup log contains com.example.elf3_31dof. A non-symlink installation must be rebuilt after every Mod change.

The robot jumps when switching

This is an expected risk of an instant switch. Enter zero-position mode first, and ensure that on_update() produces the zero pose at elapsed=0. If the state must enter smoothly from arbitrary poses, use a Transition; that is outside this minimal example.

Minimal VKH6 Arm IK with Pinocchio

This guide uses Pinocchio's damped least-squares method to convert a wrist target pose into seven VKH6 single-arm joint angles. Resources for both the left and right arms are provided. It performs offline inverse kinematics only; it does not start ROS or command any motors.

Never send an unverified IK result directly to hardware

This example applies only the URDF joint limits. It does not check self-collision, environment collision, velocity, acceleration, torque, or singular configurations. Verify convergence and validate trajectory continuity and safety in simulation first.

1. Download the example resources

Download the scripts and URDFs for both arms into the same directory:

The directory should look like this:

elf3_arm_ik/
├── elf3_arm_l.urdf
├── elf3_arm_r.urdf
├── pinocchio_ik_solve.py
└── pinocchio_ik_solve_r.py

Both URDFs contain STL paths for visual and collision geometry. This example calls pin.buildModelFromUrdf() to build only the kinematic model, so the STL files are not required for the minimal IK solver.

2. Install Pinocchio

Use an isolated Python environment on the development computer so Pinocchio's NumPy dependencies do not affect the ROS environment:

cd elf3_arm_ik
python3 -m venv .venv
source .venv/bin/activate
python -m pip install --upgrade pip
python -m pip install pin scipy

The package and import names differ

The PyPI package is named pin, while Python code imports it as pinocchio. Do not replace the command with pip install pinocchio.

Verify the installation:

python -c "import pinocchio as pin; print(pin.__version__)"

This guide was verified with pin 4.1.0, numpy 2.2.6, and scipy 1.15.3. Other compatible versions may also work.

3. Complete solver code

Complete left-arm code

The code below exactly matches the downloadable pinocchio_ik_solve.py:

import numpy as np
import pinocchio as pin
from scipy.spatial.transform import Rotation as R


if __name__ == "__main__":
    # 从 URDF 创建机器人模型
    model = pin.buildModelFromUrdf("elf3_arm_l.urdf")
    data = model.createData()

    # 选择末端坐标系
    frame_id = model.getFrameId("l_wrist_z_link")

    # 设置目标位置和目标姿态
    target = pin.SE3(
        R.from_euler("xyz", [10, 0, 0], degrees=True).as_matrix(),
        np.array([0.1, 0, 0]),
    )

    # 初始关节角
    q = np.zeros(model.nq)

    max_iterations = 1000
    error_tolerance = 1e-5
    step_size = 0.1
    damping = 1e-6

    for i in range(max_iterations):
        # 正运动学,计算当前末端位姿
        pin.forwardKinematics(model, data, q)
        pin.updateFramePlacements(model, data)
        current = data.oMf[frame_id]

        # SE(3) 位姿误差:当前末端坐标系到目标坐标系的变换
        current_to_target = current.actInv(target)
        error = pin.log6(current_to_target).vector

        # 判断是否收敛
        if np.linalg.norm(error) < error_tolerance:
            break

        # 计算末端在局部坐标系下的雅可比矩阵
        jacobian = pin.computeFrameJacobian(
            model,
            data,
            q,
            frame_id,
            pin.ReferenceFrame.LOCAL,
        )

        # 将末端雅可比转换为 SE(3) 位姿误差的雅可比
        jacobian = -pin.Jlog6(current_to_target.inverse()) @ jacobian

        # 阻尼最小二乘法,计算关节角增量
        velocity = -jacobian.T @ np.linalg.solve(
            jacobian @ jacobian.T + damping * np.eye(6),
            error,
        )

        # 更新关节角,并限制在 URDF 给出的关节范围内
        q = pin.integrate(model, q, velocity * step_size)
        q = np.clip(q, model.lowerPositionLimit, model.upperPositionLimit)

    print(q)

Use the same solver for the right arm

This page keeps only one complete code listing because the solver flow is identical for both arms. For the right arm, download pinocchio_ik_solve_r.py, or copy the left-arm code above and change only these two strings:

  • Change elf3_arm_l.urdf to elf3_arm_r.urdf.
  • Change l_wrist_z_link to r_wrist_z_link.

Both scripts use the same solver sequence:

  1. Compute the current end-frame pose with forward kinematics.
  2. Obtain the six-dimensional SE(3) pose error with pin.log6().
  3. Compute the frame Jacobian in the local frame.
  4. Compute joint velocity with damped least squares:
v = -Jᵀ (J Jᵀ + λI)⁻¹ e
  1. Update the configuration with pin.integrate() and clip it to the URDF limits.

End-frame origin and orientation

The left-arm end frame is l_wrist_z_link; the right-arm frame is r_wrist_z_link. In the simplified URDFs supplied with this guide:

  • The end-frame origin is at the common intersection of the wrist X, Y, and Z rotation axes, not at the palm centre or a fingertip. Both wrist_y_joint and wrist_z_joint have <origin xyz="0 0 0" rpy="0 0 0">, so the three wrist joints share one origin.
  • base_link is the root of the simplified single-arm model. Its origin is at the first shoulder-axis centre for that arm; it is not a full-robot base frame located at the torso or on the ground. Transform the pose before using it with a full-robot model.
  • With all seven joint angles at zero, the end-frame origin is (0.256, 0, -0.256) m in this base_link: the chain first goes 0.256 m along -Z from shoulder to elbow and then 0.256 m along +X from elbow to wrist. The simplified left- and right-arm URDFs use the same zero-position geometry.
  • Every fixed joint rpy is zero. At the zero configuration, the end-frame +X/+Y/+Z axes therefore align exactly with the corresponding base_link axes. Under VKH6's ROS body-frame convention, +X points forward, +Y to the robot's left, and +Z upward. The end axes rotate with the wrist as the joints move.

target.translation, in metres, is the desired end-frame origin expressed in the simplified base_link. target.rotation is the desired orientation of the end-frame axes relative to base_link. In the example, R.from_euler("xyz", [10, 0, 0], degrees=True) requests an end frame rotated 10 degrees about X; it does not simply add 10 degrees to one wrist joint.

4. Run and interpret the result

Run from the directory containing the resources because both scripts open their URDF through a relative path:

cd elf3_arm_ik
source .venv/bin/activate

# Left arm
python pinocchio_ik_solve.py

# Right arm
python pinocchio_ik_solve_r.py

Both scripts use the same target pose and currently print:

[-0.18420714  0.14130363 -0.02609032 -0.95993     0.14621128  1.309
 -0.14385886]

elf3_arm_l.urdf defines the left-arm array order:

Index Joint Result (rad)
0 l_shoulder_y_joint -0.18420714
1 l_shoulder_x_joint 0.14130363
2 l_shoulder_z_joint -0.02609032
3 l_elbow_y_joint -0.95993
4 l_wrist_x_joint 0.14621128
5 l_wrist_y_joint 1.309
6 l_wrist_z_joint -0.14385886

The right-arm output uses the same seven numeric values, mapped by elf3_arm_r.urdf to:

r_shoulder_y_joint, r_shoulder_x_joint, r_shoulder_z_joint,
r_elbow_y_joint, r_wrist_x_joint, r_wrist_y_joint, r_wrist_z_joint

The current target does not meet the configured tolerance

After 1000 iterations with the original parameters, the error norm is approximately 0.1787, above 1e-5. The elbow reaches its lower limit of -0.95993 rad, and wrist Y reaches its upper limit of 1.309 rad. The script still prints the final iterate, so receiving an array does not mean the target was reached successfully.

Production code should recompute the error after the loop and accept the result only when it is below the tolerance. If convergence fails, adjust the target pose, initial configuration, step size, or damping.

5. Change the target pose

Change the target position with:

target_position = np.array([x, y, z])  # metres, in base_link

Change the target orientation with:

target_rotation = R.from_euler(
    "xyz",
    [roll, pitch, yaw],
    degrees=True,
).as_matrix()

Combine them into a Pinocchio pose:

target = pin.SE3(target_rotation, target_position)

A seven-DoF arm is redundant for a six-dimensional end pose, so the same target may have multiple solutions. The initial q, damping, and step size affect the result. For continuous trajectories, use the previous solution as the next initial configuration to avoid joint jumps.

6. Use the result as a joint override

The IK result is only a joint target. To validate it in simulation, use actuators_cmds_override to override the named left-arm joints. The publishing rate must satisfy the override timeout; the current default is 0.2 s.

ros2 topic pub -r 20 \
  /simulation/actuators_cmds_override \
  communication/msg/ActuatorCmds \
  '{
    actuators_name: [
      "l_shoulder_y_joint", "l_shoulder_x_joint",
      "l_shoulder_z_joint", "l_elbow_y_joint",
      "l_wrist_x_joint", "l_wrist_y_joint", "l_wrist_z_joint"
    ],
    pos: [
      -0.18420714, 0.14130363, -0.02609032, -0.95993,
      0.14621128, 1.309, -0.14385886
    ],
    kp: [54.224, 54.224, 16.747, 54.224, 16.747, 16.747, 16.747],
    kd: [3.452, 3.452, 1.066, 3.452, 1.066, 1.066, 1.066]
  }'

Press Ctrl+C to stop continuous publication; the override then times out and blends back to the current state. It can also be released explicitly:

ros2 topic pub --once \
  /simulation/actuators_cmds_override \
  communication/msg/ActuatorCmds '{}'

Use /hardware/actuators_cmds_override on hardware. To control the right arm, replace the seven l_ joint names in the command with their corresponding r_ names. Because the current example solution contains two limit values, do not send it directly to hardware.

Top Screen Guide

The VKH6 top display is used to show basic robot status information. It can also display cute facial expressions to make the robot feel more lively. For secondary development, the screen supports Bluetooth and Wi-Fi communication for wireless data transmission, and it also supports touch interaction.

Features

The top display can be used for:

  • Robot expressions: Display cute facial expressions to make the robot feel more lively.
  • Data display: Supports Bluetooth and Wi-Fi communication for wireless data transmission.
  • Touch interaction: The screen supports touch input, allowing custom interactive programs to be developed.

Hardware Platform

The top display is based on the Waveshare ESP32-S3-Touch-LCD-2.1 touch display development board, which is suitable for robot status display and simple interaction.

Item Description
MCU ESP32-S3R8, Xtensa 32-bit LX7 dual-core processor, up to 240MHz
Display 2.1-inch touch screen, 480 x 480 resolution, 262K colors
Memory 16MB Flash, 8MB PSRAM
Wireless 2.4GHz Wi-Fi, Bluetooth 5 (BLE)
Common interfaces USB Type-C, UART, I2C, Micro SD card slot
Onboard resources QMI8658 six-axis sensor, RTC, and more

Interface Note

Before hardware debugging, refer to the official Waveshare manual for interface usage restrictions. This helps avoid firmware hangs caused by incorrect programs. If the screen firmware hangs and cannot be flashed normally, follow the recovery steps in the official manual to reflash the firmware.

Usage

On the real robot, the top display is connected to the robot host through a USB cable. This USB connection can be used for firmware flashing and debugging.

Basic usage:

  1. Make sure the main robot battery power is turned on.
  2. Check that the USB connection between the top display and the robot host is secure.
  3. If the display lights up normally, the screen is working.

Communication

The current real-robot setup uses USB wired communication by default, which is suitable for flashing and debugging. The display hardware also supports Bluetooth 5 (BLE) and 2.4GHz Wi-Fi, but the wireless link, communication protocol, and host-side data publisher need to be developed according to project requirements.

Method Current Use Notes
USB Flashing, debugging, host connection Recommended as the default development and debugging method
Bluetooth 5 (BLE) Optional wireless communication Requires custom pairing, data protocol, and display logic
2.4GHz Wi-Fi Optional wireless communication Requires custom network connection, data protocol, and recovery logic

Secondary Development

The top display program is maintained in the https://github.com/Luckyt1/bxi_show repository. When modifying displayed content, page layout, backlight behavior, communication method, or reflashing firmware, use the following workflow:

  1. Read the build, flashing, and dependency instructions in the bxi_show repository.
  2. Configure the development environment according to the framework used by the project, referring to the Waveshare Arduino or ESP-IDF documentation as needed.
  3. Connect the display to the development host via USB, then compile, flash, and debug through the serial port.
  4. After flashing, verify that data refresh works while the robot is stationary before starting motion debugging.

Common development items include:

  • Use the LVGL graphics library to develop facial expressions and animations.
  • Adjust the layout of voltage, battery level, temperature, and other displayed fields.
  • Add robot status, network status, or debugging status indicators.
  • Change brightness, sleep timeout, and wake-up behavior.
  • Extend BLE or Wi-Fi data communication.
  • Add color, icon, or text warnings for abnormal states.

Debugging Checklist

Symptom Possible Cause Suggested Action
Screen does not turn on Main power is off, the display is not powered, USB connection is loose, or firmware is not running Check battery power, display power, and USB cable; restart the device if needed
Screen turns on but data does not update Host-side data is not being sent, communication is abnormal, or the display program has failed Check the host-side program status; restart the screen if needed
Flashing fails USB cable issue, port occupied, driver issue, or abnormal download mode Try another USB cable or port, close programs using the serial port, and enter the flashing workflow again according to the repository instructions

References

External Dexterous Hand

This page is intended for customer-side deployment of the Revo2 dexterous hand on VKH6. It focuses on wiring, dependency installation, build, run, and acceptance checks. For SDK APIs and custom development, refer to the example repository:

Safety

Note that only the Revo2 Advanced and Haptic versions support 58V voltage. Do not connect the basic version to the robot.

The demo moves the fingers through open, fist, pinch, single-finger motion, speed/current/PWM control, and other gestures. Make sure no body parts, cables, or fragile objects are inside the hand motion range. Do not run the full demo while the hand is holding an object.

Environment

Item Requirement
Robot VKH6 with the robot hardware node running
Dexterous hand Revo2 PRO && TOUCH
Communication VKBOTS controller CANFD
ROS version ROS 2 Humble
Example package bxi_revo2_example
Python SDK bc-stark-sdk==1.5.1

The example package communicates with the VKBOTS CANFD hardware node through communication/msg/CANFDPacket, so the bxi_ros2_pkg environment must be sourced first.

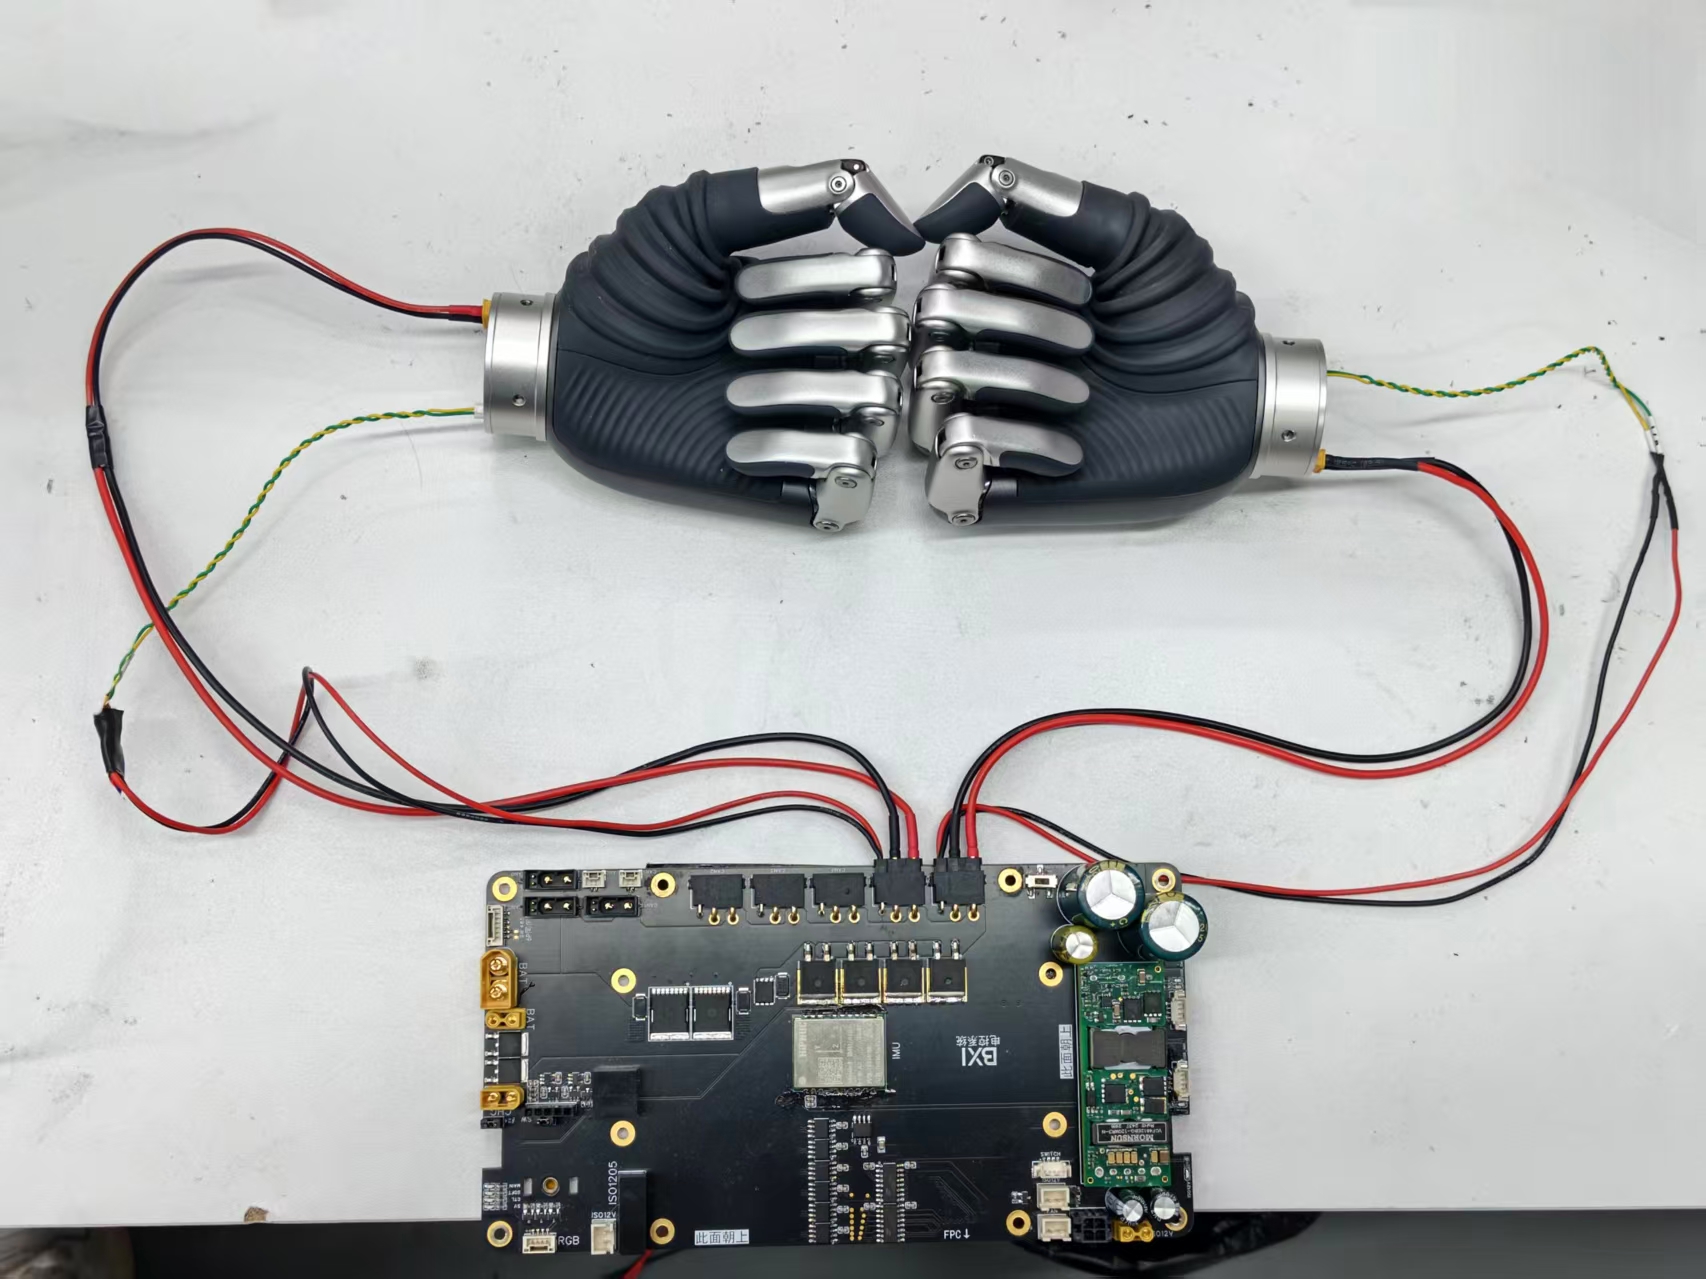
Wiring

With the default wiring, no source-code changes are required:

Hand VKBOTS controller port Default ID Protocol master_id
Left hand CAN5 126 / 0x7E CANFD 1
Right hand CAN6 127 / 0x7F CANFD 1

Revo2 dexterous hand wiring diagram

After wiring, start the robot normally. When the hardware node starts successfully, the Revo2 hand usually opens automatically. Use this as the first hardware-link check.

Quick Deployment

1. Get The Example Package

Run the following on the robot controller or a ROS 2 host:

cd ~/bxi_ws
git clone https://github.com/konodoki/bxi_revo2_example.git

If GitHub is unavailable on site, download the repository in advance and copy it to ~/bxi_ws/bxi_revo2_example.

2. Download The C++ SDK Files

The C++ demo requires the official SDK shared library and headers before build.

cd ~/bxi_ws/bxi_revo2_example
./download-lib.sh

The script creates:

  • dist/include/
  • dist/shared/linux/libbc_stark_sdk.so
  • VERSION

3. Install The Python SDK

Install the pinned SDK version before running the Python demo:

pip install bc-stark-sdk==1.5.1 --index-url https://pypi.org/simple/

4. Build The Package

cd ~/bxi_ws/bxi_revo2_example
source /opt/ros/humble/setup.bash
source /opt/bxi/bxi_ros2_pkg/setup.bash
colcon build
source install/setup.bash

Tip

If the communication package is built in another workspace, source that workspace before running colcon build.

Run And Validate

1. Set The CANFD ROS 2 Environment

The hand demo communicates with the robot hardware node through /canfd_packet/rx and /canfd_packet/tx. Because the hardware node normally runs as root, set the same ROS 2 Domain and CycloneDDS network configuration in a root shell, and run the demo from that shell:

sudo su
export ROS_DOMAIN_ID=ROBOT_DOMAIN_ID
export RMW_IMPLEMENTATION=rmw_cyclonedds_cpp
export ROS_LOCALHOST_ONLY=0
export CYCLONEDDS_URI='<CycloneDDS><Domain Id="any"><General><Interfaces><NetworkInterface name="lo" multicast="true"/></Interfaces><AllowMulticast>true</AllowMulticast></General></Domain></CycloneDDS>'

Replace ROBOT_DOMAIN_ID with the numeric Domain ID used by the robot. Do not set the variables only in a normal-user shell and then switch to root; sudo su does not reliably preserve the ROS environment.

2. Start The Robot Hardware Node

Start VKH6 using the normal robot startup flow. See Motion Control Development Guide if needed.

Check that the CANFD topics exist:

source /opt/ros/humble/setup.bash
source /opt/bxi/bxi_ros2_pkg/setup.bash
ros2 topic list | grep canfd_packet

Expected topics:

/canfd_packet/rx
/canfd_packet/tx

3. Run The Demo

Run the C++ demo:

cd ~/bxi_ws/bxi_revo2_example
source /opt/ros/humble/setup.bash
source /opt/bxi/bxi_ros2_pkg/setup.bash
source install/setup.bash
ros2 run bxi_revo2_example bxi_revo2_example

Or run the Python demo:

cd ~/bxi_ws/bxi_revo2_example
source /opt/ros/humble/setup.bash
source /opt/bxi/bxi_ros2_pkg/setup.bash
source install/setup.bash
ros2 run bxi_revo2_example bxi_revo2_example.py

3. Acceptance Check

The terminal should print device information, finger positions, speeds, currents, and configuration values. The hand will run:

  1. Basic position control: fist, open hand, single-finger motion;
  2. Speed, current, and PWM control;
  3. Revo2 advanced control: unit mode, position with time, position with speed, multi-finger motion;
  4. Built-in gestures: Open, Fist, Pinch, Point, and others;
  5. Device information and parameter queries.

The default demo runs the left hand first, then the right hand. If both hands complete these actions without continuous errors, the basic deployment is complete.

Change The Default Bus Or ID

If the site wiring or hand ID differs from the default configuration, update the bus and ID in the example source.

Python example:

~/bxi_ws/bxi_revo2_example/src/bxi_revo2_example.py

Default configuration:

left_ctx = await init_bxipci_device(5, 126, master_id=1, is_canfd=True, ...)
right_ctx = await init_bxipci_device(6, 127, master_id=1, is_canfd=True, ...)

C++ example:

~/bxi_ws/bxi_revo2_example/src/bxi_revo2_example.cpp

Default configuration:

init_bxipci_device(&left_ctx_, 5, 126, true);
init_bxipci_device(&right_ctx_, 6, 127, true);

Rebuild after changing the source:

cd ~/bxi_ws/bxi_revo2_example
colcon build
source install/setup.bash

Troubleshooting

Missing stark-sdk.h Or libbc_stark_sdk.so

The C++ SDK files have not been downloaded. Run:

cd ~/bxi_ws/bxi_revo2_example
./download-lib.sh

Then rebuild the package.

No module named bc_stark_sdk

The Python SDK is missing or installed into the wrong Python environment. Run:

pip install bc-stark-sdk==1.5.1 --index-url https://pypi.org/simple/

communication.msg.CANFDPacket not found

The VKBOTS ROS 2 message package environment has not been sourced:

source /opt/bxi/bxi_ros2_pkg/setup.bash
source ~/bxi_ws/bxi_revo2_example/install/setup.bash

No Response Or Read Timeout

Check the following:

  1. Left hand is connected to CAN5 and uses ID 126;
  2. Right hand is connected to CAN6 and uses ID 127;
  3. The robot hardware node is running and /canfd_packet/rx plus /canfd_packet/tx exist;
  4. Cabling and power are normal;
  5. No other process is controlling the same hand at the same time.
  6. If it is a factory-installed hardware node, please check if ROS_DOMAIN_ID is consistent.

Development Entry

Customer deployment usually does not require changes to the low-level CAN bridge. To control the hand from a custom ROS 2 node, see “Use In Your Own ROS 2 Node class” in the example repository README:

https://github.com/konodoki/bxi_revo2_example

Upper-Body Teleoperation

com.bxi.upper_body_teleop is a standalone VKH6 Mod. It bundles PICO access, MediaMTX, head-camera RTSP, Pinocchio dual-arm IK, and its runtime libraries. It only requires com.bxi.basic_actions; the legacy bxi_teleop_v2 and separate bringup nodes are not required.

Safety

Validate in simulation before using the real robot. Use a gantry or equivalent protection, clear the arm workspace, keep the emergency stop reachable, and begin with slow, small motions.

Installation

Install the Mod in the independent directory that is not overwritten by App updates:

sudo mkdir -p /opt/bxi/mods
sudo git clone https://github.com/konodoki/com.bxi.upper_body_teleop.git /opt/bxi/mods/com.bxi.upper_body_teleop

Update an existing checkout:

cd /opt/bxi/mods/com.bxi.upper_body_teleop
git pull --ff-only

If an older project already contains the same Mod in its built-in mods or private_git_mods, back it up and move it outside the scanned directories. Two copies with the same Mod ID will prevent startup.

Startup

Startup method Project directory Handling
Remote controller ~/bxi_ws/bxi_rl_controller_ros2_example Source tree; rebuild the main project after updates. The Mod is loaded from /opt/bxi/mods.
App /opt/bxi/bxi_rl_controller_ros2_example App-downloaded prebuilt tree; no manual build. The Mod is loaded from /opt/bxi/mods.

Start the robot and the normal control program. The Mod nodes start automatically when com.bxi.upper_body_teleop/upper_body_teleop is entered. Do not run the legacy elf3_arm_bringup_nohand.launch.py, pico_bxi_server, or bxi_teleop_v2 scripts separately.

PICO Connection And Calibration

Use the same PICO connection and body-tracking calibration procedure as Sonic:

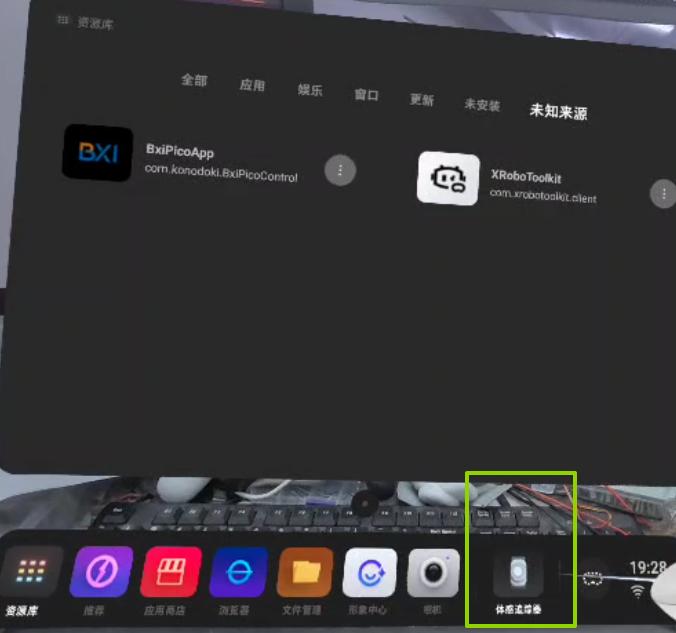
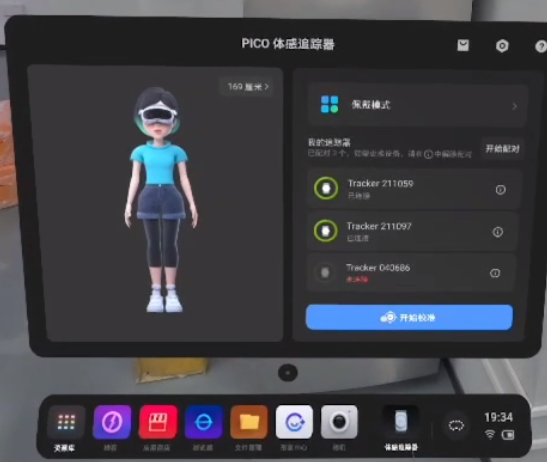
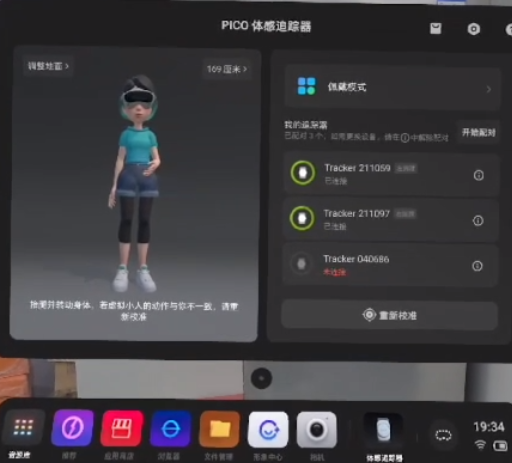
  1. Secure one Motion Tracker to each leg, with the button/indicator side facing upward, and power them on.
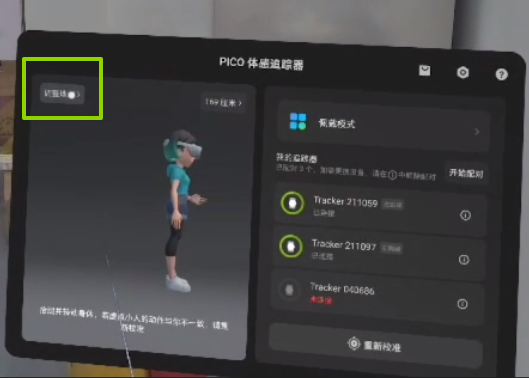
  2. Open Motion Tracker on the PICO home screen, confirm both trackers are connected, select Start Calibration, and complete the guided procedure.
  3. Select Adjust Floor and align the virtual floor with the physical floor.
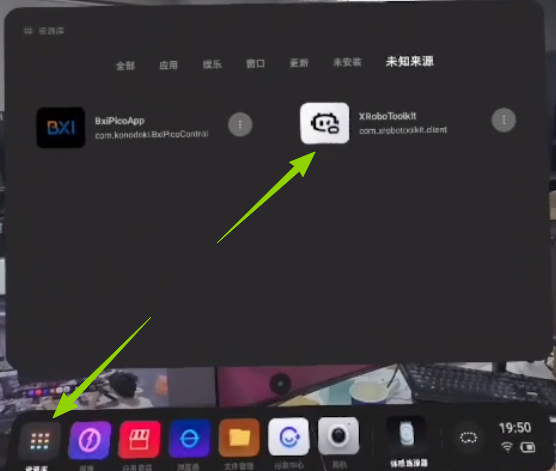
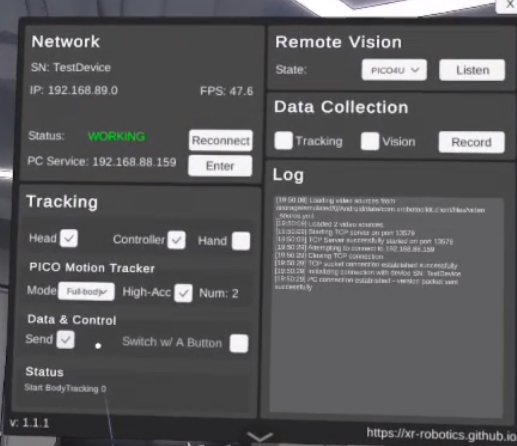
  4. Open XRoboToolkit and connect to the robot through Network → PC Service using the robot's LAN IP.
  5. Confirm these settings:
Section Option Setting
Tracking Head Selected
Tracking Controller Selected
PICO Motion Tracker Mode Full-body
PICO Motion Tracker High-Acc Selected
PICO Motion Tracker Num 2
Data & Control Send Selected
  1. Confirm the Network status is WORKING and the log has no continuous errors. Then enter the Mod state and perform the button calibration.

Operation

  1. From normal, press LB + LT + X (btn_10=17) on the remote controller to enter upper-body teleoperation.
  2. On PICO, enable Body Tracking, Controller, and Send. Confirm XRoboToolkit reports WORKING.
  3. Hold the standard upright posture and press A+B+X+Y to calibrate. Successful calibration enters POSE automatically; A+X is not required.
  4. Hold the left or right grip to take over the corresponding arm. Releasing the grip smoothly returns that arm to its PD standing posture.
  5. The left and right triggers control the corresponding grippers. Each state entry performs a low-speed gripper limit calibration.
  6. Press A+B+X+Y again to recalibrate; both arms return to PD posture during calibration.
  7. Exit through the standard system event to normal, PD brake, recover, or zero-torque.

A+X no longer toggles following mode. If PICO temporarily disconnects, the lower body continues under the gait policy and both arms hold the PD posture.

Video Streaming

MediaMTX and the head-camera node are managed by the Mod. The default URL is rtsp://<robot-ip>:2212/video. Select this address in the PICO app on the same LAN; no separate video script is required.

Acceptance And Troubleshooting

  • Logs should show mediamtx_server, head_camera_rtsp, pico_manager, and arm_ik_bridge starting automatically;
  • A+B+X+Y enters POSE, and the gripped arm follows the controller;
  • Triggers control the grippers and child processes stop on state exit.

For a duplicate Mod ID error, keep only /opt/bxi/mods/com.bxi.upper_body_teleop and move the old project copy outside the scanned directories. If no PICO data arrives, wake the headset, enable Body Tracking and Send, and confirm WORKING.

Sonic Full-Body Teleoperation

This guide explains how to deploy and use Sonic full-body teleoperation on VKH6, including robot-side dependency installation, PICO Motion Tracker calibration, XRoboToolkit network configuration, full-body motion following, and the exit procedure.

Safety

Full-body teleoperation drives the robot's legs, torso, and both arms at the same time. Incorrect operation may destabilize the robot or cause a collision with nearby people or objects. Before first use, clear the operating areas around both the robot and operator, make sure the emergency stop is available, and have a safety operator stand by the robot.

Begin with slow, small movements. Do not jump, turn quickly, stand on one leg, or move beyond the robot's joint range. Stop motion following immediately if the robot shakes, assumes an abnormal posture, or starts to lose balance. Press the emergency stop if necessary.

Environment

Item Requirement
Robot VKH6 with the motion-control program running normally
Robot-side project Remote-controller startup: ~/bxi_ws/bxi_rl_controller_ros2_example; App startup: /opt/bxi/bxi_rl_controller_ros2_example
Input devices Robot remote controller, PICO headset, and left and right PICO controllers
Motion tracking 2 leg-mounted PICO Motion Trackers
PICO application XRoboToolkit-PICO 1.1.1
Network PICO and the robot are on the same LAN and can communicate with each other

Choose the Project Directory

Use the project path that matches how the robot is started. Do not place the Sonic Mod inside the App project or its private_git_mods; install it in the independent /opt/bxi/mods directory, which is outside the App download and survives App updates.

Migrating an older project

Some older project versions already contain Sonic under src/bxi_example_py_elf3/mods or private_git_mods. If that copy and /opt/bxi/mods/com.bxi.sonic are both scanned, the runtime finds the duplicate Mod ID com.bxi.sonic and refuses to start. Before migrating, locate the old copy, make a backup, and move it outside the scanned directories so that only /opt/bxi/mods/com.bxi.sonic remains:

mv ~/bxi_ws/bxi_rl_controller_ros2_example/src/bxi_example_py_elf3/mods/private_git_mods/com.bxi.sonic \
  ~/bxi_ws/bxi_rl_controller_ros2_example/com.bxi.sonic.backup

Apply the same procedure to an old copy inside the App project. Do not leave two scannable Sonic copies in place.

Startup method Project directory Build requirement
Robot remote controller ~/bxi_ws/bxi_rl_controller_ros2_example Source tree; install the Mod in /opt/bxi/mods and rebuild after updating it.
App /opt/bxi/bxi_rl_controller_ros2_example App-downloaded prebuilt deployment; the Mod is loaded from /opt/bxi/mods, with no manual rebuild required.

When following the commands below, use the project path for your startup method. Clone the Sonic Mod into the independent /opt/bxi/mods/com.bxi.sonic directory.

Prepare the Robot

0. Clone the Sonic Mod

The Sonic Mod is maintained in a separate repository. Clone it manually into the motion-control project's private Mod directory before building:

sudo mkdir -p /opt/bxi/mods
sudo git clone https://github.com/konodoki/com.bxi.sonic.git /opt/bxi/mods/com.bxi.sonic

If the directory already exists, update that repository separately:

cd /opt/bxi/mods/com.bxi.sonic
git pull --ff-only

The parent project does not track this directory. At runtime, the configured /opt/bxi/mods root is scanned recursively, so the Mod remains available after an App update.

1. Update the Motion-Control Project

Update bxi_rl_controller_ros2_example on the robot to the latest version:

cd /home/bxi/bxi_ws/bxi_rl_controller_ros2_example
git pull --ff-only

After updating the source, rebuild the project as described in the repository README and source the environment:

source /opt/ros/humble/setup.bash
source /opt/bxi/bxi_ros2_pkg/setup.bash
cd /home/bxi/bxi_ws/bxi_rl_controller_ros2_example
bash build.sh
sudo systemctl restart ros_elf_launch.service

Note

If your site uses another managed deployment process, follow its update and build procedure instead. Do not update the working tree directly when it contains uncommitted site-specific changes.

2. Install Sonic Dependencies

Before using Sonic for the first time, switch to the root user on the robot and install the Python dependencies required for PICO connectivity:

sudo su
python3 -m pip install -r /opt/bxi/mods/com.bxi.sonic/requirements-pico.txt

If no proxy is configured, or downloads from the default PyPI index are slow or time out, retry with the Tsinghua University PyPI mirror in the same root shell. The following command sets the timeout to 120 seconds and disables caching:

python3 -m pip install \
  -r /opt/bxi/mods/com.bxi.sonic/requirements-pico.txt \
  -i https://mirrors.tuna.tsinghua.edu.cn/pypi/web/simple \
  --no-cache-dir \
  --timeout 120

The dependencies normally need to be installed only once. Run the command again after an update if requirements-pico.txt has changed.

3. Install the PICO Application

Download XRoboToolkit-PICO-1.1.1.apk and install the APK on the PICO headset. After installation, XRoboToolkit is available under Unknown Sources in the PICO Library.

Enter the Sonic Ready State

  1. Start VKH6 normally, confirm that the robot has completed its self-check, and use the remote controller to put the robot into walking mode. The robot should hold its normal standing posture.

VKH6 in the normal standing state

  1. Press LB + RB + X simultaneously on the robot remote controller to request Sonic full-body teleoperation.

  2. Wait for the state transition to finish. The robot assumes the ready posture shown below. Continue with PICO calibration and motion following only after the posture is stable.

VKH6 in the Sonic full-body teleoperation ready state

Sonic Does Not Start

Confirm that the robot is already in normal walking mode, then press LB + RB + X simultaneously. If the robot still does not respond, check that the motion-control project has been updated, rebuilt, and sourced correctly.

Calibrate the PICO Motion Trackers

Recalibrate the Motion Trackers before each full-body teleoperation session to reduce body-pose and floor-height errors.

  1. Secure one Motion Tracker to each leg. The side with the button and indicator light must face upward along the body. Press the button to turn on each tracker.

  2. Put on the PICO headset and pick up both controllers. Select Motion Tracker in the lower-right corner of the PICO home screen.

Open Motion Tracker from the PICO home screen

  1. Confirm that both leg trackers are connected. Select Start Calibration and follow the instructions in the headset.

Confirm the trackers and start calibration

  1. After calibration, select Adjust Floor and follow the instructions to align the virtual floor with the physical floor.

Adjust the floor height for PICO body tracking

  1. Observe the avatar on the screen. When the operator moves their head, hands, and legs, the avatar should follow those movements and its feet should remain close to the floor.

Confirm that the avatar follows the operator

Connect XRoboToolkit

  1. Return to the PICO Library and open XRoboToolkit under Unknown Sources.

Open XRoboToolkit under Unknown Sources

  1. Confirm that PICO and the robot are connected to the same LAN, then obtain the robot's LAN IP address.

  2. In the Network section of XRoboToolkit, select Enter next to PC Service, enter the robot's IP address, and connect.

  3. Check the tracking and transmission options against the table below:

Section Option Setting
Tracking Head Selected
Tracking Controller Selected
PICO Motion Tracker Mode Full-body
PICO Motion Tracker High-Acc Selected
PICO Motion Tracker Num 2
Data & Control Send Selected
  1. Confirm that Status in the Network section shows WORKING and that the log does not contain continuous errors.

Configure XRoboToolkit full-body tracking and data transmission

Calibrate the Reference Posture and Start Following

  1. Face the same direction as the robot and stand upright. Let the upper arms hang naturally, bend the elbows approximately 90 degrees, and hold the forearms horizontally in front of the body as shown below.

Initial calibration posture for Sonic full-body teleoperation

  1. Hold the posture steady and press A + B + X + Y across the two PICO controllers at the same time. This aligns PICO three-point tracking with the robot's reference posture.

  2. After calibration, continue matching the robot's posture and heading. Confirm that body tracking in the headset does not show significant drift.

  3. Press A + X simultaneously on the PICO controllers. The robot begins following the operator's full-body motion. Move the arms slowly first, then make small torso and leg movements to verify that all motion directions are correct.

  4. To pause following and return the robot to its default posture, press A + X simultaneously again.

  5. After confirming that real-time following has stopped, press RB + X simultaneously on the robot remote controller to return the robot to normal walking mode.

Common controls:

Device Buttons Function
Robot remote controller LB + RB + X Enter the Sonic ready state from walking mode
PICO controllers A + B + X + Y Align body tracking with the robot's reference posture
PICO controllers A + X Start following; press again to return to the default posture
Robot remote controller X Reset heading alignment when no shoulder or trigger button is held
Robot remote controller RB + X Exit Sonic and return to normal walking mode

Acceptance Check

After deployment, verify all of the following:

  1. Both leg trackers show as connected in the PICO Motion Tracker screen;
  2. The avatar's head, hands, and legs follow the operator's movements;
  3. XRoboToolkit shows WORKING, Mode is set to Full-body, and Send is selected;
  4. The robot enters and stably holds the Sonic ready posture after LB + RB + X is pressed;
  5. After calibration with A + B + X + Y, pressing A + X makes the robot follow small movements with low latency;
  6. Pressing A + X again returns the robot to its default posture, and pressing RB + X returns it to normal walking mode.

Troubleshooting

XRoboToolkit Cannot Connect to the Robot

  • Confirm that PICO and the robot are on the same LAN;
  • Confirm that PC Service contains the robot's IP address, not the PICO IP address;
  • Check whether the IP address changed after switching networks;
  • Confirm that XRoboToolkit shows WORKING, and review its log for connection errors.

The Avatar's Legs Do Not Follow or Its Feet Float

  • Confirm that both leg trackers are connected and sufficiently charged;
  • Make sure the button and indicator side of each tracker faces upward along the body;
  • Run Start Calibration and Adjust Floor again;
  • Confirm that XRoboToolkit uses Full-body mode with Num set to 2.

The Robot Cannot Enter the Sonic Ready State

  • Confirm that the robot has completed its self-check and is in normal walking mode;
  • Confirm that LB + RB + X is pressed as a three-button combination;
  • Confirm that the project has been updated to the latest version and rebuilt;
  • On first use, confirm that the packages in requirements-pico.txt were installed into the Python environment used by the robot process.

The Robot Does Not Follow After Calibration

  • Confirm that Send is selected in XRoboToolkit and its status is WORKING;
  • Confirm that the avatar in PICO Motion Tracker follows the operator correctly;
  • Return to the initial posture and press A + B + X + Y again;
  • Wait for calibration to finish, then press A + X to start real-time following.

The Robot Moves in a Different Direction From the Operator

Stop real-time following, face the same direction as the robot, and recalibrate. If only the heading is offset, press X alone on the robot remote controller while no shoulder or trigger button is held to reset heading alignment.

Motion Stutters or the Posture Jumps

Stop large movements and check the wireless network quality between PICO and the robot, the tracker connections, and the XRoboToolkit log. Before resuming, verify the initial posture and surrounding safety again. If the issue continues, exit Sonic, then recalibrate and reconnect.

References

VKH6 Navigation App User Guide

This guide explains how to configure a Livox MID-360s LiDAR for VKH6 and use bxi_rc_app to create maps, edit navigation data, and run guided tours.

Reference project: bxi_nav

Prerequisites

  • Install the latest version of bxi_rc_app.
  • Prepare an VKH6 robot equipped with a Livox MID-360s LiDAR.
  • Make sure the bxi_rc_slam package is up to date.
  • Connect the computer directly to the LiDAR with an Ethernet cable.
  • Keep the operating area safe and the paths clear, with as little pedestrian traffic as possible.

Environment Setup

This guide assumes Ubuntu 22.04 and ROS 2 Humble. Before continuing, source a ROS 2 environment with Navigation2 installed, then install the point-cloud-to-laser-scan tool:

source /opt/ros/humble/setup.bash
sudo apt update
sudo apt install -y ros-humble-pointcloud-to-laserscan

After installation, verify that the required packages are available:

ros2 pkg prefix nav2_bringup
ros2 pkg prefix pointcloud_to_laserscan

If both commands print their package installation paths, the environment is ready.

1. Configure the Livox MID-360s LiDAR

If the LiDAR does not start, the network or device configuration is usually incorrect. First confirm that the computer and LiDAR are on the same subnet, then check the configuration file.

1.1 Configure a Static IP Address

Set the computer's Ethernet interface to a static IP address, such as 192.168.1.51. A direct Ethernet connection is recommended. Changing network settings through a remote desktop session may cause permission issues.

Open the computer's network settings

Configure a static IP address for the Ethernet interface

1.2 Update the LiDAR Configuration File

Configuration file path:

bxi_rc_slam/src/livox_ros_driver2/config/MID360s_config.json

Check the following fields:

  • host_ip: the static IP address of the computer's Ethernet interface, such as 192.168.1.51.
  • ip: the LiDAR IP address. A MID-360s address is typically in the 192.168.1.1xx range. The final two digits may be printed below the QR code on the LiDAR housing.

If the label is difficult to read, place the computer and LiDAR on the same subnet and run:

ros2 launch livox_ros_driver2 msg_MID360s_launch.py

Identify the LiDAR IP address in the program output, then enter it in the configuration file.

Example configuration:

{
  "lidar_summary_info": {
    "lidar_type": 8
  },
  "Mid360s": {
    "lidar_net_info": {
      "cmd_data_port": 56100,
      "push_msg_port": 56200,
      "point_data_port": 56300,
      "imu_data_port": 56400,
      "log_data_port": 56500
    },
    "host_net_info": [
      {
        "host_ip": "192.168.1.51",
        "cmd_data_port": 56101,
        "push_msg_port": 56201,
        "point_data_port": 56301,
        "imu_data_port": 56401,
        "log_data_port": 56501
      }
    ]
  },
  "lidar_configs": [
    {
      "ip": "192.168.1.128",
      "pcl_data_type": 1,
      "pattern_mode": 0,
      "extrinsic_parameter": {
        "roll": 0.0,
        "pitch": 0.0,
        "yaw": 0.0,
        "x": 0,
        "y": 0,
        "z": 0
      }
    }
  ]
}

Rebuild after changing the configuration

After saving the configuration, enter the project directory containing install.sh and rebuild the installation with root privileges:

  sudo /opt/bxi/bxi_rc_slam/install.sh

2. Use the Navigation App

  1. Open bxi_rc_app and select My Devices (我的设备).

Open My Devices in bxi_rc_app

  1. Select the robot you want to navigate from the device list to open its details page.

Select the robot from My Devices

  1. Open Map Management (地图管理) from the robot details page.

Open Map Management from the robot details page

2.1 Create a Map

Keep the robot stable before mapping

Position the robot's head upright and keep its body stable. Avoid large movements that could interfere with IMU initialization.

  1. Open Map Management (地图管理) and select New Map (新建地图).

Create a map from the Map Management page

  1. Start the robot and keep it in walking mode. After confirming that the point cloud is displayed correctly, select Start Mapping (开始建图).

Confirm the point cloud and start mapping

  1. Stand behind the robot and remotely drive it through the target area. Staying behind the robot prevents the operator from being captured in the map. Minimize pedestrian movement while mapping.

  2. After the map covers the target area, select Save (保存). Wait for confirmation that the map has been saved before leaving the mapping page.

Complete mapping and save the map

2.2 Edit the Map

  1. In Map Management (地图管理), select the map you just saved.

Select the saved map from Map Management

  1. Open the guided-tour editor, switch to Waypoint (航点), and mark each destination on the map.

Add a waypoint to the map

  1. Set the robot's arrival heading for each waypoint. Add a waypoint name if needed.

Set the waypoint name and arrival heading

  1. Optional: To make the robot perform a specific behavior after reaching the waypoint, select Add Action (添加动作), choose Voice (语音), Action (动作), or Delay (延迟), configure it, and then select Add (添加). You can add multiple behaviors to the same waypoint if needed.

Add an arrival action to the waypoint

Configure a voice, action, or delay after arrival

  1. Switch to Area (区域) and select Add Clearing Zone (添加清除区). Draw clearing zones over the robot's travel paths to remove obstacles that no longer exist in the physical environment.

Add a clearing zone over a travel path

  1. Verify the waypoints, headings, arrival behaviors, and clearing zones, then wait for the map to be saved successfully.

2.3 Start a Guided Tour

Keep the robot stable before starting the tour

Position the robot's head upright and keep its body stable. Avoid large movements that could interfere with IMU initialization.

  1. Return to the robot details page, open Operating Mode (运行模式), and select guided-tour mode.

Open the robot's Operating Mode menu

  1. Select the required map, then select Start (开始) on its card.

Select a map and start the guided tour

  1. Select Relocalize (重定位). Tap the robot's approximate position on the map, then drag the pose marker in the direction the robot is facing.

  1. Check whether the red point cloud around the robot aligns with the walls on the map. If they align, select Confirm (确认). If the offset is significant, adjust the position and heading again.

Adjust the robot position and heading to complete relocalization

  1. Select Navigate (导航) to start the guided-tour task.

Start the navigation task

  1. If a problem occurs during the tour, immediately select Pause (暂停) or Stop (终止). You can also use the on-screen joystick to take manual control and prevent the robot from continuing off course.

Pause, stop, or manually control the navigation task

  1. When the tour is complete, stop navigation before leaving the page.

Troubleshooting

How to Adjust the Remote-Control Speed

  1. Open the robot remote-control page and select the Settings icon in the upper-right corner.

Open Settings from the remote-control page

  1. Select Control (控制) on the Settings page, then adjust the following parameters as needed:

  2. Speed Output Range (速度输出范围): limits the forward and reverse linear speed for both the on-screen virtual joystick and an external gamepad.

  3. Rotation Output Range (旋转输出范围): limits the left and right turning speed for both the on-screen virtual joystick and an external gamepad.

Adjust the speed and rotation output ranges

After changing the ranges, test the robot at low speed in a clear, safe area. Increase the limits gradually only after confirming that the robot moves as expected.

The LiDAR Does Not Start

  • Confirm that the computer and LiDAR are connected by Ethernet and are on the same subnet.
  • Confirm that host_ip matches the static IP address of the computer's Ethernet interface.
  • Confirm that ip matches the actual LiDAR IP address.

People or Dynamic Obstacles Appear on the Map

  • Keep the mapping operator behind the robot.
  • Minimize pedestrian movement during mapping.
  • Add clearing zones in the map editor for obstacles that no longer exist.

The Point Cloud Does Not Align with the Walls After Relocalization

  • Select the robot's position on the map again.
  • Adjust the pose marker to match the robot's actual heading.
  • Start navigation only after the red point-cloud returns are reasonably aligned with the walls.

Manipulation Algorithm Development

This document contains manipulation algorithm development instructions for the VKH6 robot.


Pipeline Overview

Theoretical Background

Training Environment

Deployment Framework

VKBOTS Control App User Guide (New Version)

VKBOTS Control is used to add, connect to, control, and maintain VKBOTS robots. This guide reflects the current App pages and routing for Android and Windows.

Download the latest version

Download the latest Android package from the VKBOTS Control App download page. The iOS version is under internal testing and optimization and will be released later.

Safety first

Remote control, mapping, touring, firmware upgrades, and remote assistance can affect robot state. Before starting, make sure the area around the robot is clear, the robot is in a safe pose, and power and network connections are stable. Screenshots in this guide are from a test environment; device names, addresses, and identifiers have been redacted.

Before you use a robot for the first time

If this is your first robot, complete onboarding, Wi-Fi provisioning, and the first start with guidance from an experienced on-site operator. In this guide, the controller is the phone, tablet, or PC running the App; the robot is the physical device being added and controlled; binding saves that robot to the current account or controller so it can be connected again later.

For first-time use, follow this order:

  1. Place the robot in a level, clear area without people, loose items, or objects that could be knocked over.
  2. Open VKBOTS Control on the controller and choose sign-in or Local mode.
  3. Use Add Device to scan and bind the robot, then complete Wi-Fi provisioning as prompted.
  4. Connect by Wi-Fi and open Device Home; check battery and Diagnostics first.
  5. If the App reports legacy firmware, complete the firmware upgrade first.
  6. Enter Remote Control and start the robot only when you understand the controls, the site is safe, and you are authorized to operate it.

When unsure, do not start the robot

If the robot cannot be found, a prompt is unclear, the network is unstable, or the robot pose looks abnormal, stop and contact the on-site owner or technical support. Opening pages, viewing state, and refreshing lists normally do not move the robot. Starting the robot, operating joysticks, upgrading firmware, and requesting remote assistance can change robot state.

Page map

Entry Page Purpose Prerequisite
Home Add Device View power-on, Bluetooth, and Wi-Fi provisioning guidance None
Home My Devices View, add, connect, and manage bound robots Local mode or signed in
My Devices Connection Method Select Wi-Fi or Bluetooth direct connection A robot is selected
Device Home Operation Mode Enter Remote Control or Touring mode Connected
Device Home Diagnostics View logs, battery, joint temperature, 3D pose, and command line Wi-Fi connection
Device Home / Home Firmware Management Review, select, and install packages Device online; stable network
Control screen Settings Configure control, video, and developer parameters None
Home Profile Tickets, language, app updates, and About VKBOTS Some services require sign-in in Local mode

Map management

The App also includes map list, viewer, editor, mapping, tour selection, and tour execution pages. Per the current scope, map-management functions are not described further in this guide.

1. Home

1.1 First launch

The welcome page is shown on first launch. If you already have a VKBOTS account, enter a mobile number, accept the Terms of Service and Privacy Policy, and request a verification code. For first on-site use without an account, select Enter Local Mode at the bottom. Local mode does not create a cloud account automatically, but it can connect to robots already bound on this controller.

First-launch welcome page

1.2 Home entries

After signing in or entering Local mode, the Home page provides Add Device, My Devices, Firmware Upgrade, Diagnostics, and Profile. The Local Mode label at top right means the App is using device bindings stored on this controller.

Home

Cloud mode and Local mode

Item Cloud mode Local mode
Identity and data Sign in with a mobile verification code; bindings load from the cloud account No sign-in; only bindings and maintenance credentials stored locally are used
Collaboration Supports device sharing, QR-code joining of shared devices, and account services Cannot join shared devices with a share code
Services Tickets, unread notifications, and account profile are available Tickets request sign-in; account services are unavailable
Control Connect after account authorization Directly connect to robots already bound locally over LAN or Bluetooth
Switching Sign-in enters Cloud mode automatically Sign out first; switching disconnects the current robot connection

Local mode suits offline and field maintenance. Cloud mode suits multi-device collaboration, account management, and support services.

2. Add a robot

2.1 Add Device guidance

Select Add Device on Home. This lets the controller recognize and save the robot, and must be completed for first use. Before starting:

  1. Turn on the robot controller and place the robot safely.
  2. Enable Bluetooth and location permission on the phone or tablet.
  3. Connect the controller to usable Wi-Fi. For Wi-Fi control, the controller and robot should be on the same LAN.
  4. Select Start Pairing to scan for nearby robots.

Power-on and Bluetooth connection guidance

2.2 Scan and select a Bluetooth device

The scan page lists discoverable VKBOTS robots and their signal strength. Select Connect for the target robot, then follow the on-screen flow to provision or bind it.

Can't find the robot?

Check that the robot is powered on, Bluetooth and location are enabled on the controller, and then move closer and select Search again.

Select a robot to add

2.3 Provisioning and binding

After Bluetooth connection, confirm the target robot, enter or select Wi-Fi information, and wait for the robot to join the network. Think of this as finding the robot over Bluetooth first, then telling it which Wi-Fi network to join. Once binding is complete, the robot appears in My Devices.

Do not leave during provisioning

Do not close the App, turn off Bluetooth, or remove robot power while credentials are being written and the network is switching. If the flow fails, start again from Add Device.

3. Manage and connect devices

3.1 My Devices

My Devices shows bound robots as cards. Select a card to choose a connection method. It also provides entries such as pairing a new robot and scanning a maintenance credential. Online status only indicates discoverability; it is not a substitute for an on-site safety check.

My Devices

3.2 Choose a connection method

Method Best for Capabilities and limits
Wi-Fi connection Controller and robot on the same LAN Recommended; supports video, diagnostics, maps, and firmware management
Bluetooth direct connection No usable LAN or nearby basic control Basic close-range control only; no video and some network features are unavailable

Choose a connection method

3.3 Wi-Fi auto-discovery and network changes

After selecting Wi-Fi connection (called Wi-Fi Control in some releases), the App automatically looks for the robot on the LAN currently used by the phone, tablet, or PC. A bound robot on the same subnet can then be connected for video, diagnostics, and firmware management.

To move a robot to another Wi-Fi network:

  1. Connect the phone or tablet to the destination Wi-Fi.
  2. Return to the robot's Connection Method page and select Wi-Fi connection / Wi-Fi Control.
  3. If the App finds that the robot and controller are on different networks, it enters the Wi-Fi provisioning flow.
  4. Confirm the destination network, finish provisioning, wait for the robot to join it, then start Wi-Fi control again.

Why connect the controller first?

The App uses the controller's current network as the target for discovery and provisioning. Switching the phone or tablet first reduces the need to enter an SSID manually and lets the App find the robot on the destination LAN immediately after provisioning.

3.4 Device Home

After a successful connection, Device Home provides entries for the current robot. On your first successful connection, check Firmware Management first, then learn Remote Control:

  • Operation Mode: choose Remote Control or Touring mode;
  • Diagnostics: view robot diagnostic data;
  • Firmware Management: review and install robot packages;
  • The top-right More menu can open Settings or Remote Assistance, depending on connection and permissions.

Device Home

4. Selecting an operation mode and the remote-control interface

4.1 Operation modes

Select Operation Mode from Device Home to open the mode picker:

  • Remote Control: operate the robot with virtual joysticks or an external gamepad. Read the Remote-control interface section below before first use.
  • Touring: follow a prepared route. Core functionality is complete and is undergoing internal testing and optimization; it will be made generally available later.

Operation mode picker

4.2 Remote-control interface

After entering Remote Control, do not operate the joysticks yet. First verify that the video or model view, network, and battery are normal, then enable the robot if required. Opening this screen does not enable the robot or issue movement commands.

Area Description
Top left Back; Refresh Video recreates or refreshes Wi-Fi video; Diagnostics opens robot diagnostics.
Top right Network quality (normally Wi-Fi RTT or Bluetooth RSSI), battery state, and Start Robot / Stop Robot.
Center Main view. Switch between live video and a 3D digital-twin model; this does not change robot model, operation mode, or control parameters.
Bottom left and right Virtual joysticks for translation, turning, height, and other motion; use only when the robot is enabled and the area is safe.
Right-side function island Common actions, control settings, and the gamepad-status overlay.

Remote-control screen

4.3 Top-bar functions and view switching

Refresh Video only refreshes the Wi-Fi video stream. Use it when video is missing, frozen, or needs to be fetched again after network recovery. Bluetooth direct connection has no video stream.

Diagnostics is a shortcut to robot-reported status. If battery, temperature, joint, or log data looks abnormal, stop remote-control activity, put the robot in a safe state, and then investigate.

Use the view switch for live video and the 3D digital-twin model. Video is best for checking the surrounding environment, footing, and actual pose; the model is best for inspecting pose and joint state.

4.4 Gamepad, virtual joystick, and control settings

The screen supports virtual joysticks, keyboard input, and external gamepads. A USB or Bluetooth gamepad connects to the phone, tablet, or PC running the App. Open the gamepad-status overlay from the right-side function island to verify connection and input state.

In Settings → Control, configure gamepad enablement, sensitivity, dead zone, translation/rotation output ranges, and hold mode. When using a gamepad for the first time, inspect input feedback with the robot stopped and begin at a low speed.

Avoid residual input

When changing pages, losing window focus, or changing control method, release the gamepad or center the virtual joystick. Confirm that the robot is no longer receiving motion input before continuing.

4.5 Start, stop, and safety reminders

Start Robot makes the robot ready to receive control commands; once active, the button becomes Stop Robot to exit that state. Network and battery icons are informational only and cannot replace an assessment of the site and mechanical state.

Required checks before starting

Start only in a clear, level, controlled area. Confirm that people and obstacles are outside the motion area, the robot pose is normal with no entanglement or suspended parts, and battery and network are adequate. Start with low-speed, small movements to verify direction. After stopping, do not assume all mechanical risk has immediately disappeared; wait until the robot is stable and follow site safety procedures.

Motion control

Select Start Robot or operate joysticks only after confirming a safe environment and understanding the control mapping. Entering the Remote Control screen does not start the robot.

5. Settings

Open Settings from the remote-control shortcut or Profile. Available tabs include:

  • Control: speed level, joystick sensitivity and dead zone, translation/rotation ranges, gamepad enablement, and hold mode;
  • Video: video quality and video statistics;
  • Developer: shown only after Developer mode is unlocked, for development and troubleshooting.

Use Import, Export, and Reset at lower left to manage local settings. Import only configurations from trusted sources.

Control settings

6. Diagnostics

Diagnostics reads robot runtime data over Wi-Fi. Use it after the first connection, before remote control, or when something appears abnormal. On first entry, confirm DOMAIN_ID; it is the identifier used for internal robot communication and must match the robot's ROS 2 communication domain. If you do not know this value, ask the on-site technical team rather than changing it.

Set DOMAIN_ID

Page Content Recommendation
Logs View robot logs Review content before exporting because it may contain device information
Battery Voltage, current, temperature, and trends Include in pre-operation checks
Joint Temperature Temperature state of each joint Stop high-load operation if temperature is abnormal
3D Pose Digital-twin pose view Inspect pose and joint state
Command Line SSH terminal Maintenance personnel only

Battery diagnostics

6.1 Diagnostics overview

The left panel identifies the diagnostic target and data-stream state; the right panel groups pages under View and Tools. Waiting for data or No data normally means that the robot has not reported that diagnostic data. Check Wi-Fi, DOMAIN_ID, and robot services instead of repeatedly operating remote control.

Diagnostics overview (device details redacted)

6.2 Logs

Select Logs to choose a current log file and view runtime records. Logs help investigate service startup, connection, and node errors. The file name and body in this screenshot are redacted.

Logs may contain sensitive data

Logs can include robot names, IP addresses, directories, command parameters, or runtime identifiers. Confirm the recipient is authorized and redact unnecessary device and network information before sharing with support or third parties.

Logs (content redacted)

6.3 Joint Temperature

Joint Temperature displays temperatures reported for each joint. Use filtering and paging controls to inspect the records. Stop high-load movement and follow maintenance procedures for sustained high temperature, abnormal fluctuations, or missing data. The test screenshot shows the normal empty state; actual values depend on robot reporting.

Joint Temperature

6.4 SSH Command Line

Selecting Command Line first shows the SSH credentials page. Enter an authorized username and password to create a secure terminal session; select Save this robot's password only if it should be retained on this controller. Opening the page neither connects nor runs a command. First-time users normally do not need this feature.

Maintenance personnel only

SSH commands can change robot configuration, stop services, or affect operational safety. Use them only with maintenance authorization, full understanding of the command, and a safe robot state. Never share passwords, IP addresses, ports, or complete terminal output in documentation, tickets, or chat.

SSH command-line connection (device details redacted)

7. Firmware management and upgrade

Firmware Management on Device Home maintains the current robot. Firmware Upgrade on Home provides a batch-upgrade entry for multiple devices.

7.1 Firmware version and encryption requirement

When the new App detects a robot with legacy, unencrypted firmware, it shows an upgrade prompt and requires the firmware upgrade flow first. Complete the robot firmware upgrade before using connection, encryption, and sharing functions. Do not close the App, disconnect the network, or remove robot power during the upgrade.

Firmware upgrade prompt for a legacy robot (device list redacted)

Encryption and credential protection

Even after encryption is enabled by a firmware upgrade, never expose Wi-Fi passwords, SSH passwords, device or Bluetooth addresses, tokens, or session identifiers in screenshots, tickets, logs, or chat. Use the App's authorization and sharing workflow and grant only the access required for the task.

7.2 Review upgrade packages

The page reads each package's current version, target version, and download size. Packages with an update indication can be upgraded separately or added to Upgrade Selected.

Firmware management

7.3 Confirm an upgrade

After selecting an individual package or Upgrade Selected, verify the packages, versions, and sizes. Start Upgrade submits a real upgrade task to the robot.

Confirm firmware upgrade

Pre-upgrade checklist

  • Keep robot power and network stable.
  • Do not close the App, disconnect the network, or force-restart the robot during an upgrade.
  • If a restart is requested after upgrade, do it only when the robot is stationary and safe.
  • For a batch upgrade, validate on one test robot first.

8. Remote assistance

Remote Assistance is available only when the robot is connected over Wi-Fi; it is not shown for Bluetooth direct connection.

8.1 Entry

  1. Open the target robot's Device Home.
  2. Select More (three dots) at top right.
  3. Select Remote Assistance.

The App carries the current robot's address, display name, and serial number into the Remote Assistance page and tries to establish its network session. If no current robot is selected, the page shows LAN and historical device lists for selection.

Remote Assistance entry from Device Home

8.2 Request assistance

The page has three stages:

  1. Connect Robot: confirm the target is online and establish a WebSocket session.
  2. Check Status: show device identity, robot connection state, and network connectivity checks.
  3. Request Assistance: read and accept the authorization notice, select Request Assistance, and review requested, active, and closed state in the session panel.

Remote Assistance status checks

After selecting Request Assistance, the App displays an authorization notice. It can authorize support staff to communicate via a reverse SSH tunnel, read necessary diagnostic information such as system logs, control state, and sensor data, and start or stop robot services within the authorized scope. A session is created only after selecting Agree and Request.

Remote Assistance consent

8.3 The robot maintains the session

Once authorized, the robot-side service starts the assistance channel. The App on the phone, tablet, or PC initiates authorization, shows session state, and provides a close entry. The session can survive App page changes and network reconnection; if the App restarts while the robot-side session is still valid, returning to Remote Assistance can recover its state.

The controller does not need to remain on the Remote Assistance page after the session is established. Keep network access available and avoid force-closing the App during assistance. Use the session's close action to end assistance; power-off or an explicit close on the robot destroys the channel.

When ready, the panel shows remaining time and provides Extend +30 minutes and Close Now. Ports, remaining time, and connection IDs are dynamic session information and must not be shared publicly.

Remote Assistance session ready

Remote-assistance authorization

Confirm both the recipient of authorization and the on-site state before requesting assistance. Remote Assistance opens the robot session needed for troubleshooting. Do not select Request Assistance without explicit authorization.

9. Profile, About, and service pages

Profile on Home includes:

  • Official website link and ticket entry. Tickets require sign-in and Local mode asks the user to sign in.
  • Language switching.
  • Settings and manual App-update checks.
  • About VKBOTS: App version, open-source licenses, Privacy Policy, Terms of Service, export of personal data, and withdrawal of privacy consent.
  • Signed-in users can sign out or cancel their account.

Developer mode is hidden by default. In the current implementation, repeatedly tapping the version number in About VKBOTS unlocks developer settings; use them only for development or maintenance.

9.1 Ticket service

Open Profile → Ticket Service. Tickets are a cloud-account service: Local mode shows that sign-in is required; after sign-in, users can view unread counts, create tickets, and communicate with support.

The ticket list shows ticket number, subject, category, linked robot, state, and last update time. A new support reply creates an unread indicator in Profile; opening a ticket marks it read.

To create a ticket, provide:

  1. Issue category.
  2. Subject and detailed description.
  3. Contact email.
  4. Related robot, selected from bound robots or entered by serial number.
  5. Optional attachments such as photos or log files.

After submitting, use the ticket detail to check progress and messages, reply, and attach files. When the issue is resolved, the user can confirm closure.

Submit a useful ticket

Include robot model/serial number, App version, network environment, reproduction steps, time of occurrence, and error messages. Remove passwords, tokens, and internal addresses before uploading logs or screenshots.

10. Page coverage and access conditions

Current App routes also include sign-in, SMS verification, permission guidance, device binding, single-device OTA, batch OTA, device sharing management, Remote Assistance, an RL controller workspace, ticket list/create/detail, Privacy Policy, and Terms of Service pages.

These pages depend on sign-in state, device binding, network, robot capability, or Developer mode. For publication-quality screenshots of restricted pages, use a dedicated test account and an isolated robot; do not trigger binding, sharing, remote sessions, upgrades, or control actions on production robots.


For connection or upgrade issues, record the App version, robot name, network environment, and reproduction steps, then contact support through the ticket entry in Profile.

New Software Backend Interfaces

This document explains how a custom app can connect to and control RC ROS2 directly, as well as the interfaces exposed by RC over the local network and BLE. Local control does not depend on account login, SMS verification, or an app cloud service.

Suggested reading order

For the shortest path to a working controller:

  1. Derive a deviceKey from the local password, or obtain ownerKeyHex from your customer service.
  2. Bind once through BLE Provisioning or the encrypted Wi-Fi API in section 5.3.1.
  3. Build the HMAC query and connect to ws://<robot>:8081/.
  4. Send control.cmd_vel with flat fields in payload, then keep the link alive with control.heartbeat.

The Python walkthrough in section 8 follows this order. The HTTP map, navigation, and OTA APIs reuse the same key but use a different signature string.

Security boundary

All UIDs, serial numbers, and keys in this document are examples. Robot cloud credentials and server-side keys are not part of the app control interface and must never be embedded in an app, source code, or logs.

1. Architecture and binding states

flowchart LR A[Custom App] S[Customer service<br/>login and credential issue] R[RC ROS2<br/>local gateway] C[Robot cloud service<br/>activation/heartbeat/logs] M[Maintenance credential] A -->|access token| S S -->|token + ownerKeyHex| A A -->|BLE BIND_START<br/>or encrypted Wi-Fi bind| R A -->|WS/HTTP HMAC<br/>deviceKey| R A -.->|No-service mode: derive deviceKey from password| R M -->|Temporary auth override| R R -.->|robot_token| C
  • Service credential mode: the app logs in to the customer service; the service issues token, ownerKeyHex, and the UID. Only binding fields are sent to the robot; the service signing secret is never released.
  • Local password mode: the app does not log in or call any service. It derives the deviceKey locally and binds over BLE or encrypted Wi-Fi.
  • After binding, normal WS, HTTP, and BLE control runs between the app and RC; it does not call the customer service for every command.
  • The robot may still use its own robot_token for activation, heartbeat, and log upload. That cloud path is independent of app control.
  • Local binding does not require a robot-side environment switch and has no temporary claim window.
  • Neither an app access token nor the robot robot_token is accepted as an RC control signature.

RC has three persistent binding states:

State binding_mode Meaning
Unbound unbound Initial cloud or local password binding is allowed
Cloud-bound cloud Bound with a binding credential issued by the official backend
Locally bound local Bound directly between the app and RC with a password, without a cloud user relationship

Maintenance mode is not a fourth binding state. It is a time-limited authentication override that works while the robot is unbound, cloud, or local. It does not modify the original binding, and RC automatically falls back to the original authentication state when the maintenance credential becomes invalid.

2. BLE Provisioning protocol

2.1 Provisioning GATT

UUID base: …-b1a1-4003-8000-000000000000.

Service/characteristic UUID suffix Properties Purpose
Provisioning Service 00000001 service Network provisioning and binding
PROV_CMD 00000002 write App → RC TLV frames
PROV_EVT 00000003 read/notify RC → App responses

The legacy connectable BLE advertisement includes the complete Provisioning Service UUID 00000001-b1a1-4003-8000-000000000000, while the scan response carries the Complete Local Name. The app should filter by this UUID first, then connect, discover GATT, and send HELLO. The Control Service UUID is not advertised and must be obtained through GATT service discovery after connecting.

The default advertised name is BXI_<hostname>. The hostname is limited to letters, digits, -, and _, and the name is truncated after 29 UTF-8 bytes. Treat the name as display-only metadata, not device identity; use the serial number returned by HELLO_ACK as the authoritative identity.

Frame format:

[version u8=0x03][op u8][seq u8][TLV...]
Short TLV: [tag][len<=0xFE][value]
Long TLV: [tag][0xFF][len u16 little-endian][value]
Request/response opcode
HELLO / HELLO_ACK 0x01 / 0x81
WIFI_SCAN / WIFI_LIST 0x10 / 0x90
WIFI_JOIN / WIFI_STATE 0x11 / 0x91
BIND_START / BIND_OK / BIND_FAIL 0x20 / 0xA0 / 0xA1
BIND_CANCEL 0x21
BIND_STATUS_GET / BIND_STATUS 0x22 / 0xA2
UNBIND / UNBIND_ACK 0x23 / 0xA3

2.2 HELLO_ACK

The app should send HELLO first and read the actual serial number and binding state from HELLO_ACK:

TLV Type Meaning
0x01 UTF-8 Serial number
0x02 u8 bound_flag: 0 unbound, 1 bound
0x03 16B Device-key fingerprint, right-padded with zeroes
0x04 UTF-8 Current IP address
0x05 UTF-8 RC firmware version
0x06 u32 LE Supported-opcode bitmap
0x07 u8 binding_mode: 0 unbound, 1 cloud, 2 local
0x08 bytes Local-binding KDF salt; empty for other states
0x09 u32 LE Local-binding KDF iterations; 0 for other states
0x0A u8 KDF ID; 0 for other states

BIND_STATUS_GET returns BIND_STATUS with these fields:

TLV Type Meaning
0x01 u8 bound_flag
0x02 UTF-8 Serial number
0x03 u64 LE Owner UID
0x04 u64 LE Unix binding time
0x05 8B Device-key fingerprint
0x06 u8 binding_mode: 0 unbound, 1 cloud, 2 local
0x07 bytes KDF salt
0x08 u32 LE KDF iterations
0x09 u8 KDF ID

3. Local password binding

3.1 Fixed identity and password derivation

Local binding uses the fixed owner UID:

ownerUid = 2147483646

The password must contain 8 to 64 printable ASCII characters, with every byte in the 0x20..0x7e range. Derive the 32-byte deviceKey as follows:

KDF        = PBKDF2-HMAC-SHA256
password   = UTF-8 password bytes
salt       = 16 cryptographically random bytes
iterations = 200000
dkLen      = 32 bytes
KDF ID     = 1

credentialId uniquely identifies this local binding and must contain 1 to 128 characters. It contains no secret and may be a UUID or an equivalent unique random string.

Store the derived deviceKey in platform secure storage such as Android Keystore, iOS Keychain, or Windows Credential Locker. Never put the password, derived key, or a maintenance credential in logs, analytics, or a plaintext settings file.

3.2 BIND_START

The app must first send HELLO and read the actual serial number from HELLO_ACK, then send:

BIND_START op=0x20
TLV 0x01 = empty; only cloud binding uses a binding credential
TLV 0x02 = credentialId UTF-8
TLV 0x03 = HELLO_ACK.sn UTF-8
TLV 0x04 = deviceKey raw bytes, exactly 32B
TLV 0x05 = bindMode u8 = 1 for a local-binding request
TLV 0x06 = ownerUid u64 LE = 2147483646
TLV 0x07 = KDF salt raw bytes, exactly 16B
TLV 0x08 = iterations u32 LE = 200000
TLV 0x09 = KDF ID u8 = 1

RC accepts this request only when the robot has been activated and is currently unbound. A local request cannot replace an existing cloud or local binding, and cloud synchronization does not overwrite a local binding.

On success, RC stores binding_mode=local, sync_state=local_only, and bind_method=ble_local_password_v1. BIND_OK returns the serial number, owner UID, credential ID, binding nonce, binding time, and key fingerprint, but never the key. Save the device relationship only after verifying that the response matches the current request.

Common BIND_FAIL codes:

Code Meaning
1 Invalid local fields, UID, key, or KDF parameters
4 Already bound to another UID
5 Robot is not activated
6 Internal error
8 Persistence failed

3.3 Reconnecting to a locally bound robot

Another app reads the salt, iteration count, and KDF ID from HELLO_ACK or BIND_STATUS, derives the same deviceKey from the user-entered password, and compares the returned fingerprint. It must not save the credential or start control until that check succeeds.

The password and key are never uploaded to the cloud, so local mode has no cloud recovery path. If the password is lost, use a client that still holds the original key to authorize unbinding, or clear the local binding through a controlled maintenance process and bind again.

3.4 Unbinding and targeted cloud clearing

When the robot is bound, an owner holding the current deviceKey can send an authenticated BLE UNBIND:

UNBIND op = 0x23
TLV 0x01  = ts, Unix seconds, u64 little-endian
TLV 0x02  = mac, 16 bytes

payload = "unbind|" || UTF8(sn) || "|" || ts_le_8B
mac = HMAC-SHA256(deviceKeyRaw, payload)[0:16]

RC accepts requests within 60 seconds of the robot's current time. While bound, missing TLVs, an out-of-window timestamp, or an invalid HMAC is rejected silently without UNBIND_ACK; the sender must handle this as a timeout. The app currently waits five seconds by default. In the unbound/factory state, RC returns UNBIND_ACK directly. On success, RC deletes binding.json and clears the local sharing-grant records.

  • Local-app unbinding does not create, remove, or synchronize any cloud user relationship.
  • RC reports bindingMode in heartbeat requests and also reports localBindingCredentialId while locally bound.
  • For an administrator-requested remote clear, RC requires both binding_mode=local and an exact match with the current credential ID. A stale command cannot delete a newer replacement binding.

4. HMAC authentication after binding

RC control authentication uses a credential UID, robot serial number, and 32-byte key. It does not accept an app access token and does not use the robot's robot_token. Normal control uses the owner credential in the binding record; maintenance control uses the temporary credential described in section 6.

4.1 WebSocket HMAC

message = ws|user_id|sn|ts|nonce
sig = Base64(HMAC-SHA256(deviceKeyRaw, UTF8(message)))

Connection query:

user_id=<UID>&client_id=<client-id>&sn=<SN>&ts=<Unix milliseconds>&nonce=<random value>&sig=<URL-encoded Base64 signature>
ws://<robot>:8081/?user_id=42&client_id=app&sn=BXI-A1&ts=...&nonce=...&sig=...
ws://<robot>:8081/ws/signaling?user_id=42&client_id=video_v1&sn=BXI-A1&ts=...&nonce=...&sig=...

The timestamp skew must not exceed 60 seconds. Use a new nonce for each connection. The serial number must match the binding record, and the UID must be present in the authorization list.

4.2 HTTP v2 HMAC

bodyHash = lowercaseHex(SHA256(exactRawBodyBytes))
message = http.v2|UPPER_METHOD|PATH|bodyHash|user_id|sn|ts|nonce
sig = Base64(HMAC-SHA256(deviceKeyRaw, UTF8(message)))

The request query contains:

auth_v=2&user_id=<UID>&sn=<SN>&ts=<Unix milliseconds>&nonce=<random value>&sig=<URL-encoded Base64 signature>

PATH excludes the query string. The SHA-256 hash must also be calculated for an empty body. Sign the exact final raw body bytes sent on the wire; do not reformat JSON after generating the signature.

4.3 BLE control HMAC

The protocol version is 0x03, and all multibyte fields use little-endian byte order:

22B header: <BBHffffH>
            ver, auth, seq, vx, vy, wz, height, buttons

24B header: <BBHffffHBB>
            base header + btn_slot + btn_val

tag = first8Bytes(HMAC-SHA256(deviceKeyRaw, headerBytes))
frame = headerBytes + tag

auth: 0 means no tag, 1 means HMAC4, and 2 means HMAC8. Use auth=2 in production. Maintain an increasing u16 seq for each BLE connection. RC uses a 0x8000 half-window for wraparound handling and replay prevention.

4.4 Offline guest sharing

The owner can issue a local BXIS1.<base64url(JSON)> share token. It lets a guest use WS, HTTP, and BLE without learning the owner's deviceKey. The payload fields are:

{
  "v": 1,
  "sn": "BXI-EXAMPLE-0001",
  "role": "co_owner",
  "iat": 1780000000,
  "exp": 1780000120,
  "epoch": 0,
  "jti": "unique random value for this token",
  "k": "64 hexadecimal characters encoding the subkey",
  "sig": "Base64 HMAC-SHA256 signature",
  "conn": {"i": "192.168.88.162", "p": 8081}
}

conn is an optional connection hint and is not signed. k is the connection subkey delivered to the guest. The robot does not trust this field directly; it independently derives the subkey from its local owner key and verifies the handshake signature:

shareKey = HMAC-SHA256(deviceKeyRaw, "bxi-share-key-v1|<epoch>")
tokenSig = Base64(HMAC-SHA256(shareKey,
           "bxishare.v1|<sn>|<role>|<iat>|<exp>|<epoch>|<jti>"))
subkey   = HMAC-SHA256(shareKey, "bxi-share-tx-v1|<jti>")
  • For WS and HTTP, generate signatures as described in sections 4.1 and 4.2, but use subkey and include the complete share_token in the query.
  • For BLE, first write a {user_id,sn,ts,nonce,sig,share_token} JSON proof to CONTROL_GUEST_AUTH. After it succeeds, use subkey for HMAC8 on that connection.
  • epoch must equal share_epoch in the robot's binding.json. Incrementing the epoch lets the owner revoke every older share token at once.
  • The robot registers the jti when the guest first connects before exp. A registered guest may reconnect during a sliding authorization period, currently 30 days by default and configurable through BXI_SHARE_GRANT_TTL_SEC. An expired token that was never registered is rejected.
  • A share token contains the guest control subkey. Treat it like a password and never upload it to logs or analytics.

5. Interfaces exposed by RC ROS2

Interface Address Authentication Purpose
Control WebSocket ws://<robot>:8081/ WS HMAC Control, telemetry, and status
WebRTC signaling ws://<robot>:8081/ws/signaling WS HMAC Video negotiation
HTTP REST http://<robot>:8082 HTTP v2 HMAC OTA, maps, navigation, mapping, and tours
Encrypted Wi-Fi pairing http://<robot>:8082/api/v1/pairing/* X25519 + AES-256-GCM Create pairing sessions, bind, and unbind
UDP discovery UDP :8083 None Discover IP address, ports, and serial number
BLE Provisioning GATT …0001 Proximity and claim conditions Network provisioning, binding, and unbinding
BLE Control GATT …0010 HMAC8 Proximity control
ROS 2 offline TTS /tts/say, /tts/result ROS 2 domain Submit speech requests and receive playback results

5.1 UDP local network discovery

The app broadcasts the following payload to UDP :8083:

{"type":"discover"}

RC broadcasts a beacon every two seconds and sends a unicast reply to discovery requests:

{
  "type": "beacon",
  "hostname": "robot_elf3_02",
  "port": 8081,
  "seq": 42,
  "sn": "BXI-EXAMPLE-0001",
  "pairing_protocol": 1
}

The beacon is for discovery only and does not prove the device's identity. Subsequent connections must still pass HMAC authentication.

pairing_protocol=1 means that the robot supports the encrypted Wi-Fi pairing protocol in section 5.3.1. LAN discovery may also open an unauthenticated one-shot probe at ws://<robot>:8081/?user_id=probe; RC returns {type:"welcome",user_id:"probe",session_id,hostname} and immediately closes the connection. A probe cannot send control commands.

5.2 WebSocket control

Standard message envelope:

{
  "type": "control.cmd_vel",
  "ts": 1780000000000,
  "seq": 1,
  "payload": {}
}

App → RC:

type Main payload Purpose
control.cmd_vel vx,vy,wz,height,mode,btn_1..btn_14 Remote control; the sender becomes the active controller
control.heartbeat None Keep the control connection active
control.authz_set authorized_users[] Owner updates the authorization list
control.preflight_abort None Cancel a conflicting startup operation
video.client_stats fps,loss_percent,rtt_ms,bitrate_kbps,width,height,freeze_count Report receiver quality once per second for diagnostics and video.stats; it does not change the fixed encoder bitrate
ping / health ts? / None RTT and health checks
system.reboot / system.shutdown None Privileged power operations
offer / candidate / bye WebRTC fields Signaling
assist.request/cancel/status/extend Assistance parameters Remote assistance
logs.list/open/close name/path/tail Log access
peek.set_domain / peek.clear domain_id / None Set or clear cross-ROS-domain inspection

Velocity control fields must be flat members of payload:

{
  "type": "control.cmd_vel",
  "payload": {
    "vx": 0.2,
    "vy": 0.0,
    "wz": 0.1,
    "height": 1.0,
    "mode": "manual",
    "btn_1": 0,
    "btn_5": 1
  }
}

There is no control.acquire or control.release message. An authenticated client becomes the active controller when it sends control.cmd_vel. Disconnecting the control connection triggers a safe stop. The client should send a control frame or control.heartbeat at intervals shorter than 500 ms. A heartbeat creates a heartbeat_only ControlIntent: it refreshes the deadman timer without overwriting autonomous navigation with a zero-velocity command.

The gateway no longer implements a software E-stop or latched reset. Values mode=2 and safety_state=3 remain permanently unused; E-stop and freeze semantics belong entirely to the motion-control layer. The gateway retains only the connection deadman: after 1500 ms without a ControlIntent by default, it enters STATE_TIMEOUT=2 and zeros the command. Including the two-tick debounce and slew-rate deceleration, worst-case stopping time is approximately 2.1 seconds.

/ws/signaling accepts only offer, candidate, bye, and ping. Send logs.*, peek.*, power, and control commands through the regular / control channel.

Common RC → App messages:

type Purpose
welcome Session and robot information
telemetry.frame Battery, pose, velocity, mode, and faults
control.status Safety, enable state, and input limits
control.manifest Dynamic button and state-machine definitions
control.state Live state-machine state
control.authz_ack Authorization-list update result
control.preflight_conflict Conflicting processes detected before startup
control.controller_disconnected Active controller disconnected; other clients should refresh control state
system.reboot.ack / system.shutdown.ack Power-command acceptance result
assist.status Remote-assistance tunnel status
logs.list_response / logs.chunk / logs.error Log list, content chunks, and errors
peek.error Cross-ROS-domain inspection startup failure
pong / health / error General responses
nav.* Map, localization, path, mapping, and tour data; see the list below
offer/answer/candidate/peer_failed/stop WebRTC signaling
video.stats / video.degraded Video status

The complete set of nav.* message types is:

nav.map                 nav.scan
nav.pose                nav.path.global
nav.costmap.global      nav.costmap.local
nav.footprint           nav.cloud
nav.status              nav.tour.status
nav.mapping.status      nav.runtime.status
nav.reloc_required

Grid and point-cloud payloads use gzip+base64. When a new control connection is established, the gateway replays the most recent navigation states that have latched semantics.

Digital-twin telemetry uses length-prefixed binary frames rather than JSON. The first byte is one of these tags:

tag Content
0xB0 BMS
0xB1 Joint temperatures
0xB2 Joint positions, approximately 20 Hz
0xB3 IMU orientation

5.3 HTTP REST (port 8082)

Except for CORS OPTIONS and the three exact /api/v1/pairing/* routes below, business routes use HTTP v2 HMAC. Pairing cannot use HTTP HMAC before a deviceKey exists, so section 5.3.1 protects it with an X25519 session and AES-256-GCM payloads:

Request-body limits depend on the route: 64 KB for regular and OTA routes, 8 MB for map and mapping routes, and 64 MB after decompressing a gzip grid. Oversized requests are rejected.

Method Path Purpose
POST /api/v1/pairing/session Create a 60-second encrypted pairing session; no HTTP HMAC
POST /api/v1/pairing/bind Submit an encrypted binding payload within the session
DELETE /api/v1/pairing/binding Submit an encrypted owner unbinding proof within the session
GET /api/v1/ota/releases?robot=ELF3 OTA catalog
GET /api/v1/ota/status OTA status
POST /api/v1/ota/start {robot,version,reboot_after,package_names?}
POST /api/v1/ota/reboot/precheck Pre-reboot checks
POST /api/v1/ota/reboot Reboot with {robot}
GET /api/v1/maps Map list
GET /api/v1/maps/{id} Complete map
GET /api/v1/maps/{id}/thumbnail.png Thumbnail
GET /api/v1/maps/{id}/tile/{z}/{x}/{y}.png Map tile
GET/PUT /api/v1/maps/{id}/{waypoints\|regions\|topology} Read or write sidecar data; waypoints is the default route
GET /api/v1/maps/{id}/routes List routes as {routes:[{id,name,updated_sec,waypoint_count}]}
POST /api/v1/maps/{id}/routes Copy a route with {name,source_route_id?}; the source defaults to default; each map allows at most 64 custom routes and returns 409 route_limit_reached at the limit
GET /api/v1/maps/{id}/routes/{route_id} Read {id,name,updated_sec,waypoints,segments}
PUT /api/v1/maps/{id}/routes/{route_id} Write {name?,waypoints,segments?}; returns 204
POST /api/v1/maps/{id}/routes/{route_id}/rename Rename a route with {name}
DELETE /api/v1/maps/{id}/routes/{route_id} Delete a custom route; default returns 409
POST /api/v1/maps/{id}/activate Activate localization and navigation; a 202 response may still be localizing
POST /api/v1/maps/{id}/rename {name}
DELETE /api/v1/maps/{id} Delete a map; returns 409 for the active version or a map with child versions
POST /api/v1/nav/initial_pose {x,y,yaw,frame_id?,cov?}
POST /api/v1/nav/goal {x,y,yaw?,frame_id?}
POST /api/v1/nav/cancel Cancel navigation
POST /api/v1/nav/pause {data:bool}
POST /api/v1/nav/retry Cancel the old goal, clear global/local costmaps, and resend the last direct goal
POST /api/v1/tour/start {map_id,waypoint_ids,route_id?,loop?,speed_scale?,waypoint_headings?}; route_id defaults to default, speed scale is [0.2,1.0], and waypoint_headings maps selected waypoint IDs to finite angles in radians
POST /api/v1/tour/{pause\|resume\|stop\|skip\|retry} Tour control; retry keeps the current waypoint and replans after clearing costmaps
GET /api/v1/tour/status Tour status
GET /api/v1/tour/actions Navigation action catalog derived from the current control.manifest
POST /api/v1/mapping/start {base_map_id?}
POST /api/v1/mapping/stop Stop mapping
POST /api/v1/mapping/save {name,base_map_id?}
POST /api/v1/mapping/pause {data:bool}
POST /api/v1/mapping/clear_terrain {radius}; radius must be a positive finite number
GET /api/v1/mapping/status Mapping status
PUT /api/v1/runtime/mode {mode,map_id?,request_id?}; mode is idle, new_mapping, navigation, or extend_mapping, and the last two require map_id
GET /api/v1/runtime/status Runtime mode and localization quality

A map bundle always contains manifest.json, map.pcd, map.pgm, and map.yaml. A legacy_2d_only map containing only the old PGM/YAML format cannot be activated, used for navigation, or extended; it must be rebuilt with the 3D mapping flow. Extending a map creates an immutable child version and inherits the parent waypoints, regions, topology, and custom-route snapshots.

Route IDs must match [A-Za-z0-9_-]{1,64}. The default route continues to use the legacy /maps/{id}/waypoints endpoint; custom routes are stored under <id>.routes/<route_id>.json. The default route may be renamed but not deleted. Both tour/status and WS nav.tour.status include route_id; clients treat a missing field from old status payloads as default. When an old firmware returns 404 for the routes API, the new App uses only the default route.

The main fields returned by GET /api/v1/runtime/status and WS nav.runtime.status are:

current_mode, desired_mode, transition_id, active_map_id,
localized, fitness_score, inlier_ratio, driver_healthy, last_error

A 202 response from POST /api/v1/maps/{id}/activate means only that the runtime-mode transition was accepted; localization is not complete yet. The app must wait until active_map_id is correct and driver_healthy=true, and treat nav.reloc_required.required=false as the authoritative relocation-success signal. It must not send navigation goals or start a tour while localized=false.

5.3.1 Encrypted Wi-Fi pairing

Only the three exact method-and-path combinations below bypass HTTP v2 HMAC; other /api/v1/pairing/* requests do not receive the pairing exemption. Application payloads remain encrypted and authenticated.

Plaintext body for POST /api/v1/pairing/session:

Field Description
protocol Must be 1
mode cloud or local
client_public_key Base64-encoded 32-byte X25519 public key
client_nonce Base64-encoded 16-byte random value
capability_payload Required for cloud mode on an unbound robot; payload part of the cloud binding token
auth Required for a bound, non-recovery session; HMAC defined below
recover May be true only to read local-binding recovery status; this session cannot bind or unbind

For a bound session, auth is the lowercase hexadecimal HMAC-SHA256 result:

HMAC(deviceKey, "wifi-session-v1|" || mode || "|" ||
     client_public_key_bytes || "|" || client_nonce_bytes)

A successful response contains protocol, a 32-hex-character session_id, Base64 robot_public_key, Base64 robot_nonce, expires_at, a Base64 12-byte nonce, and ciphertext. Derive the session key as follows:

shared = X25519(client_private_key, robot_public_key)
session_key = HKDF-SHA256(
  IKM  = shared || PSK,
  salt = client_nonce || robot_nonce,
  info = "bxi-wifi-pairing-v1|" || hex_decode(session_id),
  len  = 32
)

Choose PSK as follows: use deviceKey for a bound non-recovery session; use the Base64-decoded signature bytes from the binding token for an unbound cloud session; use an empty value for an unbound local or read-only recovery session.

Requests and responses for POST /api/v1/pairing/bind and DELETE /api/v1/pairing/binding use this envelope:

{"session_id":"32 hex characters","nonce":"Base64 12 bytes","ciphertext":"Base64 AES-GCM ciphertext and tag"}

The AES-256-GCM plaintext must be a UTF-8 JSON object. RC serializes responses as compact canonical JSON with sorted keys. AAD must match these bytes exactly:

bxi.pairing.v1|<HTTP_METHOD>|<PATH>|<session_id>

Decrypted bind payloads:

  • cloud: sn, credential_id, a 32-byte hexadecimal owner_key, and the complete token;
  • local: sn, owner_uid, credential_id, a 32-byte hexadecimal owner_key, kdf_salt, kdf_iterations, and kdf_id.

The decrypted unbinding payload contains proof, the hexadecimal result of:

HMAC(deviceKey, "wifi-unbind-v1|" || session_id || "|" || sn)

Sessions expire after 60 seconds. A bind or binding request consumes the session, preventing replay.

5.4 BLE Control GATT

Service/characteristic UUID suffix Properties Purpose
Control Service 00000010 service BLE control
CONTROL_CMD 00000011 write/write-without-response HMAC control frame
CONTROL_GUEST_AUTH 00000012 write Guest authorization proof
CONTROL_STATUS 00000013 read/notify 3-byte status frame
CONTROL_MANIFEST 00000014 read/notify Dynamic button manifest
CONTROL_SM_STATE 00000015 read/notify State-machine state

Send a 24-byte extended header to CONTROL_CMD. RC accepts the legacy 22-byte header without btn_slot and btn_val only for backward compatibility:

[ver u8=0x03][auth u8][seq u16 LE]
[vx f32 LE][vy f32 LE][wz f32 LE][height f32 LE]
[buttons u16 LE][btn_slot u8][btn_val u8][HMAC tag]

auth=0/1/2 means no tag, a 4-byte truncated HMAC-SHA256, or an 8-byte truncated HMAC-SHA256. The HMAC covers the complete 22- or 24-byte header. A bound robot requires auth=2 by default; an unbound factory-state robot accepts only auth=0. seq is a monotonically increasing u16 used for replay rejection. Use the buttons bitmap for regular buttons and btn_slot plus btn_val for multivalue actions.

CONTROL_MANIFEST and CONTROL_SM_STATE use chunked transfer with chunks of approximately 180 bytes:

[total_len:u16 little-endian][offset:u16 little-endian][chunk...]

Write each chunk into the receive buffer at offset, and parse the JSON only after all total_len bytes have arrived.

Status frame:

[ver u8=0x03][flags u8][safety u8]

flags: 0x01 RUNNING, 0x02 LOCKED, 0x04 FAILED, 0x08 PENDING, 0x10 UNAUTHORIZED, and 0x20 PREFLIGHT_CONFLICT. PREFLIGHT_CONFLICT means that RC found leftover robot processes before startup; the app should confirm with the user before resending a forced start action.

5.5 ROS 2 Offline TTS

bxi_offline_tts subscribes to /tts/say using std_msgs/msg/String. Plain text uses the female voice by default. To select a voice explicitly, set data to a JSON string.

JSON field Type Description
text string Text to speak; required
voice string female or male; defaults to female
speed number Speech rate from 0.5 to 2.0; defaults to 1.0
# Female voice (default)
ros2 topic pub --once /tts/say std_msgs/msg/String "{data: 'Welcome to VKBOTS.'}"

# Female voice (explicit)
ros2 topic pub --once /tts/say std_msgs/msg/String \
  "data: '{\"text\":\"Welcome to VKBOTS.\",\"voice\":\"female\",\"speed\":1.0}'"

# Male voice
ros2 topic pub --once /tts/say std_msgs/msg/String \
  "data: '{\"text\":\"Welcome to VKBOTS.\",\"voice\":\"male\",\"speed\":1.0}'"

After playback succeeds or fails, the node publishes a std_msgs/msg/String JSON result on /tts/result:

{"text":"Welcome to VKBOTS.","success":true,"message":""}

A tour waypoint actions entry can also select the voice:

{"id":"say-welcome","type":"voice","content":"Welcome to VKBOTS.","voice":"male"}

Omitting voice selects female. Tour voice actions currently use a fixed speed=1.0.

6. Maintenance mode

Maintenance mode supports factory testing, repair, and on-site service. It works regardless of whether the robot is unbound, cloud-bound, or locally bound. It does not modify binding.json, cloud membership, or the original owner. The maintenance credential takes priority only for that maintenance session; after it becomes invalid, the robot continues using its original binding authentication.

6.1 Generate a credential on the robot

Use the deployment wrapper from the robot shell:

sudo /opt/bxi/bxi_rc_ros2/scripts/bxi_maintenance.sh enable
sudo /opt/bxi/bxi_rc_ros2/scripts/bxi_maintenance.sh enable --minutes 120
  • The default lifetime is 1440 minutes, or 24 hours.
  • The allowed range is 30 to 10080 minutes, with a maximum of 7 days.
  • The command creates /var/lib/bxi/maintenance.json with mode 0600 and prints a text credential beginning with BXIM1. only once when it is created.
  • When stdout is an interactive terminal and qrencode is installed, it also prints a complete ANSI UTF-8 QR code. The text credential is always printed.
  • Transfer the complete credential to the app by protected copy or QR code. No account login, SMS verification, or cloud approval is required.

The wrapper uses /opt/bxi/bxi_rc_ros2 by default. CI or custom installations can override it with BXI_RC_ROS2_INSTALL_DIR. If the ROS2/install environment is already sourced, bxi-maintenance may also be run directly.

Status does not print the key again:

sudo /opt/bxi/bxi_rc_ros2/scripts/bxi_maintenance.sh status

Revoke it immediately:

sudo /opt/bxi/bxi_rc_ros2/scripts/bxi_maintenance.sh disable

Removing a maintenance code from an app only deletes that app's local copy. It does not revoke the robot-side credential. To revoke early, run disable on the robot or generate a new credential to replace the old one.

6.2 VKBOTSM1 credential

The credential format is:

BXIM1.<base64url(JSON, without padding)>

The decoded JSON contains:

{
  "version": 1,
  "credential_id": "32 lowercase hexadecimal characters",
  "user_id": 2147483645,
  "sn": "BXI-EXAMPLE-0001",
  "key_hex": "64 hexadecimal characters encoding a 32-byte key",
  "created_at": 1780000000,
  "expires_at": 1780007200
}

The app must strictly validate the prefix, exact field set, UID, serial number, key length, creation time, and expiry. The credential contains a control key and must be handled like a password: never upload it, log it, or keep it in long-term plaintext storage.

6.3 Maintenance authentication

WebSocket and HTTP use the exact HMAC formats in section 4 with the following values from the maintenance credential:

user_id = 2147483645
sn      = token.sn
key     = hexDecode(token.key_hex)

For BLE maintenance control, first write UTF-8 JSON to CONTROL_GUEST_AUTH. Its signature uses the WS message format:

{
  "maintenance": true,
  "user_id": "2147483645",
  "sn": "BXI-EXAMPLE-0001",
  "ts": "1780000000000",
  "nonce": "a new random value",
  "sig": "Base64 HMAC-SHA256 signature"
}

After connection-scoped maintenance authentication succeeds, send the HMAC8 control frames described in section 4.3 using the maintenance key. Existing WS and BLE maintenance sessions are invalidated when the credential expires, is deleted, or is replaced.

6.4 Permission boundary

A maintenance credential allows:

  • motion control, state, video, and telemetry;
  • log access, reboot, and shutdown;
  • remote assistance;
  • OTA and HTTP management operations;
  • maps, navigation, mapping, and tours.

A maintenance credential does not allow:

  • control.authz_set;
  • device sharing or authorization-list changes;
  • owner unbinding;
  • creating, replacing, or changing a cloud or local binding.

7. Minimum integration flows

Local password binding:

  1. Read the actual serial number, binding state, and KDF metadata from BLE HELLO_ACK.
  2. Only for an unbound robot, ask the user to set a local password and generate a 16-byte salt.
  3. Derive the key with PBKDF2, send the complete local BIND_START, and validate BIND_OK.
  4. Save the serial number, BLE-device mapping, credential ID, and securely stored key only after binding succeeds.
  5. Find the robot through a UDP beacon, BLE HELLO, or a previously saved address.
  6. Generate WS, HTTP, or BLE HMAC authentication with the UID, serial number, and key.
  7. Connect to :8081 for state and control; call :8082 when required, or send BLE HMAC8 control frames.

Maintenance access:

  1. Generate a time-limited BXIM1 credential on the robot.
  2. Import and validate it locally in the app without an app-cloud request.
  3. Authenticate WS, HTTP, or BLE using the maintenance UID, serial number, and key.
  4. Run sudo /opt/bxi/bxi_rc_ros2/scripts/bxi_maintenance.sh disable on the robot when service is complete.

8. Developer quick start

The examples use Python 3.10+ and the standard library for KDF, HMAC, and HTTP. Install websockets for the control connection. The same byte-level rules can be moved to Android, iOS, Flutter, or another client.

8.1 Derive the local device key

The local-password path does not call a customer service. The robot fixes the owner UID and KDF parameters; the app generates and stores the 16-byte salt with the binding record.

import hashlib


def device_key_from_password(password: str, salt_hex: str) -> bytes:
    raw = password.encode("utf-8")
    if not 8 <= len(raw) <= 64 or any(b < 0x20 or b > 0x7e for b in raw):
        raise ValueError("password must be 8..64 printable ASCII bytes")
    salt = bytes.fromhex(salt_hex)
    if len(salt) != 16:
        raise ValueError("salt must be 16 bytes")
    return hashlib.pbkdf2_hmac("sha256", raw, salt, 200_000, 32)


password = "my-robot-password"
salt_hex = "22" * 16  # Generate with secrets.token_bytes(16) in production
device_key = device_key_from_password(password, salt_hex)
print(device_key.hex())  # Example only; never log the real key

Send the resulting raw 32-byte key in the local BIND_START request, together with UID 2147483646, the salt, kdf_iterations=200000, and kdf_id=1. After BIND_OK, keep the key only in platform secure storage. The encrypted Wi-Fi flow can carry the same local-claim fields; see section 5.3.1. A mode=local,recover=true session is read-only and returns KDF metadata so a new client can verify the password before normal authentication.

8.2 Complete local bind for an unbound robot

Once the robot is activated and reachable on :8082, the local bind is just one encrypted bind request. If it has no IP yet, configure Wi-Fi first through BLE Provisioning (WIFI_SCAN / WIFI_JOIN). The following continues the Wi-Fi helper from section 5.3.1:

import secrets

# Uses open_session(), seal(), post(), and unseal() from your implementation
# of the encrypted session in section 5.3.1.

SN = "BXI-EXAMPLE-0001"  # Read from BLE HELLO_ACK
PASSWORD = "my-robot-password"
SALT = secrets.token_bytes(16)
CREDENTIAL_ID = secrets.token_urlsafe(24)

owner_key = device_key_from_password(PASSWORD, SALT.hex())
session_key, session_id, status = open_session(mode="local")
assert status == {"bound": False, "sn": SN, "binding_mode": "unbound"}

request = seal(session_key, "POST", PATH_BIND, session_id, {
    "sn": SN,
    "owner_uid": 2147483646,
    "credential_id": CREDENTIAL_ID,
    "owner_key": owner_key.hex(),
    "kdf_salt": SALT.hex(),
    "kdf_iterations": 200000,
    "kdf_id": 1,
})
result = unseal(session_key, "POST", PATH_BIND, session_id,
                post(PATH_BIND, request))
assert result["status"] == "bound" and result["sn"] == SN

Store owner_key only after checking the returned UID, serial number, credential ID, and fingerprint. The robot never returns the key. Do not log the password or key. Use this same key for the WS HMAC query in section 8.3.

8.3 Build the WS URL and an HTTP request

import base64
import hashlib
import hmac
import json
import secrets
import time
import urllib.request
from urllib.parse import urlencode

HOST = "192.168.88.162"
UID = "2147483646"
SN = "BXI-EXAMPLE-0001"
DEVICE_KEY = bytes.fromhex("11" * 32)  # Load from secure storage


def hmac_b64(message: str) -> str:
    return base64.b64encode(
        hmac.new(DEVICE_KEY, message.encode(), hashlib.sha256).digest()
    ).decode("ascii")


def ws_url(path: str = "/", client_id: str = "py_demo") -> str:
    ts = str(int(time.time() * 1000))
    nonce = secrets.token_urlsafe(18)
    query = {"user_id": UID, "client_id": client_id, "sn": SN,
             "ts": ts, "nonce": nonce,
             "sig": hmac_b64(f"ws|{UID}|{SN}|{ts}|{nonce}")}
    return f"ws://{HOST}:8081{path}?{urlencode(query)}"


def http_json(method: str, path: str, payload):
    method = method.upper()
    body = (b"" if payload is None else
            json.dumps(payload, ensure_ascii=False,
                       separators=(",", ":")).encode())
    ts = str(int(time.time() * 1000))
    nonce = secrets.token_urlsafe(18)
    digest = hashlib.sha256(body).hexdigest()
    message = f"http.v2|{method}|{path}|{digest}|{UID}|{SN}|{ts}|{nonce}"
    query = {"auth_v": "2", "user_id": UID, "sn": SN, "ts": ts,
             "nonce": nonce, "sig": hmac_b64(message)}
    request = urllib.request.Request(
        f"http://{HOST}:8082{path}?{urlencode(query)}",
        data=body if payload is not None else None,
        headers={"Content-Type": "application/json"}, method=method)
    with urllib.request.urlopen(request, timeout=10) as response:
        return json.loads(response.read())

The HTTP signature must hash the exact body bytes sent on the wire. WS and HTTP share the key, but not the canonical message. For a guest connection, use the share token's subkey and add the complete share_token query field.

8.4 Send WS control parameters

import asyncio
import json
import time
import websockets


async def control() -> None:
    async with websockets.connect(ws_url()) as ws:
        await ws.send(json.dumps({
            "type": "control.cmd_vel",
            "ts": int(time.time() * 1000), "seq": 1,
            "payload": {
                "vx": 0.2, "vy": 0.0, "wz": 0.1,
                "height": 1.0, "mode": "manual",
                "btn_1": 0, "btn_5": 1,
            },
        }))
        await ws.send(json.dumps({
            "type": "control.heartbeat",
            "ts": int(time.time() * 1000), "seq": 2, "payload": {},
        }))
        print(await ws.recv())


asyncio.run(control())

vx, vy, wz, height, and btn_1..btn_14 are flat fields under payload; do not add a nested cmd_vel object. Sending control.cmd_vel implicitly takes control. Send control frames while moving and a heartbeat at least every 500 ms while idle. A disconnected link or roughly 1.5 seconds without a fresh control intent triggers the gateway timeout stop. There is no control.acquire, control.release, mode:"estop", or E-stop reset message.

8.5 Map activation, relocation, and navigation

Recommended sequence:

maps = http_json("GET", "/api/v1/maps", None)
http_json("POST", "/api/v1/maps/demo_map/activate", None)

# Continue consuming the control WS; do not use a fixed sleep(20):
# 1. Wait for nav.runtime.status.payload.active_map_id == "demo_map"
# 2. Wait for current_mode in {"localizing", "navigation"}
# 3. Confirm driver_healthy == true and last_error is empty

http_json("POST", "/api/v1/nav/initial_pose",
          {"x": 0.0, "y": 0.0, "yaw": 0.0, "frame_id": "map"})

# Wait for nav.reloc_required.payload.required == false and the latest
# nav.runtime.status.payload.localized == true before sending a goal.
http_json("POST", "/api/v1/nav/goal",
          {"x": 2.0, "y": 1.0, "yaw": 0.0, "frame_id": "map"})

Track navigation progress through nav.status. If map activation, initial pose, or localization fails, show last_error and stop the sequence instead of sending more goals that the server will reject.

9. Security requirements

  • Never place robot cloud credentials or server-side keys in the app.
  • Store the deviceKey and maintenance key only in the app's system security storage and in the robot's local storage. Never write either value to logs or analytics.
  • Use the current time and a new random nonce for every WS connection and HTTP request.
  • For HTTP, sign the exact final body bytes that will be sent.
  • Keep WS, HTTP, and BLE HMAC authentication enabled in production builds.
  • Local password binding can only bind an unbound robot; it cannot forcibly replace the owner.
  • Local mode cannot recover keys from the cloud. The app should provide a secure backup notice and an entry point for device reset.
  • Save a BLE-device mapping only after password verification or a successful BIND_OK; canceling password setup must not leave a false bound or recoverable-device record.
  • Keep BXIM1 credentials short-lived and revoke them when the task is complete instead of relying only on expiry.

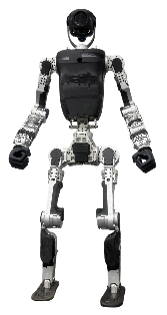
VKBOTS Tool User Guide

1. Software Overview

Basic Information

  • Name: BXI_Tool
  • Icon: logo
  • Version: Latest
  • Languages: Chinese and English (switch in the top-right corner)
  • Download: Go to Download Page

Interface Overview (Left Menu)

Interface Overview
Menu Description
Serial Quickly check motor output messages
Debug Control the motor in MIT mode
Calibration Complete magnetic encoder calibration
Config Modify motor parameters
Firmware Upgrade motor firmware

2. Connect Motor via bxi_usb2can

2.1 Connect Serial Port

Use a USB-to-Type-C cable to connect the debugger to your computer:

  • Type-C side to the debugger
  • USB side to the computer

Find the correct COM port:

  • Windows: right-click Start icon 鈫?Device Manager
  • Expand "Ports (COM & LPT)"
  • Find the COM port under "USB Serial Device" (e.g. COM20, COM31)

COM Example

Open bxi_tool, then select the corresponding port from the top-left port dropdown. If no port appears, click refresh.

Connect and Refresh Example

2.2 Select Target

Connection Example

When the debugger is connected for the first time, it outputs a target selection menu:

  • Input 1~8: communicate with the motor whose can_id matches that number
  • Input 9: receive output from all motors on the CAN bus, and use the latest received can_id as output ID

Example: choose 9.

Selection Example

2.3 Connect Motor

Connect the motor and debugger through the 2+2 interface:

  • Thicker wire: power line
  • Thinner wire: signal line (red = H, black = L)

Recommended power input:

  • Voltage: 24~48V
  • Current: 3~5A

After power-on, observe motor serial output.

Motor Power-on Output Example


3. Serial Page

Used to view motor output and basic communication information.

Serial Page


4. Debug Page

Used for MIT control debugging, command sending, and status monitoring.

Debug Page


5. Config Page

Used to modify motor parameters and communication settings.

Config Page

After connecting and powering on the motor, enter the left menu Config page to edit parameters.

5.1 CAN BUS Settings

Scroll down to the CAN BUS section to modify CAN communication parameters.

Key parameters:

  • can_id: motor ID (the motor receives control frames sent to this ID)
  • master_id: target sender ID (the motor sends feedback to this ID)

Common operations:

  • Read ID: up arrow
  • Write ID: down arrow

Rules:

  • Writing can_id will also update master_id = can_id | 0x010
  • master_id can also be written independently
  • If you want to change only can_id while keeping a specific master_id, write master_id again after updating can_id

CAN BUS Section

5.2 Save Parameters

To keep parameters after power-off, use the "Save Parameters" button at the bottom-right after modification.

Save Parameters Button


6. Calibration Page

Used to run the magnetic encoder calibration process.

Calibration Page


7. Firmware Page

Used to upgrade motor firmware.

Firmware Page

Firmware Update Procedure

  1. Select the firmware file path in the center of the page.
  2. Start the firmware update and wait for the progress bar to complete. Do not disconnect the power supply or communication connection during the update.
  3. After the update is complete, click the Switch to APP button to switch the motor to the APP.
  4. Return to the serial terminal and verify that the motor's power-on output is normal.

VKBOTS5014-19 Joint Motor

VKBOTS Hollow Planetary Series — Motor Specifications


Engineering Drawing

  • Mounting OD: 64.00 mm
  • Height: 66.50 mm
  • Hollow Bore: 6 mm

VKBOTS50 Engineering Drawing


Specifications

Parameter Value Unit
Rated Voltage 24–58 V
No-load Speed 200 RPM
Rated Output Speed 100 RPM
Rated Torque 7 Nm
Peak Torque 25 Nm
Peak Phase Current 17 A(rms)
Gear Ratio 19.5 —
Moment of Inertia 0.00424198 kg·m²
Weight 0.5 kg

Note: All parameters above are theoretical values and may vary under actual operating conditions.


Interface & Sensor Definitions

Item Specification
Communication CAN / CANFD
Protocol MIT Protocol Compatible
Control Mode Mixed Torque / Velocity / Position
Bearing Type Cross Roller Bearing
Dual Absolute Encoder Supported
Input Encoder Magnetic Encoder (16-bit)
Output Encoder Inductive Encoder

Performance Curves

Torque–Current Curve

VKBOTS50 Torque-Current

Test conditions: Voltage 57 V; Speed 50 RPM

Torque–Speed Curve

VKBOTS50 Torque-Speed

Test conditions: Voltage 57 V


Specifications may be updated or revised. For more information, visit vkbots.com.

VKBOTS5018-19 Joint Motor

VKBOTS Hollow Planetary Series — Motor Specifications (VKBOTS50 Long Version)


Engineering Drawing

  • Mounting OD: 64.00 mm
  • Height: 70.50 mm
  • Hollow Bore: 6 mm

VKBOTS50L Engineering Drawing


Specifications

Parameter Value Unit
Rated Voltage 24–58 V
No-load Speed 200 RPM
Rated Output Speed 100 RPM
Rated Torque 11 Nm
Peak Torque 35 Nm
Peak Phase Current 22 A(rms)
Gear Ratio 19.5 —
Moment of Inertia 0.00524292 kg·m²
Weight 0.55 kg

Note: All parameters above are theoretical values and may vary under actual operating conditions.


Interface & Sensor Definitions

Item Specification
Communication CAN / CANFD
Protocol MIT Protocol Compatible
Control Mode Mixed Torque / Velocity / Position
Bearing Type Cross Roller Bearing
Dual Absolute Encoder Supported
Input Encoder Magnetic Encoder (16-bit)
Output Encoder Inductive Encoder

Performance Curves

Torque–Current Curve

VKBOTS50 Torque-Current

Test conditions: Voltage 57 V; Speed 50 RPM

Torque–Speed Curve

VKBOTS50 Torque-Speed

Test conditions: Voltage 57 V


Specifications may be updated or revised. For more information, visit vkbots.com.

VKBOTS7010-19 Joint Motor

VKBOTS Hollow Planetary Series — Motor Specifications


Engineering Drawing

  • Mounting OD: 81.00 mm
  • Height: 68.00 mm
  • Hollow Bore: 9 mm

VKBOTS70 Engineering Drawing


Specifications

Parameter Value Unit
Rated Voltage 24–58 V
No-load Speed 200 RPM
Rated Output Speed 100 RPM
Rated Torque 15 Nm
Peak Torque 48 Nm
Peak Phase Current 40 A(rms)
Gear Ratio 19.5 —
Moment of Inertia 0.0137351 kg·m²
Weight 0.8 kg

Note: All parameters above are theoretical values and may vary under actual operating conditions.


Interface & Sensor Definitions

Item Specification
Communication CAN / CANFD
Protocol MIT Protocol Compatible
Control Mode Mixed Torque / Velocity / Position
Bearing Type Cross Roller Bearing
Dual Absolute Encoder Supported
Input Encoder Magnetic Encoder (16-bit)
Output Encoder Inductive Encoder

Performance Curves

Torque–Current Curve

VKBOTS70 Torque-Current

Test conditions: Voltage 57 V; Speed 50 RPM

Torque–Speed Curve

VKBOTS70 Torque-Speed

Test conditions: Voltage 57 V


Specifications may be updated or revised. For more information, visit vkbots.com.

VKBOTS8515-19 Joint Motor

VKBOTS Hollow Planetary Series — Motor Specifications


Engineering Drawing

  • Mounting OD: 99.00 mm
  • Height: 73.00 mm
  • Hollow Bore: 10 mm

VKBOTS85 Engineering Drawing


Specifications

Parameter Value Unit
Rated Voltage 24–58 V
No-load Speed 200 RPM
Rated Output Speed 100 RPM
Rated Torque 40 Nm
Peak Torque 150 Nm
Peak Phase Current 125 A(rms)
Gear Ratio 19.5 —
Moment of Inertia 0.044688 kg·m²
Weight 1.4 kg

Note: All parameters above are theoretical values and may vary under actual operating conditions.


Interface & Sensor Definitions

Item Specification
Communication CAN / CANFD
Protocol MIT Protocol Compatible
Control Mode Mixed Torque / Velocity / Position
Bearing Type Cross Roller Bearing
Dual Absolute Encoder Supported
Input Encoder Magnetic Encoder (16-bit)
Output Encoder Inductive Encoder

Performance Curves

Torque–Current Curve

VKBOTS85 Torque-Current

Test conditions: Voltage 57 V; Speed 50 RPM

Torque–Speed Curve

VKBOTS85 Torque-Speed

Test conditions: Voltage 57 V


Specifications may be updated or revised. For more information, visit vkbots.com.

Gripper Introduction

The gripper module uses the VKBOTS gripper motor firmware for gripping, opening, closing, and end-effector applications.

Main Features

  • CAN / CAN FD bus communication.
  • MIT control mode support.
  • MIT control frames use physical position, velocity, and gripper-force values.
  • Position is expressed in mm, velocity in mm/s, and feed-forward force in N.
  • Runtime status, temperature, and AUX polling feedback are supported.

Main Parameters

Parameter Range or specification Recommended Description
Position 0 mm when closed, approximately 70 mm when open — Actual position depends on the gripper mechanism
Protocol encoding range 0–90 mm — Firmware protocol mapping range
Maximum force 50: approximately 16.37 N; 50L: approximately 24.03 N — Positive force closes; negative force opens
kp 0–5 2 Position stiffness
kd 0–1 0.05 Velocity damping
MIT control frame 8 bytes — Standard 11-bit CAN ID

The theoretical feed-forward force range differs between the 50 and 50L grippers. The actual usable gripping force is also affected by the mechanical structure, power supply, and thermal protection. See the Gripper Communication Guide for detailed communication ranges, frame formats, and register definitions.

Usage Recommendations

  1. Confirm the gripper zero position, opening direction, closing direction, and mechanical limits before first use.
  2. Start with kp=2 and kd=0.05.
  3. Begin with a low target velocity and small feed-forward force, then tune the parameters based on the actual response.
  4. Use 0 mm for closed and approximately 70 mm for open; do not treat the protocol upper limit of 90 mm as the actual opening position.
  5. Configure non-conflicting CAN IDs when multiple grippers are used simultaneously.

Gripper Communication Guide

The communication interface uses standard 11-bit CAN IDs and MIT control frames.

This communication guide applies to all gripper firmware versions in the 0.3.x and 1.4.x series.

1. Firmware and Parameter Overview

The gripper MIT frame uses physical units rather than the ordinary joint-motor units:

Field Ordinary joint motor Gripper motor
Position rad mm
Velocity rad/s mm/s
kp Configuration dependent 0–5
kd Configuration dependent 0–1
t_ff / reply torque N·m Gripper force in N

The recommended initial gains are:

kp = 2.00
kd = 0.05

2. CAN Bus Parameters

The gripper uses the same CAN/CAN FD communication method as the joint module. See the Joint-Module CAN Communication Guide for the common communication overview.

The current gripper communication configuration is a 1 Mbps FDCAN nominal rate, a 5 Mbps data-phase rate, and CAN FD BRS. MIT command and reply frames are 8 bytes long.

Item Configuration
Bus interface FDCAN / CAN FD
Standard ID 11-bit standard frame ID
Nominal rate 1 Mbps
Data-phase rate 5 Mbps (CAN FD BRS)
MIT frame length 8 bytes
Byte order MIT bit fields use the layout below; register fields are little-endian

The firmware uses the received frame format for its reply. Keep CAN/CAN FD and BRS settings consistent between the host and the gripper.

3. CAN IDs

The general rules for CAN IDs, MIT unicast, broadcast, and reply IDs are the same as for the joint module. See:

The following only lists the gripper defaults and usage.

3.1 MIT Unicast Control

MIT control frames are sent to the gripper can_id. The default configuration is:

can_id    = 1
master_id = can_id | 0x010 = 0x011

The gripper sends replies to master_id, and data[0] in the reply contains the gripper's own can_id.

Frame type CAN ID Description
MIT unicast control can_id Node 1 uses 0x001 by default
MIT broadcast control 0x7FF Carries one 8-byte control block per node
MIT reply master_id Node 1 replies to 0x011 by default

In a broadcast frame, node n uses the 8-byte block at offset (n - 1) × 8. The DLC must cover the block for the target node.

3.2 Configuration Register CAN IDs

Configuration register commands use:

CAN ID = (cmd << 4) | can_id

For the default node can_id=1:

Command cmd CAN ID Request DLC
REG_READ 0x17 0x171 4
REG_WRITE 0x18 0x181 8
REG_SAVE 0x19 0x191 0
REG_INFO 0x1A 0x1A1 0

Configuration-register commands respond only to the target unicast ID. They do not support broadcast register reads or writes.

4. MIT Control Frame

The MIT byte layout, bit widths, and packing method are the same as for the joint module. See the MIT Mode Master Control Frame and Bit Width Description.

The gripper physical ranges and sign convention differ from ordinary joint motors; use the definitions in Gripper Communication Ranges below.

5. Gripper Communication Ranges

5.1 Position

The gripper MIT bus position meaning is:

p_des = 0 mm   -> closed
p_des ≈ 70 mm  -> open

The recommended physical positions for the current gripper are 0 mm when closed and approximately 70 mm when open. The protocol and firmware protection ranges are:

Protocol encoding range: 0–90 mm
Firmware protection range: 0–80.55 mm

The firmware clamps the target and feedback position to 0–80.55 mm, but the host should use the actual approximately 70 mm open position as the application target. Do not treat 90 mm as the actual opening position.

Position encoding:

p_raw = uint16((p_des / 90.0) × 65535)
p_des = p_raw / 65535 × 90.0 mm

5.2 Velocity

The gripper velocity mapping range is calculated from the max_vel configuration register:

v_limit = round(89.5 × max_vel / 2π) mm/s
v_des   = -v_limit to +v_limit mm/s

The default max_vel=45 rad/s corresponds to approximately:

v_des = -642 to +642 mm/s

Velocity encoding:

v_raw = uint12((v_des + v_limit) / (2 × v_limit) × 4095)
v_des = v_raw / 4095 × (2 × v_limit) - v_limit

5.3 kp and kd

Parameter Communication range Recommended Description
kp 0–5 2 Position stiffness
kd 0–1 0.05 Velocity damping
kp_raw = uint12(kp / 5.0 × 4095)
kd_raw = uint12(kd / 1.0 × 4095)

5.4 Feed-forward Force t_ff

The MIT t_ff field represents gripper force in N. Its range is calculated from the current limit:

F_limit = current_limit × 0.07 × 1 / (2 × 0.007125)
t_ff    = -F_limit to +F_limit N

The theoretical default ranges are:

Build Default current limit Theoretical force range
50 gripper 10/3 A Approximately -16.37 to +16.37 N
50L gripper 14.6667/3 A Approximately -24.03 to +24.03 N

Sign convention:

  • Positive force/positive torque closes the gripper.
  • Negative force/negative torque opens the gripper.
  • Maximum force magnitude: approximately 16.37 N for the 50 gripper and 24.03 N for the 50L gripper.

The actual usable gripping force is affected by the mechanism, friction, supply voltage, temperature, and current derating.

t_raw = uint12((t_ff + F_limit) / (2 × F_limit) × 4095)
t_ff  = t_raw / 4095 × (2 × F_limit) - F_limit

When t_raw is 0x7FF or 0x800, the firmware decodes it as exactly zero feed-forward force.

6. MIT Reply Frame

For the common reply layout and master_id rules, see the Joint-Module Motor Response Frame. The gripper position, velocity, and force fields use the physical ranges in Section 5.

For default NTC decoding, AUX polling format, and polling order of data[6] and data[7], see the MIT Polling Reply Guide. Writing 1 to register 0x6D switches the last two bytes to AUX polling data.

7. Configuration Register Communication

The gripper register configuration function is consistent with the joint-module implementation. For register commands, request and reply formats, save operations, information queries, data types, and write levels, see the Motor Register Communication Protocol. The sections below only list commonly used registers and gripper-specific parameter ranges.

7.1 Request and Reply Format

Register requests use little-endian byte order. float values use IEEE754 single-precision format.

REG_READ request:
  data[0..3] = address

REG_WRITE request:
  data[0..3] = address | (value_type << 8)
  data[4..7] = value_raw

Reply:
  data[0..3] = status | (value_type << 8)
  data[4..7] = value_raw
value_type Type
0 int32_t
1 bool
2 float
3 uint32_t
4 version

7.2 Common Gripper Registers

Address Parameter Type Communication range Description
0x60 can_id int32_t Writable in menu/error state Gripper node ID
0x61 master_id int32_t Writable in menu/error state Reply target ID, default can_id \| 0x010
0x63 can_timeout_ms int32_t Runtime read/write CAN timeout; 0 disables it
0x66 mit_mode bool Writable in menu/error state MIT protocol switch
0x67 max_pos float Runtime read/write Ordinary motor position parameter; gripper bus range is fixed at 0–90 mm
0x68 max_vel float Runtime read/write Used to calculate gripper velocity range; default 45 rad/s
0x69 max_tor float Runtime read/write Torque limit configuration
0x6A kp_max float Runtime read/write kp mapping upper limit; gripper limit is 5
0x6B kd_max float Runtime read/write kd mapping upper limit; gripper limit is 1
0x6D mit_aux_enable bool Runtime read/write Switches data[6..7] to AUX polling
0x7C config_version version Read only Configuration layout version

7.3 Register Write Levels

Level Meaning
0 Runtime read/write
1 Writable only in menu or error state
2 System communication parameter; writable only in menu or error state
3 Read only

Register writes modify RAM only. To persist a setting across power cycles, confirm status=0 and then send REG_SAVE. mit_aux_enable is runtime-only and returns to 0 after power-up, configuration read, or configuration save.

8. Communication Examples

For node 1, write kd_max=1.0. The little-endian IEEE754 representation of float 1.0 is 00 00 80 3F:

CAN ID: 0x181
DLC:    8
DATA:   6B 02 00 00 00 00 80 3F

Read kd_max:

CAN ID: 0x171
DLC:    4
DATA:   6B 00 00 00

Example MIT command: target position 40 mm, velocity 0 mm/s, kp=2, kd=0.05, and feed-forward force 0 N:

CAN ID: 0x001
DLC:    8
DATA:   71 C6 7F F6 66 0C C7 FF

The example uses p_raw=0x71C6, v_raw=0x7FF, kp_raw=0x666, and kd_raw=0x0CC. Zero feed-forward force uses t_raw=0x7FF.

9. Usage and Safety Notes

  1. Read can_id, master_id, config_version, and kd_max before first use.
  2. Confirm the gripper zero position, direction, and mechanical limits; 0 mm is closed and approximately 70 mm is open, while the protocol range 0–90 mm is not the actual opening position.
  3. Start with kp=2 and kd=0.05, using a low target velocity and small t_ff.
  4. MIT control frames should be sent continuously. If can_timeout_ms is non-zero, keep the command period below the timeout.
  5. When using broadcast control, reserve the correct 8-byte block for each node and avoid CAN ID conflicts.
  6. Change can_id, master_id, and MIT mode only in the allowed state, confirm the write response, and save the configuration when needed.

CAN Communication Guide

This document describes the CAN/CANFD communication protocol of the VKBOTS actuator in MIT control mode.

1. Communication Overview

The motor uses CANFD communication and is compatible with classic CAN. The motor replies using the same frame format as the received CANFD/CAN frame, so frame type and variable bitrate usually do not need separate configuration.

  • Max CANFD bitrate: 1M + 5M
  • Bitrate without variable bitrate: 1M

By function, frames are divided into:

  • Master control frame: control commands sent from upper controller to motor
  • Motor response frame: motor status feedback sent from motor to upper controller

2. MIT Mode Master Control Frame (8 Bytes)

2.1 Data Layout

Control Frame D[0] D[1] D[2] D[3] D[4] D[5] D[6] D[7]
ID p_des[15:8] p_des[7:0] v_des[11:4] v_des[3:0] \| Kp[11:8] Kp[7:0] Kd[11:4] Kd[3:0] \| t_ff[11:8] t_ff[7:0]

2.2 Field Description

  • Frame ID: equals target motor can_id, default 1; broadcast frame uses 0x7FF
  • p_des: position command value
  • v_des: velocity command value
  • Kp: position proportional gain
  • Kd: position differential gain
  • t_ff: torque feedforward value

2.3 Default Parameter Ranges

Kp / Kd ranges (configurable via upper computer)

Parameter Applicable object Range
Kp General [0, 500]
Kd MOTOR_50 [0, 5]
MOTOR_50_L [0, 5]
MOTOR_70 [0, 5]
MOTOR_85 [0, 20]
MOTOR_J3505 [0, 5]
MOTOR_J3510 [0, 5]

p_des / v_des / t_ff ranges (configurable via upper computer)

Parameter Applicable object Range
p_des General [-12.5, 12.5]
v_des General [-45.0, 45.0]
t_ff MOTOR_50 [-40.0, 40]
MOTOR_50_L [-40, 40]
MOTOR_70 [-80, 80]
MOTOR_85 [-160, 160]
MOTOR_J3505 [-18, 18]
MOTOR_J3510 [-18, 18]

Temperature communication range: [-30.0, 150.0] ℃.

2.4 Bit Width Description

A standard CAN frame has only 8 bytes. The MIT control command packs 5 parameters into 8 bytes:

  • Position: 16 bits (2 bytes)
  • Velocity: 12 bits
  • Kp: 12 bits
  • Kd: 12 bits
  • Torque: 12 bits

3. CANFD Broadcast Multi-Motor Control

A CANFD frame can carry up to 64 bytes. In multi-motor control:

  • Frame ID is fixed to 0x7FF
  • Data for motor id occupies its 8-byte block: (id - 1) * 8 to id * 8 - 1

That is, each motor uses a full 8-byte MIT control block, concatenated in motor-ID order in one frame.

Example (first 16 bytes, controlling M[1] and M[2]):

Control Frame (ID=0x7FF) D[0] D[1] D[2] D[3] D[4] D[5] D[6] D[7]
M[1] p_des[15:8] p_des[7:0] v_des[11:4] v_des[3:0] \| Kp[11:8] Kp[7:0] Kd[11:4] Kd[3:0] \| t_ff[11:8] t_ff[7:0]
Control Frame (ID=0x7FF) D[8] D[9] D[10] D[11] D[12] D[13] D[14] D[15]
M[2] p_des[15:8] p_des[7:0] v_des[11:4] v_des[3:0] \| Kp[11:8] Kp[7:0] Kd[11:4] Kd[3:0] \| t_ff[11:8] t_ff[7:0]

Subsequent motors follow in 8-byte steps.

For example, motor 3 uses D[16]~D[23], motor 4 uses D[24]~D[31], and so on, up to 64 bytes.


4. Special Control Frames (8 Bytes)

All commands below are fixed 8-byte values:

  • Motor enable: 0xFF 0xFF 0xFF 0xFF 0xFF 0xFF 0xFF 0xFC
  • Motor disable: 0xFF 0xFF 0xFF 0xFF 0xFF 0xFF 0xFF 0xFD
  • Save zero position: 0xFF 0xFF 0xFF 0xFF 0xFF 0xFF 0xFF 0xFE
  • Enable terminal output: 0xFF 0xFF 0xFF 0xFF 0xFF 0xFF 0xFF 0xFB
  • Disable terminal output: 0xFF 0xFF 0xFF 0xFF 0xFF 0xFF 0xFF 0xFA

5. Motor Response Frame

The response frame ID can be configured via upper computer, default 0x11 (internal field: master_id).

Main feedback includes position, velocity, torque, driver temperature, and motor temperature.

5.1 Data Layout

Feedback Frame D[0] D[1] D[2] D[3] D[4] D[5] D[6] D[7]
MST_ID ID POS[15:8] POS[7:0] VEL[11:4] VEL[3:0] \| T[11:8] T[7:0] T_MOS T_Motor

5.2 Field Description

  • ID: motor ID
  • POS: position data
  • VEL: velocity data
  • T: torque data
  • T_MOS: MOS temperature on driver (℃)
  • T_Motor: internal winding temperature (℃)

Position, velocity, and torque use linear mapping to convert floating-point values to signed fixed-point values:

  • Position: 16 bits
  • Velocity: 12 bits
  • Torque: 12 bits

5.3 Relationship Between master_id and can_id

  • Default relation: master_id = can_id | 0x010
  • Modifying can_id will synchronize update of master_id
  • master_id can also be written independently via upper computer

Motor Register Communication Protocol

This page describes how to read, write, save, and query VKBOTS motor configuration registers over CAN. Register maps differ between motor firmware versions, so check the motor software version, hardware/program model, and configuration version before operating on registers.

Unless otherwise noted, CAN IDs, register addresses, data bytes, and example values in this page are hexadecimal. Other bases are called out explicitly.

1. Check the Version First

After power-on, the motor outputs boot information. It can be viewed with bxi_tool; common fields are:

========== BOOT INFO ==========
STATE : 00 STARTUP
BUILD : Aug 31 2026 10:00:00
VER   : code=1.4.1 config=1.4
CAN   : id=1(boot)

---------- DEVICE CHECK ----------
HW    : Bxi_motor_85
PRO   : NORMAL
CON   : same
Field Meaning
VER code Motor software program version.
VER config Motor configuration content version, also the register-map version. It can also be read over CAN from 0x7C. It must match the software version.
CAN id Current motor node ID. Use this value as node_id in later CAN commands. The boot ID is used by default; the ID source can be changed through registers.
HW Motor hardware identification result.
PRO Current build target/program model.
CON Whether the configuration version matches the program version.

Note

The first two components of the software version must match the configuration version. For example, software version 1.4.1 corresponds to configuration version 1.4, and software version 0.3.1 corresponds to configuration version 0.3. The CAN register interface currently exposes config_version, not the full code=x.y.z software version. Check the complete software version from the boot information, firmware file name, or upgrade package.

2. CAN Command Format

Register commands use the high bits of the standard CAN ID for the command, and the low 4 bits for the motor node:

CAN ID = (cmd << 4) | node_id

For example, when the motor can_id = 1, the register read command REG_READ has cmd = 0x17, where 0x17 is hexadecimal. The transmit CAN ID is:

(0x17 << 4) | 0x01 = 0x171
Command cmd CAN ID when node_id=1 DLC Purpose
REG_READ 0x17 0x171 4 Read one register
REG_WRITE 0x18 0x181 8 Write one RAM register
REG_SAVE 0x19 0x191 0 Save RAM configuration to Flash
REG_INFO 0x1A 0x1A1 0 Query the number of public registers

3. Read Sending and Parsing

Use REG_READ to read a register; cmd = 0x17.

3.1 Transmit Frame

Field Content
CAN ID 0x17 is the hexadecimal command value. Shift it left by 4 bits, then merge the motor node_id into the low 4 bits
DLC 4
data[0..3] address, the register address, sent as a 32-bit little-endian value. See the final "Little-Endian Parsing Notes" section. Addresses are normally written in hexadecimal

The CAN ID has two parts:

High bits: cmd << 4, where cmd is the hexadecimal command value
Low bits : node_id, the current motor CAN id; node_id occupies the low 4 bits
Final CAN ID: (cmd << 4) | node_id

For a read command, cmd is fixed to hexadecimal 0x17, so first calculate the command high bits:

0x17 << 4 = 0x170

Then merge the motor node ID into the low 4 bits. The calculations below are hexadecimal bitwise OR operations:

Motor node_id Hex node value Calculation Transmit CAN ID
1 0x01 0x170 bitwise OR 0x01 0x171
3 0x03 0x170 bitwise OR 0x03 0x173
8 0x08 0x170 bitwise OR 0x08 0x178

If the motor node is not 1, replace the low 4 bits of the CAN ID. For example, when node_id=3, the read command CAN ID is 0x173.

3.2 Reply Parsing

The motor replies with the same CAN ID and an 8-byte payload:

data[0..3] = status | (value_type << 8)
data[4..7] = value_raw

All multi-byte fields are little-endian. See the final "Little-Endian Parsing Notes" section.

Field Parsing
status data[0]; 0 means success.
value_type (data[1] & 0x07), the data type of value_raw.
value_raw data[4..7], parsed according to value_type.

status values:

status Meaning
0 OK
1 Invalid address, or non-zero reserved request header bits
2 Read-only, or writing is not allowed in the current state
3 Save failed
4 DLC too short
5 Write type mismatch

value_type values:

value_type Parsing
0 int32_t, little-endian signed integer. See the final "Little-Endian Parsing Notes" section
1 bool, 0=false, non-zero means true
2 float, IEEE754 single-precision floating-point value
3 uint32_t, little-endian unsigned integer. See the final "Little-Endian Parsing Notes" section
4 version, first read as uint32_t, then parse with major=(value>>8)&0xFF, minor=value&0xFF

3.3 Parsing Example

After reading 0x7C, if the reply is:

171#0004000004010000

Split it into bytes:

data[0..3] = 00 04 00 00
data[4..7] = 04 01 00 00

Parsing result:

Item Result
status 0x00, success
value_type 0x04, version
value_raw 0x00000104
Configuration version major=1, minor=4, so 1.4

After reading 0x60, if the reply is:

171#0000000001000000

value_type=0 means int32_t, and value_raw=0x00000001, so the current can_id = 1.

4. Write Sending and Parsing

Use REG_WRITE to write a register; cmd = 0x18. Writing only changes the configuration value in RAM. To keep the value after power-off, send REG_SAVE afterwards.

4.1 Transmit Frame

Field Content
CAN ID 0x18 is the hexadecimal command value. Shift it left by 4 bits, then merge the motor node_id into the low 4 bits
DLC 8
data[0..3] address bitwise OR value_type << 8, little-endian. See the final "Little-Endian Parsing Notes" section
data[4..7] value_raw, encoded according to the target register type, little-endian. See the final "Little-Endian Parsing Notes" section

The value_type in the write request must match the target register type. For bool, write 0 to disable and non-zero to enable; float uses IEEE754 single precision.

4.2 Reply Parsing

Both successful and failed writes return an 8-byte reply:

data[0..3] = status | (value_type << 8)
data[4..7] = value_raw

status=0 means the write succeeded. The reply value_type is the actual type of the target register, and value_raw is the current value after the write. status=5 means the request value_type does not match the register type. status=2 means the register is read-only, or the current motor state does not allow writing.

5. Save Sending and Parsing

Use REG_SAVE to save configuration; cmd = 0x19. It writes the current RAM configuration to Flash.

5.1 Transmit Frame

Field Content
CAN ID 0x19 is the hexadecimal command value. Shift it left by 4 bits, then merge the motor node_id into the low 4 bits
DLC 0
Data Empty

5.2 Reply Parsing

The reply length is 8 bytes:

data[0..3] = status | (3 << 8)
data[4..7] = register_count

status=0 means save succeeded, and status=3 means save failed. data[4..7] is the number of public registers, parsed as little-endian uint32_t. See the final "Little-Endian Parsing Notes" section.

6. Info Query Sending and Parsing

Use REG_INFO to query the number of registers; cmd = 0x1A. When host software needs to support different firmware versions, query REG_INFO first, then use the 0x7C configuration version to select the matching register map.

6.1 Transmit Frame

Field Content
CAN ID 0x1A is the hexadecimal command value. Shift it left by 4 bits, then merge the motor node_id into the low 4 bits
DLC 0
Data Empty

6.2 Reply Parsing

The reply length is 8 bytes:

data[0..3] = status | (3 << 8)
data[4..7] = (writable_count << 16) | register_count

Here value_type=3, so value_raw is parsed as uint32_t. For example, value_raw = 0x00280036 means the number of public registers is 0x0036 = 54, and the number of writable registers is 0x0028 = 40.

7. Version Differences and Register Map Selection

This page only describes how to send and parse register commands. It does not include the concrete register map. Register maps are provided separately for different program versions. Before using a register address, first confirm the current motor configuration version, then find the matching register map.

Recommended lookup flow:

  1. Read VER code and VER config from the boot information.
  2. You can also read 0x7C over CAN to confirm the current config_version.
  3. Use the register map matching VER config. For example, software version 1.4.1 uses the 1.4.1 register map, and software version 0.3.1 uses the 0.3.1 register map.
  4. For automatic host-side adaptation, send REG_INFO to query the number of public registers, then combine it with the 0x7C configuration version to select the matching register map.

Warning

Register maps may change between program versions. Host software should not hard-code all parameters only by address. Confirm the configuration version first and use the matching register map.

8. Little-Endian Parsing Notes

Little-endian is a byte order for multi-byte data: the low-order byte is placed at the low address, which means the low byte is sent first and the high byte is sent later. In this page, register addresses, status | (value_type << 8), and value_raw are all sent and parsed as little-endian values.

For 32-bit data 0x0000007C, the little-endian byte order is:

7C 00 00 00

Therefore, when reading register 0x7C, data[0..3] is:

data[0] = 0x7C
data[1] = 0x00
data[2] = 0x00
data[3] = 0x00

For another example, if reply value_raw in data[4..7] is:

04 01 00 00

It is restored to the 32-bit value:

value_raw = 0x00000104

If value_type=4, the field is a version value and is parsed as:

major = (value_raw >> 8) & 0xFF = 1
minor = value_raw & 0xFF = 4
configuration version = 1.4

The final interpretation depends on value_type: int32_t is parsed as a signed integer, uint32_t as an unsigned integer, float as an IEEE754 single-precision float, and version with the version rule above.

MIT Polling Reply Guide

This page describes the VKBOTS motor MIT-mode reply frame and the AUX polling reply format enabled by mit_aux_enable. After the host sends MIT control frames periodically, the motor returns one status frame for each valid control frame; AUX polling data reuses the last two bytes of that reply frame.

Unless otherwise noted, CAN IDs, data bytes, raw values, and example values in this page are hexadecimal. Physical values, frequencies, and unit conversion results are shown in decimal.

1. Check Before Use

MIT replies are triggered by MIT control frames from the host. The motor responds to these control frame IDs:

Control frame CAN ID Description
can_id Unicast MIT control frame for the current motor
0x7FF Broadcast MIT control frame; the motor reads its own 8-byte control block according to can_id

The motor reply frame uses master_id as its CAN ID. By default:

master_id = can_id | 0x010

For example, when can_id=1, the default master_id=0x11, so the host should receive reply frames with CAN ID 0x11. When can_id is changed, the program normally updates master_id together with it. master_id can also be changed independently through registers. See "Motor Register Communication Protocol" and the register map for the matching version for register commands and register selection.

Warning

When polling multiple motors in MIT mode, make sure their master_id values do not conflict. Otherwise, multiple motors may reply with the same CAN ID and the host cannot reliably distinguish the sources.

2. MIT Reply Frame Format

The MIT reply frame is always 8 bytes:

Field Content
CAN ID master_id
DLC 8
data[0] Current motor can_id
data[1..5] Position, velocity, and torque feedback
data[6..7] Temperature feedback by default; AUX polling data when mit_aux_enable is enabled

The byte layout is:

Reply frame data[0] data[1] data[2] data[3] data[4] data[5] data[6] data[7]
mit_aux_enable=0 ID POS[15:8] POS[7:0] VEL[11:4] VEL[3:0] and TOR[11:8] TOR[7:0] NTC1 NTC2
mit_aux_enable=1 ID POS[15:8] POS[7:0] VEL[11:4] VEL[3:0] and TOR[11:8] TOR[7:0] aux[15:8] aux[7:0]

Position, velocity, torque, and AUX are packed as bit fields with the high bits first. See the final "Bit-Field Parsing Notes" section.

3. Basic Feedback Parsing

First parse the raw values from data[1..5]:

id_raw  = data[0]
pos_raw = (data[1] << 8) | data[2]
vel_raw = (data[3] << 4) | (data[4] >> 4)
tor_raw = ((data[4] & 0x0F) << 8) | data[5]

Then convert raw values back to physical values with linear mapping:

value = raw * (max - min) / ((1 << bits) - 1) + min

The ranges below come from motor configuration. They may differ between motor models or configurations, so read the related configuration values or check the register map for the matching version before parsing.

Field Width Default range
POS 16 bit [-max_pos, max_pos], default [-12.5, 12.5] rad
VEL 12 bit [-max_vel, max_vel], default [-45.0, 45.0] rad/s
TOR 12 bit [-max_tor, max_tor], default value depends on the motor model

Common parsing formulas:

position_rad = uint_to_float(pos_raw, -max_pos, max_pos, 16)
velocity_rad_s = uint_to_float(vel_raw, -max_vel, max_vel, 12)
torque_Nm = uint_to_float(tor_raw, -max_tor, max_tor, 12)

Note

In normal operation, TOR is torque feedback. When current-test functions are enabled, the program may use this field to return q-axis current instead. Use the current program state as the final reference.

4. AUX Polling Reply Parsing

mit_aux_enable controls the last two bytes of the MIT reply:

mit_aux_enable = 0 -> legacy protocol: data[6]=NTC1, data[7]=NTC2, both 8-bit encoded
mit_aux_enable = 1 -> AUX polling: data[6..7] carry aux_id + payload

mit_aux_enable is disabled by default after power-on and is not saved to Flash. To receive AUX polling data, the host must write mit_aux_enable=1 for the current run. In the currently checked programs, this configuration item is at 0x6D; for different configuration versions, use the matching register map as the final reference.

When enabled, data[6..7] is parsed as one 16-bit AUX field:

aux = (data[6] << 8) | data[7]
aux_id = (aux >> 12) & 0x0F
payload = aux & 0x0FFF

Equivalent split:

aux_id = data[6] >> 4
payload = ((data[6] & 0x0F) << 8) | data[7]

Do not infer the data type from the frame index. Parse aux_id in every frame, then interpret payload according to that aux_id.

5. AUX Polling Order and Rate

AUX IDs rotate in this order:

0x0 -> 0x1 -> 0x2 -> 0x3 -> 0x4 -> 0x5 -> 0x6 -> 0x7 -> 0x8 -> 0x9 -> 0xF -> 0x0

The total AUX rate equals the MIT reply rate. Each item updates at roughly the MIT reply rate divided by 11.

MIT reply rate Single item rate
1000 Hz 90.9 Hz
500 Hz 45.5 Hz
100 Hz 9.1 Hz

6. AUX Data Parsing

aux_id Data payload parsing Communication range Resolution
0x0 NTC1 temperature temp_C = payload / 10.0 - 30.0 -30.0..150.0 C 0.1 C
0x1 NTC2 temperature temp_C = payload / 10.0 - 30.0 -30.0..150.0 C 0.1 C
0x2 Winding temperature observer temp_C = payload / 10.0 - 30.0 -30.0..150.0 C 0.1 C
0x3 Bus voltage v_bus v_bus = payload / 10.0 0.0..100.0 V 0.1 V
0x4 Bus current i_bus_filt current_A = payload / 10.0 - 150.0 -150.0..150.0 A 0.1 A
0x5 q-axis current i_q_filt current_A = payload / 10.0 - 150.0 -150.0..150.0 A 0.1 A
0x6 d-axis current i_d_filt current_A = payload / 10.0 - 150.0 -150.0..150.0 A 0.1 A
0x7 Program state and runtime flags See bit definitions below 0x000..0xFFF bitfield
0x8 Thermal derating coefficient temper_coefficient coeff = payload / 1000.0 0.000..1.000 0.001
0x9 Voltage utilization util = payload / 1000.0 0.000..2.000 0.001
0xF Heartbeat counter heartbeat = payload 0..4095, wraps 1

payload = 0xFFF means the data is invalid or unsupported by the current program. Heartbeat 0xF is the exception, because it naturally wraps through 0xFFF.

When parsing payload, first use aux_id to identify the data type, then treat payload as an unsigned integer and apply the corresponding formula. The divisions, offsets, and unit conversions in the table are decimal calculations.

Temperature data includes aux_id=0x0, 0x1, and 0x2:

payload = 0x02BC = 700
temp_C = 700 / 10.0 - 30.0 = 40.0 C

Voltage data uses aux_id=0x3:

payload = 0x0F0 = 240
v_bus = 240 / 10.0 = 24.0 V

Current data includes aux_id=0x4, 0x5, and 0x6:

payload = 0x05DC = 1500
current_A = 1500 / 10.0 - 150.0 = 0.0 A

Coefficient data includes aux_id=0x8 and 0x9:

payload = 0x02EE = 750
coeff = 750 / 1000.0 = 0.750
util = 750 / 1000.0 = 0.750

Heartbeat aux_id=0xF does not need unit conversion. payload is the current heartbeat count. It increments and wraps in the 12-bit range, so it can be used to check whether MIT replies are still updating.

7. Status Word 0x7

When aux_id=0x7, payload is a status word:

bit0..3   FSM state
bit4      FOC armed
bit5      ENCI calib_valid
bit6      ENCO calib_valid
bit7      field_weaken_mode
bit8      mit_mode
bit9..11  control_mode

bit6 is related to the external output encoder. It may remain 0 in programs that do not support that hardware or function.

Common FSM state values:

0  STARTUP
1  MENU
2  MOTOR
3  ENCI_AUTO
4  ENCI
5  ENCO
6  ENCI_SLS_AUTO
7  SETUP
8  ERROR
9  OPEN
10 SLS

8. Default Protocol Temperature Parsing

When mit_aux_enable=0, data[6] and data[7] are not an AUX field. They are two 8-bit temperature values:

ntc1_C = data[6] * 180.0 / 255.0 - 30.0
ntc2_C = data[7] * 180.0 / 255.0 - 30.0

In this mode, the MIT reply directly provides only NTC1 and NTC2 temperatures. Other AUX data requires mit_aux_enable to be enabled.

9. Parsing Example

Assume this reply is received:

11#017FFF7FF7FF30F0

CAN ID 0x11 is master_id, and the data bytes are:

data[0] = 0x01
data[1] = 0x7F
data[2] = 0xFF
data[3] = 0x7F
data[4] = 0xF7
data[5] = 0xFF
data[6] = 0x30
data[7] = 0xF0

The basic raw feedback values are:

pos_raw = 0x7FFF
vel_raw = 0x7FF
tor_raw = 0x7FF

If mit_aux_enable=1, the last two bytes parse as:

aux_id = 0x3
payload = 0x0F0

aux_id=0x3 means bus voltage, so:

v_bus = 0x0F0 / 10.0 = 24.0 V

10. Bit-Field Parsing Notes

POS, VEL, TOR, and aux in MIT reply frames are packed as bit fields with high bits first. Restore raw values with shifts and masks.

For example, when data[6]=0x30 and data[7]=0xF0:

aux = (0x30 << 8) | 0xF0 = 0x30F0
aux_id = (0x30F0 >> 12) & 0x0F = 0x3
payload = 0x30F0 & 0x0FFF = 0x0F0

Then parse payload with the formula for the corresponding aux_id to get the physical value or status field.

1.4.1

Software version: 1.4.1; configuration version: 1.4.

Register Category Address Parameter type Data Type Access Description
Motor 0x01 motor_pole_pairs 0 int32_t 1 menu/error writable Motor pole pairs
Motor 0x02 motor_phase_resistance 2 float 1 menu/error writable Phase resistance, in ohm
Motor 0x03 motor_phase_inductance 2 float 1 menu/error writable Phase inductance, in H
Motor 0x04 inertia 2 float 1 menu/error writable Controller feedforward inertia parameter
Motor 0x05 reduction_ratio 2 float 3 read-only Reduction ratio from build configuration
Encoder 0x10 encoder_dir_rev 0 int32_t 1 menu/error writable ENCI direction reverse flag, 0/1
Encoder 0x11 encoder_offset 0 int32_t 1 menu/error writable ENCI electrical angle offset, usually written by calibration
Encoder 0x12 calib_valid 0 int32_t 3 read-only ENCI calibration valid flag
Encoder 0x13 ENCO_calib_valid 0 int32_t 3 read-only ENCO calibration valid flag
Encoder 0x14 usr_enc1_offset 0 int32_t 3 read-only ENCI user zero position
Encoder 0x15 usr_enc2_offset 2 float 3 read-only ENCO user zero position
Encoder 0x16 enc2_closed_loop_enable 1 bool 0 runtime read/write Output encoder closed-loop enable, 0 off, non-zero on
Calibration/Test 0x20 calib_current 2 float 0 runtime read/write Calibration current, in A
Calibration/Test 0x21 calib_max_voltage 2 float 0 runtime read/write Calibration maximum voltage, in V
Calibration/Test 0x22 current_test_enable 1 bool 0 runtime read/write Runtime current-test switch
Calibration/Test 0x23 backlash_test_enable 1 bool 0 runtime read/write Runtime backlash-test switch
Calibration/Test 0x24 aging_test_enable 1 bool 0 runtime read/write Aging-test switch, can be saved
Control 0x30 control_mode 0 int32_t 0 runtime read/write Control mode: current, velocity, position, etc.
Control 0x31 pos_gain 2 float 0 runtime read/write Position-loop proportional gain
Control 0x32 vel_gain 2 float 0 runtime read/write Velocity-loop proportional gain
Control 0x33 vel_integrator_gain 2 float 0 runtime read/write Velocity-loop integral gain
Control 0x34 vel_limit 2 float 0 runtime read/write Velocity limit, in turn/s
Control 0x35 current_limit 2 float 0 runtime read/write q-axis current limit, in A
Control 0x36 torquet_limit 2 float 0 runtime read/write MIT/torque-control torque limit
Control 0x37 current_ramp_rate 2 float 0 runtime read/write Current ramp rate, in A/s
Control 0x38 vel_ramp_rate 2 float 0 runtime read/write Velocity ramp rate, in turn/s^2
Control 0x39 traj_vel 2 float 0 runtime read/write Trapezoid trajectory target velocity, in turn/s
Control 0x3A traj_accel 2 float 0 runtime read/write Trapezoid trajectory acceleration, in turn/s^2
Control 0x3B traj_decel 2 float 0 runtime read/write Trapezoid trajectory deceleration, in turn/s^2
Control 0x3C field_weaken_mode 1 bool 0 runtime read/write Field-weakening switch, 0 off, non-zero on
Current Loop 0x40 current_ctrl_p_gain 2 float 1 menu/error writable Current-loop P gain
Current Loop 0x41 current_ctrl_i_gain 2 float 1 menu/error writable Current-loop I gain
Current Loop 0x42 current_ctrl_bandwidth 0 int32_t 1 menu/error writable Current-loop bandwidth parameter
Protection 0x50 protect_under_voltage 2 float 0 runtime read/write Bus undervoltage protection threshold, in V
Protection 0x51 protect_over_voltage 2 float 0 runtime read/write Bus overvoltage protection threshold, in V
Protection 0x52 protect_over_speed 2 float 0 runtime read/write Overspeed protection threshold, in turn/s
Protection 0x53 protect_temperature_low 2 float 0 runtime read/write Thermal derating start temperature, in C
Protection 0x54 protect_temperature_high 2 float 0 runtime read/write Overtemperature shutdown threshold, in C
Protection 0x55 protect_i_abc_error 2 float 0 runtime read/write Three-phase current-sum fault threshold, in A
CAN 0x60 can_id 0 int32_t 2 system communication parameter Motor node ID
CAN 0x61 master_id 0 int32_t 2 system communication parameter MIT reply CAN ID
CAN 0x62 sync_boot_id_flag 1 bool 2 system communication parameter Boot-ID sync switch
CAN 0x63 can_timeout_ms 0 int32_t 0 runtime read/write CAN control timeout in ms; 0 disables timeout
CAN 0x64 can_sync_target_enable 1 bool 0 runtime read/write CAN sync-target enable
CAN 0x65 can_mode_switch 1 bool 0 runtime read/write CAN mode switch flag
MIT 0x66 mit_mode 1 bool 1 menu/error writable MIT protocol mode switch
MIT 0x67 max_pos 2 float 0 runtime read/write MIT position mapping range
MIT 0x68 max_vel 2 float 0 runtime read/write MIT velocity mapping range
MIT 0x69 max_tor 2 float 0 runtime read/write MIT torque mapping range
MIT 0x6A kp_max 2 float 0 runtime read/write MIT kp mapping range
MIT 0x6B kd_max 2 float 0 runtime read/write MIT kd mapping range
MIT 0x6D mit_aux_enable 1 bool 0 runtime read/write MIT AUX polling reply switch
Runtime State 0x70 runtime_state 0 int32_t 3 read-only Current FSM state code
Version 0x7C config_version 4 version 3 read-only Configuration layout version

0.3.1

Software version: 0.3.1; configuration version: 0.3.

Register Category Address Parameter type Data Type Access Description
Motor 0x01 motor_pole_pairs 0 int32_t 1 menu/error writable Motor pole pairs
Motor 0x02 motor_phase_resistance 2 float 1 menu/error writable Phase resistance, in ohm
Motor 0x03 motor_phase_inductance 2 float 1 menu/error writable Phase inductance, in H
Motor 0x04 inertia 2 float 1 menu/error writable Controller feedforward inertia parameter
Motor 0x05 reduction_ratio 2 float 3 read-only Reduction ratio from build configuration
Encoder 0x10 encoder_dir_rev 0 int32_t 1 menu/error writable ENCI direction reverse flag, 0/1
Encoder 0x11 encoder_offset 0 int32_t 1 menu/error writable ENCI electrical angle offset, usually written by calibration
Encoder 0x12 calib_valid 0 int32_t 3 read-only ENCI calibration valid flag
Encoder 0x13 enco_calib_valid 0 int32_t 3 read-only ENCO calibration valid flag
Encoder 0x14 usr_enc1_offset 0 int32_t 3 read-only ENCI user zero position
Encoder 0x15 usr_enc2_offset 2 float 3 read-only ENCO user zero position
Encoder 0x17 enco_dir 0 int32_t 1 menu/error writable ENCO direction configuration, 0/1
Encoder 0x18 enco_offset 2 float 1 menu/error writable ENCO raw offset
Calibration/Test 0x20 calib_current 2 float 0 runtime read/write Calibration current, in A
Calibration/Test 0x21 calib_max_voltage 2 float 0 runtime read/write Calibration maximum voltage, in V
Calibration/Test 0x22 current_test_enable 1 bool 0 runtime read/write Runtime current-test switch
Calibration/Test 0x24 aging_test_enable 1 bool 0 runtime read/write Aging-test switch, can be saved
Control 0x30 control_mode 0 int32_t 0 runtime read/write Control mode: current, velocity, position, etc.
Control 0x31 pos_gain 2 float 0 runtime read/write Position-loop proportional gain
Control 0x32 vel_gain 2 float 0 runtime read/write Velocity-loop proportional gain
Control 0x33 vel_integrator_gain 2 float 0 runtime read/write Velocity-loop integral gain
Control 0x34 vel_limit 2 float 0 runtime read/write Velocity limit, in turn/s
Control 0x35 current_limit 2 float 0 runtime read/write q-axis current limit, in A
Control 0x36 torquet_limit 2 float 0 runtime read/write MIT/torque-control torque limit
Control 0x37 current_ramp_rate 2 float 0 runtime read/write Current ramp rate, in A/s
Control 0x38 vel_ramp_rate 2 float 0 runtime read/write Velocity ramp rate, in turn/s^2
Control 0x39 traj_vel 2 float 0 runtime read/write Trapezoid trajectory target velocity, in turn/s
Control 0x3A traj_accel 2 float 0 runtime read/write Trapezoid trajectory acceleration, in turn/s^2
Control 0x3B traj_decel 2 float 0 runtime read/write Trapezoid trajectory deceleration, in turn/s^2
Control 0x3C field_weaken_mode 1 bool 0 runtime read/write Field-weakening switch, 0 off, non-zero on
Current Loop 0x40 current_ctrl_p_gain 2 float 1 menu/error writable Current-loop P gain
Current Loop 0x41 current_ctrl_i_gain 2 float 1 menu/error writable Current-loop I gain
Current Loop 0x42 current_ctrl_bandwidth 0 int32_t 1 menu/error writable Current-loop bandwidth parameter
Protection 0x50 protect_under_voltage 2 float 0 runtime read/write Bus undervoltage protection threshold, in V
Protection 0x51 protect_over_voltage 2 float 0 runtime read/write Bus overvoltage protection threshold, in V
Protection 0x52 protect_over_speed 2 float 0 runtime read/write Overspeed protection threshold, in turn/s
Protection 0x53 protect_temperature_low 2 float 0 runtime read/write Thermal derating start temperature, in C
Protection 0x54 protect_temperature_high 2 float 0 runtime read/write Overtemperature shutdown threshold, in C
Protection 0x55 protect_i_abc_error 2 float 0 runtime read/write Three-phase current-sum fault threshold, in A
CAN 0x60 can_id 0 int32_t 2 system communication parameter Motor node ID
CAN 0x61 master_id 0 int32_t 2 system communication parameter MIT reply CAN ID
CAN 0x62 sync_boot_id_flag 1 bool 2 system communication parameter Boot-ID sync switch
CAN 0x63 can_timeout_ms 0 int32_t 0 runtime read/write CAN control timeout in ms; 0 disables timeout
CAN 0x64 can_sync_target_enable 1 bool 0 runtime read/write CAN sync-target enable
CAN 0x65 can_mode_switch 1 bool 0 runtime read/write CAN mode switch flag
MIT 0x66 mit_mode 1 bool 1 menu/error writable MIT protocol mode switch
MIT 0x67 max_pos 2 float 0 runtime read/write MIT position mapping range
MIT 0x68 max_vel 2 float 0 runtime read/write MIT velocity mapping range
MIT 0x69 max_tor 2 float 0 runtime read/write MIT torque mapping range
MIT 0x6A kp_max 2 float 0 runtime read/write MIT kp mapping range
MIT 0x6B kd_max 2 float 0 runtime read/write MIT kd mapping range
MIT 0x6D mit_aux_enable 1 bool 0 runtime read/write MIT AUX polling reply switch
Runtime State 0x70 runtime_state 0 int32_t 3 read-only Current FSM state code
Version 0x7C config_version 4 version 3 read-only Configuration layout version
Version 0x7D crc 3 uint32_t 3 read-only Flash configuration CRC

Reinforcement Learning Controller

About this part

This part documents the VKH6 reinforcement-learning controller framework: the ROS 2 example repository (bxi_rl_controller_ros2_example) and its developer wiki. The English chapters are translated from the original Chinese wiki; package names, commands, paths and code are kept exactly as they appear in the software.

Overview

This repository provides a controller development framework for VKBOTS robots, including:

  • A sample controller program that deploys reinforcement-learning-based control policies;
  • A Mujoco simulator based on ROS2;
  • The VKBOTS hardware environment based on ROS2;
  • A ROS2 remote controller node that reads joystick or keyboard input.

Package Structure

The binary ROS2 packages for the ROS2 environment and Mujoco are available in bxi_ros2_pkg.

In the binary ROS2 package directory bxi_ros2_pkg/:

  1. communication: the robot communication package, including custom message formats.
  2. description: robot description files, including URDF, XML, and mesh files.
  3. mujoco: the Mujoco simulator based on ROS2. Controller programs are recommended to be verified in Mujoco before deployment to robot hardware.
  4. hardware: the robot hardware package. This node publishes all robot sensor data and receives control commands.
  5. hardware_arm: the hardware control package for the upper-body-only version of the robot. This node publishes upper-body arm information and receives control commands.

bxi_ros2_pkg is a unified framework for both simulation and hardware:

ROS2 structure for simulation: ROS2 structure simulation

ROS2 structure for hardware: ROS2 structure hardware

The src/ directory contains:

  1. src/bxi_example_py_elf3: a demo of an VKH6 learning-based control policy.
  2. remote_controller: reads joystick or keyboard input and publishes commands. It works with both robot hardware and the simulation environment.

Description Files (URDF)

  1. elf3_dof29: VKH6 with 29 DoF.
  2. elf3_dof31: VKH6 with 31 DoF, including 2 DoF on the head.

For USD or XML formats, see unofficial models.

Instructions

Extended Documentation / Wiki

For adding remote controllers or input controllers, robot business states, state transitions, transition behaviors, on_bind(ctx) state subscription, and get_cmd_vel(ctx) velocity handling, see the project Wiki:

Switching Between Hardware and Simulation

  1. hw is short for hardware. All launch files with the hw suffix launch real hardware. Use them carefully.
  2. The simulation environment and robot hardware share the same control program. Use different launch files to switch between simulation and hardware. Topics for simulation use the simulation/ prefix, while topics for hardware use the hardware/ prefix. For details, see the topic parameter settings in src/bxi_example_py_elf3.
  3. The robot in simulation starts with a virtual suspension. The suspension must be released after startup. Suspension-related signals are ignored when operating robot hardware.
  4. There is a global odometer topic odm in the simulation environment. This topic is not available in the hardware environment.

System Environment Setup

  1. Use Ubuntu 22.04 with ROS2 humble. mujoco requires libglfw3-dev.
  2. The remote controller uses /dev/input/jsBattleDragon by default. Individual developers and local debugging setups must configure the udev rule first so this stable device alias can be created.
  3. Install the Battle Dragon joystick link helper and make it executable:
sudo install -m 0755 ./script/bxi-battle-dragon-link /usr/local/bin/bxi-battle-dragon-link
  1. Install the separate IMU, battery and remote-controller udev rules, then reload udev. If /etc/udev/rules.d/bxi-dev.rules is installed, back it up and move it out of the rules directory first:
sudo install -m 0644 ./script/udev/70-bxi-*.rules /etc/udev/rules.d/
sudo udevadm control --reload-rules
sudo udevadm trigger --subsystem-match=tty --action=add
sudo udevadm trigger --subsystem-match=input --action=add

The rules select USB paths by uname -m: 3-8/3-9 on x86_64, or 4-1.7/5-1 on the supported aarch64 board. The IMU and battery may exchange ports; USB VID/PID distinguishes them.

After reconnecting the Battle Dragon controller, /dev/input/jsBattleDragon should be available. For local debugging only, you can temporarily change sources.gamepad.device in src/remote_controller/config/xbox_default.yaml to the current system device, such as /dev/input/js0.

  1. To set up remote controller auto-start, edit ./script/ros_elf_launch.service according to the actual workspace path and ROS settings, copy it to /etc/systemd/system/, and enable it with systemctl:
sudo cp ./script/ros_elf_launch.service /etc/systemd/system/
sudo systemctl daemon-reload
sudo systemctl enable --now ros_elf_launch.service
sudo systemctl status ros_elf_launch.service

Running a Demo Control Program in the Simulator

  1. Pull the ROS2 binary packages bxi_ros2_pkg to /opt/bxi/bxi_ros2_pkg:
mkdir -p /opt/bxi/
cd /opt/bxi/
git clone https://github.com/bxirobotics/bxi_ros2_pkg.git

Then activate it. On robot hardware, run this as root:

source /opt/bxi/bxi_ros2_pkg/setup.bash
  1. In the bxi_rl_controller_ros2_example directory, run bash build.sh to compile all sources in ./src. After compilation, run source ./install/setup.bash to activate the current package environment.
  2. Run the whole-body control policy:
ros2 launch bxi_example_py_elf3 example_launch_demo.py

This starts the simulation environment and the learning-based controller program.

  1. Start the keyboard control node:
ros2 launch remote_controller remote_controller_keyboard.launch.py

Running a Demo Control Program on Hardware

  1. Log in as root.
  2. Pull the ROS2 binary packages bxi_ros2_pkg to /opt/bxi/bxi_ros2_pkg:
mkdir -p /opt/bxi/
cd /opt/bxi/
git clone https://github.com/bxirobotics/bxi_ros2_pkg.git

Then activate it. On robot hardware, run this as root:

source /opt/bxi/bxi_ros2_pkg/setup.bash
  1. In the bxi_rl_controller_ros2_example directory, run bash build.sh to compile all sources in ./src. After compilation, run source ./install/setup.bash to activate the current package environment.
  2. Run the whole-body control policy:
ros2 launch bxi_example_py_elf3 example_launch_demo_hw.py

This starts the robot hardware and the control policy.

Tips for Running a Control Program

  1. Control commands in the topic must be sent in the specified joint order. See the examples in src/bxi_example_py_elf3 for the joint order.
  2. Both the simulation environment and the hardware robot have out-of-control protection. The protection is triggered if control commands are lost for more than 100 ms. Once triggered, the motors are disabled, and the system must be reinitialized before use.
  3. The default remote controller device is /dev/input/jsBattleDragon. If the udev rule is not configured yet, or you only want to use the currently detected joystick device during debugging, temporarily change the configured device path to /dev/input/js0.

Startup Process

In both simulation and hardware, the motors are disabled at startup and all parameters are uncontrollable. The startup process has two steps:

  1. Enable position control of the motors. The motors can implement position control by setting pos kp kd. As of VKBOTS hardware, when the first reset command is received, the joints rotate to zero position and hold it for 10 seconds.
  2. Enable all control parameters. The motors can then be set with pos vel tor kp kd. As of VKBOTS hardware, when the second reset command is received, the joints start taking control input.

For startup examples, see src/bxi_example_py_elf3.

Hardware Protection

In addition to communication timeout protection, the hardware node includes torque protection, overspeed protection, and position protection.

  1. There is an error counter inside the hardware node. When the error count reaches 1000, the motor exits the enabled state.
  2. Error counter logic: increase the error count by 50 when a motor speed overrun is received; increase it by 100 when a torque overrun is received; decrease it by 1 when a normal motor message is received, with a minimum value of 0.
  3. When position overrun protection is triggered, the error count is not increased. Control in the overrun direction is disabled, and the motor can only rotate in the opposite direction.
  4. Contact us for detailed overrun values. Modifying them is not recommended unless necessary.
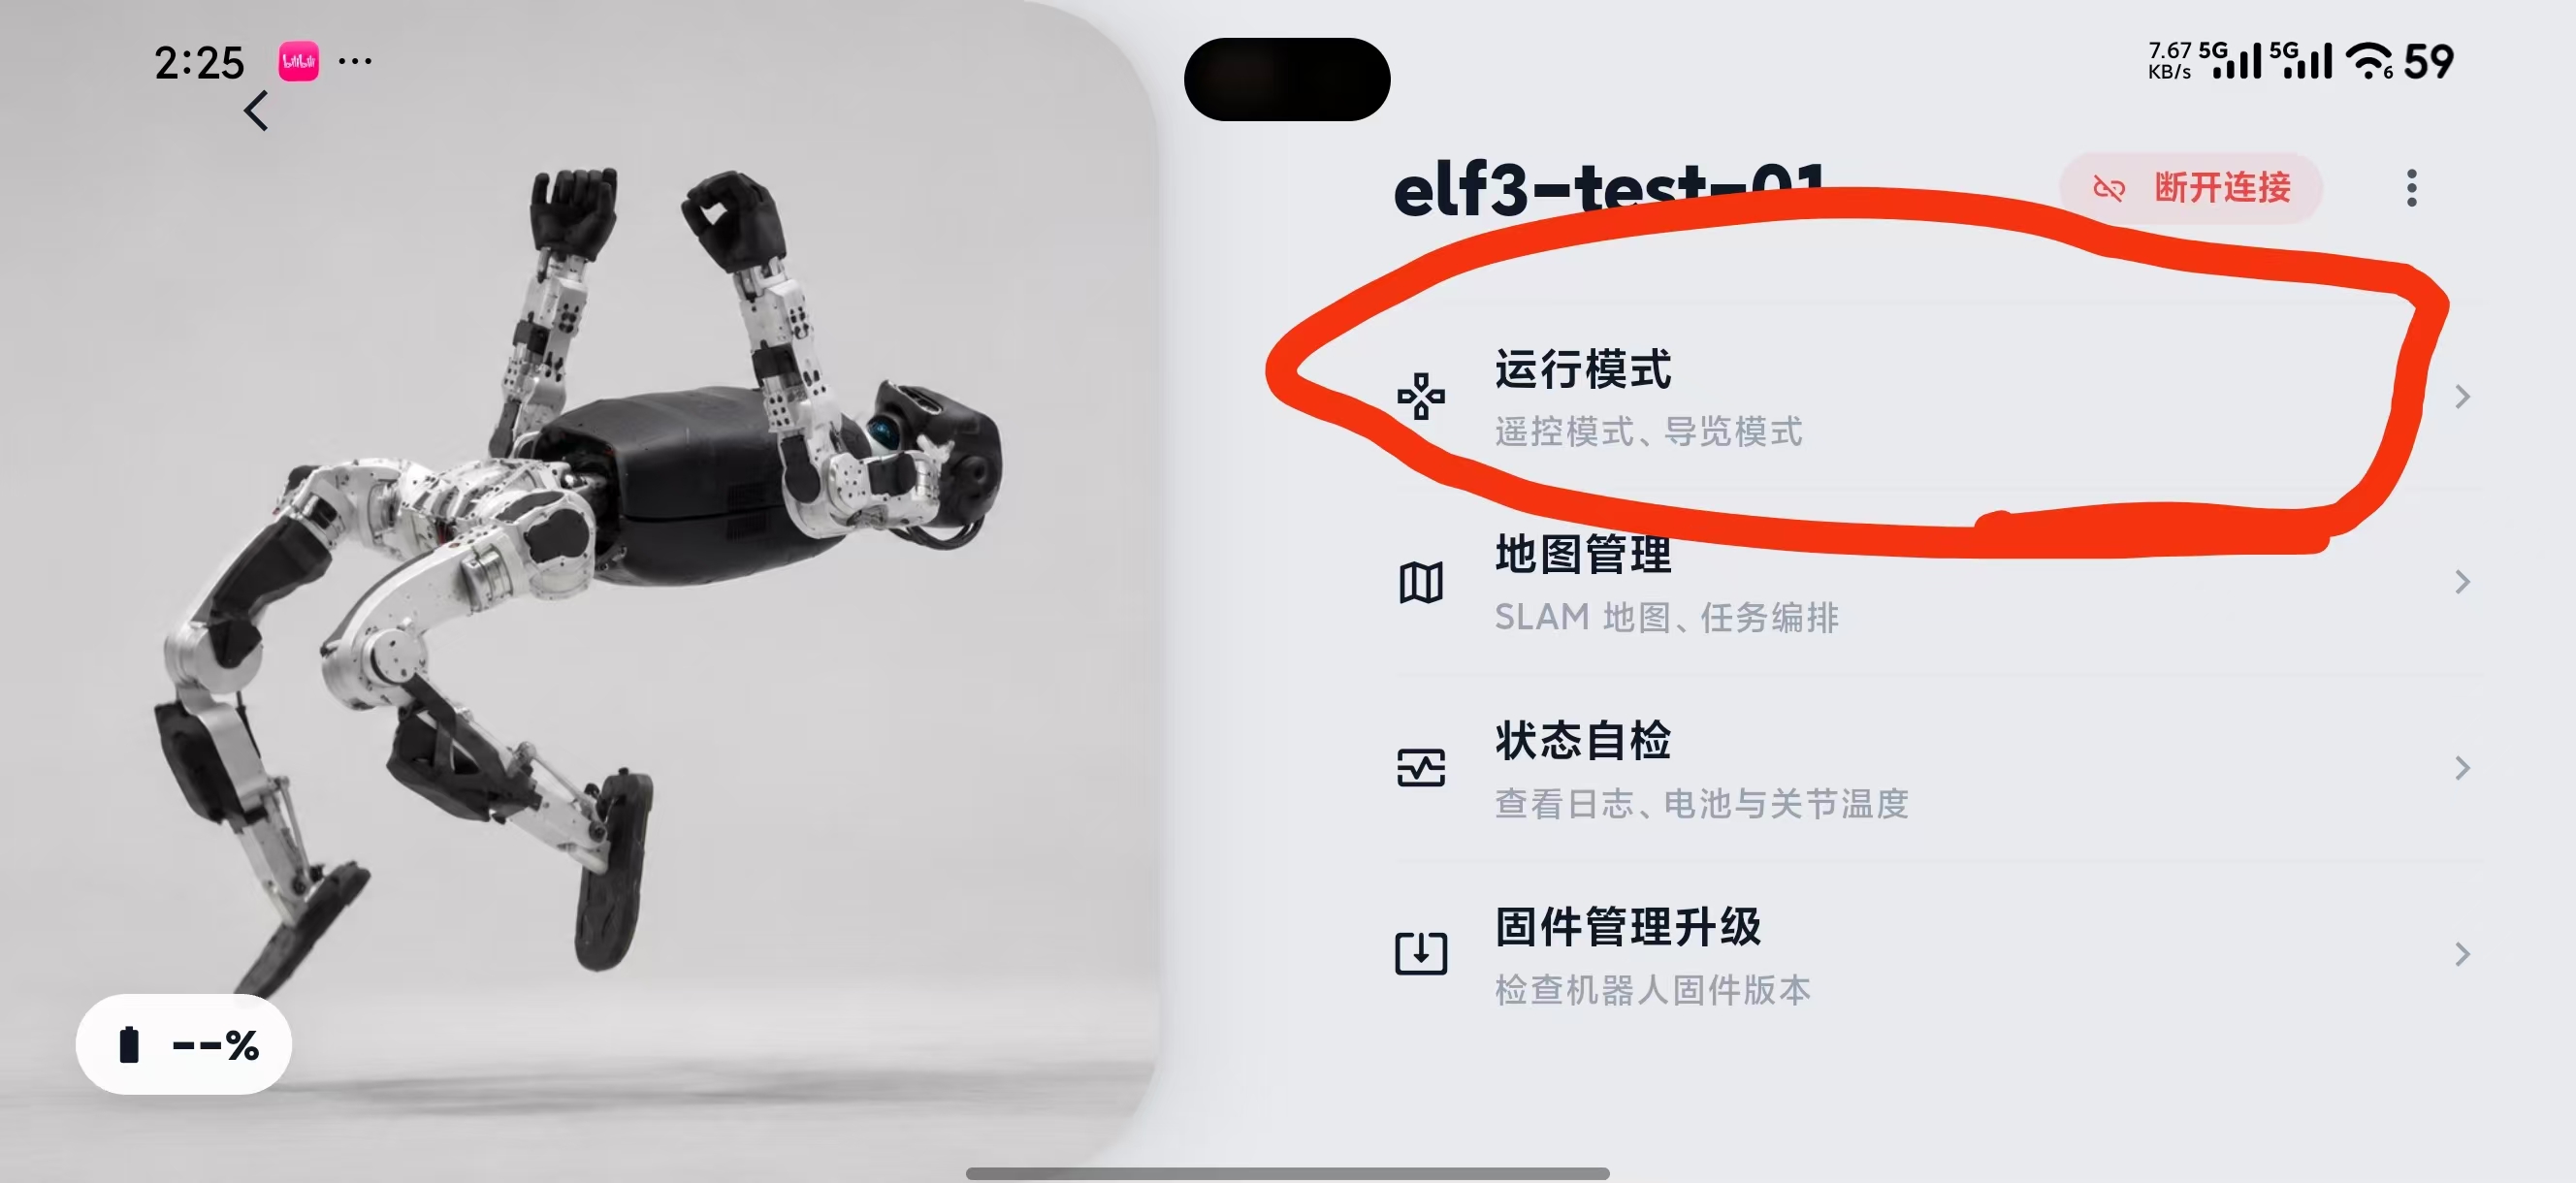
Important Notes

Large robots may pose risks. Check the instructions carefully before operation.

All control programs must be verified in simulation before deployment to robot hardware.

Press the stop button immediately if any abnormality occurs.

VKBOTS Robot Motion Control Framework Documentation

This Wiki covers robot platform integration, control scheduling, the state machine and Mods, model inference, input systems, Sim2Real and framework maintenance. Mods are the main extension mechanism for motions and business capabilities, but they are not the boundary of the whole framework.

Framework capabilities at a glance

Capability Features currently provided Read more
Modular motion system Motions, models, states, events, routes and assets are packaged as independent Mods; supports version constraints, dependencies, conflicts, enable/disable, external deployment and release visibility Mod System
Layered state development API Built around RobotControlState, with convenience base classes for fixed poses, formula trajectories, online policies and motion replay; supports strongly typed YAML parameters and a complete lifecycle State Development Guide
Safe state switching Built-in hold, gain ramping, sequence transitions and real-time blending of two states; supports entry frames, running frames, cancel preparation and business-defined Transitions State Machine Config, Custom Transitions
Named joints and command composition Handles 29/31/N joint layouts by joint name; supports partial model outputs, cross-layout resolution, and ownership checks and composition of commands from models, ROS, IK, trajectories and other sources Joint Layout and Mapping, Multi-source Command Composition
MIT commands and runtime overrides MotorFrame carries position, velocity, PD gains and feed-forward torque in full; supports temporarily overriding the final output per joint name from a ROS topic, with timeouts and smooth release Runtime Joint Command Override, Platform Integration Guide
Model inference and resource management Supports selecting and falling back between ONNX Runtime, OpenVINO and RKNN backends; models can be prepared at startup or loaded asynchronously on first request, with unified warm-up, caching and shutdown Inference Architecture, Models and Resources
Unified simulation and hardware access The platform integration layer isolates robot messages and the hardware SDK; MuJoCo and the real robot can use the same logical camera names and ROS topic contract, switching only the simulation/hardware prefix Platform Integration Guide, Sim2Real
Depth-perception policies A separate camera process publishes Image + CameraInfo; the policy crops FOV, scales and rotates using the real intrinsics; supports camera freshness checks and a safe exit on loss of signal Depth-perception Walking
Multi-device input mapping Keyboard, Xbox/compatible gamepads and CRSF are mapped uniformly to business controls; supports key combinations, mutually exclusive released conditions, curves, priorities and custom UDP/serial Drivers Input Mapping, Custom Input Driver
Managed helper processes Mods can declare Python, native executables, ROS package nodes and plain commands; supports start/stop by state, dependency order, CPU roles, environment isolation, restart on failure and staged shutdown Mod Child Nodes
AI-assisted development The source tree ships an elf3-feature-development Skill that guides AI to plan feature boundaries, buttons, App display, joint commands, dependencies and layered verification from the current framework code, production Mods and the Wiki Using the built-in Skill
Real-time control and engineering delivery Provides cycle budgets, deadline statistics, CPU affinity and real-time scheduling; validates the state graph, input conflicts and dependencies at startup, and supports levelled logging, public-release trimming and self-checks Control Scheduling, Debugging, Release Protection

Choose your starting point

Your goal Start here Read next
Add a pose, trajectory or motion state Develop your first motion with Mod API 4.0 Advanced Mod State Development Guide
Use AI to help implement or review VKH6 features Using the built-in Skill Mod Public API
Integrate ONNX, NPZ or perception policies Package a model motion as a Mod Inference Architecture
Connect your own robot messages, SDK or hardware Robot Platform Integration Guide Sim2Real
Change the state machine, scheduler or framework internals Architecture Overview Framework Internals
The program fails to load or run Debugging, Verification and FAQ Go to the reference manual for the failing layer

You don't need to read the Wiki from start to finish. Pick the route that matches your work.

Route A: develop a motion Mod

  1. Develop your first motion with Mod API 4.0: complete the minimal mod.yaml + state.py.
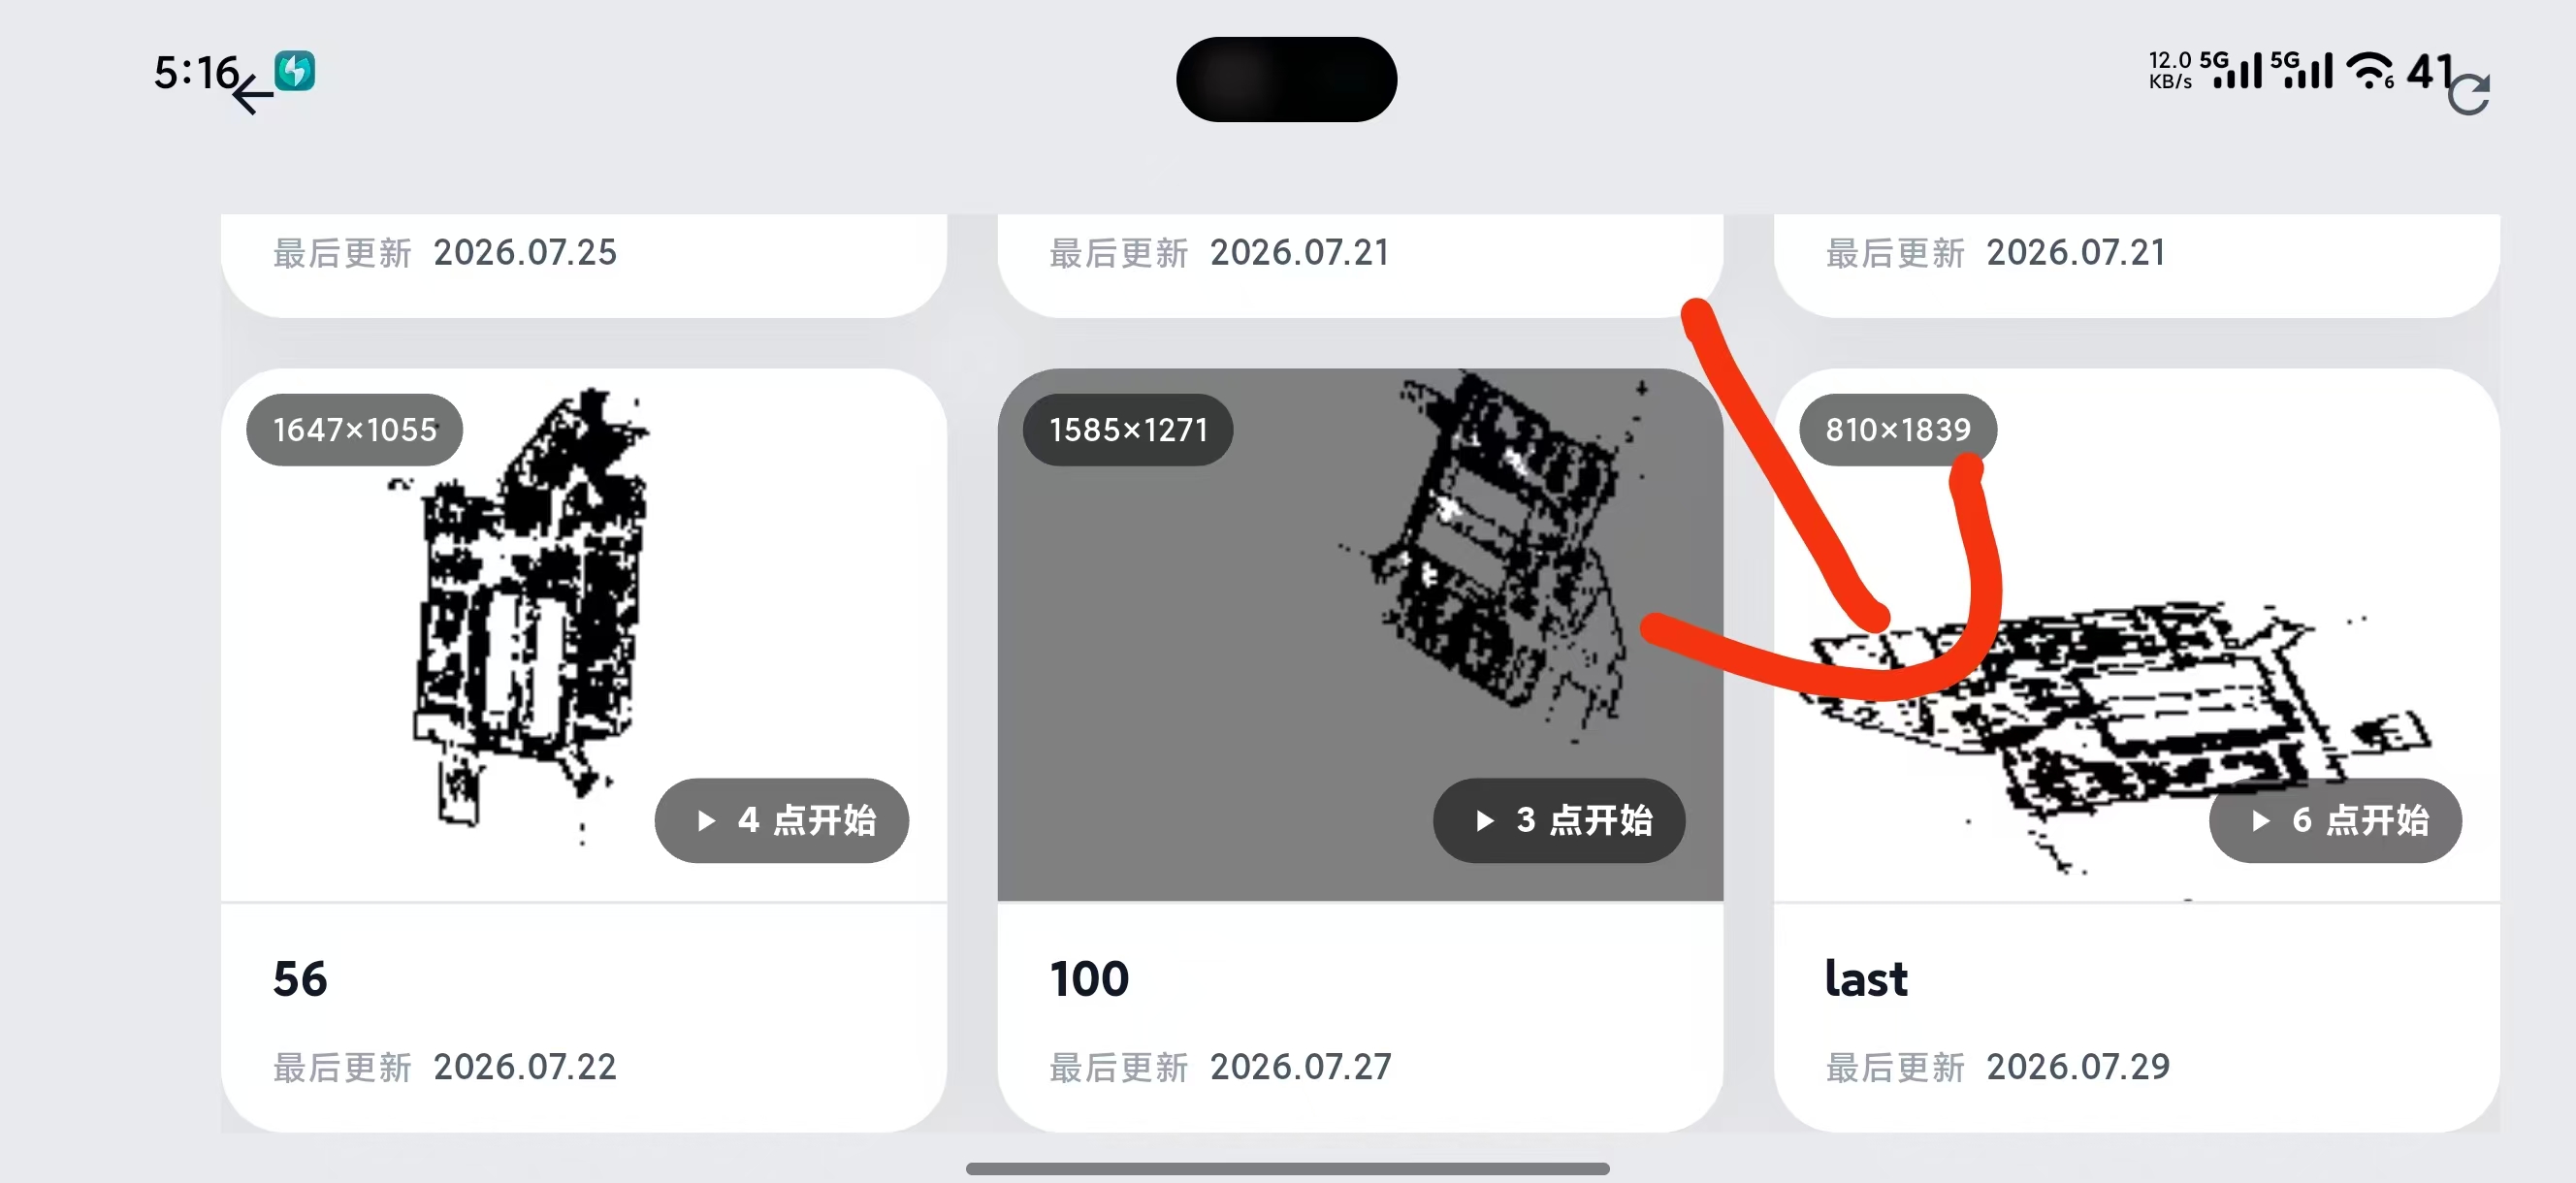
  2. Advanced Mod State Development Guide: choose the Pose, formula trajectory, model or full state API.
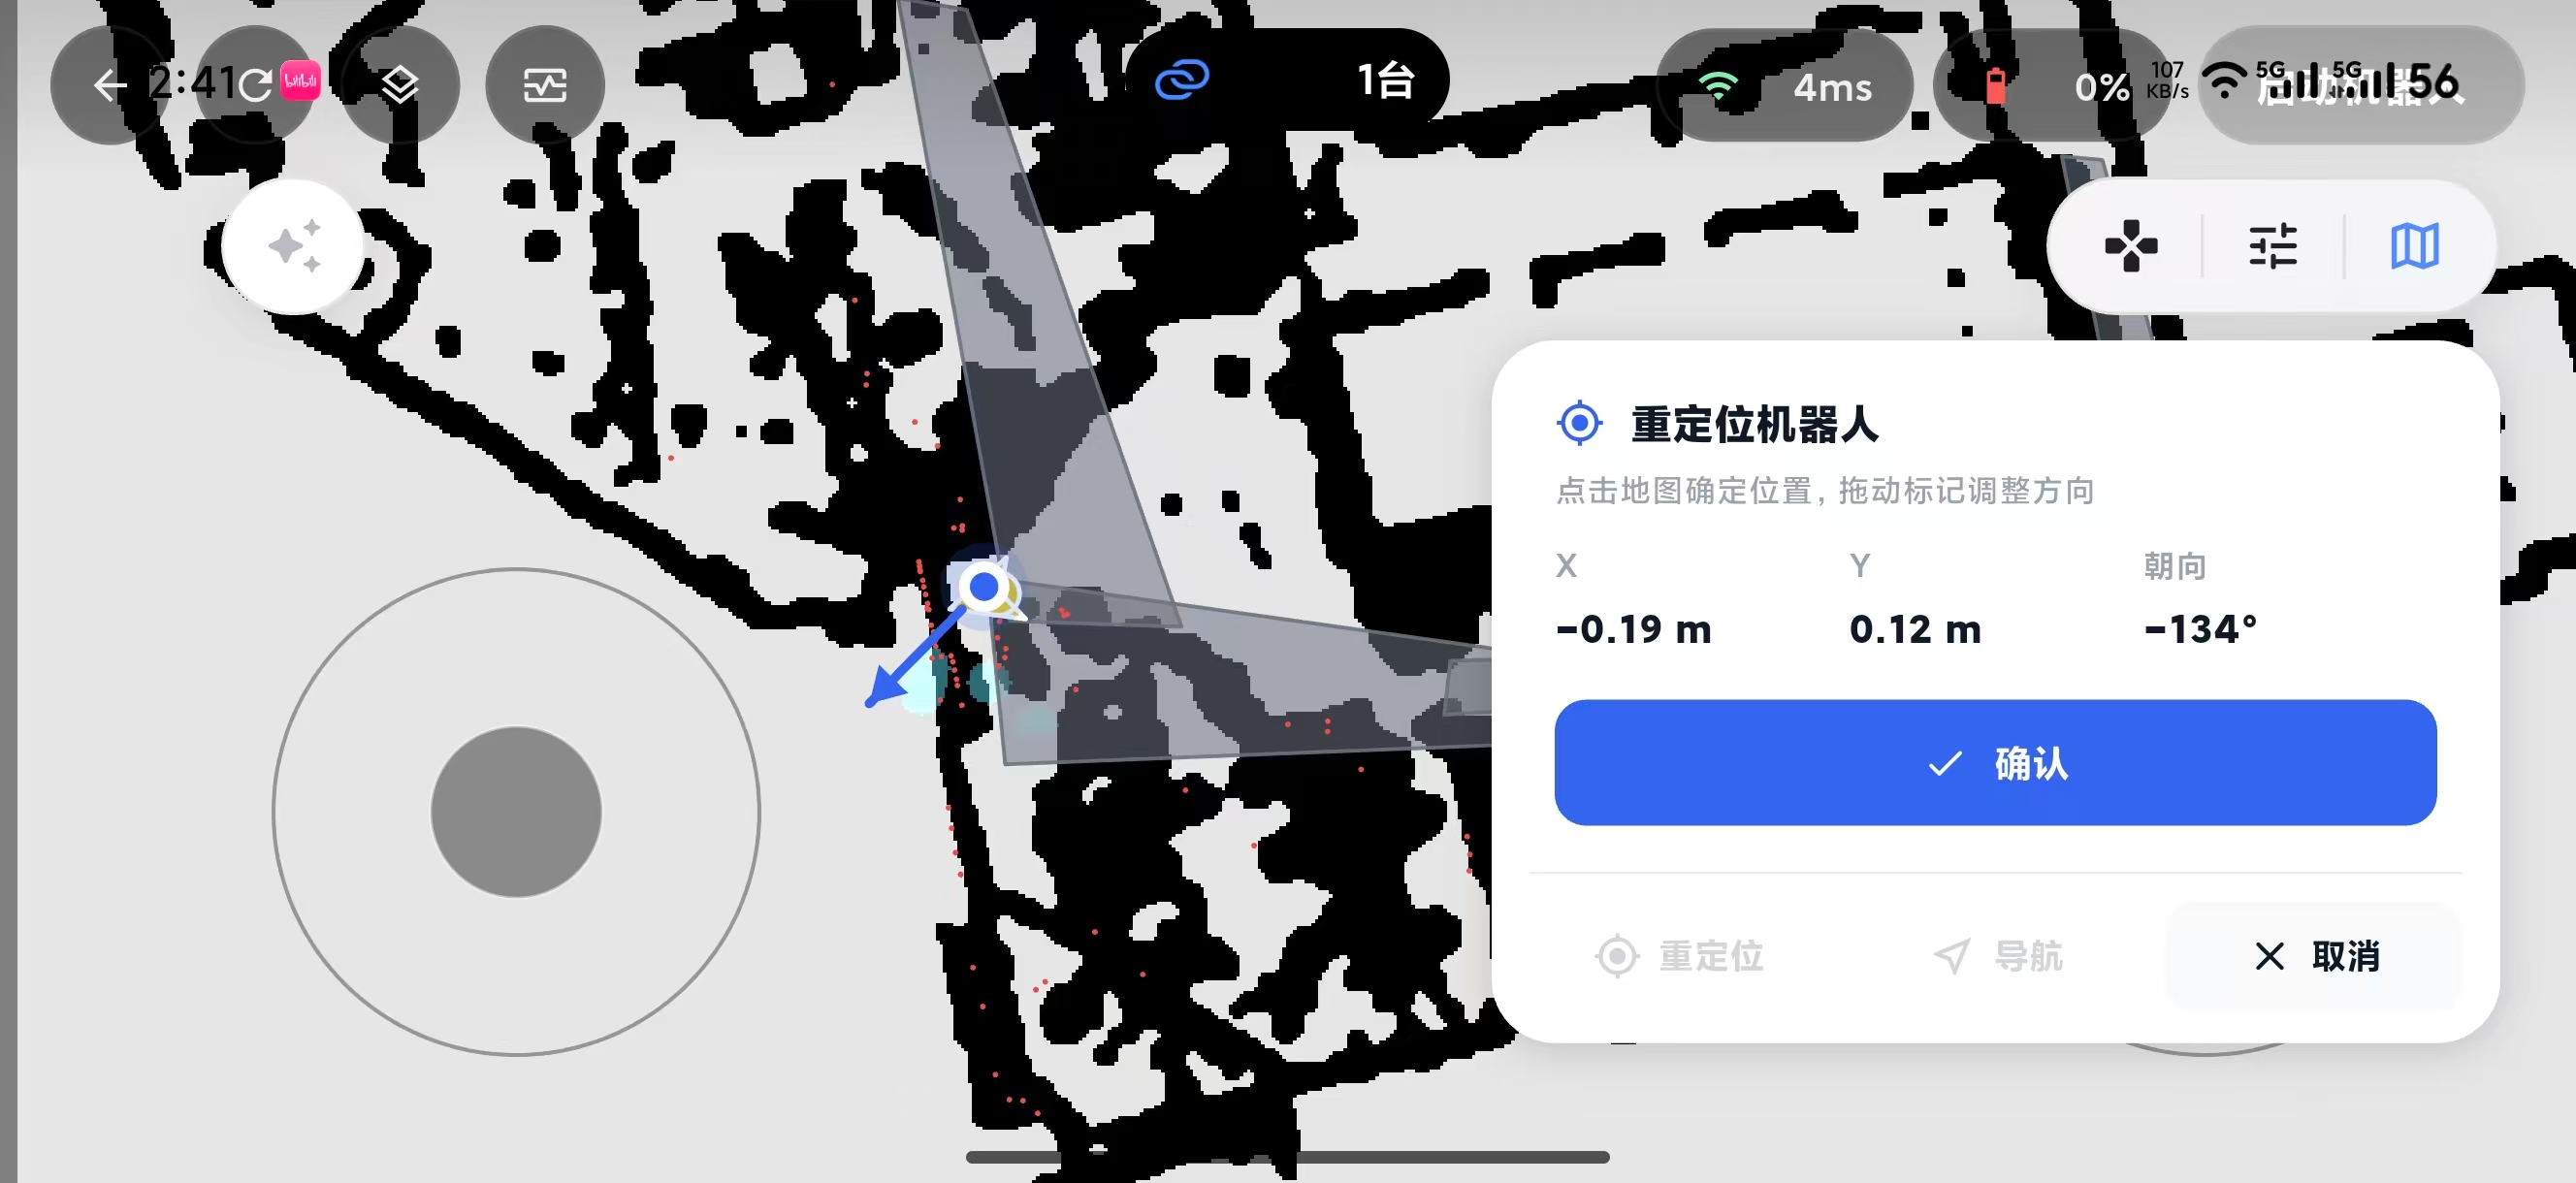
  3. Bind buttons and connect routes: trigger states from the keyboard, gamepad or CRSF.
  4. Engineering composition example: add resources, dependencies, startup validation and release boundaries.

Route B: deploy an inference policy

  1. Package a model motion as a Mod: manage model assets and lifecycle.
  2. Inference Architecture: choose ONNX Runtime, OpenVINO or RKNN, and understand history frames and performance constraints.
  3. Depth-perception walking Mod development log: a complete engineering reference for a multi-input perception policy.
  4. Sim2Real: check observation, action, control frequency and real-robot safety.

Route C: connect your own robot program

  1. Architecture Overview: understand the boundary between the platform integration layer and the motion control core.
  2. Robot Platform Integration Guide: implement state snapshots, joint mapping and hardware output.
  3. Framework Control Scheduling: configure cycles, deadlines, core pinning and real-time priority.
  4. Sim2Real: validate in stages: power-off enable, gantry, then ground.

Route D: extend or maintain the framework

  1. Architecture Overview: first confirm whether the change belongs to the platform, Runtime, Mod, input or inference layer.
  2. Framework Internals: locate the implementation along the startup, loading and per-cycle paths.
  3. Mod Public API: don't leak framework.runtime internal interfaces into customer Mods.
  4. Advanced Configuration Recipes and Version Migration Guide: handle complex compositions and upgrades of existing projects.

All step-by-step lessons are collected in the Tutorial Index.

Find docs by task

What I want to do Read directly
Add a fixed pose or formula trajectory Custom State Reference
Merge joint commands from models, topics, IK or trajectories Multi-source Joint Command Composition
Understand 29/31/N joint input and output mapping Joint Layout and Mapping
Temporarily override the head or other specific joints Runtime Joint Command Override
Manage model assets and startup/on-demand resources Models, Resources and launch
Add a new way to switch between states Custom Transition Tutorial
Configure real-time blending of two states Dual-state Running Blend
Change buttons, combinations or joystick mapping Remote Controller Input Mapping
Connect UDP, serial or a new input protocol Custom Input Driver Tutorial
Start camera, perception or communication ROS nodes for a Mod Declaring and Running Mod Child Nodes
Look up a YAML field YAML Field Reference
Organise multiple Mods, startup validation and release Engineering Composition Example
Use AI to plan, implement or review project features Built-in AI Development Skill
Generate the public release tree Release Protection and Public Sync

Document types

Type Use Examples
Step-by-step tutorial Complete a specific goal in order Tutorial Index
Development guide Explains choices, boundaries and the full engineering approach State Development Guide, Platform Integration Guide
Reference manual Look up fields or interfaces when you already know what to do YAML Field Reference, Mod Public API
Architecture docs Read when changing the framework or tracking down low-level problems Architecture Overview, Framework Internals

Core boundaries

  1. bxi_example_demo.py is the VKH6 ROS/hardware integration layer, not the motion control framework itself.
  2. RobotControlRuntime manages control scheduling and lifecycle; RobotControlFramework manages Mods, the state machine, Transitions and the per-cycle control computation.
  3. Customer Mods integrate with control through framework.mod_api, and policy implementations may depend on framework.inference; neither depends on framework.runtime.
  4. New motions start from a Mod; new robots start from a platform adapter; new inference devices start from an inference backend.
  5. Input Drivers only produce raw input; business state switching is decided by Mod events and routes.

Tutorial Index

This page is a table of contents for the tutorials; you don't need to read them all in number order. On first use, complete the basic path first, then pick topics by task.

Recommended starting point: Develop your first motion with Mod API 4.0

Basic path

Order Tutorial Goal
1 Develop your first motion with Mod API 4.0 Create, validate and load a two-file Mod, using named joints and long-lived buffers
2 Advanced Mod State Development Guide Understand the core state base class, its convenience wrappers and advanced extension points
3 Bind buttons and connect Mod routes Trigger states with the keyboard, gamepad or CRSF

After these three you can develop ordinary customer motions on your own.

Models and real-robot deployment

Tutorial When you need it
Package a model motion as a Mod Integrating ONNX, NPZ, motion replay and model warm-up
Depth-perception walking Mod development log Developing a multi-input perception policy state step by step from an external ROS image subscription
Take a model from simulation to the real robot Checking observation, action, joint order and real-robot safety

Connect your own robot platform

If you are only adding motions to an existing robot, keep using the Mod tutorials. Platform integration is only needed when the robot state messages, joint contract, motor commands or hardware SDK change:

Guide Goal
Robot Platform Integration Guide Connect your own state and hardware commands to RobotControlRuntime
Framework Control Scheduling Configure control cycle, deadlines, core pinning and real-time priority
Sim2Real Verify the policy contract and real-robot safety

State switching

A Transition decides how motor frames are generated between the source state and the target state, avoiding jumps when the MIT command fields of the two sides are discontinuous. For ordinary motions prefer the built-in transitions; only read the custom tutorials when the switching algorithm has special needs.

Tutorial When you need it
Write a custom transition inside a Mod The built-in transitions cannot express the switching process you need
Use dual-state running blend Two dynamic states must be sampled at the same time during the switch

System extension and delivery

Tutorial When you need it
Write a custom UDP input Driver Connecting a new device or communication protocol
Engineering composition example Combining multiple Mods, resources, startup validation and release protection

Tutorials vs reference manuals

  • Tutorials give the complete sequence of operations from creating files to verification.
  • Reference manuals are for looking up fields, interfaces and boundary conditions.
  • When you hit an error, read Debugging, Verification and FAQ first rather than re-reading every tutorial.

Hands-on 1: Develop a motion with Mod API 4.0

This lesson creates com.example.sin_wave, which enters a sine-wave swing from the basic walking state and returns when the normal-mode button is pressed.

For developers new to the framework. This lesson involves only two files and does not require understanding Resources, command composition or state machine internals first. The example uses the current named joints and long-lived reusable buffers and does not rely on VKH6's numeric joint indices.

This page is an introductory tutorial to follow in order. For the full lifecycle and fields, go to Custom State Reference; to add models, Resources or ROS entities, continue to Advanced Mod State Development Guide.

What you will build

After this lesson you will have:

  • an auto-discoverable com.example.sin_wave Mod;
  • a RobotControlState that uses the core base class directly, with strongly typed parameters;
  • a named-joint motion that adapts to robots with 29, 31 or more joints;
  • a set of states and routes that are loaded and validated when the node starts.

First understand the core state base class

RobotControlState is the framework's core state base class. The state machine requires every state factory to ultimately return an instance of it, and runs control logic through the on_bind/on_prepare/on_enter/on_update/on_exit/on_unbind lifecycle it provides.

This lesson inherits RobotControlState directly and explicitly implements time accumulation, motor frame output and a stable entry frame. The first lesson only uses an entry-frame transition; dynamic sampling of two states is left to a dedicated lesson so as not to introduce too many concepts at once.

1. Create the directory

First make sure the terminal is at the repository root:

cd ~/bxi_rl_controller_ros2_example

Create the Mod directory by hand:

mkdir -p src/bxi_example_py_elf3/mods/com.example.sin_wave
src/bxi_example_py_elf3/mods/com.example.sin_wave/
  mod.yaml
  state.py

2. Write the state

state.py:

from dataclasses import dataclass
import math
import numpy as np

from bxi_example_py_elf3.framework.mod_api import (
    EntryFrameProvider,
    RobotControlState,
)


@dataclass(frozen=True)
class SinWaveParams:
    joint: str = "l_knee_y_joint"
    amplitude: float = 0.25
    frequency: float = 0.5


class SinWaveState(RobotControlState, EntryFrameProvider):
    Params = SinWaveParams

    def __init__(self, name, state_id, params: SinWaveParams | None = None):
        super().__init__(name, state_id)
        self.params = params or SinWaveParams()
        self.elapsed = 0.0
        self._joint_index = None
        self._base_position = None
        self._layout = None

    def on_prepare(self, ctx, from_state):
        layout = ctx.robot_layout
        if self._layout is not layout:
            # Recompile only on first entry or when the Robot Layout changes.
            self._joint_index = layout.index(self.params.joint)
            self._base_position = np.empty(
                layout.dof_num,
                dtype=np.float32,
            )
            self._layout = layout
        # Capture the reference pose before each entry, so the sine value does not accumulate frame by frame.
        np.copyto(self._base_position, ctx.last_motor_frame.qpos)

    def on_enter(self, ctx):
        self.elapsed = 0.0

    def _calculate_frame(self, ctx, elapsed):
        if self._joint_index is None:
            raise RuntimeError("sin wave state is not prepared")
        last = ctx.last_motor_frame
        frame = self._motor_frame(
            ctx,
            self._base_position,
            last.kp,
            last.kd,
        )
        frame.qpos[self._joint_index] = self._base_position[self._joint_index] + (
            self.params.amplitude * math.sin(
                2.0 * math.pi * self.params.frequency * elapsed
            )
        )
        return frame

    def get_entry_frame(self, ctx):
        return self._calculate_frame(ctx, 0.0)

    def on_update(self, ctx, dt):
        frame = self._calculate_frame(ctx, self.elapsed)
        self._apply_frame(ctx, frame)
        self.elapsed += dt

RobotControlState provides the core lifecycle, the long-lived reusable _motor_frame() buffer and the _apply_frame() output entry point. The example implements get_entry_frame() to meet the requirement that first_frame_switch places on the target state; normal control only goes through on_update(), which advances elapsed once per cycle.

This state's natural output layout is ctx.robot_layout: target joints are updated by the formula and the remaining robot joints hold the pose they had on entry. So when the robot grows from 29 joints to 31 or N, you don't need to change model inputs or hard-code new array lengths. Joint names and buffers are compiled in on_prepare() only the first time a Robot Layout is seen; the reference array and the _motor_frame() MotorFrame are both reused long-term, with no .copy() in the control cycle and no repeated array creation.
Don't read ctx.robot_layout in on_bind(), because the first robot state snapshot may not have arrived when the state is bound. on_bind() is mainly for creating ROS entities; preparation that depends on the robot layout goes in on_prepare().

Here we explicitly choose to keep the kp/kd of the previous control frame, so this tutorial only enters from a normally controlled state; if the state can be entered from zero-torque mode, it must provide its own non-zero safe gains. on_enter() resets the time when the Transition completes and the state formally takes over control, and on_update() advances time and submits the motor frame every control cycle.

3. Write the manifest

mod.yaml:

schema: 1
id: com.example.sin_wave
name: Sine Swing
version: 1.0.0
api: ">=4,<5"
enable: true
entrypoint: null
visibility: public
requires:
  - id: com.bxi.basic_actions
    version: ">=1,<2"
conflicts: []
python_exports: []
runtime_requirements:
  python: []
  ros: []
  system: []

events:
  activate:
    slot: btn_10
    value: 4

states:
  sin_wave:
    factory: state:SinWaveState
    label: Sine Swing
    priority: 100
    group: Customer
    icon: waves
    params:
      joint: l_knee_y_joint
      amplitude: 0.25
      frequency: 0.5

routes:
  - from: com.bxi.basic_actions/normal
    event: activate
    to: sin_wave
    transition: first_frame_switch

  - from: sin_wave
    event: com.bxi.basic_actions/normal
    to: com.bxi.basic_actions/normal
    transition: first_frame_switch

The Transition here describes how motor frames should be generated each control cycle between the state machine receiving a switch request and the target state formally entering. The MIT command fields of the two states may be discontinuous, and swapping frames directly could make the robot move suddenly. Both routes use first_frame_switch, which reads the target state's stable entry frame and builds up control force gradually. This example only needs to implement EntryFrameProvider; to blend two dynamic states, read Dual-state Running Blend.
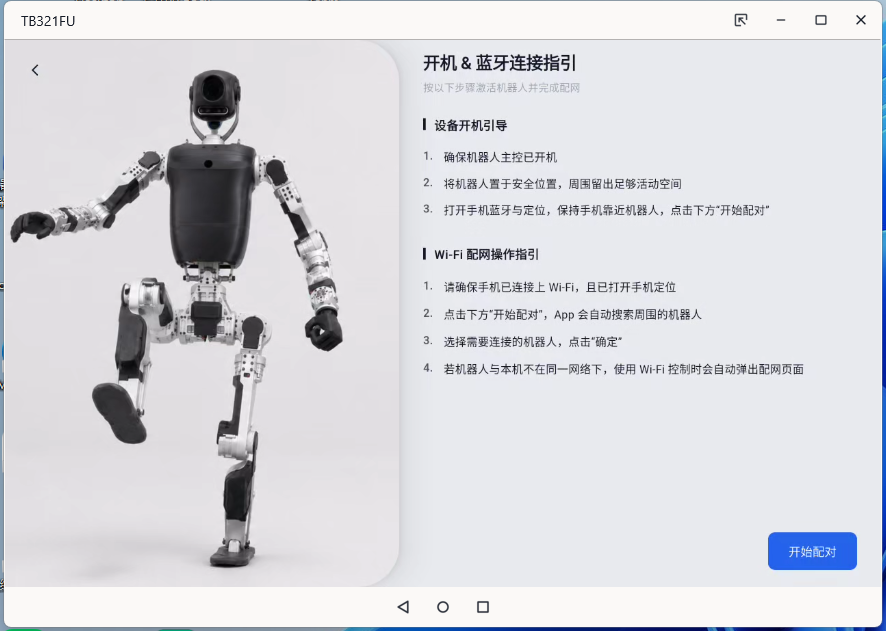
entrypoint: null lets the conventional factory build the dataclass automatically from the class's Params, so no plugin.py is needed; the other header fields still need to be filled in explicitly.

4. Build and verify

colcon build --packages-select bxi_example_py_elf3 \
  --symlink-install --merge-install
source install/setup.bash

The startup log should contain:

[com.example.sin_wave]: loaded v1.0.0: .../com.example.sin_wave

The full state name is com.example.sin_wave/sin_wave. The remote controller already has a gamepad/CRSF combination btn_10=4, but there is no keyboard entry for this lesson yet; test that combination first, or continue to lesson 3 to add the keyboard binding.

Checklist

  1. The module and class in factory: state:SinWaveState exist.
  2. Cross-Mod references have full names and requires.
  3. Parameter names match the dataclass fields and the types are correct.
  4. on_update() advances elapsed only once per cycle.
  5. The code works through joint names and does not treat numeric indices as a cross-component contract.
  6. The control cycle reuses MotorFrame, with no per-frame .copy() or array creation.

If a motion's joint commands come from a model, ROS topics, IK or programmatic trajectories at the same time, don't keep piling logic onto this single-source example; use Multi-source Joint Command Composition. If the policy outputs a different number of joints than the robot has, read Joint Layout and Mapping.

Next lesson: Model motion state.

To keep upgrading this state step by step into models, Resources, custom Transitions, ROS and Drivers, go to Advanced Mod State Development Guide.

AI-assisted development with the built-in Skill

The project source ships an elf3-feature-development Skill that constrains AI to develop features according to the real API, Mod organisation and engineering rules of the current VKH6 framework:

.agents/skills/elf3-feature-development/
├── SKILL.md
├── agents/openai.yaml
└── references/
    ├── feature-planning.md
    ├── manifest-and-layout.md
    ├── state-and-lifecycle.md
    ├── models-resources-and-nodes.md
    ├── joints-transitions-and-inputs.md
    └── validation-and-release.md

It applies when adding, migrating, extending, debugging or reviewing:

  • robot features, states, motions and control modes;
  • mod.yaml, event, route, action, speed profile and the App manifest;
  • RobotControlState and Pose, Procedural, Policy and MotionReplay states;
  • models, Resources, Mod child nodes, ROS topics and third-party runtime dependencies;
  • 29/31/N joint adaptation, five-field MIT commands, command composition and Transitions;
  • gamepad button planning, simulation verification, real-robot safety checks and Mod release.

How to use it

Start an AI coding tool that supports project-level Skills at the repository root, then simply describe what you need. To make it explicit that the project's rules should apply, you can also name the Skill in your request:

Using the project's built-in elf3-feature-development Skill,
add a navigation control state that subscribes to /cmd_vel, and plan gamepad entry, exit and mode switching.

Tools that support the $SkillName syntax can also use:

$elf3-feature-development Add a self-contained, portable visual-following feature to ELF3.

An AI that scans .agents/skills will discover the Skill from .agents/skills/elf3-feature-development/SKILL.md and continue reading the relevant material in references for the task. If your AI tool doesn't support automatic Skill discovery, explicitly ask it to:

  1. read .agents/skills/elf3-feature-development/SKILL.md in full;
  2. read the references it routes to for the task;
  3. only then start planning or changing code.

Don't copy just a small part of the Skill into a prompt. The main file and the references together form the complete development constraints, and they are updated along with the project code.

How the Skill organises a feature

The Skill treats "implement a feature" as the goal. A Mod is the default unit of deployment and portability, but Mods are not created for their own sake. The AI first checks whether one extra Mod can hold all the states, events, routes, App display, dependencies, nodes and assets; only platform integration, global Input Drivers, shared framework capabilities or defects in existing features are changed in central code first.

A typical planning chain looks like this:

User feature
  -> Single-Mod boundary and dependencies
  -> Physical button combination
  -> btn_* slot and value
  -> event
  -> route or action
  -> RobotControlState behaviour
  -> App manifest
  -> Layered verification in simulation and on the real robot

The project's default Xbox configuration already reserves every state on LB/RB/LT/RT and the A/B/X/Y combinations. When developing a new feature, the AI should first scan the events used by enabled Mods and reuse the preset btn_* values, rather than changing the remote controller configuration every time. State icons and action icons in the App should use exact Material Symbols names chosen from Google Fonts Icons.

API lookup order

The Skill requires the AI not to guess APIs from names, but to verify them in this order:

  1. the public exports and implementation of framework/mod_api in the current working tree;
  2. the production code in src/bxi_example_py_elf3/mods closest to the requirement, plus the repository tests and load validation;
  3. the Wiki repository matching the current code repository;
  4. Runtime internals, only to understand behaviour or locate framework defects;
  5. for ROS 2, message packages and vendor SDKs, the official material for the versions the project actually uses.

If the source, production Mods, tests and Wiki disagree, the currently checked-out framework code and its actual loading behaviour win, and the documentation drift should be pointed out explicitly. Customer Mods depend only on bxi_example_py_elf3.framework.mod_api; policy implementations may also depend on the public framework.inference, and must not import framework.runtime internal interfaces.

An actionable request should contain the goal and constraints; you don't need to choose internal APIs for the AI in advance:

Using the elf3-feature-development Skill, add a patrol-inspection feature to the robot.
It subscribes to /inspection/target and is entered from the normal state with an unused preset button combination;
the B button switches back to manual control; keep the feature, nodes and dependencies in one portable Mod where possible.
Plan the interaction, fault fallback and App display first, then implement it and verify it in simulation.

You can also ask the AI for a read-only review first:

Use the elf3-feature-development Skill to review com.example.inspection,
reporting dangerous motor output, joint layout errors, thread races and missing deployment dependencies first; don't modify any files.

Human acceptance is still necessary

The Skill reduces API guessing, scattered features and deployment omissions, but AI-generated code must still be reviewed by a person. At minimum confirm that:

  • event slot/value pairs do not conflict with enabled Mods;
  • the state gives correct five MIT fields for every target joint;
  • there are no unprotected shared writes between callbacks and the control thread;
  • signal loss, model failure, motion end and cancellation all have a defined outcome;
  • the build, configuration loading and every entry/exit path have been verified in simulation;
  • for real-robot tests the emergency stop is reachable, and you start with a gantry, low gains and a cleared area.

Further reading:

Debugging, Verification and FAQ

This page covers common failures from input devices, Mod loading, state switching, inference resources and Mod child nodes through to build and deployment. For robot state subscription, motor output or hardware watchdog problems, go to the Robot Platform Integration Guide; for control-cycle overruns, go to Framework Control Scheduling.

Locate the failing layer first, then read the specific section. Don't change the input YAML, Mod routes, Transitions and state code all at once.

Quick diagnosis

Symptom Check first
Mod fails to load at node startup Mod manifest, factory, dependencies and parameters
No message when a button is pressed sources -> controls -> outputs
/motion_commands arrives but the state doesn't switch Mod events and the current state's routes
State switched but output is wrong on_enter/on_update and MotorFrame
Jumps during the switch or a capability error Transition and Entry/RunningFrameProvider
A change has no effect Whether you rebuilt and restarted the relevant node
Model file errors Resource asset path, loader and warm-up stage

Build

colcon build --packages-select remote_controller bxi_example_py_elf3 \
  --symlink-install --merge-install
source install/setup.bash

If you are told the install layout is inconsistent, use the matching --merge-install, or switch to a fresh set of build/install/log directories. If an old build cache still references a deleted model directory, clean only that package's cache.

Inspect input and state

ros2 topic echo /motion_commands
ros2 topic echo /simulation/state_machine_info

For hardware, replace simulation/ with hardware/. The state information JSON contains current, pending, preparing, the active transition, events and a graph snapshot; action display information is in graph.actions[], each Mod's loaded/unavailable/disabled status is in mods[], and each Mod node's running/stopped/restarting/faulted/unavailable status is in nodes[].

A Mod is not discovered

  • Is mod.yaml inside the built-in mods/ or a mod_paths subtree?
  • Does the installed share/bxi_example_py_elf3/mods/ contain the files?
  • Are all 12 header fields filled in explicitly, does runtime_requirements contain python/ros/system, is schema set to 1, is api compatible with the current framework, and are the name, id and version valid?
  • Is there a duplicate id?
  • Does the log print loaded v<version>: <root> from the Mod logger?

A Mod fails to load

  • needs factory: module:Class: a state using entrypoint: null is missing the conventional factory.
  • factory ... must name a RobotControlState class: wrong module, class name or inheritance.
  • entrypoint module does not exist: the entrypoint doesn't match the file name.
  • entrypoint is not callable: the factory after the colon doesn't exist.
  • state manifest/factory mismatch: the keys of states and state_factories differ.
  • requires missing/version: a dependency is missing or its version doesn't match.
  • dependency cycle: Mod dependencies form a cycle.
  • enabled Mods conflict: two enabled Mods hit at least one side's conflicts declaration.
  • missing Python module/ROS package/system library: runtime_requirements are not met; check the Mod's own vendor/ or the target machine's runtime environment.
  • status: unavailable: the dependency check failed; the framework did not import the Mod or node module and does not consume a restart attempt.
  • unknown params: manifest parameters were not consumed by StateBuildContext.
  • missing required param / must be ...: a dataclass parameter is missing or the YAML type is wrong.

Model not found or not loaded

  • Assets must be in the current Mod's assets/.
  • The context.asset() path should be written as assets/file.onnx.
  • Resources with policy="startup" are prepared before the control loop starts; failure blocks startup.
  • Resources with policy="on_demand" are prepared asynchronously the first time the target state is requested; the state information shows preparing.
  • A state must declare its dependency via resources=(handle,); ResourceHandle.get() does not trigger loading or block waiting.
  • Warm up in on_prepare(); don't create an inference Session when the plugin is imported.
  • After replacing a model, restart the control node; on startup failure, look at the specific resource loading exception.

Buttons produce output but the state doesn't switch

  1. Do the slot and value on /motion_commands match mod.yaml events?
  2. Is there a route for the current full state name?
  3. Do cross-Mod names contain /, and does the dependency exist?
  4. Is it waiting on a delay, a resource that is preparing, or an active transition?
  5. Are there inputs that can trigger at the same time for the same state? The loader rejects these in advance.

priority and index

Normal states only set manifest.priority. Larger values come first; states with equal priority are ordered by full state name, ascending, and the framework generates the index automatically.

ValueError: duplicate explicit state manifest index N: 'state-a' and 'state-b'

Only set manifest.index explicitly when you really need a fixed absolute position. Two duplicate explicit indexes abort startup; negative numbers, booleans and strings are also configuration errors.

Transition errors

A Transition is responsible for motor frames during a state switch, avoiding jumps when the MIT command fields of the source and target states are discontinuous. So for these errors check both the transition the route selects and the frame capabilities the two states provide.

  • must implement EntryFrameProvider: the target has no entry frame.
  • must implement RunningFrameProvider: the dynamically sampled side has no running-frame capability.
  • unknown transition type: the business transition module was not imported by the Mod entrypoint.
  • unknown fields: ConfigReader.finish() found a misspelt field.
  • A jump occurs: check that the entry frame matches the first frame after on_enter().

A change has no effect

  • Mods, system YAML, model assets and remote controller YAML are only read when the relevant node starts.
  • After changing source code, rebuild the workspace first, then restart the control node or remote_controller.
  • With --symlink-install, Python source changes may take effect directly, but the process must still be restarted.
  • For a deployed non-symlink install/, you can copy a complete Mod directory straight into share/bxi_example_py_elf3/mods/; it is discovered automatically after a restart, with no rebuild needed on the target machine.
  • A failed startup never enters the control loop; fix the manifest, dependencies, modules or resource paths according to the first loading exception.

Release tree fails

python3 tools/sanitize_release.py --out /tmp/public_release --self-check

If a public Mod is reported to depend on a protected Mod, check explicit requires and cross-Mod routes. Shared resources should move to a public resource Mod.

Offline load check

The check below loads all startup resources but does not request on_demand resources; use it to validate Mods, startup resources and the state graph:

from pathlib import Path
import yaml
from bxi_example_py_elf3.framework.runtime.mod_loader import load_mod_runtime

package = Path("src/bxi_example_py_elf3")
base = yaml.safe_load((package / "config/elf3_state_machine.yaml").read_text())
runtime = load_mod_runtime(base, built_in_root=package / "mods")
print([mod.id for mod in runtime.mods])
print(sorted(runtime.state_factories))
runtime.close()

The current default tree should discover 7 Mods and 17 states.

The depth camera has no data

com.bxi.normal_depth no longer includes a built-in RealSense node. The real-robot camera is managed by the separate bxi_depth_camera package, and the hardware example launch includes its cameras.launch.py by default.

First check the nodes and standard topics:

ros2 node list
ros2 topic list | grep body_depth_camera
ros2 topic hz /hardware/body_depth_camera/depth/image_rect_raw
ros2 topic echo /hardware/body_depth_camera/depth/camera_info --once

For simulation, replace hardware with simulation. Then confirm:

  • Does cameras.body_depth_camera.serial_no match the actual device? Single-camera fallback is only suitable when exactly one device is connected.
  • Are the depth image and CameraInfo both present, and do they belong to the same resolution profile?
  • Is the image encoding 16UC1, mono16 or 32FC1?
  • Are camera_name and any explicit topic/camera_info_topic in mod.yaml consistent with each other?
  • Does the log show waiting for CameraInfo, invalid intrinsics, a wrong shape or a depth timeout?

When a state can't be entered, check /hardware/state_machine_info: stale camera data makes is_available() return False, while a model resource that is still being prepared shows preparing. These are different problems: for the first, check the ROS data; for the second, check the Resource status and loading errors.

A normal user can't rebuild after running as root

If the run user is root and the build user is a normal user, older versions could generate root-owned __pycache__/*.pyc in Mod or vendor directories, and later builds fail with Permission denied: '*.pyc'. The current framework prevents the Mod main process, the dependency probe process and built-in node child processes from writing Python bytecode into Mod directories; files generated before the upgrade still need a one-off fix of the workspace ownership:

cd ~/bxi_ws/bxi_rl_controller_ros2_example
sudo chown -R bxi:bxi src build install log
./build.sh

If you don't want to change the whole workspace, first locate root-owned files with find src build install log -user root -print. You can also add PYTHONDONTWRITEBYTECODE=1 to the run command to further stop ROS launch itself from generating caches:

PYTHONDONTWRITEBYTECODE=1 ros2 launch \
  bxi_example_py_elf3 example_demo_hw.launch.py

Advanced Mod State Development Guide

This guide covers Mod API 4.0 and follows a progressive path, extending a fixed-pose state step by step up to a custom input Driver. Each stage can serve as a standalone final implementation. Throughout, we maintain the same state:

This page is for developers who have completed the first lesson. Don't stack every convenience class onto one state in order; first use "Choosing where to stop reading" to find the section that matches your need, and implement one clear state design.

com.example.wave/wave

Understand the core first, then choose a convenience class. RobotControlState is the main abstraction of the state system; PoseState, ProceduralState, PolicyState and MotionReplayState are all its subclasses that simply implement repetitive code for common scenarios.

How the core class and convenience classes relate

What the state machine builds and runs is always a RobotControlState:

RobotControlState                         Core lifecycle and full control capability
├─ PoseState                              Fixed target pose wrapper
├─ ProceduralState                        Trajectory wrapper with elapsed time
├─ PolicyState                            Resource resolution, warm-up and inference wrapper
└─ MotionReplayState                      Fixed motion replay wrapper

The core class defines lifecycles such as on_bind/on_prepare/on_enter/on_update/on_exit/on_unbind, and provides helpers for velocity input, MotorFrame and motor output. Convenience classes inherit from the core class and implement common logic such as on_update(), entry frames or running frames, so beginners only fill in the motion itself.

Using a convenience class does not create a second runtime, nor does it lower the framework's ceiling. When the default behaviour doesn't fit, you can switch to inheriting RobotControlState directly; as long as you keep the construction contract and state capabilities, the Mod ID, state name and routes don't need to change.

How the convenience classes work

  • PoseState's on_update() calls target_position(), builds a complete MotorFrame with the kp/kd from gains(), then writes the frame to the control context. It uses the same computation for both the entry frame and the running frame.
  • ProceduralState resets elapsed to zero in on_enter(). Each real update first calls compute_frame(ctx, elapsed) and then advances time; when a Transition samples with advance=False, it only observes the current output and does not change the time.
  • PolicyState resolves and resets the policy during prepare/enter and can call model warm-up; at run time the subclass provides the entry position and the inferred position, and the base class handles policy gains, the ResourceHandle and the MotorFrame uniformly.
  • MotionReplayState targets fixed motions that implement the ReplayPolicy interface, and handles warm-up, pause, completion detection and explicit end-state requests uniformly.

The core value of these wrappers is reusing the correct lifecycle and Transition sampling semantics, not hiding or replacing RobotControlState. Developers can still override inherited methods, or implement the core class directly once requirements get complex.

Developing an ordinary motion for the first time: reading up to section 3 is enough. Read the later sections only when you need models, shared resources, custom transitions, ROS entities or new input protocols.

Choosing where to stop reading

Need Read up to Main abstraction
Fixed joint targets Section 1 PoseState
Formula trajectories, interpolation or periodic motion Section 3 ProceduralState + dataclass
Online policy inference or motion replay Section 4 PolicyState / MotionReplayState
Full control of the state lifecycle yourself Section 5 Implement RobotControlState directly
Shared models, data or hardware objects Section 6 Resource
A custom state-switching algorithm Section 7 Transition
A state that owns ROS communication entities Section 8 on_bind/on_unbind
Connecting a completely new input device or protocol Section 9 InputDriver

Stable contract

When upgrading, id, state names, button events and routes don't need to change; old configuration and remote controller bindings don't need rewriting. Only move to the next layer when the current one really isn't enough.

When you need more capability, keep adding Resources, Transitions, ROS entities and InputDrivers on the same core model.

0. Create the Mod by hand

Create the directory:

mkdir -p ~/bxi_mods/com.example.wave

This guide creates two files:

~/bxi_mods/com.example.wave/
  mod.yaml
  state.py

Append a search root to src/bxi_example_py_elf3/config/elf3_state_machine.yaml:

mod_paths:
  - /home/your-username/bxi_mods

Build the workspace and load the environment:

colcon build --packages-select bxi_example_py_elf3
source install/setup.bash

Create ~/bxi_mods/com.example.wave/mod.yaml by hand:

schema: 1
id: com.example.wave
name: Wave Example
version: 1.0.0
api: ">=4,<5"
enable: true
entrypoint: null
visibility: public
requires:
  - id: com.bxi.basic_actions
    version: ">=1,<2"
conflicts: []
python_exports: []
runtime_requirements:
  python: []
  ros: []
  system: []

events:
  activate:
    slot: btn_10
    value: 11

states:
  wave:
    factory: state:WaveState
    label: Wave Example
    priority: 100
    group: Customer
    icon: waving_hand
    confirm: true
    confirm_message: Make sure there are no obstacles around the robot's arms

routes:
  - from: com.bxi.basic_actions/normal
    event: activate
    to: wave
    transition: soft_switch
  - from: wave
    event: com.bxi.basic_actions/normal
    to: com.bxi.basic_actions/normal
    transition: dual_running_blend
  - from: wave
    event: com.bxi.basic_actions/zero_torque
    to: com.bxi.basic_actions/zero_torque

factory: state:WaveState means load WaveState from state.py in the same directory; a simple Mod like this uses an explicit entrypoint: null and needs no plugin.py. The header fields describing the Mod cannot be omitted even when empty.

1. PoseState: describe only the target pose

New concept: you only return joint targets, and the framework handles kp/kd, the entry frame, the running frame and motor output. Joint names are the contract between components; numeric indices are only allowed as an internal cache compiled in advance.

Change only state.py:

import numpy as np

from bxi_example_py_elf3.framework.mod_api import PoseState


class WaveState(PoseState):
    def __init__(self, name, state_id):
        super().__init__(name, state_id)
        self._shoulder_index = None
        self._target = None
        self._layout = None

    def on_prepare(self, ctx, from_state):
        layout = ctx.robot_layout
        if self._layout is not layout:
            self._shoulder_index = layout.index("r_shoulder_y_joint")
            self._target = np.empty(layout.dof_num, dtype=np.float32)
            self._layout = layout
        np.copyto(self._target, ctx.last_motor_frame.qpos)
        self._target[self._shoulder_index] += 0.35

    def gains(self, ctx):
        return ctx.last_motor_frame.kp, ctx.last_motor_frame.kd

    def target_position(self, ctx):
        return self._target

Here, the first time a Robot Layout is seen in on_prepare(), joints are resolved by name and buffers are allocated, and the pose at motion entry is captured. The control cycle just returns the same array. Don't read the layout in on_bind(), because the first robot state may not have arrived yet. On first debugging you must still confirm joint directions and safe ranges. PoseState implements EntryFrameProvider and RunningFrameProvider automatically, so soft_switch, entry_gain_ramp and running_blend can be used directly.

Unchanged: mod.yaml, the full state name, routes and button bindings.

Stop here if: the goal is a fixed pose, a hold pose or a simple zero position, with no change over time.

2. ProceduralState: add time and continuous trajectories

New concept: compute the trajectory from elapsed. The framework only advances time on real updates; sampling by a transition with advance=False does not secretly advance the motion.

Still change only state.py:

import math
import numpy as np

from bxi_example_py_elf3.framework.mod_api import ProceduralState


class WaveState(ProceduralState):
    def __init__(self, name, state_id):
        super().__init__(name, state_id)
        self._shoulder_index = None
        self._elbow_index = None
        self._base_position = None
        self._layout = None

    def on_prepare(self, ctx, from_state):
        layout = ctx.robot_layout
        if self._layout is not layout:
            self._shoulder_index = layout.index("r_shoulder_y_joint")
            self._elbow_index = layout.index("r_elbow_y_joint")
            self._base_position = np.empty(layout.dof_num, dtype=np.float32)
            self._layout = layout
        np.copyto(self._base_position, ctx.last_motor_frame.qpos)

    def gains(self, ctx):
        return ctx.last_motor_frame.kp, ctx.last_motor_frame.kd

    def compute_frame(self, ctx, elapsed):
        frame = self.frame(ctx, self._base_position)
        frame.qpos[self._shoulder_index] += 0.35
        frame.qpos[self._elbow_index] += 0.25 * math.sin(
            2.0 * math.pi * 0.7 * elapsed
        )
        return frame

self.frame(ctx, qpos) calls the current state's gains(ctx); the framework no longer provides global gains coupled to a specific robot. Here we explicitly keep the kp/kd of the previous control frame. If the state is entered from zero torque or needs special gains, it should return its own verified kp/kd, or pass self.frame(ctx, qpos, kp=..., kd=...).

Unchanged: everything in mod.yaml.

Stop here if: the trajectory can be expressed with formulas, interpolation or small finite-state variables, with no model inference.

3. dataclass parameters: make YAML a typed tuning panel

New concept: parameters have names, types and defaults; a misspelt field or wrong type fails at startup rather than surfacing while the real robot is running.

Replace state.py:

from dataclasses import dataclass
import math
import numpy as np

from bxi_example_py_elf3.framework.mod_api import ProceduralState


@dataclass(frozen=True)
class WaveParams:
    shoulder: str = "r_shoulder_y_joint"
    elbow: str = "r_elbow_y_joint"
    shoulder_offset: float = 0.35
    amplitude: float = 0.25
    frequency: float = 0.7
    duration: float | None = None


class WaveState(ProceduralState[WaveParams]):
    Params = WaveParams

    def __init__(self, name, state_id, params=None):
        super().__init__(name, state_id, params)
        self._shoulder_index = None
        self._elbow_index = None
        self._base_position = None
        self._layout = None

    def on_prepare(self, ctx, from_state):
        layout = ctx.robot_layout
        if self._layout is not layout:
            self._shoulder_index = layout.index(self.params.shoulder)
            self._elbow_index = layout.index(self.params.elbow)
            self._base_position = np.empty(layout.dof_num, dtype=np.float32)
            self._layout = layout
        np.copyto(self._base_position, ctx.last_motor_frame.qpos)

    def gains(self, ctx):
        return ctx.last_motor_frame.kp, ctx.last_motor_frame.kd

    def compute_frame(self, ctx, elapsed):
        frame = self.frame(ctx, self._base_position)
        frame.qpos[self._shoulder_index] += self.params.shoulder_offset
        frame.qpos[self._elbow_index] += self.params.amplitude * math.sin(
            2.0 * math.pi * self.params.frequency * elapsed
        )
        return frame

Add only this under states.wave in mod.yaml:

    params:
      shoulder: r_shoulder_y_joint
      elbow: r_elbow_y_joint
      shoulder_offset: 0.35
      amplitude: 0.20
      frequency: 0.8

When the conventional factory sees that Params on the class is a dataclass, it automatically calls StateBuildContext.dataclass_params() and then constructs WaveState(name, state_id, params). int, float, bool, str and optional values of these types are supported; bool is not mistaken for an integer. Dataclass defaults, default_factory and unknown-field checks are all kept.

Unchanged: class name, factory, state name, events and routes.

Stop here if: customers only need to tune the motion through YAML, without replacing the algorithm.

4A. PolicyState: put the inference object in a Resource

In API 4, PolicyState no longer calls create_policy() inside the state. The policy must be created by a Resource, and the state receives a ResourceHandle at construction; this keeps model initialisation off the control thread and lets the state machine wait for the resource to be ready before switching. The interface is still explained below with a pure-Python policy.

state.py:

from dataclasses import dataclass
import math
import numpy as np

from bxi_example_py_elf3.framework.inference import PolicyOutput
from bxi_example_py_elf3.framework.mod_api import (
    JointLayout,
    JointTargetBuffer,
    PolicyState,
)


@dataclass(frozen=True)
class WaveParams:
    joint: str = "r_elbow_y_joint"
    amplitude: float = 0.20
    frequency: float = 0.8


class WavePolicy:
    def __init__(self, params: WaveParams):
        self.params = params
        self.elapsed = 0.0
        layout = JointLayout.create((params.joint,), label="wave policy")
        self.target = JointTargetBuffer(layout)
        self.output = PolicyOutput(self.target.view)
        self.base = np.empty(1, dtype=np.float32)

    def reset(self, base):
        self.elapsed = 0.0
        np.copyto(self.base, base)

    def infer(self, dt, *, advance):
        np.copyto(self.target.position, self.base)
        self.target.position[0] += self.params.amplitude * math.sin(
            2.0 * math.pi * self.params.frequency * self.elapsed
        )
        if advance:
            self.elapsed += dt
        return self.target.position


class WaveState(PolicyState[WavePolicy]):
    def __init__(self, name, state_id, policy, params):
        super().__init__(name, state_id, policy)
        self.params = params

    def _robot_joint_index(self, ctx):
        return ctx.robot_layout.index(self.params.joint)

    def gains(self, ctx):
        index = self._robot_joint_index(ctx)
        return (
            ctx.last_motor_frame.kp[index : index + 1],
            ctx.last_motor_frame.kd[index : index + 1],
        )

    def reset_policy(self, ctx, policy):
        index = self._robot_joint_index(ctx)
        policy.reset(ctx.last_motor_frame.qpos[index : index + 1])

    def policy_entry_position(self, ctx, policy):
        return policy.base

    def infer_position(self, ctx, policy, dt, *, advance):
        return policy.infer(dt, advance=advance)

Add plugin.py, which reads the strongly typed parameters in the state factory and registers an on-demand resource for the state:

from bxi_example_py_elf3.framework.mod_api import (
    ModDefinition,
    ResourceKey,
)

from .state import WaveParams, WavePolicy, WaveState


def create_mod(context):
    def build_state(state):
        params = state.dataclass_params(WaveParams)
        key = ResourceKey[WavePolicy](f"{state.name}/policy")
        context.register_resource(
            key,
            lambda _resource: WavePolicy(params),
            policy="on_demand",
        )
        return WaveState(
            state.name,
            state.state_id,
            context.resource(key),
            params,
        )

    return ModDefinition(state_factories={"wave": build_state})

At the same time, change the manifest to entrypoint: plugin:create_mod and delete states.wave.factory. On the first request to enter the state, the state machine prepares WavePolicy asynchronously; only after the resource is ready does PolicyState.on_prepare() resolve, reset and warm up the policy. advance=False must still guarantee that policy time is not advanced.

Stop here if: the real-time model has its own observation/action logic, or there is recurrent state, but it isn't a fixed motion replay.

4B. MotionReplayState: reuse directly for fixed model motions

If the policy provides the current ReplayPolicy contract (a long-lived output, reset(frame), step(frame, dt, advance=...) and finished(trim)), prefer reusing MotionReplayState rather than rewriting playback, warm-up, pause and end-return logic.

Minimal form of the state:

from bxi_example_py_elf3.framework.mod_api import MotionReplayState


class WaveState(MotionReplayState):
    def __init__(self, name, state_id, policy):
        super().__init__(
            name,
            state_id,
            policy,
            finish_state="com.bxi.basic_actions/normal",
            finish_trigger="wave_finished",
            end_frame_trim=20,
            end_transition={
                "profile": "dual_running_blend",
                "duration": 0.6,
            },
        )

Here the policy usually comes from the Resource in section 6, so a plugin.py is added. For a complete runnable model example, see Package a model motion as a Mod.

finish_state is required. The framework doesn't know which state is a particular robot's base state, so it never implicitly returns to normal. A model's action layout is also not the same as the robot's or the state's output layout: a 29-joint model can run on a 31-joint robot, and the two missing state outputs must be filled in by another command Layer or by platform defaults.

Stop here if: the offline motion + policy interface matches ReplayPolicy.

4C. Command sources besides the model

A state doesn't have to put every joint into the model action. For example, a waving motion can take base commands from a 29-joint policy, override the right arm with a programmatic trajectory, and have the two additional neck joints supplied by a ROS topic or a head controller:

from bxi_example_py_elf3.framework.mod_api import (
    JointCommandComposer,
    JointCommandLayer,
    JointLayout,
    JointTargetBuffer,
)

HEAD_JOINTS = JointLayout(("neck_y_joint", "neck_z_joint"))

self.policy_target = self.policy.output.joints
self.state_output = JointLayout(
    (*self.policy_target.layout.names, *HEAD_JOINTS.names)
)
self.head = JointTargetBuffer(HEAD_JOINTS)
self.composer = JointCommandComposer(
    self.state_output,
    (
        JointCommandLayer("policy", self.policy_target),
        JointCommandLayer("head", self.head.view),
    ),
)

Layers, Buffers and the Composer are created in the preparation stage; the control cycle only updates self.head.position/kp/kd in place and then calls self.composer.compose(). If one source intentionally overrides joints another source already controls, the later Layer must set override=True explicitly. For the complete example, thread boundaries and ownership rules see Multi-source Joint Command Composition; for 29/31/N joint adaptation see Joint Layout and Mapping.

5. Implement RobotControlState directly

RobotControlState has been the core base class of every state from the start. This section stops using the convenience subclasses and implements the core lifecycle, Transition capabilities and motor output directly.

Change state.py to:

from bxi_example_py_elf3.framework.mod_api import RobotControlState
from bxi_example_py_elf3.framework.mod_api.transition import (
    EntryFrameProvider,
    RunningFrameProvider,
)


class WaveState(RobotControlState, EntryFrameProvider, RunningFrameProvider):
    def __init__(self, name, state_id):
        super().__init__(name, state_id)
        self.elapsed = 0.0

    def on_enter(self, ctx):
        self.elapsed = 0.0

    def is_available(self, ctx):
        # States without external dependencies don't need to override this; the base class returns True by default.
        return True

    def _calculate(self, ctx, elapsed):
        last = ctx.last_motor_frame
        frame = self._motor_frame(ctx, last.qpos, last.kp, last.kd)
        # Here you can write frame.qpos in place, read sensors, or do IK, MPC or filtering.
        return frame

    def get_entry_frame(self, ctx):
        return self._calculate(ctx, 0.0)

    def sample_running_frame(self, ctx, dt, *, advance):
        frame = self._calculate(ctx, self.elapsed)
        if advance:
            self.elapsed += dt
        return frame

    def on_update(self, ctx, dt):
        self._apply_frame(
            ctx,
            self.sample_running_frame(ctx, dt, advance=True),
        )

If you don't use transitions that need entry/running frames, you don't have to implement those Protocols. on_exit() does nothing extra by default; only override it when the state really owns run-time resources or needs to record business state.

When depending on external sensors or services, you can override is_available(ctx) -> bool. It is a quick health check before entering the state; it must be non-blocking and side-effect free, reading only snapshots already maintained by callbacks or background nodes. When it returns False, the state machine stays where it is and does not call the target state's on_prepare(); ctx.request_state() also returns False. The default implementation returns True, so existing states need no changes.

The framework reserves ctx.request_state(..., force=True) for rare maintenance and diagnostic operations. It only skips is_available() and does not swallow configuration, node startup or lifecycle errors; business motions should not enable it by default.

Unchanged: factory: state:WaveState still works; parameterless construction still needs no plugin.py.

Stop here if: you can already implement any in-state algorithm, but don't yet need sharing, configurable loading policies or uniform release of large objects.

6. Custom Resources: sharing, configurable loading policy and uniform release

New concept: separate expensive objects such as models, datasets and hardware handles from the state lifecycle. This level adds plugin.py and changes the factory to an explicit entry point.

The directory becomes:

com.example.wave/
  mod.yaml
  plugin.py
  state.py
  assets/
    wave.yaml

First create assets/wave.yaml:

shoulder: r_shoulder_y_joint
elbow: r_elbow_y_joint
shoulder_offset: 0.35
amplitude: 0.20
frequency: 0.8

Replace state.py with a complete Resource consumer:

from dataclasses import dataclass
import math
import numpy as np

from bxi_example_py_elf3.framework.mod_api import (
    EntryFrameProvider,
    RobotControlState,
    RunningFrameProvider,
)


@dataclass(frozen=True)
class WaveProfile:
    shoulder: str
    elbow: str
    shoulder_offset: float
    amplitude: float
    frequency: float


class WaveState(RobotControlState, EntryFrameProvider, RunningFrameProvider):
    def __init__(self, name, state_id, profile):
        super().__init__(name, state_id, resources=(profile,))
        self._profile_handle = profile
        self._profile = None
        self.elapsed = 0.0
        self._shoulder_index = None
        self._elbow_index = None
        self._base_position = None
        self._layout = None

    def on_prepare(self, ctx, from_state):
        profile = self._profile_handle.get()
        self._profile = profile
        layout = ctx.robot_layout
        if self._layout is not layout:
            self._shoulder_index = layout.index(profile.shoulder)
            self._elbow_index = layout.index(profile.elbow)
            self._base_position = np.empty(layout.dof_num, dtype=np.float32)
            self._layout = layout
        np.copyto(self._base_position, ctx.last_motor_frame.qpos)

    def on_enter(self, ctx):
        self.elapsed = 0.0

    def _calculate_frame(self, ctx, elapsed):
        profile = self._profile
        if profile is None:
            raise RuntimeError("wave resource has not been prepared")
        last = ctx.last_motor_frame
        frame = self._motor_frame(
            ctx,
            self._base_position,
            last.kp,
            last.kd,
        )
        frame.qpos[self._shoulder_index] += profile.shoulder_offset
        frame.qpos[self._elbow_index] += profile.amplitude * math.sin(
            2.0 * math.pi * profile.frequency * elapsed
        )
        return frame

    def get_entry_frame(self, ctx):
        return self._calculate_frame(ctx, 0.0)

    def sample_running_frame(self, ctx, dt, *, advance):
        frame = self._calculate_frame(ctx, self.elapsed)
        if advance:
            self.elapsed += dt
        return frame

    def on_update(self, ctx, dt):
        self._apply_frame(
            ctx,
            self.sample_running_frame(ctx, dt, advance=True),
        )

Full contents of plugin.py:

import yaml

from bxi_example_py_elf3.framework.mod_api import (
    ModDefinition,
    ResourceKey,
)

from .state import WaveProfile, WaveState


PROFILE = ResourceKey[WaveProfile]("com.example.wave/profile")


def create_mod(context):
    def load_profile(resource):
        path = resource.asset("assets/wave.yaml")
        with path.open("r", encoding="utf-8") as input_file:
            raw = yaml.safe_load(input_file)
        return WaveProfile(
            shoulder=str(raw["shoulder"]),
            elbow=str(raw["elbow"]),
            shoulder_offset=float(raw["shoulder_offset"]),
            amplitude=float(raw["amplitude"]),
            frequency=float(raw["frequency"]),
        )

    context.register_resource(PROFILE, load_profile, policy="on_demand")
    profile = context.resource(PROFILE)  # Only obtain the handle here
    return ModDefinition(
        state_factories={
            "wave": lambda state: WaveState(
                state.name,
                state.state_id,
                profile,
            )
        }
    )

In state.py the state receives a ResourceHandle and declares its entry dependency through RobotControlState(..., resources=(profile,)). On the first request for the state, the state machine prepares on_demand resources asynchronously and only calls on_prepare() once they are ready, so get() here never blocks. The control cycle also doesn't repeatedly call get() or look up names. A model policy can hand its ResourceHandle[Policy] straight to PolicyState or MotionReplayState, and these two convenience classes declare the resource dependency automatically.

Two changes in mod.yaml:

entrypoint: plugin:create_mod

states:
  wave:
    # Delete factory: state:WaveState
    label: Wave Example
    priority: 100

All other fields stay the same. This example uses YAML so it can run as-is; for ONNX, just make the loader return an inference object. A resource can only access this Mod's assets/ via resource.asset("assets/..."). If the resource object has close(), it is called automatically when the node shuts down. Models that must be available at startup should change the registration parameter to policy="startup"; the framework completes preparation and checks for failures before the control loop starts.

Stop here if: several states share a model, or an object needs lazy initialisation, caching and reliable release.

7. Custom Transitions: make "how to switch" pluggable too

New concept: a state describes its own run-time behaviour, while a Transition describes how motor frames are generated between the state machine receiving a switch request and the target state formally entering. This stretch needs its own design because the MIT command fields of the two sides may be discontinuous, and switching directly could make the robot move suddenly; the built-in implementations can hold, ramp gains or blend the running frames of both sides.

Only write a custom Transition when the built-in strategies can't express the business need. Below we add pose_gain_blend.py:

from collections.abc import Mapping
import numpy as np

from bxi_example_py_elf3.framework.mod_api.transition import (
    ConfigReader,
    MotorFrame,
    SingleClassTransition,
    require_entry_frame_provider,
)


class PoseGainBlend(SingleClassTransition):
    type_name = "com.example.wave.pose_gain_blend"

    def __init__(self, name, duration):
        super().__init__(name, duration)
        self.start = None
        self.target = None
        self.output = None

    @classmethod
    def from_config(cls, name: str, raw: Mapping[str, object]):
        reader = ConfigReader(raw, name)
        duration = reader.float("duration", minimum=0.0)
        reader.finish()
        return cls(name, duration)

    def validate_states(self, from_state, to_state):
        require_entry_frame_provider(to_state)

    def on_start(self, ctx, from_state, to_state):
        self.start = MotorFrame.create(
            ctx.robot_layout,
            ctx.last_motor_frame.qpos,
            ctx.last_motor_frame.kp,
            ctx.last_motor_frame.kd,
            vel=ctx.last_motor_frame.vel,
            torque=ctx.last_motor_frame.torque,
        )
        natural_target = require_entry_frame_provider(to_state).get_entry_frame(ctx)
        self.target = MotorFrame.empty(ctx.robot_layout)
        ctx.resolve_motor_frame(natural_target, self.target)
        self.output = MotorFrame.empty(ctx.robot_layout)

    def apply(self, ctx, dt, progress):
        if self.start is None or self.target is None or self.output is None:
            raise RuntimeError("pose gain blend has not started")
        alpha = progress * progress * (3.0 - 2.0 * progress)
        for start, target, output in (
            (self.start.qpos, self.target.qpos, self.output.qpos),
            (self.start.vel, self.target.vel, self.output.vel),
            (self.start.kp, self.target.kp, self.output.kp),
            (self.start.kd, self.target.kd, self.output.kd),
            (self.start.torque, self.target.torque, self.output.torque),
        ):
            np.subtract(target, start, out=output)
            output *= alpha
            output += start
        ctx.set_motor_target(self.output)

Add the Mod definition explicitly in plugin.py:

from .pose_gain_blend import PoseGainBlend


return ModDefinition(
    state_factories={
        "wave": build_wave_state,
    },
    transition_plugins={
        PoseGainBlend.type_name: PoseGainBlend,
    },
)

build_wave_state is the state factory already used in the previous section; here we only add transition_plugins. Don't write a second create_mod().

Add a profile to mod.yaml and replace only the route's transition:

transition_profiles:
  wave_entry:
    type: com.example.wave.pose_gain_blend
    duration: 0.6

routes:
  - from: com.bxi.basic_actions/normal
    event: activate
    to: wave
    transition: wave_entry

The Transition and its dynamic module are loaded together at node startup; on failure, the resources, modules and registrations already created are cleaned up. For full fields, capability checks and testing, see Hands-on custom transitions.

Stop here if: the built-in instant/hold/gain ramp/running blend/sequence can no longer express the switching process.

8. Custom ROS subscribers, services and timers

New concept: a state can own ROS entities, but creation and destruction must be paired. Don't create ROS objects in __init__(); the node isn't bound yet at construction time.

Add to WaveState:

from std_srvs.srv import SetBool
from std_msgs.msg import Float32


def on_bind(self, ctx):
    node = ctx.ros_node
    self.external_scale = 1.0
    self.enabled = True
    self.subscription = node.create_subscription(
        Float32,
        "/wave/amplitude_scale",
        self._on_scale,
        10,
    )
    self.service = node.create_service(
        SetBool,
        "/wave/enable",
        self._on_enable,
    )
    self.timer = node.create_timer(1.0, self._on_timer)

def _on_scale(self, message):
    # The callback only updates state-private data; it never sends motor commands directly.
    self.external_scale = max(0.0, min(float(message.data), 1.0))

def _on_enable(self, request, response):
    self.enabled = bool(request.data)
    response.success = True
    response.message = "wave enabled" if self.enabled else "wave disabled"
    return response

def _on_timer(self):
    # Low-frequency maintenance work; real-time motor output is still produced only in on_update.
    pass

def on_unbind(self, ctx):
    node = ctx.ros_node
    node.destroy_timer(self.timer)
    node.destroy_service(self.service)
    node.destroy_subscription(self.subscription)
    self.timer = None
    self.service = None
    self.subscription = None

Then read enabled/external_scale in _calculate() or compute_frame(). RobotControlContext only exposes the ROS node through ctx.ros_node and does not proxy create_*/destroy_*. When the node shuts down, the framework calls on_unbind() on the state; forgetting to release entities means subscriptions, services or callbacks can't be destroyed deterministically with the lifecycle.

Unchanged: Mod ID, state name, routes, Resource and Transition.

Stop here if: you need external perception, business services or low-frequency tasks, but the input protocol is still the existing keyboard/gamepad/CRSF.

If the ROS entity is itself a background capability that can run independently, such as a camera publisher, perception preprocessing or a Mod-specific service, prefer declaring it under the top-level nodes in mod.yaml. It can run in the controller process or be isolated in a Python child process, and it can live for the whole Mod or start before a group of states is prepared. Only lightweight subscriptions, services or timers that clearly belong to a single state object go in on_bind/on_unbind.

9. Custom input Drivers: connect a completely new device or protocol

This is a system extension point outside state Mods. Only write a Driver to connect UDP, SBUS, a new serial protocol, Bluetooth or a custom HID; "change a button", "change the gamepad mapping" and "key combinations" only need the remote controller YAML.

The data boundary must be kept:

Custom Driver
  -> raw signal (for example udp.vx, udp.wave)
  -> sources
  -> controls
  -> outputs
  -> MotionCommands.btn_10=11
  -> com.example.wave/activate
  -> the original route and wave state

So a Driver should not know about com.example.wave/wave. Implementation steps:

  1. Implement InputDriverBase in src/remote_controller/src/drivers/.
  2. is_available() must be non-blocking and judge health from the device and recent valid frames.
  3. start()/stop() manage threads and fds/sockets in pairs; is_ready() is only true after a complete, safe initial frame is received.
  4. Publish raw signals with set_signal("udp.wave", 0.0/1.0).
  5. Register type: udp in the driver registry and add it to the CMake sources.
  6. Declare the device under sources in the remote controller YAML, then map it back to the original btn_10=11 through controls/outputs.

Minimal YAML connection section:

sources:
  udp_remote:
    type: udp
    priority: 20
    bind: 0.0.0.0
    port: 14550
    ready_timeout_ms: 1000
    loss_timeout_ms: 500
    signals:
      udp.wave:
        from: udp.wave
        timeout_ms: 500
        failsafe: 0.0

controls:
  udp.wave_event:
    type: bool
    threshold: 0.5
    inputs:
      - source: udp.wave

outputs:
  edge:
    - output: btn_10=11
      when:
        any:
          - [udp.wave_event]

For the complete C++ Driver, registration, disconnect pre-emption and packet verification, see Hands-on UDP Driver.

10. Final checklist

Only prove the current layer is correct before moving up one:

  • No Mod loading, parameter, dependency or route validation errors in the node startup log.
  • In simulation, first verify joint order, ranges, the first frame, the exit frame and advance=False.
  • Dataclasses keep no unused parameters; wrong fields fail at load time.
  • Model resources are not loaded at import time or in the state's __init__().
  • Custom Transitions validate the required state capabilities at load time.
  • All ROS entities created in on_bind() are released in on_unbind().
  • Drivers only produce raw signals, zero them on disconnect and let the device manager switch safely.
  • Only at the end, test on the real robot with low gains, a reachable emergency stop and obstacles cleared.

The single most important upgrade rule: keep the stable contract com.example.wave/wave and replace the implementation behind it as needed. The basic APIs can be used directly for production features; introduce the advanced extension points gradually as real needs arise.

Custom States

This page is an API reference, not a first tutorial. If you are developing a motion for the first time, complete Develop a motion with Mod API 4.0 first, and come back here when you have specific lifecycle, factory, parameter or Transition capability questions.

A custom state must be provided by a Mod. The minimum is just the state class and mod.yaml; add plugin.py when you share resources or register advanced extensions. For the full progressive route, see Advanced Mod State Development Guide.

Core state model: RobotControlState

RobotControlState is the core base class of all robot states. State builders, the state machine and Transitions all ultimately handle RobotControlState; the other state base classes are just reusable wrappers built on top of it.

from __future__ import annotations

from bxi_example_py_elf3.framework.mod_api import RobotControlContext, RobotControlState


class HoldState(RobotControlState):
    def on_update(self, ctx: RobotControlContext, dt: float) -> None:
        last = ctx.last_motor_frame
        ctx.set_motor_target(
            self._motor_frame(ctx, last.qpos, last.kp, last.kd)
        )

If the constructor has no extra dependencies, it can simply inherit the base class's (name, state_id).

Convenience state base classes

These classes all inherit RobotControlState; they don't change the state machine model or stop you from moving to the full API later:

Class What the developer implements What the base class implements Use cases
PoseState target_position(), gain strategy Fixed-pose MotorFrame, entry frame, running frame and on_update() Hold pose, zero position, a single target pose
ProceduralState compute_frame(ctx, elapsed), gain strategy Time reset and accumulation, side-effect-free sampling and on_update() Formula trajectories, interpolation, periodic motion
PolicyState Resource handle, entry position, inference and any needed gain strategy Resource dependency declaration, handle resolution, reset, warm-up and frame output Online policies, models with history
MotionReplayState Policy resource, finish_state and end configuration Warm-up, pause, completion detection, explicit end-state request Fixed model motion replay

For example, a fixed pose can use the thinnest option, PoseState:

schema: 1
id: com.example.hold
name: Hold Pose
version: 1.0.0
api: ">=4,<5"
enable: true
entrypoint: null
visibility: public
requires: []
conflicts: []
python_exports: []
runtime_requirements:
  python: []
  ros: []
  system: []
states:
  hold:
    factory: state:HoldState
    label: Hold Pose
    priority: 100
from bxi_example_py_elf3.framework.mod_api import PoseState


class HoldState(PoseState):
    def gains(self, ctx):
        return ctx.last_motor_frame.kp, ctx.last_motor_frame.kd

    def target_position(self, ctx):
        return ctx.last_motor_frame.qpos

PoseState's on_update() internally calls target_position() and the state's own gains(), writes the result into the state's long-lived MotorFrame, and then calls ctx.set_motor_target(frame). So the example above can return an existing array directly, with no .copy(). It also provides stable entry and running frames, so it works directly with Transitions that need EntryFrameProvider or RunningFrameProvider.

The framework provides no hidden global kp/kd. The example above explicitly keeps the previous control frame's gains, which suits entering from a normally controlled state; if entry from a zero-torque state is allowed, the previous frame's gains may all be zero, and the state must instead provide its own gains verified on the real robot. Alternatively, don't override gains() and pass them explicitly each frame in self.frame(..., kp=..., kd=...).

When you need to control the lifecycle, sensor processing, output timing or special capabilities yourself, inherit RobotControlState directly. Switching from a convenience class to the core class doesn't require changing the state name or routes in the Mod manifest.

When a state depends on a camera, localisation, an external service or other preconditions that may temporarily fail, override is_available(ctx) -> bool. The state machine calls it before preparing the Transition; returning False rejects this switch, the current state and any running Transition stay unchanged, and the target state's on_prepare() is not executed. The method must be non-blocking and side-effect free, and must not load models or wait for messages. The default implementation returns True.

Explicit factories

from bxi_example_py_elf3.framework.mod_api import ModDefinition, ModLoadContext

from .state import HoldState


def create_mod(context: ModLoadContext) -> ModDefinition:
    return ModDefinition(
        state_factories={
            "hold": lambda state: HoldState(state.name, state.state_id),
        }
    )

The framework no longer scans all RobotControlState subclasses. Factory keys must exactly match the manifest's local state names.

Manifest declaration

schema: 1
id: com.example.hold
name: Hold Pose
version: 1.0.0
api: ">=4,<5"
enable: true
entrypoint: plugin:create_mod
visibility: public
requires:
  - id: com.bxi.basic_actions
    version: ">=1,<2"
conflicts: []
python_exports: []
runtime_requirements:
  python: []
  ros: []
  system: []

events:
  activate:
    slot: btn_10
    value: 11

states:
  hold:
    manifest:
      label: Hold Pose
      priority: 100
      group: Customer
      icon: pause

routes:
  - from: com.bxi.basic_actions/normal
    event: activate
    to: hold
  - from: hold
    event: com.bxi.basic_actions/normal
    to: com.bxi.basic_actions/normal

The full run-time state name is com.example.hold/hold.

Lifecycle

Method When Purpose
on_bind(ctx) Once after the state is built Create ROS resources such as subscriptions, clients and timers
on_prepare(ctx, from_state) Before the transition Session is created Warm up models, choose motions, prepare caches; don't output to motors
on_prepare_cancel(...) A prepared transition is interrupted Undo the side effects of preparation
on_enter(ctx) After becoming the current state Reset playback progress and state-private variables
on_update(ctx, dt) Every control cycle while current Generate motor output
on_action(ctx, name) When an actions rule fires Perform the action and return whether it was handled
on_exit(ctx) On a successful switch away Release the state's run-time resources or record business state; no-op by default
on_unbind(ctx) Node shutdown Release resources created in on_bind

Don't access the ROS node context in __init__(); at construction there are only factory dependencies and manifest parameters.

Strongly typed parameters

A dataclass is recommended for simple Mods:

from dataclasses import dataclass

from bxi_example_py_elf3.framework.mod_api import PoseState

@dataclass(frozen=True)
class HoldParams:
    gain_scale: float = 0.5
    allow_motion: bool = False

class HoldState(PoseState[HoldParams]):
    Params = HoldParams

The conventional factory builds the parameter object automatically, keeping defaults and rejecting unknown fields. An explicit plugin.py factory can still use the field-by-field API below:

states:
  hold:
    params:
      gain_scale: 0.5
      allow_motion: false
state_factories = {
    "hold": lambda state: HoldState(
        state.name,
        state.state_id,
        gain_scale=state.float_param("gain_scale", 1.0),
        allow_motion=state.bool_param("allow_motion", False),
    )
}

int_param, float_param, string_param, bool_param and the generic param are supported. Unknown parameters fail at build time.

MotorFrame and transition capabilities

When switching directly from one model to another, qpos, kp or kd may jump within a single frame and make the robot lurch. The built-in Transitions have two common solutions:

  • first_frame_switch first obtains the target state's first frame and then increases the control gains gradually, so the target state needs EntryFrameProvider.get_entry_frame().
  • dual_running_blend samples the two running states separately and blends their complete MotorFrames, so both ends configured for dynamic sampling need RunningFrameProvider.sample_running_frame(), and the target state also needs an entry frame as the initial and fallback value.

During a switch the Transition temporarily takes over motor output, so it can't directly call on_update(), which would publish commands and advance the model. get_entry_frame() and sample_running_frame() exist precisely to give Transitions independently obtainable frame data; they come from the EntryFrameProvider and RunningFrameProvider protocols, not from arbitrarily named helpers.

RobotControlState remains the main abstraction for states, and it only requires the lifecycle needed for normal running. Providers are optional capabilities added as Transitions need them; other transition types can specify the extra interfaces they need in a similar way. The current built-in transitions map as follows:

Transition configuration The state must provide
instant, hold No extra Provider
Target state of entry_gain_ramp EntryFrameProvider
Target state of running_blend EntryFrameProvider
running_blend with sample_from: true RunningFrameProvider on the source state
running_blend with sample_to: true RunningFrameProvider on the target state

For the full chain of cause and effect and the naming rationale, see Depth-perception walking Mod development log: Transition capabilities.

A state that needs an entry frame implements EntryFrameProvider:

class HoldState(RobotControlState, EntryFrameProvider):
    def get_entry_frame(self, ctx: RobotControlContext) -> MotorFrame:
        last = ctx.last_motor_frame
        return self._motor_frame(
            ctx,
            last.qpos,
            last.kp,
            last.kd,
        )

Implement RunningFrameProvider as well when running_blend needs dynamic sampling:

def sample_running_frame(self, ctx, dt, *, advance):
    qpos = self._calculate(ctx, dt, advance=advance)
    last = ctx.last_motor_frame
    return self._motor_frame(ctx, qpos, last.kp, last.kd)

advance=False must be an observation-only operation and must not advance the timestep or history. A normal on_update() can publish the sampled result with _apply_frame().

Multi-source joint commands

When models, topics, IK, trajectories or state logic control different joints at the same time, don't disguise non-model commands as model output, and don't write them into the platform's JointCommandDefaults. Each producer writes its own long-lived JointTargetBuffer, and JointCommandComposer then composes the state's natural MotorFrame. A later Layer with explicit override=True may override joints owned by earlier sources; overlap between ordinary Layers fails at construction.

The Composer doesn't subscribe to topics, call models or decide data timeout policy. ROS callbacks should first update a thread-safe snapshot, and the control cycle then writes a complete snapshot into the state buffer. For the full API, examples and performance constraints see Multi-source Joint Command Composition.

Velocity input

Once the manifest assigns a speed_profile to the state, the state calls self.get_cmd_vel(ctx). For extra filtering, override process_cmd_vel(). Don't read remote controller buttons directly or bypass the profile.

Active switching and actions

accepted = ctx.request_state(
    "com.bxi.basic_actions/normal",
    trigger="motion_finished",
    transition={"profile": "dual_running_blend", "duration": 0.5},
)

request_state() returns a bool. True means the request was accepted: it may already have started the Transition, entered the delay queue, or be preparing an on_demand Resource asynchronously; it does not mean a non-instant Transition has finished. False means the target state's is_available() is currently false, or the target Mod node failed to start, and the framework did not start the switch. Configuration problems such as unknown states or wrong Transitions still raise exceptions rather than being hidden behind False. Delayed requests are checked once when queued and once when the delay expires, so dependencies that fail during the wait are caught.

In rare maintenance, diagnostic or explicit manual-takeover scenarios you can pass force=True:

ctx.request_state(
    "com.example.sensor/action",
    trigger="maintenance_override",
    force=True,
)

force defaults to False and only bypasses the target state's is_available(); it does not ignore unknown states, Transition configuration errors, on_prepare() exceptions or Mod node startup failures. A forced entry also doesn't disable the state's own run-time safety protection, such as falling back to normal when the depth stream drops. Ordinary motions and safety state switches should not use it.

def on_action(self, ctx, action_name):
    if action_name != "toggle_pause":
        return False
    self.playing = not self.playing
    return True

State id, priority and UI index

  • states.<local>.id: the run-time int32 id; by default computed stably from the full state name.
  • states.<local>.manifest.priority: UI ordering priority; larger values come first; default 0.
  • states.<local>.manifest.index: the UI position generated by the framework; only configure it explicitly when an absolute position must be fixed.

Equal priorities are ordered by full state name, ascending. Two duplicate explicit indexes, an invalid index or a genuine state id conflict all prevent loading.

For complete runnable steps, see Hands-on custom state.

Hands-on 2: Package a model motion as a Mod

This lesson puts an .npz and an .onnx in a standalone Mod and hands them to the state through a resource with a configurable loading policy.

1. Directory

mods/com.example.motion/
  mod.yaml
  plugin.py
  state.py
  assets/
    motion.npz
    motion.onnx

2. First declare the real joint order of the model assets

Don't infer the model order from the robot message order. First check the ONNX joint_names metadata, the training export script and the definition of the accompanying NPZ to determine the real named layout of the model's observation and action:

from bxi_example_py_elf3.framework.inference import PolicyJointContract
from bxi_example_py_elf3.policies.joints import ELF3_ISAAC_JOINTS


class ExampleMotionPolicy:
    joint_contract = PolicyJointContract(
        observation=ELF3_ISAAC_JOINTS,
        action=ELF3_ISAAC_JOINTS,
    )

The current DanceMotionPolicyGravityIsaaclab already makes this declaration and checks the ONNX metadata at load time; Isaac models such as back-flip and forward-flip can use it directly. Models such as recover that use a different order should use the corresponding Mjlab Policy. A wrong declaration should fail at load time; don't patch it with ISAAC_TO_MUJOCO, MUJOCO_TO_ISAAC or unexplained numeric slices.

If the model only takes or produces some joints, declare the real sub-layout separately too. For example, a 15-joint no-arm model uses ELF3_LOWER_BODY_JOINTS. The Policy can compose these 15 model actions with the default pose, topics, IK or programmatic trajectories into a larger Policy Action, but the Model Action Layout and the Policy Action Layout must be described separately.

NPZ files usually carry no joint names. In that case the training/export side must fix their order as a JointLayout in code; if it differs from the ONNX, the mapping may only be compiled once by name at initialisation with CompiledJointMap.

Joint order constrains not only observation and action but also default position, kp, kd and action scale. Don't keep four separate bare 29-element arrays in the policy class. Declare fixed parameters joint by joint, one row each:

from bxi_example_py_elf3.framework.joints import JointParameterSet


PARAMETERS = JointParameterSet.from_rows(
    MODEL_JOINTS,
    (
        # name, default_position, kp, kd, action_scale
        ("joint_a", 0.0, 50.0, 2.0, 0.25),
        ("joint_b", 0.1, 40.0, 1.5, 0.20),
    ),
)

Then have joint_contract reference PARAMETERS.layout, and the inference code only reads self._parameters.default_position/kp/kd/action_scale. If the four columns come from ONNX metadata, first strictly validate the metadata's joint_names, then bind through JointParameterSet.from_arrays(MODEL_JOINTS, ...). If the model has no joint_names, the policy code must provide the real MODEL_JOINTS; never guess from array length, robot topic order or class name.

3. State

Reuse the framework's MotionReplayState:

from bxi_example_py_elf3.policies import (
    DanceMotionPolicyGravityIsaaclab,
)
from bxi_example_py_elf3.framework.mod_api import ResourceHandle
from bxi_example_py_elf3.framework.mod_api import MotionReplayState


class ExampleMotionState(
    MotionReplayState[DanceMotionPolicyGravityIsaaclab]
):
    def __init__(self, name, state_id, policy):
        super().__init__(
            name,
            state_id,
            policy,
            finish_state="com.bxi.basic_actions/normal",
            finish_trigger="example_motion_finished",
            end_frame_trim=20,
            end_transition={
                "profile": "dual_running_blend",
                "duration": 0.6,
                "sample_from": True,
            },
        )

The base class handles policy reset, warm-up, the entry frame, running sampling, requesting finish_state when playback ends, and the pause action. The end target must be declared explicitly; the framework won't guess which state is the current robot's "normal".

MotionReplayState takes the policy's named output layout from policy.output.joints.layout and doesn't assume a fixed 29 joints. When the policy outputs fewer joints than the state ultimately needs, bring in topics, IK or programmatic control with Multi-source Joint Command Composition; when the state output differs from the robot's 29/31/N layout, the rules in Joint Layout and Mapping apply.

4. Register the resource and loading policy

plugin.py:

from bxi_example_py_elf3.policies import (
    DanceMotionPolicyGravityIsaaclab,
)
from bxi_example_py_elf3.framework.mod_api import (
    ModDefinition,
    ModLoadContext,
    ResourceKey,
    ResourceLoadContext,
)

from .state import ExampleMotionState

POLICY = ResourceKey[DanceMotionPolicyGravityIsaaclab](
    "com.example.motion/policy"
)


def _load(context: ResourceLoadContext):
    return DanceMotionPolicyGravityIsaaclab(
        str(context.asset("assets/motion.npz")),
        str(context.asset("assets/motion.onnx")),
        start_frame=0,
    )


def create_mod(context: ModLoadContext) -> ModDefinition:
    context.register_resource(POLICY, _load, policy="on_demand")
    policy = context.resource(POLICY)
    return ModDefinition(
        state_factories={
            "motion": lambda state: ExampleMotionState(
                state.name, state.state_id, policy
            )
        }
    )

Here we choose on_demand, so loading the Mod doesn't create the inference object. On the first request to enter motion, the resource dependency declared by MotionReplayState makes the state machine prepare the model asynchronously; the current state keeps controlling the robot, and the Transition only starts once the model is ready. To finish loading and failure checks at startup, change to policy="startup". handle.get() itself never triggers loading or blocks waiting.

5. Manifest

schema: 1
id: com.example.motion
name: Model Motion
version: 1.0.0
api: ">=4,<5"
enable: true
entrypoint: plugin:create_mod
visibility: public
requires:
  - id: com.bxi.basic_actions
    version: ">=1,<2"
conflicts: []
python_exports: []
runtime_requirements:
  python: []
  ros: []
  system: []

events:
  activate:
    slot: btn_10
    value: 11
  toggle_pause:
    slot: btn_9
    value: 1

states:
  motion:
    manifest:
      label: Model Motion
      priority: 100
      group: Customer
      icon: animation
      confirm: true
      confirm_message: Make sure the surroundings are safe

routes:
  - from: com.bxi.basic_actions/normal
    event: activate
    to: motion
    transition: soft_switch
  - from: motion
    event: com.bxi.basic_actions/normal
    to: com.bxi.basic_actions/normal
    transition: dual_running_blend
  - from: motion
    event: com.bxi.basic_actions/zero_torque
    to: com.bxi.basic_actions/zero_torque

actions:
  - from: motion
    event: toggle_pause
    action: toggle_pause
    manifest:
      label: Pause/Resume

btn_10=11 here is a customer extension value that is not in the default remote controller bindings. In practice, add an output in the same way as in Bind buttons and connect Mod routes, and first confirm that no enabled Mod already uses that slot and value from the same source state.

A Transition is a temporary control process between two states: the state graph has already decided where to switch from and to, and the Transition decides how complete MIT motor frames are generated during the switch. A model's first frame may differ greatly from the current motor frame, so you usually need a hold, gain ramp or dual-state blend to avoid a jump from swapping frames directly. The example above uses a brief hold before entering, and blends the running frames of the motion model and the walking model when returning to normal.

6. Debugging order

  1. First load the Mod offline and confirm the resource status is unloaded.
  2. Request the motion in simulation and confirm the state information briefly shows preparing before the Transition starts.
  3. Confirm on_prepare() only runs after the resource is ready, and that model warm-up completes.
  4. Check the first frame, end frame and end_frame_trim.
  5. Use shuffled named states and states with extra joints to verify the model input is still arranged in the declared layout.
  6. Check safe exit and return to normal.
  7. Only then move to low-gain verification on the real robot.

Next lesson: Bind buttons.

Models, Resources and launch

Models and motion data belong to the Mod that uses them and live in that Mod's assets/. At run time the resource manager prepares them according to the declared startup/on_demand policy; model objects are no longer attached dynamically to BxiExample.

File layout

mods/com.example.motion/
  mod.yaml
  plugin.py
  state.py
  assets/
    motion.npz
    policy.onnx

setup.py installs the whole mods/ tree recursively, skipping __pycache__, .pyc and .pyo.

Register resources

from bxi_example_py_elf3.framework.mod_api import (
    ModDefinition,
    ModLoadContext,
    ResourceKey,
    ResourceLoadContext,
)

POLICY = ResourceKey[MotionPolicy]("com.example.motion/policy")


def _load(context: ResourceLoadContext) -> MotionPolicy:
    return MotionPolicy(
        str(context.asset("assets/motion.npz")),
        str(context.asset("assets/policy.onnx")),
    )


def create_mod(context: ModLoadContext) -> ModDefinition:
    context.register_resource(POLICY, _load, policy="startup")
    policy = context.resource(POLICY)
    return ModDefinition(
        state_factories={
            "motion": lambda state: MotionState(
                state.name, state.state_id, policy
            )
        }
    )

A ResourceKey must be globally named. context.asset() rejects paths that escape the current Mod's assets/ and confirms the file exists.

Loading policy

context.resource(POLICY) only returns a ResourceHandle. policy="startup" completes preparation when the framework starts, before the control timer begins, which suits the initial state and models that must be validated at startup; policy="on_demand" is prepared asynchronously by the resource worker thread the first time a state that needs it is requested, which suits motions entered infrequently. Once prepared, handle.get() always returns the same instance; it never triggers loading or waits for the resource. The preparation policy is hard-coded in the resource registration code, not written in mod.yaml.

When the node shuts down, the resource manager calls close() (if present) on loaded instances in reverse order, then clears the cache.

When several states share a model, have them hold the same handle. When several Mods share a model, prefer splitting out a stateless resource Mod and declaring the dependency with requires.

Use inside a state

from bxi_example_py_elf3.framework.mod_api import PolicyState


class MotionState(PolicyState[MotionPolicy]):
    def __init__(self, name, state_id, policy):
        super().__init__(name, state_id, policy)

    def reset_policy(self, ctx, policy):
        policy.reset(ctx.inference_frame)

    def policy_entry_position(self, ctx, policy):
        return policy.output.joints.position

    def policy_gains(self, ctx, policy):
        return policy.output.joints.kp, policy.output.joints.kd

    def infer_position(self, ctx, policy, dt, *, advance):
        output = policy.step(ctx.inference_frame, dt, advance=advance)
        return output.joints.position

PolicyState automatically declares the handle as a state resource dependency, and uniformly implements the entry frame, running frame, normal on_update(), resource resolution and warm-up. Override the corresponding methods when the policy has special reset or warm-up requirements; don't run inference while the plugin is loading or the state is being constructed.

Current asset paths

The basic motion models are in mods/com.bxi.basic_actions/assets/. The back-flip, forward-flip, ballet and depth-perception walking assets are each in the assets/ of their own separate Mod.

Both the model and the policy for depth-perception walking belong to the com.bxi.normal_depth Mod; the policy implementation is in mods/com.bxi.normal_depth/depth.py and depends only on the generic framework/inference, and the public policies never import it in reverse. Replaceable camera or perception nodes connect through standard ROS topics and are not model Resources.

RKNN INT8 calibration for the depth model

Quantisation calibration must use the input distribution the model actually receives. Don't calibrate with random arrays or raw camera frames: the depth policy's input also includes observation history, depth cropping, normalisation and multi-frame selection.

Wrap the controller with the generic capture tool. It injects a capture proxy outside the application process and writes samples to the specified directory:

python3 tools/benchmark/collect_calibration.py \
  --output /tmp/bxi_rknn_calibration \
  --every 5 \
  --max-samples 500 \
  --skip-first 10 \
  -- ros2 launch bxi_example_py_elf3 example_demo_hw.launch.py

Parameters:

  • --output: root directory for the calibration set.
  • --every: capture one set every this many real advancing policy calls.
  • --max-samples: the maximum number of sets kept per model.
  • --skip-first: skip this many inferences after startup.

Each model independently produces <root>/<model>/dataset.txt, capture.json and one .npy per input. Each line corresponds strictly to one inference, and the file order is the ONNX input order, so future N-input models are supported too. The advance=False used by preview transitions doesn't pollute the calibration set.

Only policies that actually run produce samples. The current default mode: origin_camera corresponds to dagger2.onnx; to capture normal_depth.onnx, switch to mode: depth_walk and run again.

Copy the calibration directory to an x86_64 conversion machine with RKNN Toolkit2 2.3.2 installed, then run:

PYTHONNOUSERSITE=1 python3 tools/benchmark/quantize_rknn.py \
  src/bxi_example_py_elf3/mods/com.bxi.normal_depth/assets/dagger2.onnx \
  src/bxi_example_py_elf3/mods/com.bxi.normal_depth/assets/normal_depth.onnx \
  --calibration-root /path/to/bxi_rknn_calibration \
  --install

Before converting, the tool validates the number and order of inputs, shapes, float32, NaN/Inf and the minimum number of samples, then forcibly rebuilds the W8A8 cache and installs it atomically next to the ONNX. The quantised model must still be re-tested for backend latency on the RK3588 and validated with real inputs and closed-loop motion; a successful calibration doesn't automatically mean the control policy's accuracy is acceptable.

The model paths used by the standalone MJLab node in example_walk.launch.py and its hardware version are:

mods/com.bxi.basic_actions/assets/model_normal.onnx

Responsibilities of launch

launch is responsible for starting simulation or hardware, setting /topic_prefix, and overriding /state_machine_config and the state information parameters. Model paths used by a Mod itself should not be hard-coded into launch; they are resolved relative to the Mod root by the resource loading function.

Verification

colcon build --packages-select bxi_example_py_elf3 --symlink-install --merge-install
find install/share/bxi_example_py_elf3/mods -name mod.yaml -o -path '*/assets/*'

If the workspace previously used a different install layout or an old asset directory, use new build/install paths, or clean only that package's old build cache.

Custom Transitions

A transition plugin decides how motor frames are generated each control cycle between the state machine receiving a switch request and the target state formally entering. This mechanism is needed because the MIT command fields of the two sides are not necessarily continuous, and swapping frames directly could make the robot move suddenly; holding the current frame, building up gains gradually or blending the outputs of both ends each suit different states.

There are currently two places to put them:

  • Business-specific: in the relevant Mod, imported by the entrypoint module at node startup.
  • Framework-wide: in bxi_example_py_elf3/framework/transitions/; a restart is required after changes.

Lifecycle

plan.validate_states(source, target)
target.on_prepare(ctx, source)
session = plan.create_session(ctx, source, target)

Each cycle session.update(ctx, dt)

Done: source.on_exit() -> current=target -> target.on_enter()

When interrupted or the Session throws, the target's on_prepare_cancel() is called.

Minimal plugin inside a Mod

File pose_hold.py:

from __future__ import annotations

from collections.abc import Mapping
from bxi_example_py_elf3.framework.mod_api import RobotControlContext
from bxi_example_py_elf3.framework.mod_api.transition import (
    ConfigReader,
    MotorFrame,
    SingleClassTransition,
)

class PoseHoldTransition(SingleClassTransition):
    type_name = "com.example.motion.pose_hold"

    def __init__(self, name: str, duration: float):
        super().__init__(name, duration)
        self._frame: MotorFrame | None = None

    @classmethod
    def from_config(cls, name, raw: Mapping[str, object]):
        reader = ConfigReader(raw, name)
        duration = reader.float("duration", minimum=0.0)
        reader.finish()
        return cls(name, duration)

    def on_start(self, ctx, from_state, to_state):
        self._frame = MotorFrame.create(
            ctx.robot_layout,
            ctx.last_motor_frame.qpos,
            ctx.last_motor_frame.kp,
            ctx.last_motor_frame.kd,
            vel=ctx.last_motor_frame.vel,
            torque=ctx.last_motor_frame.torque,
        )

    def apply(self, ctx: RobotControlContext, dt: float, progress: float):
        if self._frame is None:
            raise RuntimeError("pose hold has not started")
        ctx.set_motor_target(self._frame)

The Mod's plugin.py registers the type explicitly:

from bxi_example_py_elf3.framework.mod_api import ModDefinition
from .pose_hold import PoseHoldTransition


def create_mod(ctx):
    return ModDefinition(
        state_factories={
            "hold": build_hold_state,
        },
        transition_plugins={
            PoseHoldTransition.type_name: PoseHoldTransition,
        },
    )

build_hold_state is the Mod's existing state factory. If there is already a create_mod(), merge transition_plugins into its existing return value; don't define a second entry point with the same name.

The loader checks that the dictionary key matches type_name, that the type name is globally unique, and cleans up the current Mod's dynamic types on startup failure or Runtime shutdown. Merely importing a Transition class doesn't register it; it must be added explicitly to the current Mod's transition_plugins.

Configure a profile

In the same mod.yaml:

transition_profiles:
  pose_hold:
    type: com.example.motion.pose_hold
    duration: 0.1

routes:
  - from: source
    event: activate
    to: target
    transition: pose_hold

The profile's run-time name is com.example.motion/pose_hold. Local references inside routes are resolved automatically.

ConfigReader

duration = reader.float("duration", minimum=0.0)
enabled = reader.boolean("enabled", default=True)
curve = reader.literal(
    "curve", ("linear", "smoothstep"), default="smoothstep"
)
steps = reader.mappings("steps")
reader.finish()

Always call finish() so unknown fields are exposed at load time.

Plans, Sessions and state capabilities

Most plugins inherit SingleClassTransition: compiling the configuration produces a plan prototype, which is shallow-copied into an independent Session for each switch. Run-time data is initialised in on_start(), and apply() outputs each frame.

A state's natural output may be 29, 31 or any N joints. To blend the two ends numerically, first create a full buffer for each and call ctx.resolve_motor_frame(natural_frame, full_frame); only arrays in the full Robot Layout can be interpolated directly. A Transition that only holds ctx.last_motor_frame doesn't need resolution.

When the target needs an entry frame:

def validate_states(self, from_state, to_state):
    require_entry_frame_provider(to_state)

Use require_running_frame_provider() when you need a dynamic running frame. States implement EntryFrameProvider or RunningFrameProvider only when actually needed; don't stuff plugin-specific functions into the public state base class.

Current built-in types

instant
hold
entry_gain_ramp
running_blend
sequence

Each child Session of a sequence is created only when its turn comes.

Checklist

  1. type_name is globally unique; business plugins should include the Mod id.
  2. The Mod entrypoint has added the plugin to transition_plugins.
  3. Configuration is read strictly by ConfigReader.
  4. Session data is only initialised in on_start().
  5. Required state capabilities are checked in validate_states().
  6. Cleanup of resources and registrations after a startup loading failure has no side effects.

Hands-on 4: Write a custom transition inside a Mod

A Transition temporarily generates motor frames during a state switch. It is needed because the MIT command fields of the source and target states are not necessarily continuous, and switching directly can cause a jump; the built-in transitions can hold, ramp gains or blend two running states.

You only need a custom Transition when these built-in strategies can't express the switching process the business needs. This lesson adds pose_gain_blend to com.example.sin_wave, smoothly blending the frame at the start of the transition with the target's entry frame.

1. Create the module

mods/com.example.sin_wave/pose_gain_blend.py
from collections.abc import Mapping
import numpy as np

from bxi_example_py_elf3.framework.mod_api.transition import (
    ConfigReader,
    MotorFrame,
    SingleClassTransition,
    require_entry_frame_provider,
)


class PoseGainBlendTransition(SingleClassTransition):
    type_name = "com.example.sin_wave.pose_gain_blend"

    def __init__(self, name, duration, curve):
        super().__init__(name, duration)
        self._curve = curve
        self._start = None
        self._target = None
        self._output = None

    @classmethod
    def from_config(cls, name: str, raw: Mapping[str, object]):
        reader = ConfigReader(raw, name)
        duration = reader.float("duration", minimum=0.0)
        curve = reader.literal(
            "curve", ("linear", "smoothstep"), default="smoothstep"
        )
        reader.finish()
        return cls(name, duration, curve)

    def validate_states(self, from_state, to_state):
        require_entry_frame_provider(to_state)

    def on_start(self, ctx, from_state, to_state):
        self._start = MotorFrame.create(
            ctx.robot_layout,
            ctx.last_motor_frame.qpos,
            ctx.last_motor_frame.kp,
            ctx.last_motor_frame.kd,
            vel=ctx.last_motor_frame.vel,
            torque=ctx.last_motor_frame.torque,
        )
        natural_target = require_entry_frame_provider(to_state).get_entry_frame(ctx)
        self._target = MotorFrame.empty(ctx.robot_layout)
        ctx.resolve_motor_frame(natural_target, self._target)
        self._output = MotorFrame.empty(ctx.robot_layout)

    def apply(self, ctx, dt, progress):
        if self._start is None or self._target is None or self._output is None:
            raise RuntimeError("pose gain blend has not started")
        alpha = progress
        if self._curve == "smoothstep":
            alpha = progress * progress * (3.0 - 2.0 * progress)
        for start, target, output in (
            (self._start.qpos, self._target.qpos, self._output.qpos),
            (self._start.vel, self._target.vel, self._output.vel),
            (self._start.kp, self._target.kp, self._output.kp),
            (self._start.kd, self._target.kd, self._output.kd),
            (self._start.torque, self._target.torque, self._output.torque),
        ):
            np.subtract(target, start, out=output)
            output *= alpha
            output += start
        ctx.set_motor_target(self._output)

2. Register explicitly

Import the class in plugin.py and add it to the returned ModDefinition:

from bxi_example_py_elf3.framework.mod_api import ModDefinition
from .pose_gain_blend import PoseGainBlendTransition
from .state import SinWaveState


def create_mod(ctx):
    def build_sin_wave(state):
        params = state.dataclass_params(SinWaveState.Params)
        return SinWaveState(state.name, state.state_id, params)

    return ModDefinition(
        state_factories={
            "sin_wave": build_sin_wave,
        },
        transition_plugins={
            PoseGainBlendTransition.type_name: PoseGainBlendTransition,
        },
    )

The registration belongs to the current Mod; there is no implicit side effect of "modifying the global registry when the module is imported". Forgetting transition_plugins produces unknown transition type when the configuration loads, rather than silently depending on import order.

At the same time, change the manifest entry from conventional loading to an explicit plugin, and delete the original factory line:

entrypoint: plugin:create_mod

states:
  sin_wave:
    label: Sine Swing
    priority: 100
    group: Customer
    icon: waves
    params:
      joint: l_knee_y_joint
      amplitude: 0.25
      frequency: 0.5

3. The target state provides an entry frame

class SinWaveState(RobotControlState, EntryFrameProvider):
    def get_entry_frame(self, ctx):
        last = ctx.last_motor_frame
        return self._motor_frame(
            ctx,
            last.qpos,
            last.kp,
            last.kd,
            vel=last.vel,
            torque=last.torque,
        )

4. Manifest profile and route

transition_profiles:
  pose_blend:
    type: com.example.sin_wave.pose_gain_blend
    duration: 0.5
    curve: smoothstep

routes:
  - from: com.bxi.basic_actions/normal
    event: activate
    to: sin_wave
    transition: pose_blend

One-off override:

transition:
  profile: pose_blend
  duration: 1.0
  curve: linear

5. Verify

Restart the control node after changing the plugin; the startup log should show that ModRuntime was built successfully. Common errors:

  • unknown transition type: the plugin wasn't added to transition_plugins.
  • transition key ... does not match: the dictionary key doesn't match the class's type_name.
  • duplicate transition type: the name doesn't include a unique Mod namespace.
  • unknown fields: a field wasn't consumed by the reader.
  • must implement EntryFrameProvider: a target edge lacks the required capability.

Next lesson: Dual-state Running Blend.

Hands-on 5: Use dual-state running blend

A Transition describes how motor frames should be generated between the state machine receiving a switch request and the target state formally entering. If both sides are continuously running models, switching directly may make the MIT command fields change abruptly; slowly approaching a single fixed entry pose instead loses both sides' dynamic output.

running_blend is designed for exactly this case: during the transition it samples the running frames of the source and target states and blends qpos/vel/kp/kd/torque field by field between the two.

State capabilities

class SinWaveState(RobotControlState, EntryFrameProvider, RunningFrameProvider):
    def get_entry_frame(self, ctx):
        return self._calculate_frame(ctx, 0.0)

    def sample_running_frame(self, ctx, dt, *, advance):
        frame = self._calculate_frame(ctx, self.elapsed)
        if advance:
            self.elapsed += dt
        return frame

    def on_update(self, ctx, dt):
        self._apply_frame(
            ctx, self.sample_running_frame(ctx, dt, advance=True)
        )

With advance=False, the state's internal time must not advance.

System profile

transition_profiles:
  dual_running_blend:
    type: running_blend
    duration: 0.3
    curve: smoothstep
    sample_from: true
    sample_to: true
    advance_from: true
    advance_to: true

This shared profile lives in the system elf3_state_machine.yaml.

The current shared profile has both source and target advance time, motion history and gait phase during the handover, so the real-time outputs of both ends are blended. The target state must make sure that on_enter() after the transition completes doesn't reset its output to a discontinuous old frame. If the target needs to reset history when it formally enters, override advance_to: false on that route and make sure advance=False sampling is completely side-effect free.

Mod route

routes:
  - from: com.bxi.basic_actions/normal
    event: activate
    to: sin_wave
    transition:
      profile: dual_running_blend
      advance_to: false

  - from: sin_wave
    event: com.bxi.basic_actions/normal
    to: com.bxi.basic_actions/normal
    transition:
      profile: dual_running_blend
      duration: 1.0
      advance_to: false

SinWaveState.on_enter() resets elapsed to 0, so both routes above override advance_to: false. The target side only previews the entry time point, so the first frame after the Transition completes won't jump back because of a timeline reset.

Returning from code:

ctx.request_state(
    "com.bxi.basic_actions/normal",
    trigger="motion_finished",
    transition={
        "profile": "dual_running_blend",
        "duration": 0.5,
        "sample_from": False,
    },
)

Blending and lifecycle

from_frame = source running frame, or the last motor frame before the transition started
to_frame   = target running frame, or the target entry frame
alpha      = curve(progress)
output     = from + (to - from) * alpha

The formula above is applied separately to qpos/vel/kp/kd/torque, so velocity targets and feed-forward torque don't switch suddenly when the Transition ends.

The built-in implementation first resolves both sides' natural layouts to the full Robot Layout and then applies the formula. So an old 29-joint state and a new 31-joint state can be blended with each other; the extra joints transition smoothly to the default targets declared by the platform.

The target runs on_prepare() first, then the Session takes the entry frame. The source's on_exit() and the target's on_enter() are only called when the transition completes; on interruption the target's on_prepare_cancel() is called.

Within one control cycle the source and target are sampled in turn. The two models don't need to run in parallel; as long as the total time of both inferences fits within the control cycle budget, serial sampling gives simpler, more deterministic state semantics.

Common problems

  • With sample_from enabled, the source must implement RunningFrameProvider.
  • With sample_to enabled, the target must implement RunningFrameProvider.
  • The target always needs EntryFrameProvider.
  • The current shared profile uses advance_from: true and advance_to: true. If the target's on_enter() resets history or the timeline, use advance_to: false for that route and check that the Transition's end frame is continuous with the target's first frame.
  • Only use sample_from: false, which blends from the last motor frame before the transition started, when the source motion has already ended and can no longer generate valid frames.
  • If there's a jump, check that the entry frame matches the first frame after the target enters.

Declaring and running Mod child nodes (the nodes field in mod.yaml)

This page explains how, in the VKBOTS ROS 2 control framework, a Mod declares, starts and manages helper ROS 2 nodes and ordinary background commands in its own mod.yaml. A "Mod child node" here means a managed run unit in the top-level nodes: field, such as a camera publisher, a perception node, a communication bridge or a device SDK service.

This page is not a list of all ROS 2 nodes in the workspace, nor the states: list, nor a list of inference classes. If your Mod only has motion states and needs no extra ROS 2 publishers or subscribers, you can leave out nodes: entirely.

Where this applies

Item Location or meaning
Project The VKBOTS Mod framework in src/bxi_example_py_elf3/
Configuration entry The top-level nodes: field in each Mod's own <mod dir>/mod.yaml
Public type NodeBuildContext in bxi_example_py_elf3/framework/mod_api/node.py
Runtime implementation ModNodeManager in bxi_example_py_elf3/framework/runtime/mod_nodes.py
Scope of management Node creation, start/stop by state, separate processes, parameters, remapping, restart on failure and shutdown

For example, a customer Mod with a separate perception process can be organised as:

com.example.perception Mod
├── nodes.detector                    # Helper ROS 2 node that publishes perception results
│   └── detector_node:create_node
└── states.avoidance                  # Control state that consumes the perception results

The two have different responsibilities: detector produces ROS messages, while avoidance is a control state; the Mod node manager decides when the former starts and stops according to lifecycle. This page is about the nodes branch above. For states, read Custom States; for the full Mod structure, read Mod System.

The current com.bxi.normal_depth no longer includes a built-in camera node. The real-robot camera is managed by the separate bxi_depth_camera package, MuJoCo provides simulated images, and the depth state only subscribes to standard ROS topics.

Supported node runtimes

Mod API 4.0 supports four node runtimes, all reusing the same lifecycle, restart and display fields:

  • python: a Python factory inside the Mod that returns an rclpy.Node.
  • executable: a native executable distributed with the Mod, suitable for C++ ROS 2 nodes.
  • ros: looks up an executable in an installed ROS 2 package through the ament index; equivalent to ros2 run.
  • command: runs an ordinary script or command inside the Mod without adding ROS parameters; supports a separate interpreter, environment variables, working directory, dependency order and staged shutdown.

Mods that use executable, ros or command should declare the current public API range api: ">=4,<5".

Optional runtime environment profiles

Without runtime_profiles the bar stays as low as possible: nodes use the host Python, ROS and system libraries, and users prepare dependencies themselves with pip/apt and similar. Only when dependencies need to move with the directory does a Mod choose vendor or portable; all three modes end up in the same process manager:

mode Purpose Carries Python Allows in_process
host Default; uses the host environment No Yes
vendor Host Python plus vendor/python and vendor/lib No Yes, but native symbols may conflict
portable A complete runtime root inside the Mod, for Python/C++/vendor SDKs Optional No, must be a separate process

Portable example:

runtime_profiles:
  device:
    candidates:
      - mode: portable
        root: runtime/{platform}
        python: python/bin/python3
        executable_paths: [bin, python/bin]
        library_paths: [lib, python/lib]
      - mode: host

nodes:
  device_manager:
    runtime: command
    entrypoint: scripts/device_manager.py
    interpreter: bundled-python
    execution: process
    runtime_profile: device
    lifecycle: mod
    manifest:
      label: Device Manager

{platform} uses the framework's current platform tag; {python_tag} can also be used in paths. All paths must be safe relative paths inside the Mod and are re-resolved against the new root when the whole Mod is moved. Later candidates are only tried when the Portable directory doesn't exist; if the directory exists but Python isn't executable, a declared directory is missing or a symlink escapes the runtime root, the node is marked unavailable straight away and does not silently fall back to the host environment.

bundled-python means using the selected profile's python: the framework starts that interpreter directly and propagates BXI_RUNTIME_ROOT, BXI_PYTHON_EXECUTABLE, PATH, PYTHONHOME and LD_LIBRARY_PATH to the whole process tree. Portable clears inherited PYTHONPATH/PYTHONHOME and disables user site by default; node-level runtime_requirements also run real import checks with the same interpreter and final environment.

A Mod can mix the three modes per node. For example, the control state and a ROS bridge use Host while a vendor SDK manager uses Portable. Custom Python or native dependencies can't go into in_process nodes; one process can't have mutually isolated Python interpreters and dynamic library namespaces at the same time.

Common format

nodes:
  detector:
    runtime: executable
    entrypoint: detector_node
    execution: process
    scheduling:
      cpu_affinity: compute
    lifecycle: state
    states: [detect]
    arguments: [--device, "0"]
    namespace: /vision
    remappings:
      image: /camera/image_raw
    params:
      threshold: 0.5
      enabled: true
    manifest:
      label: C++ Detection Node
    runtime_requirements:
      python: []
      ros:
        - package: sensor_msgs
      system: []
    restart:
      max_attempts: 3
      delay: 1.0
      non_retryable_exit_codes: [78]

Fields:

  • runtime: python, executable, ros or command. For compatibility with old Mods, it defaults to python when omitted.
  • runtime_profile: an optional top-level runtime_profiles name; when omitted, the Host/existing Vendor behaviour is kept.
  • entrypoint: its format depends on runtime; see below.
  • execution: Python nodes support in_process and process; native nodes must be process. Native nodes default to process when the field is omitted.
  • scheduling.cpu_affinity: the cross-platform CPU role used by a separate process. Defaults to shared when omitted; common values are compute, background and shared. Only applies to execution: process.
  • lifecycle: mod means it lives as long as the Mod; state means it only runs while the states listed in states are active or preloaded.
  • arguments: ordinary program arguments placed after the executable and before --ros-args.
  • namespace: an empty string or an absolute ROS namespace starting with /.
  • remappings: a table of ROS name remappings.
  • params: node parameters. Native nodes receive an automatically generated standard ROS 2 parameter file.
  • restart: only for process nodes, using the existing exit monitoring and restart policy. non_retryable_exit_codes can declare exit codes for deterministic configuration faults; when one is hit, the node goes straight to faulted without consuming retries. Using sysexits EX_CONFIG=78 for configuration errors is recommended; ordinary run-time faults should still use other non-zero exit codes to keep automatic recovery.
  • depends_on: a list of node names this node depends on. The framework starts nodes in dependency topological order and stops them in reverse; local names automatically get the current Mod ID prefixed.
  • shutdown: the process shutdown policy; you can set the initial signal, the time to escalate to SIGTERM and the time for the final SIGKILL.

Every native node receives a unique node name generated by the framework. The actual command looks like:

<executable> <arguments...> --ros-args \
  -r __node:=com_example_detector_detector \
  -r __ns:=/vision \
  -r image:=/camera/image_raw \
  --params-file <temporary-file>

The temporary parameter file is held by the node manager and deleted when the manager shuts down.

CPU scheduling roles

A Mod shouldn't pick CPU numbers itself based on RK3588, x86 or Jetson. When it needs to favour compute cores, it only declares the purpose:

nodes:
  inference_worker:
    runtime: command
    entrypoint: bin/inference_worker
    execution: process
    scheduling:
      cpu_affinity: compute
    lifecycle: mod
    manifest:
      label: Inference Worker Process

The available roles are control, compute, background, shared, all and inherit; for the detailed resolution rules see Framework Control Scheduling. Separate nodes default to shared and usually need no configuration. Continuous compute nodes such as cameras and inference can choose compute, and low-frequency device services can choose background. Unless you are specifically diagnosing something, don't write numbers or CPU lists in a Mod, and don't run taskset again inside the entrypoint.

in_process nodes share the process and executor with the Framework and can't have their own process affinity; declaring scheduling for them is an error at load time. When you need a separate CPU role, switch to execution: process. A node's affinity is published as cpu_affinity and resolved_cpu_affinity, so you can confirm the role and the actual CPU set on this machine in the state snapshot.

Python nodes

nodes:
  camera:
    runtime: python
    entrypoint: camera_node:create_node
    execution: process
    lifecycle: mod
    arguments: []
    namespace: ""
    remappings: {}
    params:
      fps: 30
    manifest:
      label: Python Camera Node

A Python factory gets node_name, params, arguments, namespace and remappings through NodeBuildContext, and is responsible for using these values when constructing the rclpy.Node.

Plain command nodes

command is for long-running background programs that don't implement rclpy.Node and don't accept --ros-args:

nodes:
  device_manager:
    runtime: command
    entrypoint: scripts/device_manager.py
    interpreter: "${DEVICE_PYTHON:-python3}"
    lifecycle: state
    states: [teleop]
    arguments: [--port, "${DEVICE_PORT:-5556}"]
    cwd: .
    environment:
      PYTHONUNBUFFERED: "1"
      LD_LIBRARY_PATH:
        prepend:
          - "${DEVICE_SDK_ROOT:-/opt/device}/lib"
        existing_only: true
    manifest:
      label: Device Manager
    restart:
      max_attempts: 3
      delay: 2.0
      non_retryable_exit_codes: [78]
    shutdown:
      signal: SIGINT
      terminate_after: 3.0
      kill_after: 5.0

  protocol_bridge:
    runtime: command
    entrypoint: scripts/protocol_bridge.py
    interpreter: "${DEVICE_PYTHON:-python3}"
    lifecycle: state
    states: [teleop]
    depends_on: [device_manager]
    manifest:
      label: Protocol Bridge

entrypoint must be a safe relative path inside the Mod directory; it can't contain .. and must not escape the Mod after symlink resolution. With interpreter set, the script doesn't need the executable bit; without it, entrypoint itself must be executable. cwd likewise may only point to an existing directory inside the Mod and defaults to the Mod root.

Strings support read-only environment expansion: $NAME, ${NAME} and ${NAME:-default}. The framework doesn't go through a shell, so command substitution, redirection and pipes are never executed. The child process also gets BXI_MOD_ROOT, which can be referenced in arguments, interpreter and environment.

A string value in environment means direct assignment; mapping values support:

  • set: set the variable first.
  • unset: remove the variable from the child process environment; can't be combined with set, prepend or append.
  • prepend / append: join several values with separator; the default separator is the platform path separator.
  • existing_only: keep only prepend/append entries that exist on the current file system; suitable for optional SDK paths.

command receives no ROS parameters, so it can't declare non-empty params, namespace or remappings. If the program itself needs ROS parameters, put them in arguments yourself, or use one of the other three runtimes.

shutdown.signal can be SIGHUP, SIGINT, SIGQUIT or SIGTERM, defaulting to SIGTERM. When terminate_after is reached the framework sends SIGTERM, and when kill_after is reached it sends SIGKILL. All signals go to the command's own process group so its child processes are cleaned up.

The stdout/stderr of separate processes is drained continuously by the framework, and each line is tagged with its source:

[com.example.device/device_manager:out] device ready
[com.example.device/device_manager:err] connection lost

This also covers Python print(), C/C++ stdout, vendor SDKs and tracebacks. Output capture runs on its own thread; very long single lines are split, and during log floods excess lines are dropped with a summary printed. For detailed configuration see Logging.

Native nodes inside a Mod

A Mod can carry same-named binaries for several platforms at once:

com.example.detector/
├── mod.yaml
├── bin/
│   ├── linux-x86_64/
│   │   └── detector_node
│   └── linux-aarch64/
│       └── detector_node
└── vendor/
    └── lib/
        ├── linux-x86_64/
        └── linux-aarch64/

The matching manifest only gives the platform-independent file name:

runtime: executable
entrypoint: detector_node

At run time the same platform tag as runtime_platform_tag() is used to resolve bin/<platform>/<entrypoint> automatically. There is no fallback to other platforms. If the file is missing or lacks execute permission, the node status is unavailable, and other available nodes can still load.

entrypoint must be a safe path relative to the platform's bin directory; absolute paths, .. and symlinks that escape the directory after resolution are all rejected. Mod-private dynamic libraries go in vendor/lib/<platform>/, which is prepended to the child process's LD_LIBRARY_PATH.

Installed ROS package nodes

nodes:
  detector:
    runtime: ros
    entrypoint: detector_package:detector_node
    execution: process
    lifecycle: mod
    arguments: []
    namespace: ""
    remappings: {}
    params: {}
    manifest:
      label: System Detection Node

At run time the package prefix is obtained through the ament index and <prefix>/lib/detector_package/detector_node is executed directly. Direct execution avoids supervising a ros2 run wrapper process, and stopping and restarting on failure are still handled by the same Mod node manager.

Hands-on 7: Engineering composition example

This lesson upgrades the single-state examples from earlier lessons into a customer motion package that can be deployed independently.

/opt/bxi/mods/com.customer.motion_pack/
  mod.yaml
  plugin.py
  walk_state.py
  gesture_state.py
  transitions.py
  assets/
    locomotion.onnx
    gesture.npz
    gesture.onnx

The system YAML only appends the root:

mod_paths:
  - /opt/bxi/mods

Manifest planning

schema: 1
id: com.customer.motion_pack
name: Customer Motion Pack
version: 1.2.0
api: ">=4,<5"
enable: true
entrypoint: plugin:create_mod
visibility: public
requires:
  - id: com.bxi.basic_actions
    version: ">=1,<2"
conflicts: []
python_exports: []
runtime_requirements:
  python: []
  ros: []
  system: []

events:
  customer_walk:
    slot: btn_10
    value: 11
  customer_gesture:
    slot: btn_10
    value: 12
  toggle_pause:
    slot: btn_9
    value: 1

speed_profiles:
  customer_walk:
    vx_scale: 0.5
    vx_min: -0.3
    vx_max: 0.5
    vy_scale: 0.3
    yaw_scale: 0.5

transition_profiles:
  safe_entry:
    type: sequence
    steps:
      - type: hold
        duration: 0.02
      - type: entry_gain_ramp
        duration: 0.8
        kp_from: zero
        kd_from: target

states:
  customer_walk:
    manifest:
      label: Customer Gait
      priority: 100
      group: Customer
    speed_profile: customer_walk
  customer_gesture:
    manifest:
      label: Customer Motion
      priority: 90
      group: Customer
      confirm: true
      confirm_message: Make sure the surroundings are safe

routes:
  - from: com.bxi.basic_actions/normal
    event: customer_walk
    to: customer_walk
    transition: safe_entry
  - from: com.bxi.basic_actions/normal
    event: customer_gesture
    to: customer_gesture
    transition: safe_entry
  - from: customer_walk
    event: com.bxi.basic_actions/normal
    to: com.bxi.basic_actions/normal
    transition: dual_running_blend
  - from: customer_gesture
    event: com.bxi.basic_actions/normal
    to: com.bxi.basic_actions/normal
    transition: dual_running_blend
  - from: customer_gesture
    event: com.bxi.basic_actions/zero_torque
    to: com.bxi.basic_actions/zero_torque

actions:
  - from: customer_gesture
    event: toggle_pause
    action: toggle_pause
    manifest:
      label: Pause/Resume

btn_10=11/12 are customer extension values that aren't in the default remote controller bindings. When deploying this motion package, add the corresponding outputs and make slot/value conflict checks part of the whole-robot configuration validation.

Routes and Transitions are planned separately here: the route decides the target state after an event fires, and the Transition handles motor frames during the switch. The MIT command fields of different models may be discontinuous, so control force toward the target is built up gradually on entry, and the running outputs of both sides are blended when returning to walking, avoiding a jump from swapping frames directly.

Plugin boundaries

  • The resource factory only resolves assets inside the Mod.
  • A model shared by two states is registered only once.
  • All manifest parameters are consumed by StateBuildContext.
  • Business transition classes are registered explicitly through ModDefinition.transition_plugins.
  • A state's ROS resources are managed symmetrically in on_bind/on_unbind.

Safety strategy

  • High-risk entries use manifest.confirm.
  • On abnormal posture, actively request com.bxi.basic_actions/zero_torque.
  • When a model finishes, return explicitly to the base normal or pd_brake.
  • Warm up before entering a model, and undo temporary state when a transition is cancelled.
  • On the real robot, the default speed profile starts from a conservative range.

Restart and load-failure verification

Test each of the following:

  1. Change a manifest parameter and restart; confirm the new parameter takes effect.
  2. Replace a model and restart; confirm the new model loads successfully.
  3. Deliberately create a factory/state key mismatch; confirm the node fails to start with a clear error.
  4. Restore the previous valid Mod directory and restart; confirm the system runs again.
  5. Delete a Mod and restart; confirm the remaining Mods' dependency closure and initial state are still valid.

Release strategy

When the whole customer package needs to be removed from the public release, add:

visibility: protected

Then run the sanitizer self-check. If only one of the motions should be protected, split it into its own Mod first; the release tool doesn't trim individual states inside a package.

Engineering checks

  1. Mod ids, resource keys and transition types are globally unique.
  2. Every cross-Mod route has a dependency.
  3. Ordinary states only set priority; when a fixed index is really needed, make sure it's globally unique, since duplicates prevent startup.
  4. Input and output slots are aligned with the remote controller configuration.
  5. Every state capability satisfies the actual transition profile.
  6. Simulation, startup-failure cleanup, restart recovery and the public tree have all been verified.

Inference framework and named-joint architecture

The goal of the inference framework is for policy classes to keep only two kinds of code, "how to organise observations" and "how to decode actions", while backend selection, joint mapping, history frames, warm-up and resource release are unified. Configuration uses Python classes; models and joint contracts are not described in YAML.

Directory boundaries

bxi_example_py_elf3/
  framework/                   # Portable motion control framework
    inference/
      api.py                   # InferenceFrame / PolicyOutput
      contract.py              # PolicyJointContract / JointInputBinding
      policy.py                # How JointPolicy and Builder/Decoder are combined
      history.py               # History ring buffer with no per-frame allocation
      model.py                 # Extensible ModelArtifact / ModelSpec
      runtime.py               # Backend registration, selection and fallback
      backends/                # ONNX Runtime / OpenVINO / RKNN
    joints/                    # Layout, JointParameterSet, defaults and the command resolver
    platform/                  # Robot integration boundary and joint I/O encoders
  policies/                    # ELF3's built-in concrete policies
    joints.py                  # Model joint contracts and policy-internal order
    normal.py
    amp.py
    beyondmimic.py
  mods/com.bxi.normal_depth/
    depth.py                   # Private policy of the depth-walking Mod

framework/ imports no VKH6 policies or joint tables; policies/ and each Mod's private policies may depend on the generic framework and the project's policies/joints.py. The full robot layout is established by the platform's first valid named state snapshot, not by a policy's joint table. To move to another robot, you can reuse framework/ as a whole and provide the target robot's platform adapter, policies, default targets for missing joints, and Mods.

JointParameterSet is a portable container, so it is defined in framework/joints/parameters.py; ELF3_ISAAC_PARAMETERS is VKH6-specific data, so it is defined in policies/joints.py. Generic classes must not be put back into the VKH6 policy directory, or other robots would be forced to depend on implementations inside the VKH6 package.

Eight joint layout boundaries

Incoming Message Layout
  -> Robot Layout (complete robot layout)
  -> Policy Observation Layout
  -> Model Observation Layout
  -> backend tensor
  -> Model Action Layout
  -> Policy Action Layout
  -> State Output Layout (natural state output)
  -> Hardware Fixed Layout (optional)

Layouts are represented by the immutable JointLayout, and joint names are the semantic primary key across components. Numeric indices are only compiled on first binding or when the message order changes, and must not serve as an implicit protocol between components.

  • The Incoming Message Layout can be in any order; the platform normalises it to a stable Robot Layout.
  • The Robot Layout is the complete set of joints the platform actually has right now, and is also the layout of the final MotorFrame.
  • The Policy Observation Layout is the joints and order the policy reads from the robot state.
  • The Model Observation Layout is the real joint order written into the model's input tensor.
  • The Model Action Layout is the real joint order of the action elements in the model's output tensor.
  • The Policy Action Layout is the joint order the policy outputs after decoding, supplementing or composing, which can differ from the previous three.
  • The State Output Layout is the natural output after composing the Policy with topics, IK, trajectories and other sources; it can have more or fewer joints than the Robot.
  • The Hardware Layout is only for interfaces that carry no joint names and can only accept a fixed array order.

In most single-model policies the Policy Observation is the Model Observation and the Model Action is the Policy Action, so only one PolicyJointContract is needed. But they are not conceptually the same boundary: for example, withoutarm.onnx takes and produces 15 waist and leg joints, and the AMP Policy can supply default targets for the remaining joints before outputting a complete 29 joints. Even so, the 15-joint model observation/action layout must be declared explicitly with a JointLayout, not hidden in [:15].

The actual path each cycle is:

Complete RobotObservation (N)
  -> PolicyJointContract selects the policy observation by name (P)
  -> Organise the input tensors by named model observation (M)
  -> Backend outputs the named model action (K)
  -> Policy decodes/composes its own action JointTargetView (A)
  -> Optional JointCommandComposer composes the State Output MotorFrame (S)
  -> JointCommandResolver: S + explicit platform default targets -> complete Robot Frame (N)
  -> Transition: resolve both sides to N first, then interpolate
  -> Publish named messages directly, or map to the Hardware Layout

P, M, K, A, S and N can all differ. Policy observation names must exist in the Robot Layout; when the state output has fewer joints than the Robot, platform default targets must be provided for the missing hardware joints, and when it has more, it is trimmed by name with a single warning. For the full differences between model output, Policy Action, State Output and Hardware Layout, see Joint Layout and Mapping.

The named declaration in the policy class is the sole authority. The metadata of the model below explicitly uses Isaac order, so the contract must not be written as ELF3_POLICY_JOINTS just to match the VKH6 message order:

from bxi_example_py_elf3.framework.inference import PolicyJointContract
from bxi_example_py_elf3.policies.joints import ELF3_ISAAC_PARAMETERS


class WalkPolicy:
    joint_contract = PolicyJointContract(
        observation=ELF3_ISAAC_PARAMETERS.layout,
        action=ELF3_ISAAC_PARAMETERS.layout,
    )

Model metadata can only validate this declaration; it must not change the contract the other way at run time. A mismatch between declaration and metadata should fail at load time, never guess the order. Assets without joint metadata must have a named JointLayout declared by the policy code; if the NPZ, motion clips and ONNX inside one policy use different orders, declare a layout for each and compile the mapping at initialisation with CompiledJointMap.

Don't maintain hand-written numeric tables like ISAAC_TO_MUJOCO or MUJOCO_TO_ISAAC any more. Such tables have no direction type and can't prove which side an array actually belongs to. Numeric indices may only be compiled from two JointLayouts and kept inside a component as a hot-path cache.

Calling a policy

Each cycle the platform updates one long-lived, reused InferenceFrame:

InferenceFrame(
    joints=joint_state_view,       # JointStateView(layout, position, velocity)
    quat_wxyz=quat_wxyz,
    angular_velocity=omega,
    command=command,
    base_linear_velocity=None,
    world_position=None,
    depth=None,
    depth_frame_id=None,
)

All built-in policies use the same calling form:

policy.reset(frame)
output = policy.step(frame, dt=0.02, advance=True)

output.joints.layout
output.joints.position
output.joints.kp
output.joints.kd
output.estimated_velocity
output.completed

Callers no longer pass bare q, dq, quat, omega in an agreed order. JointInputBinding fetches joints automatically from the policy class's declaration; when the source layout is identical to the policy layout, the original view is used directly with no copy. When the layouts differ or the source contains extra joints, the mapping writes into a float32 buffer the policy holds long-term.

advance=False is used for warm-up and for sampling both sides of a Transition. In such calls a policy must not advance time, motion frames or history indices; HistoryBuffer.preview_append_into() can preview the continuous input "as if the current frame were appended" without modifying the ring buffer state.

A deployable AMP policy

Below is a condensed example using the current public API. The joint contract, backend, stable inputs, history and stable output are all kept intact; a real project can go on to add phase, VAE velocity or different observation fields.

import numpy as np

from bxi_example_py_elf3.framework.inference import (
    HistoryBuffer,
    InferenceFrame,
    InferenceRuntime,
    JointPolicy,
    ModelSpec,
    PolicyJointContract,
    PolicyOutput,
    default_runtime,
)
from bxi_example_py_elf3.policies.joints import ELF3_ISAAC_PARAMETERS


class AmpPolicy(JointPolicy):
    joint_contract = PolicyJointContract(
        observation=ELF3_ISAAC_PARAMETERS.layout,
        action=ELF3_ISAAC_PARAMETERS.layout,
    )

    def __init__(
        self,
        model_path: str,
        *,
        runtime: InferenceRuntime | None = None,
        backend: str = "auto",
    ) -> None:
        super().__init__()  # Create the named input binding and a stable PolicyOutput
        self._runtime = runtime or default_runtime()
        self._parameters = ELF3_ISAAC_PARAMETERS
        model = ModelSpec.portable_onnx(
            model_path,
            input_names=("obs",),
            output_names=("actions",),
        )
        self._backend = self._runtime.open_backend(model, backend=backend)

        count = self._parameters.layout.dof_num

        self._single = np.empty(96, dtype=np.float32)
        self._obs = np.empty((1, 960), dtype=np.float32)
        self._inputs = {"obs": self._obs}  # Dictionary and array identities stay stable
        self._history = HistoryBuffer(10, 96, dtype=np.float32)
        self._action = np.zeros(count, dtype=np.float32)
        self._scaled = np.empty(count, dtype=np.float32)
        self._joint_delta = np.empty(count, dtype=np.float32)
        self._gravity = np.empty(3, dtype=np.float32)

        # Generate positions directly in JointPolicy's output buffer, without an extra copy.
        self._target = self._target_buffer.position
        np.copyto(self._target, self._parameters.default_position)
        self.publish_output(
            self._target,
            self._parameters.kp,
            self._parameters.kd,
        )

    def reset(self, frame: InferenceFrame) -> None:
        joints = self.bind_joints(frame)  # Selected and ordered automatically according to the class contract
        self._action.fill(0.0)
        self._build_single(frame, joints.position, joints.velocity)
        self._history.fill(self._single)
        self._history.write_into(self._obs[0])
        np.copyto(self._target, self._parameters.default_position)

    def step(
        self,
        frame: InferenceFrame,
        dt: float,
        *,
        advance: bool = True,
    ) -> PolicyOutput:
        del dt
        joints = self.bind_joints(frame)
        self._build_single(frame, joints.position, joints.velocity)
        if advance:
            self._history.append(self._single)
            self._history.write_into(self._obs[0])
        else:
            self._history.preview_append_into(self._single, self._obs[0])

        raw = self._backend.run(self._inputs)["actions"]
        np.copyto(self._action, np.asarray(raw).reshape(-1))
        np.multiply(
            self._action,
            self._parameters.action_scale,
            out=self._scaled,
        )
        np.add(
            self._parameters.default_position,
            self._scaled,
            out=self._target,
        )
        return self.publish_output(self._target)

    def _build_single(self, frame, q, dq) -> None:
        if frame.command is None:
            raise ValueError("AMP policy requires frame.command")
        obs = self._single
        obs[0:3] = frame.angular_velocity
        self._project_gravity(frame.quat_wxyz, self._gravity)
        obs[3:6] = self._gravity
        obs[6:9] = frame.command
        np.subtract(
            q,
            self._parameters.default_position,
            out=self._joint_delta,
        )
        obs[9:38] = self._joint_delta
        obs[38:67] = dq
        obs[67:96] = self._action

    @staticmethod
    def _project_gravity(quat, out) -> None:
        w, x, y, z = quat
        out[0] = 2.0 * (w * y - x * z)
        out[1] = -2.0 * (w * x + y * z)
        out[2] = 2.0 * (x * x + y * y) - 1.0

    def close(self) -> None:
        self._backend.close()

There are no four sets of constructor parameters divorced from joint names here. ELF3_ISAAC_PARAMETERS.layout doubles as the model contract, and default_position, kp, kd and action_scale always follow this layout. The built-in table is maintained row by row:

from bxi_example_py_elf3.framework.joints import JointParameterSet


ELF3_ISAAC_PARAMETERS = JointParameterSet.from_rows(
    ELF3_ISAAC_JOINTS,
    (
        # name, default_position, kp, kd, action_scale
        ("l_shoulder_y_joint", 0.2, 54.224, 3.452, 0.231),
        ("r_shoulder_y_joint", 0.2, 54.224, 3.452, 0.231),
        # The remaining joints continue to be declared row by row; a name/layout mismatch fails at import
    ),
)

The real, complete 29-row table is in policies/joints.py. The ellipsis here only explains the format and can't be copied as-is as a runnable configuration. If the parameters come from ONNX metadata, you must also first validate that the metadata's joint_names exactly match the contract, then bind the four columns to the same layout with JointParameterSet.from_arrays(layout, ...). Maintaining four parallel, nameless arrays inside an inference class is forbidden.

This is the "hand-written policy" approach. If you want to split things further for unit testing, you can also use the InputBuilder + OutputDecoder + Policy composition template; both approaches share exactly the same InferenceFrame, PolicyOutput, joint contract and backend runtime.

29-joint policies on a 31-joint robot

This section only covers the inference-side contract; for the full rules on 29→31 padding, 31→29 trimming, multi-source composition and hardware output, see Joint Layout and Mapping.

Feeding a 31-joint state into a 29-joint policy is safe: the policy observation is a subset of the source, and binding extracts the 29 joints by name. The reverse can't be assumed: 29 actions are not enough to form a complete 31-joint hardware command.

ELF3_POLICY_JOINTS in policies/joints.py only fixes the old models' 29-dimensional contract; the full Robot Layout comes directly from the first valid ActuatorStates.name. So adding two joints to the robot doesn't change the input width of old models. A new 31-joint model only has to declare its own 31-joint observation/action layout.

New joints that old models don't output must be given fixed safe targets in the platform class configuration:

from bxi_example_py_elf3.framework.joints import (
    JointCommandDefaults,
    JointDefault,
)

ROBOT_COMMAND_DEFAULTS = JointCommandDefaults(
    {
        "left_gripper_joint": JointDefault(position=0.0, kp=20.0, kd=0.5),
        "right_gripper_joint": JointDefault(position=0.0, kp=20.0, kd=0.5),
    }
)

Pass it to RobotControlRuntime(command_defaults=ROBOT_COMMAND_DEFAULTS). The MotorFrame produced by states and policies keeps its own natural layout; JointCommandResolver does the following the first time that layout appears:

  1. Issues one warning for joints in the model output that the robot doesn't have, and trims them in the compiled mapping.
  2. Looks up explicit default targets for joints missing from the Robot Layout.
  3. Compiles and caches the source→robot numeric indices.
  4. The control cycle only writes into the long-lived, reused full output buffer, with no name lookups or array allocation.

If the model lacks robot joints and any default is missing, the first binding fails immediately; it never silently pads with zeros or reuses the previous frame. If the model outputs more joints than the robot has, only the intersection of names is published, with an explicit warning. The trimming indices and reused buffers are compiled only once, so later cycles never repeat name lookups, logging or array allocation.

Transitions also first resolve the source and target states each to the full Robot Layout and then interpolate. So when switching from a 31-joint state to an old 29-joint state, the new joints transition smoothly from the source state to the explicit default targets rather than jumping at the start of the switch.

Output to ROS or fixed-order hardware

Messages that carry names don't have to be forced into a fixed hardware order:

publish(names=frame.layout.names, position=frame.qpos)

The MotorFrame the framework finally returns is already in the full Robot Layout. Only when bypassing the state machine to handle PolicyOutput directly, and the downstream protocol really supports partial commands, use:

encoder = NamedJointCommandEncoder(supports_partial=True)

Hardware arrays that carry no names must declare a fixed layout and be encoded:

encoder = FixedOrderJointCommandEncoder(hardware_layout)
hardware_target = encoder.encode(policy_output.joints)

The encoder compiles indices the first time a source layout appears and reuses the output array afterwards.

Backend models and fallback

ModelSpec holds open ModelArtifacts ordered by priority; there are no fixed "onnx/openvino/rknn fields". Adding a backend only requires a new artifact and factory, with no need to widen the policy interface. When a policy class passes an ONNX path, it always uses ModelSpec.portable_onnx(...), whose default order is rknn -> openvino -> onnxruntime: first look for a .rknn with the same name, convert from ONNX when needed if explicitly authorised by an environment variable, then fall back to OpenVINO and ONNX Runtime.

from bxi_example_py_elf3.framework.inference import (
    ModelSpec, OnnxArtifact, OpenVinoArtifact, RknnArtifact,
)

model = ModelSpec(
    artifacts=(
        RknnArtifact(
            "walk.rknn",
            source_onnx="walk.onnx",
            target="rk3588",
            input_shapes=(("obs", (1, 960)),),
            output_shapes=(("actions", (1, 29)),),
        ),
        OpenVinoArtifact("walk.onnx", device="CPU"),
        OnnxArtifact("walk.onnx"),
    ),
    input_names=("obs",),
    output_names=("actions",),
)

At run time the first available backend is chosen in artifact order. When a library is missing, the install command is shown and fallback continues; explicitly specifying an unavailable backend raises an error. The real priority on a platform should be decided by benchmarks, not inferred from what happens to be installed.

OpenVINO's Intel GPU plugin may enumerate an NVIDIA GPU. The framework rejects such devices to avoid a process crash from CL_INVALID_COMMAND_QUEUE; NVIDIA should use ONNX Runtime CUDA/TensorRT.

On-demand RKNN conversion

ONNX to RKNN is a build step, not a per-frame inference step. By default there is never any conversion; only with an explicitly set environment variable does loading check the cache and convert on demand:

BXI_RKNN_CONVERT_ON_LOAD=rk3588 python3 your_program.py

BXI_RKNN_CONVERT_ON_LOAD='{
  "target": "rk3588",
  "do_quantization": true,
  "dataset": "/data/calibration.txt",
  "force_rebuild": false,
  "outputs": ["actions"],
  "config": {"optimization_level": 3}
}' python3 your_program.py

The conversion cache is judged valid by a fingerprint of the source model and settings. Whether x86 can convert depends on the rknn-toolkit2 wheel provided by Rockchip; actually running .rknn usually uses rknn-toolkit-lite2 on the target board. outputs trims the outputs actually needed in RKNN and is also part of the cache fingerprint. The benchmark converts only actions by default; this both removes useless graph nodes and avoids an optimiser error RKNN Toolkit 2.3.2 can hit when merging parallel Gather outputs of different shapes. Policies that need multiple run-time outputs must list all the names explicitly.

Notes on RKNN multi-input / multi-output

The framework supports N inputs and N outputs, but the RKNN Lite runtime interface only returns an ordered list without output names. So policy classes must clearly declare the input and output names they really need:

model = ModelSpec.portable_onnx(
    "policy.onnx",
    input_names=("obs", "depth", "command"),
    output_names=("actions", "value", "latent"),
)

portable_onnx(...) reads the model description from the ONNX, generates a same-named .rknn artifact, and uses output_names as the outputs for RKNN conversion. At run time the list RKNN returns is mapped back to a dictionary in the same order. As long as the conversion outputs order matches the policy declaration, N inputs / N outputs won't go wrong because of the framework structure itself.

Deployment still needs to respect these boundaries:

  1. Only declare the outputs the policy actually uses. If you only need actions, don't keep debug outputs; RKNN trims the unused graph, conversion is more stable and inference lighter.
  2. If a multi-output model triggers an RKNN Toolkit optimiser bug, the framework falls back to OpenVINO / ONNX Runtime; this is a compatibility issue between that Toolkit and the ONNX graph structure, not a control-cycle logic error.
  3. RKNN conversion works best with static shapes. A dynamic batch or dynamic spatial size should first be exported to a fixed shape, or have its conversion parameters made explicit through the artifact / environment variables.
  4. The RKNN artifact itself doesn't keep the ONNX metadata. The framework reads joint names, gains, shapes and so on from source_onnx; when deploying .rknn, keep the .onnx next to it, or at least the ability to keep a metadata file from the same source.
  5. If an output is only used for training or offline analysis, don't put it in output_names. The fewer run-time outputs, the more controllable backend selection and cross-platform benchmarks are.

Hot-path performance rules

  1. JointLayouts and mappings are only created at startup, on first binding or when the message name order changes.
  2. Identical observation layouts use a zero-copy fast path; different layouts use np.take(..., out=...).
  3. The command mapping is compiled the first time a state output layout appears; afterwards only the preallocated full Robot Frame is written.
  4. InferenceFrame, PolicyOutput, input dictionaries, input arrays, history storage and target arrays are reused long-term.
  5. Never create a Session, InferRequest, deep copies or name-based list.index() in the control cycle.
  6. ONNX Runtime uses I/O Binding; OpenVINO uses a persistent InferRequest and shared input Tensors.
  7. Monitoring is off by default, and when off, the performance clock is not read.

Verification and benchmarks

# All discovered models × backends available on this machine, with native driver crashes isolated in subprocesses
python3 tools/benchmark/backend_benchmark.py --quick

# Policy-level Git baseline, percentile latency and Python allocation
python3 tools/benchmark/inference_benchmark.py --baseline-ref HEAD

# 31→29 observation mapping, 29→31 default padding, 31-joint reordering and the full-layout fast path
python3 tools/benchmark/joint_mapping_benchmark.py

When comparing across platforms, keep the model, warmup, iterations, power mode and CPU load the same. The report directory tools/benchmark/results/ is ignored by Git, while the benchmark programs themselves are version-controlled.

Depth-perception walking Mod development log

This page explains, based on the current implementation, how com.bxi.normal_depth consumes a simulated or real depth camera. Camera capture is decoupled from robot control: bxi_depth_camera manages the real camera, MuJoCo publishes simulated images, and the depth-walking Mod only subscribes to unified ROS 2 images and CameraInfo.

The finished structure

Real robot: bxi_depth_camera
Simulation: MuJoCo camera sensor
             │
             │ Image + CameraInfo
             ▼
NormalDepthState
  ├─ Decode the full depth image
  ├─ Crop to the policy FOV using the real intrinsics
  ├─ Scale, clamp distance and rotate
  ├─ Select depth frames at the policy rate
  └─ RobotControlState outputs a MotorFrame

The current boundaries are:

  • The camera package handles device discovery, serial-number mapping, SDK filtering and publishing standard ROS streams.
  • The depth-walking Mod doesn't import pyrealsense2 and doesn't open the camera device.
  • Simulation and the real robot use the same logical camera names and per-stream directories.
  • simulation and hardware are distinguished only by /topic_prefix.
  • Policy cropping relies on the real CameraInfo matching each frame's configuration, rather than hard-coding the input camera intrinsics.

1. Start the camera

On the real robot you can start the camera manager on its own:

ros2 launch bxi_depth_camera cameras.launch.py

The hardware example launch file already includes it by default:

ros2 launch bxi_example_py_elf3 example_demo_hw.launch.py

MuJoCo doesn't need the real camera package. The simulation package publishes the camera-backed user sensors declared in the XML.

2. Unified topic contract

The logical camera name defaults to body_depth_camera. The state actually uses two depth streams:

/simulation/body_depth_camera/depth/image_rect_raw
/simulation/body_depth_camera/depth/camera_info

/hardware/body_depth_camera/depth/image_rect_raw
/hardware/body_depth_camera/depth/camera_info

Image requirements:

  • Type: sensor_msgs/msg/Image;
  • Encoding: 16UC1, mono16 or 32FC1;
  • 16UC1/mono16 are interpreted as millimetres by default;
  • 32FC1 is interpreted as metres;
  • step may include row-end padding;
  • Invalid depth stays 0.

Camera information requirements:

  • Type: sensor_msgs/msg/CameraInfo;
  • width and height are positive;
  • k contains 9 finite values;
  • fx=k[0] and fy=k[4] are positive;
  • It must correspond to the current depth stream's resolution and intrinsics.

The state doesn't subscribe to the old /camera/depth/image_36x48 or /camera/depth/image_64x36. The policy sizes are generated inside the state.

3. Logical names and serial numbers on the real robot

The policy configuration only gives the logical name of the mounting position:

camera_name: body_depth_camera

Each real robot maps that name to the actual device serial number in the bxi_depth_camera configuration:

/depth_camera_manager:
  ros__parameters:
    single_camera_name: body_depth_camera
    cameras:
      body_depth_camera:
        serial_no: "actual-serial-number"

An explicit serial-number mapping always wins. If only one unmapped supported camera is connected, it uses single_camera_name (default body_depth_camera); when several unmapped cameras are connected, each device uses SN_<serial>, so multi-camera deployments should configure logical names explicitly rather than relying on USB enumeration order.

4. State parameters

The core configuration in the current mod.yaml is:

states:
  normal_depth:
    params:
      mode: origin_camera
      camera_name: body_depth_camera
      topic: ""
      camera_info_topic: ""
      depth_uint16_scale: 0.001
      depth_timeout_sec: 0.5
      horizontal_fov: 45.2
      vertical_fov: 58.0616969
      min_dist: 0.2
      max_dist: 3.0

When topic and camera_info_topic are both empty, the state resolves the topics automatically from /topic_prefix and camera_name. The two must both be empty or both be filled in; you can't override just one:

camera_name: ""
topic: /recorded_camera/depth/image_rect_raw
camera_info_topic: /recorded_camera/depth/camera_info

Supported policy modes:

mode Projected output (before rotation) Shape after state rotation Default policy FOV Default range
origin_camera 36 × 48 (36, 48) 45.2° × 58.0616969° 0.2–3.0 m
depth_walk 64 × 36 (64, 36) 89.24° × 58.06° 0.2–2.5 m

These are policy input requirements, not the physical camera's full FOV. The state computes a central ROI from the physical camera's CameraInfo and then scales it to the policy size.

5. API 4 Resource

The two policies use different global Resource keys:

LEGACY_POLICY = ResourceKey[HumanoidGaitDepthPolicyIsaaclab](
    "com.bxi.normal_depth/legacy_policy"
)
ORIGIN_POLICY = ResourceKey[HumanoidGaitOriginCameraPolicyIsaaclab](
    "com.bxi.normal_depth/origin_policy"
)

The current built-in Mod prepares both models before the control loop starts:

context.register_resource(
    LEGACY_POLICY,
    _load_legacy_policy,
    policy="startup",
)
context.register_resource(
    ORIGIN_POLICY,
    _load_origin_policy,
    policy="startup",
)

If a customer motion should only load on first entry, it can switch to policy="on_demand". The state must then declare the resource dependency; NormalDepthState already does this in the API 4 way:

class NormalDepthState(
    RobotControlState,
    EntryFrameProvider,
    RunningFrameProvider,
):
    def __init__(self, name, state_id, policy, **config):
        super().__init__(name, state_id, resources=(policy,))
        self._policy = policy

ResourceHandle.get() only reads a model that is already ready. It never loads synchronously in a ROS callback or the control cycle.

6. Subscription lifecycle

The state creates long-lived subscriptions in on_bind(), because fresh images must already be arriving before the state is entered:

def on_bind(self, ctx):
    if not self.depth_image_topic:
        prefix = str(
            ctx.ros_node.get_parameter("/topic_prefix").value
        ).strip("/")
        self.depth_image_topic, self.camera_info_topic = resolve_camera_topics(
            prefix,
            self.camera_name,
        )

    self._depth_subscription = ctx.ros_node.create_subscription(
        Image,
        self.depth_image_topic,
        self.depth_image_callback,
        qos_profile_sensor_data,
    )
    self._camera_info_subscription = ctx.ros_node.create_subscription(
        CameraInfo,
        self.camera_info_topic,
        self.camera_info_callback,
        qos_profile_sensor_data,
    )

The actual implementation uses a sensor-data QoS with depth 1. on_unbind() destroys the two subscriptions symmetrically. Don't create subscriptions repeatedly in on_enter(), or there will be no image yet when the state is first requested and the health check can't pass.

7. Build the policy input from CameraInfo

The callback flow is:

  1. Decode the depth image according to encoding, is_bigendian and step;
  2. Convert depth to metres uniformly;
  3. Read fx and fy from the matching CameraInfo;
  4. Choose a central ROI according to the policy's horizontal/vertical FOV and output aspect ratio;
  5. Scale with nearest neighbour, to avoid inventing interpolated surfaces that don't exist in the depth;
  6. Clamp distance only for valid pixels; invalid pixels stay 0;
  7. Rotate 90° clockwise to match the original policy orientation;
  8. Under the lock, swap in the latest complete array and an incremented frame id.

The core call is:

projected, crop = project_depth(
    depth_meters,
    camera_info,
    self.projection,
)
depth_rotated = np.ascontiguousarray(
    np.rot90(projected, k=-1).astype(np.float32)
)

When the camera resolution changes, as long as Image and CameraInfo update together, the crop is recomputed from the new intrinsics; there's no need to hard-code a set of K/P arrays for each resolution.

8. Entry health check

is_available() must be non-blocking and only read the snapshot maintained by the callbacks:

def is_available(self, ctx):
    with self._depth_lock:
        depth = self._depth_rotated
        stamp = self._last_depth_time
        camera_info = self._camera_info
    return (
        self.depth_configured
        and camera_info is not None
        and depth is not None
        and stamp is not None
        and time.monotonic() - stamp <= self.depth_timeout_sec
    )

With no CameraInfo, no valid image or a timed-out image, the state request returns False and the robot stays in its current state. force=True only bypasses the health check and doesn't make up for missing depth data; ordinary business logic should not use it.

9. Transition capabilities

Entering normal_depth uses first_frame_switch, so the target state must implement EntryFrameProvider:

def get_entry_frame(self, ctx):
    return self._motor_frame_from_target(ctx, self.policy.output.joints)

Switching back to normal walking uses dual_running_blend. The depth state, as the source side, provides RunningFrameProvider:

def sample_running_frame(self, ctx, dt, *, advance):
    if not advance:
        return self._last_running_frame or self.get_entry_frame(ctx)

    depth, frame_id = self._get_depth_for_inference()
    self.get_cmd_vel(ctx)
    ctx.inference_frame.depth = depth
    ctx.inference_frame.depth_frame_id = frame_id
    output = self.policy.step(ctx.inference_frame, dt, advance=True)
    return self._motor_frame_from_target(ctx, output.joints)

advance=False must not advance the policy history, time or motion cache. The current implementation returns the most recent real inference frame, so Transition previews don't consume depth data repeatedly.

10. Camera rate and control rate

The control loop and the camera don't need to run at the same rate. The callback updates the complete image as the camera updates; the control cycle decides whether to accept the latest frame id according to policy.depth_update_period. The policy can reuse the same depth image across several control cycles, but never mistakes the same frame for a new sensor sample.

Don't wait for the next image in the control cycle, and don't run inference while holding _depth_lock. The lock only protects the brief copy of the reference, timestamp and frame id.

11. Safe exit at run time

Each cycle the state checks:

  • Posture outside the safe range: request com.bxi.basic_actions/zero_torque;
  • Depth not updated for longer than depth_timeout_sec: request com.bxi.basic_actions/normal;
  • New depth temporarily unavailable: don't publish a new policy frame this cycle;
  • Invalid input encoding, size or intrinsics: log one warning and drop the frame.

Safety requests only initiate a state switch; they never publish motor commands directly from the callback thread.

12. Verification order

First confirm the camera contract:

ros2 topic info /simulation/body_depth_camera/depth/image_rect_raw --verbose
ros2 topic echo /simulation/body_depth_camera/depth/camera_info --once
ros2 topic hz /simulation/body_depth_camera/depth/image_rect_raw

On the real robot, replace simulation with hardware. Then check:

ros2 topic echo /simulation/state_machine_info --once

Recommended order:

  1. Both the camera image and CameraInfo are being published continuously;
  2. The image, camera_info and post-rotation shapes in the log are correct;
  3. Enter the depth state in a stationary simulation;
  4. Block or stop the camera and confirm it automatically falls back to normal;
  5. Verify the entry and exit Transitions between normal and normal_depth;
  6. Finally verify on the real robot with a gantry and at low speed.

Common faults

Symptom Check first
The state can't be entered CameraInfo, image freshness, logical camera name
Always waiting for CameraInfo Is the camera publishing /depth/camera_info, and is the topic prefix correct?
Shape doesn't match the policy mode, FOV parameters, and whether the image and CameraInfo belong to the same profile
Depth is all zeros Encoding, units, device range and SDK filtering
The real robot can't find the camera Serial-number mapping in the bxi_depth_camera configuration
Works in simulation, fails on the real robot Compare CameraInfo, mounting pose, depth units and frame rate on both sides
A jump during switching Check the entry/running frames and the Transition profile
First entry waits for the model The resource uses policy="on_demand"; look at the preparing status

Final checklist

  1. The state doesn't depend directly on the RealSense or Orbbec SDK.
  2. Simulation and the real robot differ only in the simulation/hardware prefix.
  3. Images and CameraInfo are configured in pairs.
  4. Resources use the API 4 startup/on_demand policies.
  5. The state declares its model dependency through resources=(policy,).
  6. advance=False doesn't advance the policy.
  7. Callbacks don't run model inference, and the control cycle doesn't wait for the camera.
  8. Image loss and abnormal posture both have a clear exit path.

The current implementation is defined by these files:

src/bxi_example_py_elf3/mods/com.bxi.normal_depth/mod.yaml
src/bxi_example_py_elf3/mods/com.bxi.normal_depth/plugin.py
src/bxi_example_py_elf3/mods/com.bxi.normal_depth/state.py
src/bxi_example_py_elf3/mods/com.bxi.normal_depth/depth_projection.py
src/bxi_example_py_elf3/mods/com.bxi.normal_depth/README.md

Hands-on 8: Take a model from simulation to the real robot

Sim2Real is more than replacing the ONNX path. The current recommendation is to package the model, motion data, state parameters and version constraints into a standalone Mod, then validate in stages.

This page discusses how models and states move from simulation to the real robot. If the target robot's state messages, motor commands, joint order or hardware SDK differ from VKH6, you must also implement the platform boundary with the Robot Platform Integration Guide.

1. Pin down the policy contract

Before going live, record:

  • Number, order and default pose of joints.
  • Quaternion order xyzw/wxyz.
  • Coordinate frames of angular velocity and velocity commands.
  • Observation normalisation, history length and control frequency.
  • Action scale, kp, kd and the meaning of the output.
  • The model's start/end frames and the motion data fps.

These differences should be handled by a strongly typed policy class, not scattered through state logic.

2. Mod resources

mods/com.customer.sim2real/
  mod.yaml
  plugin.py
  state.py
  assets/policy.onnx
from bxi_example_py_elf3.framework.mod_api import ModDefinition, ResourceKey

from .policy import CustomerPolicy
from .state import CustomerWalkState


POLICY = ResourceKey[CustomerPolicy]("com.customer.sim2real/policy")


def _load(context):
    return CustomerPolicy(str(context.asset("assets/policy.onnx")))


def create_mod(context):
    context.register_resource(POLICY, _load, policy="on_demand")
    policy = context.resource(POLICY)
    return ModDefinition(
        state_factories={
            "customer_walk": lambda state: CustomerWalkState(
                state.name,
                state.state_id,
                policy,
            )
        }
    )

Validate model dimensions, joint counts and required tensors in the policy constructor, so errors happen during Resource preparation rather than being deferred to the first control cycle.

3. State template

class CustomerWalkState(
    RobotControlState, EntryFrameProvider, RunningFrameProvider
):
    def __init__(self, name, state_id, policy):
        super().__init__(name, state_id, resources=(policy,))
        self._policy = policy

    @property
    def policy(self):
        return self._policy.get()

    def on_prepare(self, ctx, from_state):
        ctx.preheat_model(
            self.policy,
            command=self.get_cmd_vel(ctx),
        )

    def get_entry_frame(self, ctx):
        return self._motor_frame_from_target(ctx, self.policy.output.joints)

    def sample_running_frame(self, ctx, dt, *, advance):
        self.get_cmd_vel(ctx)
        output = self.policy.step(ctx.inference_frame, dt, advance=advance)
        return self._motor_frame_from_target(ctx, output.joints)

    def on_update(self, ctx, dt):
        if ctx.is_orientation_unsafe(ctx.current_quat_xyzw):
            ctx.request_state(
                "com.bxi.basic_actions/zero_torque", trigger="safety"
            )
            return
        self._apply_frame(
            ctx, self.sample_running_frame(ctx, dt, advance=True)
        )

4. Conservative speed profile

speed_profiles:
  safe_walk:
    vx_scale: 0.2
    vx_min: -0.1
    vx_max: 0.2
    vy_scale: 0.1
    yaw_scale: 0.15

states:
  customer_walk:
    speed_profile: safe_walk
    manifest:
      label: Customer Gait
      priority: 100
      group: Customer
      confirm: true
      confirm_message: First real-robot test, please use a gantry

Open up the speed range step by step as verification results come in; don't use the training limits on the first real-robot run.

5. Staged verification

  1. Check the ONNX inputs, outputs and default motion offline.
  2. Load the Mod and confirm the on_demand model stays unloaded and the manifest graph passes.
  3. With stationary input in simulation, verify the joint order and quaternion.
  4. At low speed in simulation, check directions and limits.
  5. Verify the entry/exit transitions and the zero-torque safety route.
  6. Real robot on a gantry, low gains, short runs.
  7. Gradually raise gains, speed and continuous run time.

The entry/exit Transitions decide how motor frames are handed over between the model and the original state. They must be verified on the real robot, because abrupt MIT command field changes that aren't obvious in simulation can show up on the real machine as a sudden twitch or impact.

6. Consistency between simulation and the real robot

  • The same Mod and model assets.
  • Only launch changes /topic_prefix and the runtime environment.
  • Never branch the joint order inside a state based on "simulation vs real robot".
  • Record inference time and inference_timeout_count.
  • Add automatic assertions for sensor signs, units and coordinate frames.

7. Release and rollback

The model version follows the Mod version. When a high-risk customer motion needs to be removed from the public tree, protect the whole Mod. Keep the previous Mod directory that was verified on the real robot; if there's a problem, replace the whole directory and restart the control node, rather than swapping models and the state machine inside a running control process.

Hands-on 3: Bind buttons and connect Mod routes

This lesson lets the keyboard, gamepad or CRSF all trigger com.example.sin_wave/activate. The state Mod only depends on btn_10=4 and doesn't need to know which device the input came from. The built-in motions already use 1/2/3/5/6/7/8/9/10, so the example uses the free value 4; before adding a motion you should still check whether anything in the whole Mod tree already uses the same slot and value.

1. The Mod declares the event and route

events:
  activate:
    slot: btn_10
    value: 4

routes:
  - from: com.bxi.basic_actions/normal
    event: activate
    to: sin_wave
    transition: first_frame_switch

The route decides where to switch after the event is received; the Transition decides how motor frames are generated during the switch. first_frame_switch reads the target state's entry frame and builds up control force gradually, so positions and gains don't change abruptly within one frame.

2. Add a keyboard source

Add an unused key, such as u, to the keyboard signals in xbox_default.yaml:

keyboard.sin_wave:
  from: keyboard.key
  key: "u"

Don't reuse number keys that are already bound to other motions.

3. Add a keyboard control

controls:
  keyboard.sin_wave_event:
    type: bool
    inputs:
      - source: keyboard.sin_wave

4. Reuse the unified gamepad and CRSF control

The default configuration already merges the two kinds of device into a unified business control:

gamepad.trigger.left_event or crsf.trigger.left_event -> trigger.left_event
gamepad.b_event            or crsf.b_event            -> button.b_event
gamepad/crsf shoulder event                             -> shoulder.*_event

So outputs shouldn't check gamepad.* and crsf.* separately. Write the unified combination once and it works for both devices.

5. Add the btn_10=4 output

Find the existing output: btn_10=4 and add the keyboard branch to that same binding. Don't create a second binding that writes the same field and value:

outputs:
  level:
    - output: btn_10=4
      when:
        any:
          - - keyboard.sin_wave_event
          - - trigger.left_event
            - button.b_event
            - released: shoulder.left_event
            - released: shoulder.right_event
            - released: trigger.right_event

The combination uses the left trigger and B; the right trigger and both shoulder buttons, which aren't part of the combination, must all be explicitly released. Otherwise, when three or four buttons are pressed, the shorter combination is also satisfied and may trigger the wrong motion.

If you use a different modifier button, the rule is the same:

pressed modifier + face button + every other modifier released

The four modifier buttons are:

shoulder.left_event
shoulder.right_event
trigger.left_event
trigger.right_event

6. Verify the chain

After rebuilding and starting remote_controller, check:

ros2 topic echo /motion_commands
ros2 topic echo /simulation/state_machine_info

On the real robot, replace simulation with hardware. The expected chain is:

Physical button
  -> source
  -> unified bool control
  -> level output btn_10=4
  -> com.example.sin_wave/activate
  -> route of the current normal state
  -> com.example.sin_wave/sin_wave

Verify at least the following combinations:

  1. Pressing only the left trigger and B triggers it.
  2. Pressing the right trigger as well does not trigger the combination.
  3. Pressing either shoulder button as well does not trigger the combination.
  4. The keyboard u triggers it.
  5. After releasing the buttons, btn_10 returns to 0.

Common problems

  • The message has a value but the state doesn't switch: the current state has no route for that event.
  • No output at all: the source, control or output names don't match.
  • Several buttons trigger at once: the released conditions for the other modifier buttons are missing.
  • Output conflict: several bindings write different values to the same field; check conflict_policy and binding order.
  • A change has no effect: rebuild and restart remote_controller.

Next lesson: Custom Transitions.

Remote controller input mapping configuration

This page only explains how remote_controller maps keyboard, gamepad, CRSF or other device input into unified MotionCommands. States, events and routes belong in each Mod's own mod.yaml; robot joints and the IMU don't go through this configuration either.

The current default configuration file:

src/remote_controller/config/xbox_default.yaml

remote_controller reads the YAML only once at startup and never scans or reloads the configuration while running. After editing src/remote_controller/config/xbox_default.yaml, run:

colcon build --packages-select remote_controller

Once the build has updated the install/ directory, restart remote_controller. A YAML parse failure makes the new process fail to start and reports the configuration error directly.

It's best understood from top to bottom along this line:

inputs / sources  ->  curves  ->  controls  ->  outputs  ->  system
Device selection and inputs   Curve calibration   Unified controls   Write MotionCommands   Run system commands

The goal of the configuration is that the business layer doesn't care whether the device is an Xbox controller, a keyboard, CRSF or some other remote. The business layer only sees the unified controls and state-machine events.

1. inputs / sources: declare candidate devices and input sources

Each sources.<group> is one candidate input device. Strictly only one device is active at any time; sources is also responsible for naming the raw sources produced by the driver as readable business sources.

Device selection policy:

inputs:
  selection:
    scan_interval_ms: 100
    promote_stable_ms: 500
  • scan_interval_ms: how often the driver's is_available() is called; must be greater than 0.
  • promote_stable_ms: how long a higher-priority device must stay available before it may take over; 0 means immediately.
  • On a switch the framework stops the old driver, clears the old signals, publishes one zero-motion command, waits for the new driver's is_ready(), and only then accepts new input.
  • Edge commands are suppressed during a switch; edge buttons such as start/stop must be released and pressed again to trigger.

General structure:

sources:
  <group_name>:
    type: <driver_type>
    priority: <integer>
    signals:
      <semantic.source.name>:
        from: <raw.source.name>

Read it from left to right:

the semantic source is produced from the raw source

For example:

gamepad.left_y:
  from: js.axis.3

Means:

gamepad.left_y is produced from js.axis.3

Don't write it the other way round as js.axis.3: gamepad.left_y, because that suggests the raw source is defined backwards by its business meaning.

1.1 Run-time driver DEBUG

The node parameter --DEBUG calls each input driver's debug() once per second. CRSF prints the 16 normalised channel values from the most recent frame with a valid CRC; joystick and keyboard print their own available and ready status.

ros2 run remote_controller remote_controller --DEBUG --config /path/to/xbox_default.yaml

Custom launch arguments must be written as DEBUG:=true:

ros2 launch remote_controller remote_controller.launch.py DEBUG:=true

ros2 launch --debug only affects the ROS 2 launch system and is not passed to the remote-controller driver.

2. joystick / gamepad source

Example:

sources:
  gamepad:
    type: joystick
    device: /dev/input/by-id/usb-...-joystick
    priority: 50
    ready_timeout_ms: 1000
    loss_timeout_ms: 300
    cooldown_ms: 1000
    signals:
      gamepad.left_y:
        from: js.axis.3
      gamepad.left_x:
        from: js.axis.0
      gamepad.yaw:
        from: js.axis.6
      gamepad.a:
        from: js.button.0
      gamepad.b:
        from: js.button.1

Fields:

  • type: joystick or type: gamepad: use the Linux joystick driver.
  • device: device path, for example /dev/input/js0.
  • priority: candidate device priority; larger values win.
  • ready_timeout_ms: the longest time to wait after startup for the driver to reach is_ready(); default 1000.
  • loss_timeout_ms: how long an ordinary driver's is_available() must keep failing before it is judged disconnected; default 300. Drivers such as CRSF that judge this themselves from valid-frame freshness declare it and use the value directly.
  • cooldown_ms: how long after a disconnect or ready timeout the device is excluded from reselection; default 1000.
  • signals: business source declarations.
  • signals.<name>.from: the raw source, for example js.axis.3 or js.button.0.

Driver behaviour:

  • js.axis.N is normalised to [-1, 1].
  • js.button.N is 1.0 when pressed and 0.0 when released.
  • An open or read error, or unplugging the device, makes the driver unavailable; the device manager performs a safe switch after loss_timeout_ms.

3. keyboard source

Example:

sources:
  keyboard:
    type: keyboard
    poll_timeout_us: 20000
    hold_ms: 200
    stop: space
    signals:
      keyboard.vx:
        from: keyboard.axis
        negative: s
        positive: w
      keyboard.vy:
        from: keyboard.axis
        negative: d
        positive: a
      keyboard.yaw:
        from: keyboard.axis
        negative: e
        positive: q
      keyboard.normal:
        from: keyboard.key
        key: "1"
        hold_ms: 200

Fields:

  • type: keyboard: use the terminal keyboard driver.
  • poll_timeout_us: timeout for polling terminal input, in microseconds.
  • hold_ms: how long a keyboard source stays held after triggering. A keyboard terminal has no real release events, so this field is needed.
  • stop: the key that zeroes the motion axes, usually space.
  • from: keyboard.axis: declares a simulated keyboard axis.
  • negative: the key that outputs -1.0 when pressed.
  • positive: the key that outputs 1.0 when pressed.
  • from: keyboard.key: declares an ordinary key.
  • key: the key that triggers an ordinary key source.
  • signals.<name>.hold_ms: overrides the hold time for a single source.

Special key names:

space
tab
esc
escape

Ordinary keys are written as single characters:

keyboard.sin_wave:
  from: keyboard.key
  key: "u"

4. CRSF source

type: crsf is built in. It uses a POSIX serial port (default 460800, 8N1, no flow control), parses RC_CHANNELS_PACKED (0x16) frames with a valid CRC-8/DVB-S2, and outputs 16 normalised channels. It can automatically reopen /dev/ttyCRSF after the device is unplugged or stops receiving valid frames.

sources:
  crsf:
    type: crsf
    device: /dev/ttyCRSF
    priority: 100
    baud_rate: 460800
    ready_timeout_ms: 1000
    loss_timeout_ms: 300
    cooldown_ms: 1000
    signals:
      crsf.left_x:
        from: crsf.channel.1        # CH1 / left stick X
      crsf.left_y:
        from: crsf.channel.2        # CH2 / left stick Y
      crsf.trigger_right:
        from: crsf.channel.3        # CH3 / RT
      crsf.right_x:
        from: crsf.channel.4        # CH4 / right stick X
      crsf.right_y:
        from: crsf.channel.6        # CH6 / right stick Y
      crsf.trigger_left:
        from: crsf.channel.7        # CH7 / LT
      crsf.button_group_a:
        from: crsf.channel.8        # CH8 / A/B/X/Y encoded group
      crsf.button_group_b:
        from: crsf.channel.9        # CH9 / LB/RB/Back/Start/D-pad encoded group
  • The default xbox_default.yaml uses CH1, CH2, CH3, CH4, CH6, CH7, CH8 and CH9. CH1/CH2 are left stick X/Y, CH3/CH7 are RT/LT, and CH4/CH6 are right stick X/Y; CH2 is inverted where it is bound to move.vx, and CH6 should also be given direction: -1 when used. CH8 is button group A: 200/400/600/800 stand for A/B/X/Y and 992 is idle; CH9 is button group B: 200/400/600/800 stand for LB/RB/Back/Start, 1180/1380/1580/1780 stand for D-pad up/down/left/right, and 992 is idle.
  • In the default YAML, CH8/CH9 are first decoded into the enums crsf.button_group_a and crsf.button_group_b, and then the A/B/X/Y/LB/RB/Start/Back bool controls are derived through inputs[].when. D-pad left and right map to CRSF yaw as +1 and -1; up and down remain enums and can be bound to outputs as needed.
  • crsf.channel.1 to crsf.channel.16 are the raw channels written by the driver, mapped by default from the old project's 174..1811 and clamped to [-1, 1]. Business meaning can only be decided by the semantic sources and controls in the YAML.
  • baud_rate: overrides the default baud rate; the old field name baudrate is still accepted.
  • channel_min, channel_max: optional channel normalisation calibration values.
  • While inactive, the driver performs a non-blocking serial protocol probe; it only becomes an available candidate after recently receiving channel frames with a valid CRC. Once active, loss_timeout_ms is enforced by the CRSF driver itself from valid-frame freshness and is not timed a second time by the candidate manager.

SBUS, UDP/TCP, Bluetooth HID or other serial protocols still plug in through the same sources -> controls -> outputs chain, but need a corresponding driver. Other scalar parameters are stored in InputDeviceConfig.options and read by the matching C++ driver. See the Custom Input Driver Reference.

4.1 signal.timeout_ms: field expiry protection, not device disconnect

Only set it for continuously streaming protocols where a field may stop updating on its own:

udp.vx:
  from: udp.vx
  timeout_ms: 500
  failsafe: 0.0

This means that when the raw signal hasn't updated for more than 500 ms, failsafe is written. It doesn't switch devices and can't replace the driver's is_available().

  • Linux joystick: not set by default. A stationary stick producing no events is normal behaviour; device-level disconnects are judged by the driver and loss_timeout_ms.
  • CRSF: the driver should implement is_available() from "the most recent complete frame with a valid CRC"; don't use per-channel timeout_ms as the main disconnect protection.
  • UDP/TCP: can be kept if the protocol needs it, as extra protection when one particular field stops updating.

5. curves: curves, deadzones and calibration

curves handles input curve processing. It can be referenced from a control source.

Expo curve:

curves:
  stick:
    type: expo
    deadzone: 0.03
    expo: 0.2
    limit: [-1.0, 1.0]
    calibration:
      input: [-1.0, 0.0, 1.0]
      output: [-1.0, 0.0, 1.0]

Fields:

  • type: expo: exponential curve.
  • deadzone: deadzone; outputs 0 at or below this absolute value.
  • expo: exponential strength, range [0, 1].
  • limit: [min, max]: output limits.
  • min / max: equivalent limit fields.
  • calibration.input: input calibration points [min, center, max].
  • calibration.output: output calibration points [min, center, max].
  • calibration.clamp: whether to clamp the input to the calibration range; default true.

Piecewise curve:

curves:
  three_position_curve:
    type: piecewise
    points:
      - [-1.0, -1.0]
      - [-0.2, 0.0]
      - [0.2, 0.0]
      - [1.0, 1.0]

piecewise suits preprocessing for non-linear knobs and three-position switches. points must be sorted by input in ascending order.

6. controls: unified control values

controls is the most important layer in the configuration. The later outputs.when should test controls, not raw sources directly.

6.1 analog control

controls:
  move.vx:
    type: analog
    mix: max_abs
    inputs:
      - source: gamepad.left_y
        direction: -1
        curve: stick
      - source: keyboard.vx
    deadzone: 0.03
    min: -1.0
    max: 1.0
    alpha: 0.03

Fields:

  • type: analog: a continuous analog value.
  • inputs: the only list of input rules; the old source, sources and expr are no longer supported.
  • mix: max_abs: take the input with the largest absolute value.
  • mix: sum: add them; the control's min/max then limit the range.
  • mix: first_active: take the first non-zero input in order.
  • direction: direction; -1 means reversed.
  • scale: scale.
  • offset: offset.
  • curve: references a curve in curves.
  • deadzone: control-level deadzone.
  • min / max: output range.
  • alpha: low-pass filter coefficient; 1.0 means no filtering.
  • expo: control-level exponential curve.
  • invert: whether to reverse.

6.2 bool control

Buttons:

controls:
  button.south:
    type: bool
    inputs:
      - source: gamepad.a

An analog axis used as a button:

controls:
  trigger.left:
    type: bool
    threshold: 0.85
    hysteresis: 0.05
    inputs:
      - source: gamepad.trigger_left

Fields:

  • threshold: counts as pressed above the threshold.
  • hysteresis: hysteresis, to avoid chatter near the threshold.
  • invert: reverse.

6.3 enum control

For three-position switches or multi-position modes, enum is recommended:

controls:
  switch.group_b:
    type: enum
    default: idle
    hysteresis: 0.03
    inputs:
      - source: crsf.button_group_b
    positions:
      lb:         [-1.0, -0.846]
      rb:         [-0.845, -0.602]
      back:       [-0.601, -0.358]
      start:      [-0.357, -0.118]
      idle:       [-0.117, 0.114]
      dpad_up:    [0.115, 0.351]
      dpad_down:  [0.352, 0.596]
      dpad_left:  [0.597, 0.841]
      dpad_right: [0.842, 1.0]

Fields:

  • default: the value used when no range matches.
  • positions.<value>: [min, max]: the input range for an enum value.
  • hysteresis: extends the hold range of the current enum value.

Testing an enum:

when: [switch.group_b=dpad_right]

Or:

when:
  - equals:
      control: switch.group_b
      value: dpad_right

6.4 Controls derived from conditional values

Complex button combinations can first be defined as command.*:

controls:
  command.sin_wave:
    type: bool
    inputs:
      - when:
          any:
            - - trigger.right
              - button.west
              - released: trigger.left
              - released: shoulder.left
              - released: shoulder.right
            - - keyboard.sin_wave
        value: true

And then reused in outputs:

outputs:
  edge:
    - output: btn_10=5
      when: [command.sin_wave]

inputs can also map an enum directly to an analog value and use priority to take over:

crsf.yaw:
  type: analog
  mix: sum
  inputs:
    - when: [crsf.button_group_b=dpad_left]
      value: 1.0
      priority: 100
    - when: [crsf.button_group_b=dpad_right]
      value: -1.0
      priority: 100

Each time, only the active rule group with the highest priority takes part in mix; sum within a group lets positive and negative values cancel out. when supports recursive all/any/not and raw_range: {source: ..., min: ..., max: ...}. The default analog alpha is 1.0; smoothing only happens when it is set explicitly.

If a combination is only used once, it can also be written directly in outputs.when.

7. outputs: write MotionCommands

outputs is the last layer.

outputs:
  conflict_policy: first_wins
  publish_on_change: true

  analog:
    vel_des.x: move.vx
    vel_des.y: move.vy
    yawdot_des: move.yaw

  edge:
    - output: system.start
      when: [system.start]

  level:
    - output: btn_1=1
      when:
        any:
          - - shoulder.right
            - button.west
            - released: shoulder.left
            - released: trigger.left
            - released: trigger.right
          - - keyboard.normal

Top-level fields:

  • conflict_policy: first_wins: when several bindings write different values to the same btn_N, keep the first match.
  • conflict_policy: last_wins: later matches override earlier ones.
  • conflict_policy: error: raise an error on conflict.
  • publish_on_change: true: only publish MotionCommands when the payload changes.
  • publish_on_change: false: publish at a fixed rate.

7.1 analog

analog writes continuous fields; writing the MotionCommands field path directly is recommended:

outputs:
  analog:
    vel_des.x: move.vx
    vel_des.y: move.vy
    vel_des.z: move.vz
    yawdot_des: move.yaw
    height_des: body.height

Shorthands currently supported:

vx     -> vel_des.x
vy     -> vel_des.y
vz     -> vel_des.z
yaw    -> yawdot_des
height -> height_des

Advanced form:

outputs:
  analog:
    vel_des.x:
      controls: [move.vx, autonomous.vx]
      mix: first_active
      scale: 1.0
      offset: 0.0
      limit: [-1.0, 1.0]

7.2 level

level is a level output. It keeps writing the value while the condition holds and automatically returns to 0 when it doesn't.

outputs:
  level:
    - output: btn_1=1
      when: [keyboard.normal]

Suited to:

  • Buttons that stay effective while held.
  • Commands that needed to hold btn_N=1 in the old logic.

The current design doesn't need release_outputs. level recomputes every binding on each refresh, so when a combination stops being satisfied the corresponding btn_N naturally returns to 0.

7.3 edge

edge is a rising-edge output. It outputs one frame when the condition goes from false to true.

outputs:
  edge:
    - output: btn_10=5
      when: [keyboard.sin_wave]

Suited to:

  • State switches.
  • toggle / pause.
  • system.start, system.stop.

For btn_N=value, it automatically returns to 0 on the next frame. For system.*, the command is executed only once.

8. when condition syntax

A single control:

when: [keyboard.normal]

Several controls satisfied at once:

when:
  - shoulder.right
  - button.west
  - released: shoulder.left
  - released: trigger.left
  - released: trigger.right

A modifier combination must write every other modifier button not in the combination as released, otherwise a three-button combination will also match the two-button rule.

Any one group satisfied:

when:
  any:
    - - shoulder.right
      - button.west
      - released: shoulder.left
      - released: trigger.left
      - released: trigger.right
    - - keyboard.normal

Explicitly pressed:

when:
  - pressed: button.west

Explicitly released:

when:
  - button.west
  - released: shoulder.left
  - released: shoulder.right
  - released: trigger.left
  - released: trigger.right

Enum equals:

when:
  - switch.mode=high

Range test:

when:
  - range:
      control: throttle
      min: 0.2
      max: 1.0

9. system: run system commands

outputs.edge can trigger system.*:

outputs:
  edge:
    - output: system.start
      when: [system.start]

Then define the commands under system::

system:
  start:
    - "<prepare_log_or_environment_command>"
    - "<start_robot_stack_command>"

  stop:
    - "<stop_robot_stack_command>"

Mutex:

system_mutexes:
  launch:
    acquire: start
    release: stop

Zero the motion input:

system_reset_motion_after:
  - stop

10. Minimal steps to add a new button

Goal: map a new keyboard or gamepad input to a state-machine event.

  1. Add to sources.keyboard.signals:
keyboard.sin_wave:
  from: keyboard.key
  key: "u"
  1. Add to controls:
keyboard.sin_wave:
  type: bool
  inputs:
    - source: keyboard.sin_wave
  1. Add a btn_N=value output to outputs.edge:
- output: btn_N=value
  when: [keyboard.sin_wave]
  1. If this is a state switch, declare events matching that btn_N=value in the corresponding Mod's mod.yaml, and consume it with routes or actions. Don't centralise business events back into the system YAML.

Custom remote controller driver reference

This page explains how to connect SBUS, serial, UDP, TCP, Bluetooth or custom HID. CRSF is already a built-in driver and also serves as a complete reference for new protocol drivers. The current framework boundary is:

InputDeviceManager   handles selection, takeover, disconnects and safe switching
InputDriver          handles the protocol, raw signals, availability and initial ready state
YAML                 handles the source -> control -> output business mapping

A driver should not know business names such as normal, back_flip or btn_10=1.

1. When you need a new driver

Only the YAML needs changing for: switching to another Linux joystick, changing keyboard keys, changing button combinations, or changing curves or control mappings.

A new driver is needed to read a new protocol or transport, for example SBUS, serial, UDP/TCP, Bluetooth or custom HID.

2. Define the device and raw signals first

Every YAML sources.<name> is a candidate device. Candidate devices are strictly exclusive, and higher-priority devices take over from lower-priority ones.

Built-in CRSF example:

inputs:
  selection:
    scan_interval_ms: 100
    promote_stable_ms: 500

sources:
  crsf_remote:
    type: crsf
    device: /dev/ttyCRSF
    priority: 100
    baud_rate: 460800
    ready_timeout_ms: 1000
    loss_timeout_ms: 300
    cooldown_ms: 1000
    signals:
      crsf.left_x:
        from: crsf.channel.1       # CH1 / left stick X
      crsf.left_y:
        from: crsf.channel.2       # CH2 / left stick Y
      crsf.trigger_right:
        from: crsf.channel.3       # CH3 / RT
      crsf.right_x:
        from: crsf.channel.4       # CH4 / right stick X
      crsf.right_y:
        from: crsf.channel.6       # CH6 / right stick Y
      crsf.trigger_left:
        from: crsf.channel.7       # CH7 / LT
      crsf.button_group_a:
        from: crsf.channel.8       # CH8 / A/B/X/Y encoded group
      crsf.button_group_b:
        from: crsf.channel.9       # CH9 / LB/RB/Back/Start/D-pad encoded group

Naming suggestions:

  • Raw signals use a protocol prefix, for example crsf.channel.1, udp.mode.
  • Axes are uniformly normalised to [-1, 1]; buttons are uniformly 0.0 / 1.0.
  • The CRSF driver writes the 16 channels of a complete frame into crsf.channel.1 to crsf.channel.16; the default YAML uses CH1, CH2, CH3, CH4, CH6 and CH7 as continuous Xbox inputs and names CH8/CH9 as discrete encoded button groups. CH8's 200/400/600/800 mean A/B/X/Y; CH9's 200/400/600/800 mean LB/RB/Back/Start and 1180/1380/1580/1780 mean D-pad up/down/left/right; 992 means idle on both. The business meaning of channels should stay in the YAML controls.
  • device is the generic device path; scalars such as baud_rate and port go in InputDeviceConfig.options.

Then reference sources such as crsf.left_x and crsf.button_group_a in controls. Business outputs should not appear in the driver.

3. File structure

Drivers should go in a dedicated directory; don't write into the deleted input_driver.cpp any more:

include/remote_controller/drivers/
  input_driver.hpp          # InputDriver / InputDriverBase
  driver_registry.hpp       # factory registration API

src/drivers/
  driver_registry.cpp
  input_driver_base.cpp
  joystick_input_driver.cpp
  keyboard_input_driver.cpp
  crsf_input_driver.cpp     # built-in CRSF driver

The built-in CRSF driver has been added to the CMake source list of remote_controller_core.

4. Implement InputDriverBase

Usually you inherit directly from InputDriverBase. It provides a thread-safe set_signal(), logging and output dispatch. A driver must also implement:

  • is_available(): non-blocking. The device manager calls it every scan cycle.
  • is_ready(): returns true only after the driver has received a sufficiently safe initial state.
  • start() / stop(): start and stop the reader thread.

Skeleton:

#include "remote_controller/drivers/input_driver.hpp"

#include <atomic>
#include <chrono>
#include <thread>

namespace remote_controller {

class ExampleProtocolInputDriver : public InputDriverBase {
public:
    using InputDriverBase::InputDriverBase;

    ~ExampleProtocolInputDriver() override { stop(); }

    std::string name() const override { return config_.name; }

    bool is_available() override
    {
        // Must be non-blocking. While inactive it may do a lightweight serial/protocol probe; once active it should
        // judge health from the most recent frame with a valid CRC.
        return device_probe_ok() &&
            std::chrono::steady_clock::now() - last_valid_frame_ <
                std::chrono::milliseconds(config_.loss_timeout_ms);
    }

    bool is_ready() const override
    {
        // A complete channel frame with a valid CRC has written all required signals.
        return ready_;
    }

    void start() override
    {
        stop();
        stop_flag_ = false;
        ready_ = false;
        thread_ = std::thread(&ExampleProtocolInputDriver::run, this);
    }

    void stop() override
    {
        stop_flag_ = true;
        close_serial();
        if (thread_.joinable()) {
            thread_.join();
        }
        ready_ = false;
    }

private:
    std::thread thread_;
    std::atomic<bool> ready_{false};
    std::chrono::steady_clock::time_point last_valid_frame_{};

    void run()
    {
        while (!stop_flag_) {
            const CrsfFrame frame = read_next_valid_frame();  // Implement the protocol frame header, length and CRC
            if (!frame.valid) {
                continue;
            }

            // Update all required signals within the same complete frame, then declare ready.
            set_signal("proto.vx", normalize(frame.channel(0)));
            set_signal("proto.vy", normalize(frame.channel(1)));
            set_signal("proto.yaw", normalize(frame.channel(2)));
            set_signal("proto.start", frame.start_pressed ? 1.0 : 0.0);
            set_signal("proto.stop", frame.stop_pressed ? 1.0 : 0.0);
            last_valid_frame_ = std::chrono::steady_clock::now();
            ready_ = true;
        }
    }
};

}  // namespace remote_controller

In the skeleton, device_probe_ok(), read_next_valid_frame(), close_serial(), ProtocolFrame and normalize() are provided by the protocol implementation. The read loop must use a non-blocking fd with select() / poll() and check stop_flag_ on every timeout.

For CRSF, is_available() can't just check that /dev/ttyCRSF exists. It should use recent frames with a valid CRC as the basis for health. Because the device manager calls this function before activation, the driver can implement a lightweight, non-blocking protocol probe or cache probe results.

5. Register the factory

The built-in types keyboard, joystick, gamepad and crsf are created directly by driver_registry.cpp and don't need factory registration. The following applies only to new, non-built-in drivers:

remote_controller::register_input_driver_factory(
    "my_protocol",
    [](const remote_controller::InputDeviceConfig &config,
       remote_controller::InputMapper &mapper,
       std::mutex &mapper_lock,
       remote_controller::DriverOutputHandler output_handler,
       remote_controller::DriverLogHandler log_handler) {
        return std::unique_ptr<remote_controller::InputDriver>(
            new remote_controller::MyProtocolInputDriver(
                config,
                mapper,
                mapper_lock,
                std::move(output_handler),
                std::move(log_handler)));
    });

You can also register centrally in driver_registry.cpp, but registration must happen before InputDeviceManager builds its candidate list. An unregistered type doesn't make the node exit: it logs a warning and uses the next available candidate device.

6. Disconnect and switching contract

The device manager works by these rules:

Higher-priority candidate continuously available for promote_stable_ms
  -> stop the current device
  -> clear old signals
  -> publish one zero-motion command
  -> start the new driver
  -> wait for is_ready()
  -> allow normal control

An ordinary driver's is_available() keeps failing for loss_timeout_ms
  -> also goes through the safe switch

So a driver should:

  • Have is_available() describe only device/protocol health, and never block the manager.
  • For CRSF, is_available() performs a non-blocking protocol probe while inactive; once active it judges health directly from recent RC_CHANNELS_PACKED frames with a valid CRC, and declares that it handles loss_timeout_ms itself so the manager doesn't wait twice.
  • Have is_ready() mean that enough initial state has been obtained, so unknown button states aren't treated as pressed during a switch.
  • Not keep old values after a disconnect; the manager clears all raw signals configured for that device.
  • Expect edge commands to be suppressed during a switch; the user must release and press again.

7. When to use timeout_ms

signals.*.timeout_ms is only expiry protection for a single field: when the field isn't updated, failsafe is written. It is not responsible for candidate-device disconnects and switching.

  • joystick: don't set it; no events while stationary is normal.
  • CRSF: use is_available() + loss_timeout_ms to judge "no valid complete frame", not signals.*.timeout_ms.
  • UDP/TCP: when a field may stop updating on its own, timeout_ms can be kept as a supplement.

8. Verification checklist

1. The new .cpp has been added to CMake and colcon build passes.
2. Custom YAML types have their factory registered before startup; the built-in `crsf` doesn't need registering.
3. A higher-priority device takes over stably after being plugged in, with a clear reason in the log.
4. After unplugging or valid frames stopping, one zero-motion command is published after loss_timeout_ms.
5. When a new device has no complete initial frame, it falls back after ready_timeout_ms and accepts no control.
6. start/stop held down across a switch doesn't trigger by mistake; it only triggers after release and press.
7. /motion_commands matches the YAML controls/outputs.

Hands-on 6: Write a custom UDP remote controller driver from scratch

This lesson uses UDP text packets as the example, but the goal is to master the current multi-device driver framework. For the full interface description see the Custom Input Driver Reference.

Example packet:

vx=0.4 vy=0.0 yaw=-0.2 a=1 mode=0.8

Target data flow:

UDP packet
  -> UdpInputDriver
  -> udp.vx / udp.vy / udp.yaw / udp.a / udp.mode
  -> sources / controls / outputs
  -> MotionCommands

1. Define the candidate device

Whether a UDP device is online can't be judged by "does a file exist". The driver should maintain a health time based on the most recent well-formed UDP packet, and is_available() uses it while active. If you want UDP to be selectable before any packet has arrived, the driver can create/poll the socket non-blockingly inside is_available() and cache the latest packet.

inputs:
  selection:
    scan_interval_ms: 100
    promote_stable_ms: 500

sources:
  udp_remote:
    type: udp
    priority: 20
    bind: 0.0.0.0
    port: 14550
    ready_timeout_ms: 1000
    loss_timeout_ms: 500
    cooldown_ms: 1000
    signals:
      udp.vx:
        from: udp.vx
        timeout_ms: 500
        failsafe: 0.0
      udp.vy:
        from: udp.vy
        timeout_ms: 500
        failsafe: 0.0
      udp.yaw:
        from: udp.yaw
        timeout_ms: 500
        failsafe: 0.0
      udp.a:
        from: udp.a
      udp.mode:
        from: udp.mode

Don't confuse the two timeouts here:

  • loss_timeout_ms: device-level disconnect. After is_available() keeps failing, the manager clears the device, publishes one zero-motion command and switches.
  • signals.*.timeout_ms: field-level protection. It only writes expired fields as failsafe and doesn't trigger a device switch.

When each UDP packet contains the complete remote state, usually only loss_timeout_ms is needed; timeout_ms suits protocols where a field really can stop updating on its own.

2. Connect to controls

controls:
  udp.move.vx:
    type: analog
    inputs:
      - source: udp.vx
    alpha: 0.05

  udp.move.vy:
    type: analog
    inputs:
      - source: udp.vy
    alpha: 0.05

  udp.move.yaw:
    type: analog
    inputs:
      - source: udp.yaw
    alpha: 0.05

  udp.button.a:
    type: bool
    threshold: 0.5
    inputs:
      - source: udp.a

Because candidate devices are strictly exclusive, you can also put the source directly into the sources list of the existing move.vx; only the currently active device updates its raw signals.

3. Create the files

src/remote_controller/src/drivers/udp_input_driver.cpp

And explicitly add them to the remote_controller_core source list in CMakeLists.txt:

src/drivers/udp_input_driver.cpp

Don't create or modify the old src/input_driver.cpp; it has been split into the registry and concrete drivers in src/drivers/.

4. Implement a minimal driver

#include "remote_controller/drivers/input_driver.hpp"

#include <atomic>
#include <chrono>
#include <thread>

namespace remote_controller {

class UdpInputDriver : public InputDriverBase {
public:
    using InputDriverBase::InputDriverBase;

    std::string name() const override { return config_.name; }

    bool is_available() override
    {
        // While inactive, open and non-blockingly poll the socket; once active, keep checking the most recent
        // valid packet; don't just look at whether the UDP socket has been created.
        return poll_health_nonblocking();
    }

    bool is_ready() const override { return ready_; }

    void start() override
    {
        stop();
        stop_flag_ = false;
        ready_ = false;
        thread_ = std::thread(&UdpInputDriver::run, this);
    }

    void stop() override
    {
        stop_flag_ = true;
        close_socket();
        if (thread_.joinable()) {
            thread_.join();
        }
        ready_ = false;
    }

private:
    std::thread thread_;
    std::atomic<bool> ready_{false};
    std::chrono::steady_clock::time_point last_valid_packet_{};

    void run()
    {
        while (!stop_flag_) {
            const Packet packet = read_next_valid_packet();
            if (!packet.valid) {
                continue;
            }
            set_signal("udp.vx", packet.vx);
            set_signal("udp.vy", packet.vy);
            set_signal("udp.yaw", packet.yaw);
            set_signal("udp.a", packet.a ? 1.0 : 0.0);
            set_signal("udp.mode", packet.mode);
            last_valid_packet_ = std::chrono::steady_clock::now();
            ready_ = true;
        }
    }
};

}  // namespace remote_controller

read_next_valid_packet() should use a non-blocking socket with select() / poll(). Check stop_flag_ on every timeout; never block forever in recvfrom().

The device configuration can be read from config_:

const std::string bind = config_.options.at("bind");
const int port = std::stoi(config_.options.at("port"));

Real code should validate missing options, port ranges and packet fields.

5. Register the factory

Register the type in main.cpp, before constructing COMPublisher:

remote_controller::register_input_driver_factory(
    "udp",
    [](const remote_controller::InputDeviceConfig &config,
       remote_controller::InputMapper &mapper,
       std::mutex &mapper_lock,
       remote_controller::DriverOutputHandler output_handler,
       remote_controller::DriverLogHandler log_handler) {
        return std::unique_ptr<remote_controller::InputDriver>(
            new remote_controller::UdpInputDriver(
                config, mapper, mapper_lock,
                std::move(output_handler), std::move(log_handler)));
    });

If type: udp isn't registered, the node only logs a warning and falls back to the next candidate device.

6. Build and verify

colcon build --packages-select remote_controller
source install/setup.bash

Watch the logs:

input candidate available: udp_remote
starting input candidate: udp_remote
input candidate ready; accepting commands: udp_remote

Send packets:

printf 'vx=0.4 vy=0.0 yaw=-0.2 a=1 mode=0.8\n' | nc -u -w0 127.0.0.1 14550

Then check:

1. Does a higher-priority UDP device take over the current device once stable?
2. After valid UDP packets stop, is one zero-motion command published after loss_timeout_ms?
3. When data resumes, is control only possible after ready?
4. Do edge commands held during a switch have to be released and pressed again to trigger?
5. Can Ctrl+C exit within one poll cycle?

Integrate the VKBOTS motion-control framework into your own robot program

This page is for developers who want to reuse VKBOTS's state machine, Mods, Transitions, inference and control scheduling, but with their own ROS messages, vendor SDK, shared memory or CAN bus.

The current bxi_example_py_elf3/bxi_example_demo.py is only VKH6's ROS topic adaptation layer: it collects VKH6 state, organises it into framework observations, and then converts the framework output into VKH6 motor commands. It is not the motion-control framework itself. When migrating, write a new platform adapter at the same level; don't copy and modify framework/runtime.

What to keep and what to replace

Your own robot state / IMU / operator input
  -> your own platform adapter
       startup_step(now)
       snapshot_control_inputs() -> RobotObservation + events
       publish_motor_frame(MotorFrame)
  -> RobotControlRuntime
       ControlScheduler
       RobotControlFramework
       Mod / State / Transition / Inference
  -> your own platform adapter
  -> ROS messages / SDK / CAN / lower-level controller
Keep Replace or confirm
The general motion-control framework under framework/ State subscription, SDK reads and motor sending
RobotControlRuntime and control scheduling Robot joint layout, hardware order and calibration
Mods and state graphs suited to the new robot IMU frame, quaternion direction and units
Reusable policies and inference backends Whether the model really fits the target mechanism
The complete MotorFrame MIT command contract Power-up, enable, watchdog and fault stop

Message conversion can't make a model trained for a different mechanism work safely. Whenever the joint topology, default pose, sensor semantics or control frequency changes, the policy contract must be reconfirmed, and if necessary the model retrained and the Mod parameters adjusted.

Don't mix up the three kinds of joint layout

When integrating a new robot, distinguish at least:

Robot Layout      all joints the robot actually reports and finally receives commands for, e.g. 31
Policy Layout     the observation/action joints each model declares in its class, e.g. 29
Hardware Layout   fixed array order required by a nameless hardware interface, optional

The six layouts, 29↔31/N bidirectional mapping, Defaults, output trimming and Transition rules are explained together in Joint Layout and Mapping.

A platform with named state doesn't need to declare the Robot Layout again in code. NamedJointStateSource() builds it from the complete set of names in the first valid message; the Framework locks that layout when it receives the first snapshot. The policy layout doesn't have to be the same length or order as the Robot Layout: JointPolicy compiles indices by name on first binding and afterwards only uses the cached mapping.

The platform only has to declare what safe targets the joints that old policies don't output should receive:

from bxi_example_py_elf3.framework.joints import (
    JointCommandDefaults,
    JointDefault,
)


MY_COMMAND_DEFAULTS = JointCommandDefaults(
    {
        "left_gripper": JointDefault(position=0.0, kp=20.0, kd=0.5),
        "right_gripper": JointDefault(position=0.0, kp=20.0, kd=0.5),
    }
)

For example, if the Robot Layout has 31 joints and an old model outputs only 29, the resolver overwrites the 29 model targets by name and then forms a complete 31-dimensional command with the two default targets here. If a default is missing, the first binding fails immediately. When deploying in the opposite direction, if the model outputs more joints than the robot has, the resolver issues one warning the first time it binds that model layout and keeps only the joints that actually exist on the current robot by name; later control cycles use the cached mapping without repeating the warning or name lookups. A new 31-joint model outputting to a complete 31-joint robot reads no defaults and no trimming happens.

The three required methods of a platform adapter

RobotControlRuntime only touches the platform through ControlPlatformAdapter:

class ControlPlatformAdapter(Protocol):
    def startup_step(self, now: float) -> bool: ...

    def snapshot_control_inputs(
        self,
    ) -> tuple[RobotObservation, Sequence[str]]: ...

    def publish_motor_frame(self, frame: MotorFrame) -> None: ...
Method Must guarantee
startup_step(now) Non-blocking check of state, enable and hardware readiness; returns True when control may start
snapshot_control_inputs() Provides a complete observation for the same cycle and takes all unconsumed events in one go
publish_motor_frame(frame) Converts according to the name semantics of frame.layout and sends the complete command immediately

All three methods run on the control thread. They must not wait for services, sleep, read the disk, create model Sessions or log heavily; that time comes straight out of the control cycle.

The platform adapter also shouldn't apply taskset to the whole main process. control_runtime.cpu_affinity: control binds only the control thread according to the local topology; Mod standalone processes use shared by default, and when heavy computation is needed the node manifest declares scheduling.cpu_affinity: compute. All platforms share these purpose names, and the concrete CPU numbers are resolved by the framework within the cgroup's allowed set; see Framework Control Scheduling.

Input contract: RobotObservation

The current interface is:

RobotObservation(
    joints=JointStateView(layout, position, velocity),
    quat_xyzw=quat_xyzw,
    quat_wxyz=quat_wxyz,
    omega=omega,
    raw_cmd_vel=raw_cmd_vel,
)
Field Convention
joints.position joints.layout order, radians, 1-D float array
joints.velocity Same order, radians/second
quat_xyzw (x, y, z, w), shape (4,)
quat_wxyz (w, x, y, z) of the same physical attitude
omega Angular velocity in the body frame the policy expects, shape (3,)
raw_cmd_vel [vx, vy,yaw_rate], shape (3,), then passed through the speed profile

The framework never guesses or automatically corrects units and coordinate frames. You must confirm whether the IMU gives world -> body or body -> world, and handle any fixed mounting rotation. Quaternions must be finite, normalised and not all zeros.

Events use full names, for example com.customer.remote/stand. Subscription callbacks only push edge events onto a queue; the state machine advances only on the control thread, and states must never be switched directly inside sensor callbacks.

Output contract: MotorFrame

In one cycle the framework may return:

frame.layout  # complete joint layout for this frame
frame.qpos    # p_des, float32, shape=(frame.layout.dof_num,)
frame.vel     # v_des, float32, same layout
frame.kp      # kp, float32, same layout
frame.kd      # kd, float32, same layout
frame.torque  # t_ff, float32, same layout

MotorFrame is a complete MIT joint command, not a specific hardware message. The five arrays always exist and use the same layout, corresponding to:

q_des = frame.qpos
dq_des = frame.vel
kp = frame.kp
kd = frame.kd
tau_ff = frame.torque

When a state calls MotorFrame.create(), MotorFrame.update() or RobotControlState._motor_frame(), it may omit vel/torque, and the framework explicitly writes equal-length all-zero arrays. So the default behaviour is still position PD, but the fields themselves are not optional, and the previous cycle's velocity or feed-forward torque is never reused. When the Resolver fills a partial State Layout out to the full Robot Layout, the vel/torque of the added joints are also fixed at 0.

Hardware that only takes target positions can send just qpos, but this loses semantics such as the gain ramp and must be re-verified. Pure torque actuators should implement PD, saturation and the watchdog in a reliable low-level servo loop; never treat qpos as torque.

Messages like sensor_msgs/JointState carry their own names, so the array order in the message may vary. With NamedJointStateSource, the name mapping is only recompiled on the first message or when the name order changes.

Below is a ROS 2 skeleton you can adapt to the fields of your target messages. To avoid the callback and the control thread accessing the same array at once, the example separates the "latest callback buffer" from the "this-cycle snapshot buffer"; every object is reused long-term.

from collections import deque
from pathlib import Path
from threading import Event, Lock
import time

import numpy as np
import rclpy
from ament_index_python.packages import get_package_share_directory
from rclpy.executors import MultiThreadedExecutor
from rclpy.node import Node
from sensor_msgs.msg import Imu, JointState

from my_robot_msgs.msg import NamedJointCommand  # replace with your own message

from bxi_example_py_elf3.framework.joints import (
    JointCommandDefaults,
    JointDefault,
    JointStateBuffer,
)
from bxi_example_py_elf3.framework.mod_api import MotorFrame
from bxi_example_py_elf3.framework.platform import (
    NamedJointStateSource,
    RobotControlRuntime,
    RobotObservation,
)
from bxi_example_py_elf3.framework.runtime.state_machine import (
    load_state_machine_config,
)


MY_COMMAND_DEFAULTS = JointCommandDefaults(
    {
        "gripper_joint": JointDefault(position=0.0, kp=15.0, kd=0.4),
    }
)


class MyRobotAdapter(Node):
    def __init__(self) -> None:
        super().__init__("my_bxi_robot_adapter")
        self._lock = Lock()
        self._stopping = Event()
        self._events: deque[str] = deque()

        # Callback write area: the mapping is recompiled automatically when the message name order changes.
        self._latest_joints = NamedJointStateSource()
        self._joint_received = False
        self._imu_received = False
        self._joint_update_at = 0.0
        self._imu_update_at = 0.0
        self._latest_quat_xyzw = np.zeros(4, dtype=np.float64)
        self._latest_quat_wxyz = np.zeros(4, dtype=np.float64)
        self._latest_omega = np.zeros(3, dtype=np.float64)
        self._latest_command = np.zeros(3, dtype=np.float32)

        # Control-cycle snapshot area: object and array identities stay unchanged from startup to shutdown.
        self._snapshot_joints: JointStateBuffer | None = None
        self._snapshot_quat_xyzw = np.zeros(4, dtype=np.float64)
        self._snapshot_quat_wxyz = np.zeros(4, dtype=np.float64)
        self._snapshot_omega = np.zeros(3, dtype=np.float64)
        self._snapshot_command = np.zeros(3, dtype=np.float32)
        self._observation: RobotObservation | None = None

        self._joint_sub = self.create_subscription(
            JointState, "/my_robot/joint_states", self._joint_callback, 1
        )
        self._imu_sub = self.create_subscription(
            Imu, "/my_robot/imu", self._imu_callback, 1
        )
        self._command_pub = self.create_publisher(
            NamedJointCommand, "/my_robot/joint_command", 1
        )

        share = Path(get_package_share_directory("bxi_example_py_elf3"))
        config = load_state_machine_config(
            share / "config/elf3_state_machine.yaml"
        )
        self.runtime = RobotControlRuntime(
            config,
            built_in_mod_root=share / "mods",
            command_defaults=MY_COMMAND_DEFAULTS,
            ros_node=self,
            platform=self,
            fatal_callback=self._on_control_fatal,
        )

    def _joint_callback(self, msg: JointState) -> None:
        now = time.monotonic()
        try:
            with self._lock:
                self._latest_joints.update(
                    msg.name,
                    msg.position,
                    msg.velocity,
                    timestamp_ns=time.monotonic_ns(),
                )
                self._joint_received = True
                self._joint_update_at = now
        except (TypeError, ValueError) as exc:
            self.get_logger().error(f"invalid joint state: {exc}")

    def _imu_callback(self, msg: Imu) -> None:
        q = msg.orientation
        norm = float(np.sqrt(q.x*q.x + q.y*q.y + q.z*q.z + q.w*q.w))
        if not np.isfinite(norm) or norm < 1.0e-6:
            self.get_logger().error("invalid IMU quaternion")
            return
        inv_norm = 1.0 / norm
        w = msg.angular_velocity
        now = time.monotonic()
        with self._lock:
            self._latest_quat_xyzw[:] = (
                q.x * inv_norm, q.y * inv_norm, q.z * inv_norm, q.w * inv_norm
            )
            self._latest_quat_wxyz[:] = (
                q.w * inv_norm, q.x * inv_norm, q.y * inv_norm, q.z * inv_norm
            )
            self._latest_omega[:] = (w.x, w.y, w.z)
            self._imu_received = True
            self._imu_update_at = now

    def set_velocity_command(self, vx: float, vy: float, yaw: float) -> None:
        with self._lock:
            self._latest_command[:] = (vx, vy, yaw)

    def push_event(self, full_event_name: str) -> None:
        with self._lock:
            self._events.append(full_event_name)

    # ---------------- ControlPlatformAdapter ----------------

    def startup_step(self, now: float) -> bool:
        with self._lock:
            ready = self._joint_received and self._imu_received
            joint_age = now - self._joint_update_at
            imu_age = now - self._imu_update_at
        if not ready:
            return False
        if joint_age > 0.10 or imu_age > 0.10:
            self._send_safe_command()
            raise RuntimeError(
                f"robot state stale: joint={joint_age:.3f}s, imu={imu_age:.3f}s"
            )
        # Poll the asynchronously completed power-up/enable status here; never block waiting.
        return True

    def snapshot_control_inputs(
        self,
    ) -> tuple[RobotObservation, tuple[str, ...]]:
        with self._lock:
            latest = self._latest_joints.view
            if self._snapshot_joints is None:
                self._snapshot_joints = JointStateBuffer(latest.layout)
                self._observation = RobotObservation(
                    joints=self._snapshot_joints.view,
                    quat_xyzw=self._snapshot_quat_xyzw,
                    quat_wxyz=self._snapshot_quat_wxyz,
                    omega=self._snapshot_omega,
                    raw_cmd_vel=self._snapshot_command,
                )
            self._snapshot_joints.update(
                latest.position,
                latest.velocity,
                timestamp_ns=latest.timestamp_ns,
            )
            np.copyto(self._snapshot_quat_xyzw, self._latest_quat_xyzw)
            np.copyto(self._snapshot_quat_wxyz, self._latest_quat_wxyz)
            np.copyto(self._snapshot_omega, self._latest_omega)
            np.copyto(self._snapshot_command, self._latest_command)
            events = tuple(self._events)
            self._events.clear()
        assert self._observation is not None
        return self._observation, events

    def publish_motor_frame(self, frame: MotorFrame) -> None:
        if not (
            np.all(np.isfinite(frame.qpos))
            and np.all(np.isfinite(frame.vel))
            and np.all(np.isfinite(frame.kp))
            and np.all(np.isfinite(frame.kd))
            and np.all(np.isfinite(frame.torque))
        ):
            self._send_safe_command()
            raise RuntimeError("framework produced a non-finite motor frame")

        msg = NamedJointCommand()
        msg.name = frame.layout.names
        msg.position = frame.qpos.tolist()
        msg.velocity = frame.vel.tolist()
        msg.kp = frame.kp.tolist()
        msg.kd = frame.kd.tolist()
        msg.feedforward_torque = frame.torque.tolist()
        self._command_pub.publish(msg)

    def _send_safe_command(self) -> None:
        # Replace with a damping, zero-torque or emergency-stop command your hardware explicitly supports.
        pass

    def _on_control_fatal(self, message: str) -> None:
        self.get_logger().fatal(message)
        self._send_safe_command()
        self._stopping.set()
        rclpy.try_shutdown()

    def destroy_node(self) -> bool:
        self._stopping.set()
        runtime = getattr(self, "runtime", None)
        if runtime is not None:
            runtime.close()  # Stop the control thread first, so no normal frame is sent after the safety command.
        self._send_safe_command()
        return super().destroy_node()


def main() -> None:
    rclpy.init()
    node = MyRobotAdapter()
    executor = MultiThreadedExecutor(num_threads=3)
    try:
        executor.add_node(node)
        node.runtime.attach_executor(executor)
        node.runtime.start()
        executor.spin()
    finally:
        node.destroy_node()
        executor.shutdown()
        rclpy.try_shutdown()

To show the wiring, the example above still loads the VKH6 state graph. A robot with incompatible joint names or mechanism can't run VKH6 policies directly; you must swap in Mods, parameters and models that match its own Policy Layout.

Fixed-array hardware: explicit reordering and calibration

Some SDKs or CAN protocols only have arrays and carry no joint names. Then you must declare a Hardware Layout and compile the mapping once at startup. Don't skip the contract just because the current array "looks like the same order".

import numpy as np

from bxi_example_py_elf3.framework.joints import (
    CompiledJointMap,
    JointCalibration,
    JointLayout,
)


HARDWARE_JOINTS = JointLayout(
    ("joint_c", "joint_a", "joint_b"),
    label="vendor fixed order",
)
ROBOT_JOINTS = JointLayout(
    ("joint_a", "joint_b", "joint_c"),
    label="robot semantic order",
)

# source = framework output, target = hardware order; only identical joint sets are allowed.
robot_to_hardware = CompiledJointMap.compile(
    ROBOT_JOINTS,
    HARDWARE_JOINTS,
    require_exact=True,
)
calibration = JointCalibration(
    HARDWARE_JOINTS,
    direction=np.asarray([1.0, -1.0, 1.0]),
    zero_offset=np.asarray([0.0, 0.10, 0.0]),
)

semantic_q = np.empty(HARDWARE_JOINTS.dof_num, dtype=np.float32)
hardware_q = np.empty(HARDWARE_JOINTS.dof_num, dtype=np.float32)
hardware_kp = np.empty(HARDWARE_JOINTS.dof_num, dtype=np.float32)
hardware_kd = np.empty(HARDWARE_JOINTS.dof_num, dtype=np.float32)


def publish_motor_frame(frame):
    if frame.layout.names != ROBOT_JOINTS.names:
        raise ValueError("unexpected robot layout")
    robot_to_hardware.map_into(frame.qpos, semantic_q)
    calibration.position_to_hardware_into(semantic_q, hardware_q)
    robot_to_hardware.map_into(frame.kp, hardware_kp)
    robot_to_hardware.map_into(frame.kd, hardware_kd)
    vendor_sdk.send_pd(hardware_q, hardware_kp, hardware_kd)

Input is the strict reverse process: first calibrate and reorder the hardware's fixed-order array into ROBOT_JOINTS, then hand it to the Framework as JointStateView(ROBOT_JOINTS, ...). The Framework continues to map by name to each policy's observation layout. direction can only be +1/-1; zero_offset uses the same angle unit as position.

If you handle PolicyOutput.joints directly instead of the final MotorFrame, you can use:

  • NamedJointCommandEncoder: named messages; rejects incomplete targets by default.
  • FixedOrderJointCommandEncoder: fixed-order messages; caches indices and the output buffer.
  • ExactJointTargetAssembler: the policy action joint set is complete and only the order differs.
  • PartialJointTargetAssembler: the policy controls only a subset, and the caller explicitly supplies a complete fallback.

29-joint policies and robots with more joints

Feeding a 31-joint state into a 29-joint policy is allowed, as long as the source layout contains the policy observation layout. The policy automatically selects and orders the joints it needs.

The current VKH6 adaptation layer reads ActuatorStates.name and builds the State Layout from the complete set of names in the first valid message; even if the message order changes later, it writes into the same stable buffer by name. It never rewrites the policy contract from the message layout. ELF3_POLICY_JOINTS in policies/joints.py fixes the 29-dimensional input and output of existing models; the Robot Layout keeps the complete N joints from the message.

Each state produces its own natural MotorFrame.layout. Old 29-joint states form a complete 31-dimensional target through JointCommandResolver and the platform's JointCommandDefaults; new 31-joint states cover the full layout directly; models with any subset use the same mechanism. Default targets are declared by joint name, and a single missing entry fails; there's no zero-padding or holding of the previous frame.

Before interpolating, a Transition resolves each side to the full Robot Layout, so states with different joint counts can switch safely between each other. What is finally passed to publish_motor_frame() is always the full Robot Layout; even if the downstream named message supports partial targets, don't arbitrarily drop joints the framework has already filled in at the platform boundary.

Integrating an existing non-ROS program

The three adapter methods don't require motor I/O to use ROS. snapshot_control_inputs() can read a vendor SDK's shared state, and publish_motor_frame() can call the SDK or write to CAN. The current Framework still needs an rclpy.node.Node for Mod child nodes, logging and advanced ROS integration, so keeping a minimal Node is recommended even if motor data never goes through ROS.

If ROS must be removed completely, ros_node, Mod child nodes and logging also need to be abstracted into host services; that is a framework-level change and can't be papered over with a fake Node. When an existing program maintains its own hard real-time loop, it can also call RobotControlFramework.update() directly, but the caller must then take on absolute-time scheduling, the Framework lock, the low-frequency maintenance_update(), the Mod Executor, deadline statistics, exception handling and shutdown order. In general, prefer to reuse RobotControlRuntime.

Performance and thread safety

  1. Create Layouts, name mappings, calibration and all NumPy output buffers at construction or first layout binding.
  2. Callbacks only update the "latest value" in place; the control cycle copies it into a separate stable snapshot under the same lock.
  3. Don't let the Framework hold arrays that a subscription callback will later rewrite concurrently.
  4. Don't call list.index(), create Sessions, read models or deep-copy whole object sets in the control cycle.
  5. Fixed-order reordering uses np.take(..., out=...); command filling uses precompiled indices and reused buffers.
  6. Variable-length array fields in ROS Python usually still need .tolist(); when lower latency is needed, prefer shared memory or stable buffers exposed by the vendor SDK.
  7. Motor output can have only one owner; never let an old control program and VKBOTS send commands at the same time.

A single array copy of 29 or 31 joints is usually far cheaper than one neural network inference. Ensure concurrency consistency first, then use benchmarks to decide whether double buffering or lock-free snapshots are needed; don't remove locks on gut feeling.

Safety checks

  • Check input shape, finite values, timestamps and stream-loss timeouts.
  • Check output finite values, target velocity, position soft limits, gain ranges and send results.
  • After power-up, first verify zero torque, damping, emergency stop, the stream-loss watchdog and process-crash protection.
  • The watchdog must be on the lower-level controller or hardware side; "hold the last frame" can't replace a watchdog.
  • The first real-robot verification uses a gantry, low gains and low speed, with an independent physical emergency stop.
  • Verify positive direction and zero point joint by joint; don't judge from joint names alone.

Staged acceptance

Stage Motor state Must verify
1. Offline Not connected Name mapping, fixed order, direction and zero point round-trip
2. Data bypass Disabled Layout, shape, units, frequency, timestamps and quaternion direction
3. Command observation Disabled Target angles, gains and limits after MotorFrame conversion
4. Static on gantry Low gains Initial state, PD brake, emergency stop and stream-loss watchdog
5. Moving on gantry Speed-limited Direction of every joint, state entry/exit and Transitions
6. On the ground, low speed Conservative profile Command direction, inference time and deadline misses
7. Long runs Opened up gradually Temperature, packet loss, restarts, resource release and fault recovery

Final checklist

  • Responsibilities of the Robot, Policy and Hardware Layouts are clear.
  • No layout has duplicate names; missing joints fail immediately at startup or first binding.
  • Extra joints and partial motions have a clear control owner and don't rely on silent filling.
  • Joint direction, zero point, units and the output inverse transform have been round-trip verified.
  • Both quaternion orders express the same attitude, and the IMU frame matches training.
  • RobotObservation and snapshot arrays are reused long-term and never modified concurrently by callbacks.
  • MotorFrame.layout is checked at the publish boundary or sent along with a named message.
  • State stream loss, control timeouts, out-of-range output and program exit all lead into a hardware safe state.
  • Inference and control benchmarks have been run on the target platform before the real robot.

Joint layout and mapping

VKBOTS doesn't treat "the Nth element of an array" as a cross-module protocol. Models, states, robot messages and hardware interfaces all declare names and order with a JointLayout; the name is the joint's semantic primary key, and numeric indices are only compiled when a layout is first bound.

This mechanism solves all of the following deployment problems at once:

  • A 31-joint robot keeps running old 29-joint policies.
  • A 31-joint state output is deployed to a robot with only 29 actuators.
  • Model input order, state message order and fixed hardware order differ.
  • One state is composed of several command sources such as a model, topics, IK and trajectories.
  • Transitions interpolate safely between states with different joint counts.

Eight layout boundaries

Incoming Message Layout     names and order carried by this state message
Robot Layout                the robot's stable, complete joint set for this process
Policy Observation Layout   joints and order a policy reads from the Robot Layout
Model Observation Layout    joints and order actually written into the model input tensor
Model Action Layout         joints and order of the model's action output tensor
Policy Action Layout        semantic action joints and order after policy decoding or composition
State Output Layout         natural MotorFrame layout after state composition
Hardware Layout             fixed array order required by a nameless hardware protocol, optional

They can have the same names in the same order, or be completely different. Don't use a single global "control joint list" to express all these concepts at once.

The current data flow is:

Named robot state (any message order)
  -> NamedJointStateSource
  -> stable Robot Layout (N)
  -> JointInputBinding selects by Policy Observation Layout (P)
  -> organise input by Model Observation Layout (M)
  -> model inference, returns Model Action Layout (K)
  -> Policy decodes/composes by Policy Action Layout (A)
  -> optional JointCommandComposer merges several command sources
  -> State Output MotorFrame (S)
  -> JointCommandResolver maps to the Robot Layout (N)
  -> Transition interpolates on the complete N-dimensional frame
  -> publish named messages directly, or map to the Hardware Layout

P, M, K, A, S and N don't have to be equal. For ordinary directly-decoded policies, P=M and K=A; partial models or policies with extra programmatic commands needn't be equal.

Input: robot state to policy observation

Named messages are normalised by NamedJointStateSource. The first valid message establishes a stable Robot Layout; even if later messages change order, they are reordered by name into the same long-lived JointStateBuffer. The joint set should stay unchanged for the lifetime of the process; after the robot changes from 29 to 31 physical joints, restart the deployment process so the first frame establishes the new layout.

Each policy declares its own input and output contract in its class:

class WalkPolicy(JointPolicy):
    joint_contract = PolicyJointContract(
        observation=WALK_OBSERVATION_JOINTS,
        action=WALK_ACTION_JOINTS,
    )

JointInputBinding compiles the observation indices by name the first time it sees the Robot Layout:

  • Robot and observation names in the same order: the source view is reused directly with no copy.
  • Robot contains more joints or a different order: written into the policy's long-lived selection buffer.
  • Robot lacks observation joints the policy requires: an error is raised immediately; positions or velocities are never faked.

So a 31-joint state can safely feed an old 29-joint policy; conversely, if a 31-joint model's observation really needs two head joints, a 29-joint robot can't run it just by "trimming the model output". You must change the model, or the deployer must explicitly implement a physically meaningful virtual observation source.

The contract must state the order the model really uses. For example, the ONNX metadata of back-flip, forward-flip and history motion is in Isaac order, so the class declares ELF3_ISAAC_JOINTS; the recover and normal models use another order, and their classes declare the corresponding layout. Don't first pretend all policies are ELF3_POLICY_JOINTS and then correct it in _build_input() with ISAAC_TO_MUJOCO or MUJOCO_TO_ISAAC.

default_position, kp, kd and action_scale may not be four bare arrays detached from joint names either. Fixed parameters use a per-joint table, and model metadata parameters must be bound together with validated joint_names:

from bxi_example_py_elf3.framework.joints import JointParameterSet


PARAMETERS = JointParameterSet.from_rows(
    MODEL_JOINTS,
    (
        # name, default_position, kp, kd, action_scale
        ("joint_a", 0.0, 50.0, 2.0, 0.25),
        ("joint_b", 0.1, 40.0, 1.5, 0.20),
    ),
)

class WalkPolicy(JointPolicy):
    joint_contract = PolicyJointContract(
        observation=PARAMETERS.layout,
        action=PARAMETERS.layout,
    )

from_rows() requires each row's name to match MODEL_JOINTS.names in order and completely, so missing entries, duplicates or wrong order are found at import time. When loading metadata use JointParameterSet.from_arrays(MODEL_JOINTS, ...), but first check that the metadata's joint_names exactly match MODEL_JOINTS.names. If the parameters come from another named layout, parameters.select(model_layout) can produce the target parameter set by name during initialisation. The control cycle only reads parameters already bound to a layout and does no name lookups or reordering.

Model output is not state output

ONNX/RKNN/OpenVINO return model tensors. The Policy must know the Model Action Layout each joint field corresponds to and then decode it into a named JointTargetView; it can also add its own deterministic logic. For example, the no-arm model used by hello takes and outputs 15 joints according to ELF3_LOWER_BODY_JOINTS, and the Policy can form a complete 29-joint policy output with default targets or other command sources.

A State can also add commands that don't come from the model:

model controls 15
  + policy-internal control 14
  = Policy Action 29

Policy 29
  + wave command overrides right arm 3
  + head topic/IK/trajectory control 2
  = Hello State Output 31

This composition uses JointCommandComposer. Each producer maintains its own JointTargetBuffer; the Composer only reads the current position/kp/kd and doesn't care whether the source is a model, a topic, IK or a formula. Ordinary Layers may not overlap existing owners; only a Layer with explicit override=True may override existing commands.

For a complete example see Multi-source Joint Command Composition.

Output: state frame to robot layout

The state hands its natural MotorFrame to ctx.set_motor_target(). JointCommandResolver works by name and doesn't depend on array assumptions like "the first 29" or "the last two".

Relationship of State Output to Robot Layout Handling
Identical names and order Use the state frame directly (fast path)
Same joint set, different order Reorder by name into the full Robot Frame
State outputs fewer than the robot Fill missing hardware joints with explicit JointCommandDefaults
State outputs more than the robot Keep only names the robot has; warn once when the layout is first bound
Each side has unique names Trim names unique to the state and fill names unique to the robot with Defaults

The mapping is compiled and cached the first time a State Output Layout is encountered. Later cycles only perform NumPy array writes, with no repeated name lookups or warnings.

29 outputs to a 31-joint robot

An old state outputs only 29 body joints, but the new robot also has two head joints. The platform must declare a fixed safe fallback:

from bxi_example_py_elf3.framework.joints import (
    JointCommandDefaults,
    JointDefault,
)

ROBOT_COMMAND_DEFAULTS = JointCommandDefaults(
    {
        "neck_y_joint": JointDefault(position=0.0, kp=16.747, kd=1.066),
        "neck_z_joint": JointDefault(position=0.0, kp=16.747, kd=1.066),
    }
)

If any default is missing, the framework stops that control cycle and names the missing joints. It never guesses position/kp/kd or carries over the previous frame; the MIT command's vel/torque are explicitly filled with 0 per the protocol.

JointCommandDefaults only represents the fixed platform fallback "when no source in this state controls this hardware joint". Dynamic commands such as topics, IK or sine trajectories should be State command Layers and can't be written into Defaults.

31 outputs to a 29-joint robot

If a state semantically outputs 31 joints but the robot has only 29, the Resolver keeps the intersection of names, ignores the two outputs the robot doesn't have, and issues one warning through the ROS logger:

state/policy MotorFrame contains joints that are absent from the robot layout
and will be ignored: ('neck_y_joint', 'neck_z_joint')

This only solves the output projection. If the model also depends on the missing joints on the input side, it will still fail at the JointInputBinding stage.

31 outputs to a 31-joint robot

When a state outputs all joints, Defaults aren't read and no trimming happens. For example, a new 31-joint model or a HelloState that has completed head command composition goes straight into the full-layout fast path.

Mapping in Transitions

During a state switch you can't interpolate directly between the bare arrays of two natural frames, because the two sides may differ in joint count and order. The Transition first performs, for each side:

ctx.resolve_motor_frame(natural_from, full_from)
ctx.resolve_motor_frame(natural_to, full_to)

Only after both sides are the full Robot Layout are qpos, vel, kp, kd and torque blended. Therefore:

  • Switching from a 29-joint state to a 31-joint state, the added joints move smoothly from the platform default targets into the new state's targets.
  • Switching from a 31-joint state to a 29-joint state, the added hardware joints return smoothly to the default targets.
  • On a 29-joint robot, the extra outputs of a 31-joint state are trimmed before interpolation.
  • Sampling with advance=False must not advance model history, topic consumption cursors or trajectory phase.

Output to named messages or fixed-order hardware

The final Framework output is already the full Robot Layout.

When downstream messages carry joint names, send directly:

publish(
    names=frame.layout.names,
    position=frame.qpos,
    velocity=frame.vel,
    kp=frame.kp,
    kd=frame.kd,
    feedforward_torque=frame.torque,
)

If the SDK, shared memory or CAN protocol only has fixed arrays, you must also declare a Hardware Layout:

encoder = FixedOrderJointCommandEncoder(HARDWARE_JOINTS)
hardware_target = encoder.encode(named_target)

Joint zero offset, direction and scale belong to JointCalibration. The recommended order is to map from the Robot Layout to the Hardware Layout first, then convert semantic angles into hardware units. Never write hardware numbering into a Policy or State.

Common errors and warnings

Message Cause Fix
source joint layout is missing joints Robot state lacks policy observation joints Check message names, the model contract, or change the model
do not cover the complete composer output layout Output joints declared by the State have no command source Add a Layer or shrink the State Output Layout
ownership conflicts Two Layers control the same joint without authorisation Make the owner explicit; set override=True if overriding is really needed
no explicit JointCommandDefaults State has fewer joints than the Robot and a hardware joint has no fallback Add a safe JointDefault in the platform layer
will be ignored State outputs joints the Robot doesn't have Confirm the cross-robot deployment is intended; the layout warns only once
robot joint layout changed after startup Runtime received a different stable Robot Layout Stop control and re-establish the deployment layout

Performance constraints and verification

  • JointLayouts are created at class definition, in the preparation stage or on the first frame, never in the control cycle.
  • Observation, Layer, Resolver and Hardware mappings are only compiled when a layout first appears.
  • All input, selection, composition and final output buffers are reused long-term.
  • The control cycle performs no list.index(), dictionary name lookups, deep copies or array creation.
  • Identical layouts take the zero-copy or direct-frame fast path.
  • Warnings are emitted only when a new layout is first compiled and never enter the stable hot path.

Measure observation selection, command filling, output trimming, multi-source composition, reordering and the fast path in one go:

python3 tools/benchmark/joint_mapping_benchmark.py

The current tests also cover 29→31, 31→29, arbitrary order, missing-default failure, ownership conflicts and output-buffer reuse.

Multi-source joint command composition

A state's final joint commands don't all have to come from a model. Common sources include policy inference, ROS topics, IK, teleoperation, fixed poses, formula trajectories and safety controllers. The framework separates "how commands are produced" from "how commands are merged": producers only maintain their own named JointTargetView, and JointCommandComposer is only responsible for composition.

For how the State Output is then adapted to a 29-, 31- or any N-joint robot after the Composer, see Joint Layout and Mapping.

model / topic / IK / trajectory / state logic
              -> several JointTargetViews
              -> JointCommandComposer
              -> natural state MotorFrame (N)
              -> JointCommandResolver
              -> current robot MotorFrame (M)

Minimal example

The state below is based on a 29-joint policy and additionally connects two head joints. The head buffer can be updated by any producer.

from bxi_example_py_elf3.framework.mod_api import (
    JointCommandComposer,
    JointCommandLayer,
    JointLayout,
    JointTargetBuffer,
)

HEAD_JOINTS = JointLayout(("neck_y_joint", "neck_z_joint"))
STATE_OUTPUT_JOINTS = JointLayout(
    (*POLICY_JOINTS.names, *HEAD_JOINTS.names)
)

self.head_command = JointTargetBuffer(HEAD_JOINTS)
self.head_command.kp[:] = (16.747, 16.747)
self.head_command.kd[:] = (1.066, 1.066)

self.composer = JointCommandComposer(
    STATE_OUTPUT_JOINTS,
    (
        JointCommandLayer("policy", self.policy.output.joints),
        JointCommandLayer("head", self.head_command.view),
    ),
)

The control cycle only updates the source buffers and composes:

self.head_command.position[:] = latest_head_target
frame = self.composer.compose()
ctx.set_motor_target(frame)

compose() returns the same long-lived MotorFrame every time. Source layouts, output indices and ownership are only checked and compiled when the Composer is constructed.

Overriding an existing control source

A waving state usually needs to override some of the base policy's arm joints. The override must be declared explicitly:

self.composer = JointCommandComposer(
    STATE_OUTPUT_JOINTS,
    (
        JointCommandLayer("policy", self.policy.output.joints),
        JointCommandLayer("wave", self.wave_command.view, override=True),
        JointCommandLayer("head", self.head_command.view),
    ),
)

Construction follows these rules:

  1. Every joint in the output layout must be covered by at least one Layer.
  2. A Layer may not contain joints outside the output layout.
  3. Two ordinary Layers may not own the same joint.
  4. A later Layer can only replace an existing owner if it sets override=True.
  5. Each source must provide complete position, kp and kd; the Composer doesn't guess control gains.

These checks make spelling mistakes, missing joints and accidental takeovers fail before the state enters the control loop.

Topics and other asynchronous sources

The Composer doesn't depend directly on ROS. A state can subscribe to topics or get targets from Mod Resources, shared memory or an SDK, but must not let a callback rewrite the same array while the Composer is reading it. The recommended data flow is:

async callback -> latest snapshot with lock or double buffer
control cycle  -> write the complete snapshot into the state's JointTargetBuffer
              -> composer.compose()

The state must decide explicitly what happens after a source times out, for example holding the last valid target, switching to a fixed target or requesting a safe state. The Composer never implicitly carries over other Layers, pads with zeros or changes ownership.

Relationship to the robot's joint count

The Composer's output is state semantics and shouldn't change silently according to the current hardware. For example, an action that semantically controls 31 joints can still output a 31-joint MotorFrame on a 29-joint robot; the final Resolver keeps the 29 joints the robot has by name and issues one warning for the two trimmed outputs.

Conversely, if the state outputs only 29 joints and the robot has 31, the Resolver requires the platform to provide JointCommandDefaults for the other two joints. Dynamic topics or trajectories are state command sources and can't go into fixed Defaults.

Performance constraints

  • Layers and JointTargetBuffers are created in the preparation stage, never every cycle.
  • Source arrays use float32 and are updated in place.
  • The Composer caches the name mapping and the output MotorFrame.
  • compose() performs no name lookups, logging or model calls.
  • Transition sampling with advance=False must not advance a source's time, history or phase.

Local performance can be verified with the following command:

python3 tools/benchmark/joint_mapping_benchmark.py

Run-time joint command override

The VKH6 platform adapter provides a named joint override topic for debugging newly added joints, temporarily connecting a head controller, or overriding the final motor commands without modifying the existing 29-DoF policy. It takes effect after the state output has been resolved into the full Robot Layout and before ActuatorCmds is published:

MotorFrame of the current State / Transition
  -> JointCommandResolver fills out the complete Robot Layout
  -> actuators_cmds_override overrides the named joints by name
  -> /simulation|hardware/actuators_cmds

An override doesn't switch, pause or reset the state machine. The current state and policy keep running normally in the background; joints not named continue to use the state machine's output for this cycle.

Topics and messages

Environment Input topic
MuJoCo simulation /simulation/actuators_cmds_override
Real robot /hardware/actuators_cmds_override

The message type is communication/msg/ActuatorCmds. Every array is interpreted in the order of actuators_name:

Message field MIT control value Unit / requirement
actuators_name Joint semantic primary key Names non-empty, no duplicates, and must exist in the current Robot Layout
pos p_des rad; length must equal the number of names
vel v_des rad/s; sending explicitly is recommended, an empty array is treated as all 0
kp kp Non-negative; length must equal the number of names
kd kd Non-negative; length must equal the number of names
torque t_ff N·m; sending explicitly is recommended, an empty array is treated as all 0

pos/kp/kd can't be omitted. All values must be finite; a wrong array length, unknown or duplicate joint names, NaN/Inf or negative gains cause the whole message to be rejected atomically; it is never partially applied.

MotorFrame always holds the complete five MIT fields internally and in the final output. When an old state only provides qpos/kp/kd, the framework writes equal-length float32 all-zero arrays for vel/torque; they are not None and don't carry over the previous cycle's values. When a partial layout is resolved to the full Robot Layout, the vel/torque of missing hardware joints are likewise 0.

Lifecycle and safety rules

  • The fixed stream-loss timeout is 0.2 seconds. The publisher must refresh continuously; 20–50 Hz is recommended.
  • After messages stop or are actively released, the previously overridden five MIT fields are interpolated back to the current state output within 0.2 seconds.
  • An empty actuators_name with all command arrays also empty means an active release.
  • com.bxi.basic_actions/zero_torque has higher priority; override is forbidden in that state.
  • Overrides are ignored until the first valid robot joint state has established the Robot Layout.
  • The first real-robot test must be done with enable off or on a gantry, using conservative positions, gains and feed-forward torques.

The timeout and release interpolation are debugging protections; they don't replace a hardware emergency stop, CAN watchdog, joint limits or low-level torque saturation.

Overriding the two head joints

After starting the simulation and entering normal, the command below overrides the head yaw and pitch joints at 20 Hz:

ros2 topic pub -r 20 \
  /simulation/actuators_cmds_override \
  communication/msg/ActuatorCmds \
  "{actuators_name: [head_z_joint, head_y_joint], pos: [0.35, -0.25], vel: [0.0, 0.0], kp: [16.747, 16.747], kd: [1.066, 1.066], torque: [0.0, 0.0]}"

Here head_z_joint=0.35 rad is about 20° and head_y_joint=-0.25 rad is about -14°. Both are within the joint ranges declared by the current MuJoCo model. Stopping the publisher with Ctrl+C triggers a stream-loss release.

You can also send one empty message to request a release immediately:

ros2 topic pub --once \
  /simulation/actuators_cmds_override \
  communication/msg/ActuatorCmds \
  "{}"

The real robot uses exactly the same message, only with the topic prefix changed to /hardware/:

/hardware/actuators_cmds_override

Difference from command composition inside a State

Long-term product features should preferably use JointCommandComposer inside a RobotControlState, making explicit which joints the model, IK, trajectories or ROS inputs each own, and letting the commands take part in the state lifecycle. Platform override is better suited to:

  • Quickly verifying newly added actuators and joint directions;
  • Temporarily verifying an external controller's output;
  • Locating 29/31-DoF mapping problems without changing the policy;
  • Maintenance and diagnostic tools.

Control logic that needs to start and stop with a Mod, take part in Transitions or enter the state graph shouldn't rely long-term on the global override topic.

Framework control scheduling

RobotControlRuntime uses a dedicated absolute-time thread to call RobotControlFramework.update() on a fixed 50 Hz timeline. It also owns the Framework lifecycle, low-frequency Mod maintenance, thread safety, scheduling statistics and per-event timeout warnings. The ROS platform adapter is only responsible for input snapshots, startup steps and motor frame output, and no longer drives motions or maintains the Framework through ROS Timers.

The configuration is in the control_runtime section of config/elf3_state_machine.yaml:

control_runtime:
  period_sec: 0.02
  compute_budget_sec: 0.002
  deadline_tolerance_sec: 0.001
  maintenance_hz: 5.0
  statistics_interval_sec: 60.0
  deadline_warning_interval_sec: 1.0
  maintenance_guard_sec: 0.005
  python_switch_interval_sec: 0.001
  spin_wait_us: -1
  cpu_affinity: control
  realtime_priority: 0
  • period_sec: the unified control period, shared by all states and transitions.
  • compute_budget_sec: the target time budget for one round of control computation. It is only used to count budget overruns and doesn't change the 20 ms inference release timeline; the hard deadline is always the next period after this round's release.
  • deadline_tolerance_sec: extra tolerance after the release wake-up or completion time passes its deadline.
  • cpu_affinity: the cross-platform CPU role used by the control thread; default control. Numbers and number lists are kept only for old configurations and diagnostics; Mods or platform configurations shouldn't hard-code core numbers.
  • realtime_priority: 0 means normal scheduling; 1..99 tries to enable SCHED_FIFO; with insufficient permissions a warning is logged and normal scheduling continues.
  • maintenance_hz: the Mod process supervision frequency of the Runtime's own low-frequency thread; it doesn't enter the 50 Hz control path.
  • statistics_interval_sec: output interval of the periodic INFO scheduling statistics.
  • deadline_warning_interval_sec: merge interval for per-round timing anomaly warnings. Default 1 second; however many anomalies occur in that time, at most one summary WARNING is printed.
  • maintenance_guard_sec: when less than this time remains before the next control wake-up, this round's state snapshot or Mod maintenance is skipped, to avoid blocking the control thread in reverse.
  • python_switch_interval_sec: Python GIL switch interval. Default 1 ms, reducing the control thread wake-up tail latency caused by ROS Python callbacks.
  • spin_wait_us: final busy-wait duration, in microseconds. -1 means off; a non-negative value means sleep normally first and switch to busy-waiting when that much time remains before the absolute release point. For example, 200 means busy-wait for the last 200 microseconds. The value must be smaller than one control period; busy-waiting briefly occupies a CPU core and holds the Python GIL, so configure only a few hundred microseconds and use it together with control-thread core binding.

The control thread calls the Framework once per absolute release point every 20 ms; the completion time is never used to derive the next release point, so short-term fluctuations in inference time don't accumulate into drift. The startup phase uses the same timeline. When a single round slightly overruns the next release point, the next round catches up immediately and the original timeline recovers over the following short cycles; only crossing a whole extra release point counts as a skip, avoiding needlessly dropping an inference. Policies with history observations fill the history buffer directly with the current observation during state preparation and run only one warm-up inference; they no longer run history_len * 2 inferences in a single control cycle.

statistics_interval_sec only controls the output period of the INFO statistics summary. The summary includes wake-up latency, full control-cycle time, and the increments in control cycles, budget overruns, deadline misses and skipped cycles since the last successful output.

Each deadline miss is put on a queue lightweightly by the control thread and then merged into statistics by the existing maintenance thread, so no log I/O happens inside the 50 Hz control thread. By default at most one summary WARNING is printed per second, giving separately the number of scheduling wake-up latency overruns, the number of cycle-completion deadline overruns and their maxima, with a preliminary diagnosis based on the type of anomaly. If an output fails, the summary is kept and retried in a later maintenance cycle. A deadline miss doesn't switch states automatically. The control_timing field of the status information topic provides cumulative counts and the last miss.

Timing statistics logs use formal, consistent technical terms. The timing anomaly summary describes scheduling wake-up latency, cycle execution time, cycle-completion deadline overruns and a preliminary diagnosis; the periodic performance statistics give the anomaly ratio, budget overrun count, skipped cycle count, P99 metrics and maxima.

The INFO, WARNING and ERROR messages of Runtime and Scheduler use separate Python call sites, compatible with rclpy's requirement that the same log call site has a fixed severity; switching from INFO to WARNING after entering a high-load state is no longer rejected by the ROS logging system.

control_runtime is removed from the system configuration before RobotControlFramework is constructed, so it never takes part in state graph or Mod configuration merging. Simulation, the real robot and future non-ROS platform adapters share the same runtime.

Cross-platform CPU roles

The framework exposes only one set of stable purpose names; RK3588, x86, Jetson and later platforms use the same identifiers:

Role Meaning
control One highest-performance logical CPU dedicated to the control loop; the whole physical core it is on is no longer given to shared
compute The other highest-performance cores apart from the control physical core; suited to inference, vision and heavy-computation nodes
background Lower-efficiency cores; suited to logging, device management and low-frequency services
shared All available CPUs excluding the control physical core; the default for standalone Mod processes
all All CPUs the current process is still allowed to use after cgroup/systemd/taskset constraints
inherit Doesn't further narrow the allowed set at framework startup; mainly for compatibility with old configurations

At startup the framework first reads sched_getaffinity(), so it never breaks container, cgroup, systemd or external taskset limits; it then reads thread_siblings_list from the Linux CPU topology, to avoid keeping only the other SMT thread of the same physical core. Performance grouping uses cpu_capacity first, and if that's absent cpuinfo_max_freq then scaling_max_freq; platforms that can't distinguish big and little cores are treated as homogeneous CPUs. The actual resolution result is printed as one CPU affinity roles: ... INFO log line.

If the machine has only one available physical core, shared/compute/background safely degrade to the current allowed set; control-core isolation isn't possible then, but the program still runs. If an explicit number or list includes any CPU outside the cgroup, the framework reports the requested set and the actual allowed set at startup rather than silently ignoring it.

The control thread binds only to the CPU resolved for control; launch taskset is no longer applied to the whole ROS main process. Standalone Mod processes are created by a dedicated spawner thread; that thread switches to the node's target role before calling Popen, so Python, C++, ROS executables, ordinary commands and their descendants inherit the correct affinity from the moment they're created. This prevents nodes from being briefly or permanently stuck on the control core when a state switch launches them from the core-bound control thread.

bxi_example_py_elf3_mjlab keeps its original scheduling and isn't affected by these parameters.

Logging system

The framework generates a stable ROS logger identity for every Framework component, Mod, State and Mod Node. Mods don't need to declare names again in the manifest; the identity comes directly from the existing Mod ID, State name and Node name.

Logger naming

<main-node>.fw.runtime
<main-node>.fw.scheduler
<main-node>.fw.state_machine
<main-node>.com.bxi.normal_depth
<main-node>.com.bxi.normal_depth.state.normal_depth
<main-node>.com.example.device.node.sensor_bridge

These are real ROS child logger names, recognisable in the terminal and in /rosout, and levels can be set per scope. The outer launch may still show [bxi_example_py_elf3_demo-2]; that is the output source of the launch Action, while the inner ROS logger name is the framework component's identity.

Configuration still uses the full logical scopes: framework.* and mod.*. At run time only the displayed name is shortened to fw.* and the mod. prefix removed; don't copy the short names you see in the terminal verbatim into logging.levels.

State logging API

Mod API 4.0 keeps only one state logging entry point:

class MyState(RobotControlState):
    def on_bind(self, ctx):
        self.logger.info("State resources bound")

    def on_update(self, ctx, dt):
        if self.sensor_failed:
            self.logger.error("Sensor unavailable")

The logger is injected by the framework before on_bind(). Don't use ctx.ros_node.get_logger() for state logs, or they'll fall back to the main node's identity. ctx.ros_node is only for creating subscriptions, publishers, services and timers.

Level configuration

logging:
  default_level: info
  levels:
    framework.scheduler: warning
    framework.state_machine: info
    mod.com.bxi.normal_depth: debug
    mod.com.example.device.node.sensor_bridge: info
  subprocess:
    max_line_bytes: 16384
    max_lines_per_sec: 200

levels uses longest-prefix matching. In the example above, mod.com.bxi.normal_depth affects both that Mod's States and Nodes, unless a more specific scope is written later. debug, info, warning, error and fatal are supported.

Standalone process output

The stdout/stderr of Mod Nodes is drained by a single non-control thread, with the source attached to each line:

[com.example.device/sensor_bridge:out] Device ready
[com.example.device/sensor_bridge:err] Traceback (most recent call last):

This mechanism is the same for Python, C/C++, ROS executables, ordinary commands and vendor SDKs. The framework injects BXI_MOD_ID, BXI_NODE_ID, BXI_LOG_SCOPE and PYTHONUNBUFFERED=1 into the child process. The child process doesn't need to understand these variables.

max_line_bytes prevents output without newlines from growing without bound. max_lines_per_sec is a separate limit per Node and per stream; excess content keeps being read but is no longer written to the terminal, and the next window prints the number dropped, so the child process never gets blocked in reverse by a full pipe.

Rules

  • States use self.logger.
  • ROS Nodes use their own self.get_logger().
  • Framework internals use the corresponding framework.* logger.
  • print() is only allowed in launch checks before the ROS logger exists, standalone CLI tools and raw child-process output.
  • Don't log continuously in the 50 Hz control path; use statistics or state snapshots for continuous signals.

Mod public API

A Mod's state, Resource and Transition integration code should depend on bxi_example_py_elf3.framework.mod_api; policy implementations may also depend on the public bxi_example_py_elf3.framework.inference. framework.runtime is the controller's internal implementation and isn't guaranteed to be compatible across versions.

The current API version is 4.0.0. Mod manifests should declare api: ">=4,<5". States all use self.logger; ctx.get_logger() has been removed. Old Mods must be migrated; the framework doesn't keep two parallel logging entry points.

Most commonly used entry points

from bxi_example_py_elf3.framework.mod_api import (
    ModDefinition,
    ModLoadContext,
    JointCommandComposer,
    JointCommandLayer,
    JointTargetBuffer,
    MotorFrame,
    PoseState,
    ProceduralState,
    PolicyState,
    ResourceHandle,
    ResourceKey,
    ResourcePolicy,
    ResourceStatus,
    RobotControlState,
)
Module Purpose
mod_api.state StateBehavior, RobotControlState
mod_api.states Progressive base classes such as Pose, Procedural, Policy and MotionReplay
mod_api.frame MotorFrame and motor frame array types
mod_api.composition Composition and ownership checks for any named joint command source
mod_api.resource Resource keys, handles and loading context
mod_api.mod Mod definitions, loading context and state build parameters
mod_api.transition State frame capabilities, Transition configuration and plugin interfaces
mod_api.context The controller Protocol used by states and Transitions
mod_api.geometry General calculations such as quaternions and gravity direction

Control context

The public lifecycle uses RobotControlContext and no longer depends on the concrete BxiExample class. This capability contract is currently implemented by RobotControlFramework; states program only against the contract, so the ROS/hardware adaptation layer can change without forcing customer Mods to change with it.

Capability Main members
This-cycle observation robot_joints, current_quat_xyzw/wxyz, current_omega
Velocity command current_raw_cmd_vel, current_cmd_vel, speed_profiles
Robot structure robot_layout, established from the first complete state snapshot
Most recent complete output last_motor_frame
Output and switching set_motor_target(), resolve_motor_frame(), request_state()
Models and safety preheat_model(), is_orientation_unsafe()
Run-time information Lifecycle parameter dt, and loop_count in the context
Logging The state's own self.logger
Advanced ROS exit ctx.ros_node

Joint state is always read from ctx.robot_joints.position/velocity; inference policies use ctx.inference_frame, with joints selected automatically by the policy contract. on_bind() happens before the first robot state, so don't read robot_layout there. Ordinary switchable states should create layout-dependent mappings and buffers in on_prepare(), so that name validation and memory allocation don't fall into the control-cycle hot path; only components without a prepare stage create and cache them lazily on the first on_enter(), on_update() or Transition start.

Target poses and kp/kd are state output semantics, not part of the control context. Each state outputs 29, 31 or any N joints in its own natural MotorFrame.layout; the Framework resolves it by name into the full Robot Layout in set_motor_target(). Read ctx.last_motor_frame when you need the most recent complete command.

MotorFrame uses the complete MIT fields: qpos/vel/kp/kd/torque correspond to p_des/v_des/kp/kd/t_ff, and the five float32 arrays always exist with the same length as layout. Existing states only need to pass qpos/kp/kd; the vel/torque not passed are written as all 0 on each construction or update, and old buffer values are never kept.

RobotControlState.is_available(ctx) is the non-blocking health check before entry and returns True by default. The state machine prepares a Transition only when the target is available. request_state() returns whether the request was accepted: True means started, queued or preparing Resources, not that the Transition has finished; False means the target is currently unavailable or the target Mod node failed to start, and no switch was started.

request_state(..., force=True) can bypass is_available() in explicit maintenance/diagnostic scenarios and is off by default. It doesn't bypass errors in the state name, Transition, node startup or state lifecycle, and shouldn't be the default for ordinary switches.

API 4 states can declare, in the constructor, the resources that must be ready before entry:

class MotionState(RobotControlState):
    def __init__(self, name, state_id, policy):
        super().__init__(name, state_id, resources=(policy,))
        self._policy_handle = policy

When the target state's resources aren't ready yet, request_state() requests them asynchronously and returns True; the state machine enters preparing and the current state keeps controlling the robot. Only once the resources are ready is the target state's on_prepare() called and the Transition created; if loading fails, the current state is kept and the failure reason is logged. force=True doesn't bypass resource preparation.

When a state's joint commands come from several producers, use JointCommandComposer. Producers can be models, topic snapshots, IK, trajectories or any state logic; the Composer only reads their long-lived JointTargetViews and isn't involved in producer lifecycles. Output coverage, completeness and name mapping are compiled at construction; see Multi-source Joint Command Composition.

A custom Transition that wants to blend different layouts must first create MotorFrame.empty(ctx.robot_layout) for each side and then call ctx.resolve_motor_frame(source, output); it can't interpolate the arrays of two natural frames directly.

When you need to create custom ROS subscriptions, services or timers, use the advanced exit:

def on_bind(self, ctx):
    node = ctx.ros_node
    self.subscription = node.create_subscription(...)

State logs can't take the main node's logger from ros_node; always use:

def on_enter(self, ctx):
    self.logger.info("Motion started")

The framework injects the logger before on_bind(), and its name automatically includes the Mod ID and the local state name. For full naming, level configuration and child-process output rules see Logging System.

Destroy the ROS entities you created in on_unbind().

This is an explicit platform extension point: a Mod that uses it depends on ROS, while Mods that only use observations, events, Resources and MotorFrame aren't tied to BxiExample or specific hardware.

Transition capabilities

from bxi_example_py_elf3.framework.mod_api.transition import (
    EntryFrameProvider,
    RunningFrameProvider,
)

EntryFrameProvider provides the target state's stable entry frame for transitions such as first_frame_switch; RunningFrameProvider lets a transition sample live motor frames from both sides, for dual-state blending. Ordinary states don't need to implement unrelated capabilities.

Import boundary

The old bxi_example_py_elf3.utils.* extension entry has been removed. Mods must import public types from bxi_example_py_elf3.framework.mod_api; that way, code using framework internals fails immediately instead of forming hard-to-maintain implicit dependencies.

Importing mod_api itself doesn't create ROS nodes, load ONNX Runtime or scan Mods, so it can be used on its own for IDE completion, static checks and offline unit tests.

Resource preparation policies

Resource registration supports two code-side policies:

context.register_resource(POLICY, load_policy, policy="startup")
context.register_resource(CLIP, load_clip, policy="on_demand")

startup is prepared by the resource worker thread after all Mods have registered and before the control loop starts; it's the default and suits the initial state or models that must be validated at startup. on_demand is prepared asynchronously the first time a state that needs it is requested, and suits motions that are entered rarely and are expensive to load.

ResourceHandle.get() only reads instances that are already ready; it never starts loading and never blocks the control thread. To observe a resource yourself, read handle.status and handle.error, or call the non-blocking handle.request(); ordinary states should preferably let the state machine manage preparation via resources=(handle,). The policy is part of the resource factory's run-time semantics, so it isn't written into mod.yaml.

Mod system

A Mod is the smallest deployment unit on the state side. One directory carries the manifest, Python code and assets together, and can be discovered, validated, loaded and removed as a whole at node startup.

Directory structure

com.example.wave/
  mod.yaml
  state.py
  plugin.py       # only needed for resources/custom extensions
  assets/
    wave.onnx

The built-in root directory is share/bxi_example_py_elf3/mods/ in the installed package. mod_paths in the system configuration can add customer directories, for example /opt/bxi/mods. A Mod is discovered if the root directory itself is a Mod or if any of its subdirectories contains a mod.yaml.

Minimal manifest

schema: 1
id: com.example.wave
name: Wave Example
version: 1.0.0
api: ">=4,<5"
enable: true
entrypoint: null
visibility: public
requires:
  - id: com.bxi.basic_actions
    version: ">=1,<2"
conflicts: []
python_exports: []
runtime_requirements:
  python: []
  ros: []
  system: []

events:
  activate:
    slot: btn_10
    value: 11

states:
  wave:
    factory: state:WaveState
    label: Wave Example
    priority: 100
    group: Customer
    icon: waving_hand

routes:
  - from: com.bxi.basic_actions/normal
    event: activate
    to: wave
    transition: soft_switch
  - from: wave
    event: com.bxi.basic_actions/normal
    to: com.bxi.basic_actions/normal
    transition: dual_running_blend

A route decides the direction of a state switch; transition decides how motor frames are generated during the switch. They're kept separate because the same pair of states may need different safe switching methods: directly replacing discontinuous MIT command fields can cause a jump, while holding, gain ramping or dual-state blending can each suit different motions.

The Mod-describing fields schema/id/name/version/api/enable/entrypoint/visibility/requires/conflicts/python_exports/runtime_requirements must all be filled in explicitly. entrypoint: null means each state is loaded by the factory: module:Class convention; advanced plugins must write entrypoint: plugin:create_mod explicitly, and the framework never guesses the entry from whether a plugin.py exists in the directory. The shorthand label/priority/index/group/icon/confirm/confirm_message are normalised into the internal manifest, and the full form remains compatible.

When using base states and events across Mods, declare the dependency:

requires:
  - id: com.bxi.basic_actions
    version: ">=1,<2"

Enabling and disabling

To temporarily turn off a whole Mod, change the explicit enable to false:

enable: false

enable can only be the YAML boolean true/false; it can't be written as a string or omitted.

Once disabled, none of that Mod's states, events, routes, actions, nodes, resources, Transitions or Python exports enter the runtime. If an enabled Mod depends on a disabled Mod, the loader reports an explicit error. After changing enable, restart the control node.

The startup log lists enabled and disabled Mods separately.

Entry plugin

An entry plugin is only needed for Resources, custom Transition imports or dependency injection:

from bxi_example_py_elf3.framework.mod_api import ModDefinition, ModLoadContext

from .state import WaveState


def create_mod(context: ModLoadContext) -> ModDefinition:
    return ModDefinition(
        state_factories={
            "wave": lambda state: WaveState(state.name, state.state_id),
        }
    )

The states declarations and the keys of state_factories must match exactly. Factories are called while the state machine is being built and shouldn't modify global state themselves.

State parameters

A conventional class can declare a dataclass Params, and the framework constructs it automatically with strong typing:

from dataclasses import dataclass

from bxi_example_py_elf3.framework.mod_api import ProceduralState


@dataclass(frozen=True)
class WaveParams:
    amplitude: float = 0.3
    loop: bool = False

class WaveState(ProceduralState[WaveParams]):
    Params = WaveParams

Advanced explicit factories can still read field by field:

Manifest:

states:
  wave:
    params:
      amplitude: 0.4
      loop: true

Factory:

state_factories = {
    "wave": lambda state: WaveState(
        state.name,
        state.state_id,
        amplitude=state.float_param("amplitude", 0.3),
        loop=state.bool_param("loop", False),
    )
}

int_param(), string_param() and param() are also available. After the factory returns, the framework calls finish(); unconsumed or wrongly typed parameters block loading.

Resource preparation policies

Resource keys must be globally named:

from bxi_example_py_elf3.framework.mod_api import ResourceKey, ResourceLoadContext

POLICY = ResourceKey[WavePolicy]("com.example.wave/policy")


def _load_policy(context: ResourceLoadContext) -> WavePolicy:
    return WavePolicy(str(context.asset("assets/wave.onnx")))


def create_mod(context: ModLoadContext) -> ModDefinition:
    context.register_resource(POLICY, _load_policy, policy="startup")
    policy = context.resource(POLICY)
    return ModDefinition(
        state_factories={
            "wave": lambda state: WaveState(state.name, state.state_id, policy),
        }
    )

policy="startup" prepares the resource after all Mods have registered and before the control loop starts, and is the default policy; policy="on_demand" is prepared asynchronously by a background worker thread the first time a state that needs it is requested. Both cache the instance, and context.resource() always returns only a handle. ResourceHandle.get() only reads ready instances and is not responsible for triggering loading or waiting. context.asset() only allows access to files that exist in the current Mod's assets/. States should declare dependencies through super().__init__(..., resources=(policy,)), so the state machine waits for the resources before entry. A failed startup preparation prevents the framework from starting, while an on_demand failure keeps the current state and rejects that switch.

Shared resources can be provided by a stateless Mod, which users depend on through requires.

Manifest contributions

A Mod can contribute:

  • states
  • events
  • routes
  • actions
  • nodes
  • speed_profiles
  • transition_profiles
  • python_exports
  • runtime_requirements
  • runtime_profiles

Local states, events and profiles get an id/ prefix automatically. System-level transition profiles (such as soft_switch) keep their global names.

Standalone background capabilities go in nodes and don't need to be crammed into some state's on_bind(). in_process nodes share the main Executor; process nodes are started as child processes by the framework, monitored and restarted a limited number of times. Node code and assets are still installed, disabled and deleted together with the whole Mod.

python_exports temporarily adds top-level Python packages inside the Mod to the import path. Exported directories must contain __init__.py, and different Mods may not export packages with the same name. When the node shuts down ModRuntime, the corresponding modules and paths are removed.

runtime_requirements declares Python import, ROS package and system shared library dependencies. A Mod or node with missing dependencies goes to unavailable; the check never installs software automatically. A Mod's bundled dependencies are placed per platform in vendor/python/<platform-Python ABI> and vendor/lib/<platform>, and cross-platform pure-Python packages can go in vendor/python/common. At run time only the directories compatible with the current platform are injected before falling back to the host environment; bundles for other architectures are ignored with an explicit warning.

runtime_profiles is an optional per-node upper tier: simple Mods that don't declare it keep using the host environment; lightweight dependencies can use Vendor; and Portable is used when Python, C++ programs and vendor user-space shared libraries must migrate together with the whole Mod directory. Portable only supports standalone processes and doesn't change the Python environment of state classes or the main control process.

Dependencies and versions

The framework exposes a separate Mod API version, currently 4.0.0. Each Mod declares the compatible framework API range with api:

api: ">=4,<5"

requires supports strings and objects with version constraints:

requires:
  - com.example.common
  - id: com.bxi.basic_actions
    version: ">=1,<2"

The Mod version must be in dotted-number format; api and requires[].version use the same comma-separated comparison constraints. The loader performs a topological sort and rejects incompatible framework APIs, missing dependencies, version mismatches and dependency cycles.

Mod conflicts

conflicts is an explicit list of Mod ids; write an empty list even when there are no conflicts:

conflicts:
  - com.example.legacy_wave

The declaration is written one way but takes effect both ways: as long as either side declares a conflict, enabling both at once raises an error before any Mod code is loaded. A conflicting Mod that isn't installed or is disabled doesn't affect the current Mod; a Mod can't conflict with itself.

Validation rules

At node startup the following are checked:

  • All 12 header fields are present with no unknown top-level fields, schema is 1, api is compatible with the current framework, and name, id and version are valid.
  • enable is a boolean, and enabled Mods don't depend on disabled Mods.
  • Mods enabled at the same time don't hit either side's conflicts declaration.
  • The entrypoint file and function exist and return a ModDefinition.
  • Dependencies are complete and versions match.
  • Manifest states and factories correspond one to one.
  • Local names, resource keys, event slots and field types are valid.
  • A route's source, event and target exist; an action's source and event exist and it has a non-empty manifest.label; the two kinds of fields aren't mixed.
  • The node entrypoint is callable, execution/lifecycle are valid, and states referenced by State lifecycles exist.
  • No duplicate route/action for the same event in the same state.
  • No remote input conflicts that can trigger simultaneously in the same state.
  • Every event is used by at least one route or action.
  • The initial state exists and speed profile references are valid.

Ordinary states only need an integer manifest.priority; larger values come first, and the default is 0 when unset. The loader sorts by priority in descending order, then by full state name in ascending order for equal priority, and generates unique UI indices starting from 0, so the order in which Mods are discovered doesn't affect the interface order.

manifest.index is an advanced fixed-position option and usually shouldn't be set. An explicit index must be a non-negative integer; the loader reserves those positions first and then fills the remaining positions with automatically sorted states; two states explicitly declaring the same index blocks startup outright.

A state's internal id is different from the UI manifest.index: when states.<name>.id isn't set explicitly, the state id is a stable CRC32 computed from the full state name; it only has to be specified explicitly on a genuine CRC collision.

Current built-in layout

mods/
  com.bxi.basic_actions/   # 11 basic action states and shared models
  com.bxi.back_flip/       # protected
  com.bxi.forward_flip/    # public
  com.bxi.ballet/          # protected

Event names in the basic package use com.bxi.basic_actions/<action>. The three standalone packages still use their own activate events.

Release attribute

visibility: protected

Protected Mods load normally at run time; this field is used by the public release tooling. The release tooling deletes protected Mods as whole directories and verifies that public Mods don't depend on the removed features. See Release Protection.

YAML field reference

The project has three kinds of YAML: remote controller mapping, state machine system configuration and Mod manifests.

1. Remote controller YAML

Main file:

src/remote_controller/config/xbox_default.yaml

Top-level structure:

inputs:
  selection: {}
sources: {}
curves: {}
controls: {}
outputs: {}
system: {}
system_mutexes: {}
system_reset_motion_after: []

inputs.selection

Field Meaning
scan_interval_ms Period for scanning candidate devices
promote_stable_ms How long a higher-priority device must stay available before it may take over

sources

Each source group declares one candidate device:

sources:
  gamepad:
    type: joystick
    device: /dev/input/jsBattleDragon
    priority: 50
    ready_timeout_ms: 1000
    loss_timeout_ms: 300
    cooldown_ms: 1000
    signals:
      gamepad.left_y:
        from: js.axis.3

Built-in types are joystick, keyboard and crsf. Custom types require registering an input driver factory.

Common fields: type, priority, ready_timeout_ms, loss_timeout_ms, cooldown_ms, signals. Device-specific fields are parsed by the corresponding driver.

curves

curves:
  stick:
    type: expo
    deadzone: 0.03
    expo: 0.0
    limit: [-1.0, 1.0]
    calibration:
      input: [-1.0, 0.0, 1.0]
      output: [-1.0, 0.0, 1.0]

controls

analog, bool and enum are supported. A control unifies inputs from several devices into a business control value, and input rules can carry fields such as source, direction, curve, when and value. Conditions support pressed, released, equals, ranges and all/any combinations.

For full syntax and examples see Remote Controller Input Mapping.

outputs

outputs:
  conflict_policy: first_wins
  publish_on_change: true
  analog:
    vx: move.vx
  edge:
    - output: btn_10=11
      when:
        any:
          - - keyboard.wave_event
          - - gamepad.a_event

conflict_policy can be first_wins, last_wins or error. publish_on_change controls whether to publish only when the message changes. analog writes values continuously, level holds the condition result, and edge produces a pulse only on entering the condition; the final fields are written into MotionCommands. The example value 11 is an illustration of a customer extension, not a default binding; before real use, check it against the events of all enabled Mods to avoid several targets with the same slot and value from the same source state.

2. State machine system YAML

Main file:

src/bxi_example_py_elf3/config/elf3_state_machine.yaml
Field Required Meaning
initial_state Yes Full name of the initial state
mod_paths No List of extra Mod search roots
graph.validate No Whether to validate the state graph
graph.export.dot No DOT export path
graph.export.mermaid No Mermaid export path
default_transition No Default transition for edges that don't specify one
transition_profiles No System-shared transition profiles
logging No Log levels for Framework, Mods, States and Nodes, and child-process output limits
control_runtime No Control period, compute budget, maintenance frequency, core binding and real-time priority

states, remote_events and speed_profiles are composed from Mods and shouldn't be written in this file.

For the full control_runtime fields and real-time permission requirements, see Framework Control Scheduling. The period configuration here is a run-time setting shared by all platform adapters and shouldn't be copied into individual Mods.

logging

logging:
  default_level: info
  levels:
    framework.scheduler: warning
    mod.com.bxi.normal_depth: debug
  subprocess:
    max_line_bytes: 16384
    max_lines_per_sec: 200

levels matches by longest scope prefix; available levels are debug/info/warning/error/fatal. Common scopes are framework, mod.<mod-id>, mod.<mod-id>.state.<state> and mod.<mod-id>.node.<node>. The per-line byte limit and lines-per-second limit for child processes are configured by subprocess. See Logging System.

Built-in transition types

A Transition is the switching policy between a source state and a target state, deciding how complete MIT motor frames are generated during the switch. Its main job is to handle discontinuity between the two sides' outputs and avoid jumps from swapping frames directly; instant means explicitly choosing no intermediate handling.

  • instant
  • hold
  • entry_gain_ramp
  • running_blend
  • sequence

For each field see Custom Transitions and Dual-state Running Blend.

3. mod.yaml

Safe preset placeholders

Any string value in mod.yaml can use fixed placeholders in the bxi. namespace. Expansion happens after safe YAML parsing and before Mod validation and plugin import, and is computed only once each time the manifest is loaded. Mapping keys aren't expanded.

states:
  demo:
    manifest:
      confirm_message: >-
        Current platform: ${bxi.system.name} ${bxi.system.release}
        ${bxi.system.machine}
Placeholder Example content
${bxi.system.name} Linux
${bxi.system.release} Current kernel version
${bxi.system.machine} x86_64, aarch64
${bxi.system.hostname} Current hostname
${bxi.system.ip} Local IPv4 address chosen by the default route
${bxi.python.version} Current Python version
${bxi.runtime.platform} Mod runtime platform tag, such as linux-x86_64
${bxi.runtime.python_tag} Combined platform and CPython ABI tag

This isn't a template language and doesn't execute commands. $(uname), backticks and ${HOME} are kept as written; an unknown ${bxi.…} blocks loading directly, so spelling mistakes are found early. To display a VKBOTS placeholder literally, start it with a double dollar sign; for example $${bxi.system.name} finally displays as ${bxi.system.name}.

Adding a new framework preset only requires one more entry in the fixed provider registry in framework/runtime/mod_placeholders.py. Providers may only return process or platform metadata; calling a shell, executing commands supplied by the manifest or evaluating expressions is forbidden.

${bxi.system.ip} queries, via a local UDP socket, the source address the kernel picks for the default route, without sending any probe packets. With no default route it falls back first to the first non-loopback IPv4 from hostname resolution and then to 127.0.0.1. When the robot has several network cards, it represents the address used by the current default egress, not a list of all interface addresses.

Top-level fields

Field Required Meaning
schema Yes Currently fixed at 1
id Yes Globally unique, namespaced Mod id
name Yes Non-empty, user-facing Mod name
version Yes Dotted-number version, such as 1.0.0
api Yes Compatible framework Mod API version range, such as ">=4,<5"
enable Yes Whether this Mod is enabled; must be a boolean
entrypoint Yes module:function for advanced plugins; write null explicitly for conventional loading
visibility Yes public, or protected as recognised by the release tooling
requires Yes Mod dependencies and version constraints; write [] when there are none
conflicts Yes List of Mod ids that can't be enabled at the same time; write [] when there are none
python_exports Yes Temporarily exported top-level Python packages; write [] when there are none
runtime_requirements Yes Python, ROS and system shared library dependencies; all three must be filled in explicitly
runtime_profiles No Host, Vendor or Portable process runtime environments nodes can choose
events No Mapping from remote slots to events
speed_profiles No Mod-private speed profiles
transition_profiles No Mod-private transition profiles
states No Local state declarations; resource Mods may omit it or use {}
routes No State switch edges in the state graph
actions No Event actions that don't switch state
nodes No Python ROS nodes built into the Mod

The 12 fields above, which describe the Mod's identity and loading behaviour, must all be filled in explicitly, and the loader also rejects unknown top-level fields. For example, the header of a conventional public Mod is:

schema: 1
id: com.example.wave
name: Wave Example
version: 1.0.0
api: ">=4,<5"
enable: true
entrypoint: null
visibility: public
requires: []
conflicts: []
python_exports: []
runtime_requirements:
  python: []
  ros: []
  system: []

requires

requires:
  - com.example.shared
  - id: com.bxi.basic_actions
    version: ">=1,<2"

api and requires[].version use the same comma-separated constraint syntax, supporting ==, !=, >=, <=, > and <. The Mod API version currently exposed by the framework is 4.0.0; the loader checks compatibility before importing any Mod code.

conflicts

conflicts:
  - com.example.legacy_wave

A conflict declaration only needs to be given by one side; if both Mods are enabled, the loader refuses to start before running any Mod code. A conflicting Mod that isn't installed or is disabled doesn't affect loading. A Mod can't declare a conflict with itself.

python_exports

python_exports:
  - customer_common

customer_common/__init__.py must exist in the Mod root directory. Export names must be valid, globally unique Python package names.

runtime_requirements

requires only expresses dependencies between Mods; Python modules, ROS packages and system shared libraries go in runtime_requirements:

runtime_requirements:
  python:
    - import: numpy
  ros:
    - package: sensor_msgs
  system:
    - library: realsense2

The current version doesn't compare dependency versions and never runs pip, apt or rosdep automatically. Python dependencies are checked with a real import in an isolated child process; ROS packages and system shared libraries are checked for discoverability. The check order is current-platform vendor first, cross-platform pure-Python vendor second, and the host environment last:

mods/com.example.camera/
  vendor/
    python/
      linux-x86_64-cpython-310/  # OS + CPU + Python ABI
      linux-aarch64-cpython-310/
      common/                    # only cross-platform pure-Python packages
    lib/
      linux-x86_64/              # OS + CPU
      linux-aarch64/

Directory tags are generated automatically by the runtime. Directories that don't match the current OS, CPU or Python ABI aren't added to PYTHONPATH/LD_LIBRARY_PATH. If only vendors for other platforms exist, the framework warns explicitly and tries the host dependencies; when a current-platform vendor exists but the real import fails, it is marked unavailable directly, without silently falling back and masking a broken bundle. The old flat vendor/python/<package> and vendor/lib/<library> formats aren't loaded.

When a top-level dependency is missing, the whole Mod is published in the unavailable state and its Python entrypoint isn't run. Other Mods that don't depend on it keep loading; if an enabled Mod hard-depends on it through requires, the framework refuses to start with the full dependency chain.

The build machine should use a non---symlink-install release install tree. After deploying that install/, you can copy a complete Mod directory straight into share/bxi_example_py_elf3/mods/ and restart the process to have it discovered, with no need to rerun colcon build on the target machine. A Mod can carry several target directories at once; the target machine selects only the matching one. When updating, replace the Mod directory completely rather than merging over it, or old platform files may be left behind.

An ordinary non-symlink install keeps relative symlinks inside vendor/, avoiding the same versioned shared library being expanded into several binaries through libname.so, the SONAME and the full version name. A vendor bundle should include licences, source versions and a description of the target Python ABI/CPU architecture; com.bxi.normal_depth/vendor/README.md is a complete example.

Resource preparation policy is not part of the YAML. When a plugin registers a resource, it uses context.register_resource(..., policy="startup") or policy="on_demand"; that way the resource factory and the preparation policy stay in the same place in the code. The default is startup. A state that uses on_demand must put the corresponding handle into RobotControlState(..., resources=(handle,)), so the state machine prepares it asynchronously before the switch.

runtime_profiles

runtime_profiles is optional; Mods without the field keep using the host environment. A profile can be written as a single candidate, or give an explicit ordered fallback:

runtime_profiles:
  host_only:
    mode: host

  bundled_sdk:
    mode: vendor

  portable_sdk:
    candidates:
      - mode: portable
        root: runtime/{platform}
        python: python/bin/python3
        executable_paths: [bin, python/bin]
        library_paths: [lib, python/lib]
        isolated: true
      - mode: host
  • host doesn't require the Mod to carry an environment; the user installs pip/apt/ROS dependencies themselves.
  • vendor uses the existing vendor/python/<platform-Python ABI>, vendor/python/common and vendor/lib/<platform>.
  • portable runs in place from a root relative to the Mod; python is optional, and native processes such as C++ can use only executable_paths and library_paths.
  • {platform} and {python_tag} are expanded by the framework. Absolute paths, .. and symlinks escaping the Mod/runtime root are rejected.
  • Portable defaults to isolated: true and only allows execution: process.
  • Fallback only skips candidates that don't exist at all; an existing but broken Portable environment is not downgraded.

Nodes reference it through runtime_profile: portable_sdk. A command script can use interpreter: bundled-python to select the interpreter declared by the Portable profile directly. The node status snapshot publishes runtime_profile, runtime_mode and the actual runtime_root, making it easy to confirm the final choice.

events

events:
  activate:
    slot: btn_10
    value: 11
  any_change:
    slot: btn_9

slot must be a valid identifier, and value, if present, must be an integer. Every event must be used by at least one route or action.

states

states:
  wave:
    factory: state:WaveState
    id: 12345
    label: Example
    priority: 100
    group: Customer
    icon: waves
    confirm: true
    confirm_message: Please confirm it is safe
    speed_profile: walk
    params:
      amplitude: 0.4

factory: module:Class is used for conventional loading with entrypoint: null. A state's id is an optional int32. priority is the interface ordering priority and must be an integer; larger values come first, default 0; equal priorities are sorted by full state name ascending. The loader automatically generates a non-negative, unique manifest.index from it.

index can still be set explicitly as an advanced fixed-position option; two duplicate explicit indices make startup exit with an error. label/priority/index/group/icon/confirm/confirm_message can all be written directly or placed in manifest, but conflicting values can't be given in both. The types and allowed fields of params are decided by the class's dataclass Params or an explicit plugin factory.

routes

routes:
  - from: com.bxi.basic_actions/normal
    event: activate
    to: wave
    transition: soft_switch

  - from: wave
    event: stop
    to: com.bxi.basic_actions/zero_torque
    transition:
      profile: safe_exit
      duration: 0.5
    delay: 0.2

Fields: from, event, to, transition, delay. Every route must contain to and must not contain action.

actions

actions:
  - from: wave
    event: toggle_pause
    action: toggle_pause
    manifest:
      label: Pause/Resume

Fields: from, event, action, manifest. manifest.label is a required non-empty string; an action only calls the current state's action handler, causes no state switch, and can't configure to/transition/delay.

The loader normalises from/event and publishes action metadata to state_machine_info.graph.actions[]. As with state snapshots, manifest fields are expanded in the published object; for example, the example above is published as {from: ..., event: ..., action: toggle_pause, label: Pause/Resume}.

nodes

nodes:
  detector:
    entrypoint: detector_node:create_node
    execution: process
    scheduling:
      cpu_affinity: shared
    lifecycle: state
    states:
      - avoidance
    manifest:
      label: Obstacle Detector
    runtime_requirements:
      python:
        - import: onnxruntime
      ros:
        - package: sensor_msgs
      system: []
    params:
      output_topic: /perception/obstacles
    restart:
      max_attempts: 3
      delay: 1.0
      non_retryable_exit_codes: [78]

entrypoint must point to a Python module:function in the Mod directory. The factory receives the public API NodeBuildContext and returns an rclpy.node.Node:

from bxi_example_py_elf3.framework.mod_api import NodeBuildContext


def create_node(context: NodeBuildContext):
    return DetectorNode(
        context.node_name,
        output_topic=str(context.params["output_topic"]),
    )
  • execution can be in_process (default, joins the controller's MultiThreadedExecutor) or process (a standalone Python child process).
  • scheduling.cpu_affinity is only for execution: process and accepts the unified roles control, compute, background, shared, all and inherit; default shared. Numbers and number lists are accepted for compatibility, but cross-platform Mods shouldn't rely on specific core numbers. Declaring this field for in_process is rejected.
  • lifecycle can be mod (default, resident while the Mod is enabled) or state.
  • lifecycle: state must give non-empty states; the framework starts the node before the target state's on_prepare() and stops it when the transition is cancelled or the last associated state is left. Reference counting is used when several states share one node.
  • manifest.label must be a non-empty string; params are passed to NodeBuildContext as-is.
  • Node-level runtime_requirements are optional; when dependencies are missing the node status is unavailable, the module isn't imported and doesn't enter a restart loop, and the Mod's routes, actions, states and other nodes remain usable.
  • restart controls limited restarts after a standalone process exits abnormally; by default at most 3 times, 1.0 second apart. non_retryable_exit_codes is an optional list of integers 1–255; when hit, the node is marked faulted immediately and not restarted. It should only be used for deterministic configuration errors and shouldn't include exit codes used by ordinary run-time crashes.
  • runtime supports python (default), executable, ros and command. command is an ordinary in-Mod command that doesn't automatically get --ros-args appended and must use execution: process.
  • runtime_profile optionally references a top-level runtime environment; Portable must use execution: process.
  • depends_on declares node dependencies; the framework starts nodes in dependency order and shuts them down in reverse. Local names are automatically scoped to the current Mod, and unknown dependencies and cycles raise errors at load time.
  • shutdown can configure signal, terminate_after and kill_after. By default SIGTERM is sent first and SIGKILL after 3 seconds; it can also be configured as SIGINT → SIGTERM → SIGKILL.

Node status is published in state_machine_info.nodes[] and Mod status in state_machine_info.mods[]. Missing dependencies use unavailable; a node whose dependencies are satisfied but which exits abnormally after running uses faulted. An ordinary startup error in a Mod-lifecycle node still makes the framework fail to start and roll back; an ordinary startup error in a State-lifecycle node cancels the current state switch and keeps the current state.

Standalone processes use, in order, the current Mod's vendor/python/<platform-Python ABI>, vendor/python/common and the host Python, and only add vendor/lib/<platform> to the shared library path. in_process also supports a matching-platform vendor, but the framework warns explicitly: imported modules and native symbols belong to the whole control process, can't be unloaded reliably and may conflict in version or symbols with other Mods; when native dependency isolation is needed, prefer execution: process.

Ordinary command nodes also support the following dedicated fields:

nodes:
  bridge:
    runtime: command
    entrypoint: scripts/bridge.py
    interpreter: "${BRIDGE_PYTHON:-python3}"
    lifecycle: state
    states: [run]
    arguments: [--port, "${BRIDGE_PORT:-5557}"]
    cwd: .
    environment:
      PYTHONUNBUFFERED: "1"
      LD_LIBRARY_PATH:
        prepend: ["${SDK_ROOT:-/opt/sdk}/lib"]
        existing_only: true
    depends_on: [manager]
    shutdown:
      signal: SIGINT
      terminate_after: 3.0
      kill_after: 5.0
    manifest:
      label: Plain Command Bridge

entrypoint and cwd must be inside the Mod. interpreter, arguments and environment values support $NAME, ${NAME} and ${NAME:-default}, but are never executed through a shell. The framework injects BXI_MOD_ROOT. The string form of environment is a direct assignment; the mapping form supports set, unset, prepend, append, separator and existing_only. unset: true removes the variable from the child process environment and can't be combined with assignment or concatenation. command doesn't allow non-empty params, namespace or remappings.

nodes suit perception, communication or device-helper processes whose lifecycle the Mod owns itself. The current com.bxi.normal_depth no longer starts RealSense through this field; the real-robot camera is managed by the separate bxi_depth_camera package, and the depth state subscribes to the standard /<simulation|hardware>/body_depth_camera/depth/image_rect_raw and camera_info.

speed_profiles

speed_profiles:
  walk:
    vx_scale: 1.0
    vx_min: -1.0
    vx_max: 1.0
    vy_scale: 0.5
    yaw_scale: 1.5

transition_profiles

Same structure as system profiles, but automatically named mod-id/local-name at run time.

4. Name qualification rules

  • State, event, node state reference, speed profile and Mod transition profile names without / belong to the current Mod.
  • Values containing / are treated as full names.
  • Resource keys must always be written with their full namespace explicitly.
  • Cross-Mod references should also appear in requires.

For full loading and validation behaviour see Mod System.

State machine basic configuration

The current state graph is composed of two parts:

  1. config/elf3_state_machine.yaml: the system-level configuration.
  2. Each Mod's mod.yaml: states, events, speeds, private transition profiles, routes, actions and optional built-in nodes.

Don't write states or remote_events into the system YAML any more; the loader regenerates these fields from Mod contributions.

A route in the state graph decides "which event switches which state to which state", while a Transition decides "how motor frames are generated each control cycle during the switch". The MIT command fields of two states may be discontinuous, and switching directly can make the robot move suddenly, so the system provides transitions such as hold, entry gain ramping and dual-state running blend; instant is used only when an immediate switch is explicitly needed, for example entering a safe torque-off state.

System YAML

initial_state: com.bxi.basic_actions/zero_torque

mod_paths:
  - /opt/bxi/mods

graph:
  validate: true
  export:
    dot: /tmp/elf3_state_machine.dot
    mermaid: /tmp/elf3_state_machine.mmd

default_transition: instant

transition_profiles:
  instant:
    type: instant

  soft_switch:
    type: hold
    duration: 0.02

  first_frame_switch:
    type: sequence
    steps:
      - type: hold
        duration: 0.02
      - type: entry_gain_ramp
        duration: 1.0
        kp_from: zero
        kd_from: target

  dual_running_blend:
    type: running_blend
    duration: 0.3
    curve: smoothstep
    sample_from: true
    sample_to: true
    advance_from: true
    advance_to: true

The current shared profile uses advance_from: true and advance_to: true, so both sides provide live dynamic output during the transition. The two states are sampled serially within the same control cycle; no parallel threads are needed. The target state must ensure that the last Transition frame is continuous with the first frame after the formal on_enter(); if the target resets its history or timeline on entry, override advance_to: false on that route so the target only does a side-effect-free preview. Set sample_from: false, using the last motor frame before the transition started instead, only when the source motion has already ended and can't keep providing valid running frames.

initial_state must use the full state name. mod_paths only adds search roots; the built-in mods/ in the installed package is always scanned. Resources the initial state depends on must use policy="startup", because at startup there is no source state that can keep controlling the robot. Ordinary target states can use on_demand: after the request, the state machine publishes preparing, keeps the current state, and starts the Transition once the resources are ready.

Mod events

events:
  activate:
    slot: btn_10
    value: 11
  toggle_pause:
    slot: btn_9
    value: 1

The run-time names are mod-id/activate and mod-id/toggle_pause respectively. Omitting value means any change of the slot; an explicit value is usually recommended.

Mod states

states:
  wave:
    id: 12345                 # optional; by default computed stably from the full name
    manifest:
      label: Wave Motion
      priority: 100
      group: Customer
      icon: waves
      confirm: true
      confirm_message: Please confirm the surroundings are safe
    speed_profile: walk
    params:
      amplitude: 0.4

manifest.priority controls interface order: larger values come first, default 0; equal values are sorted by full state name ascending. The framework generates a unique index automatically, unrelated to the state machine id. Only write a non-negative manifest.index explicitly when an absolute position must be fixed; duplicate explicit indices block startup. params must be consumed completely by the factory's StateBuildContext.

Speed profiles

speed_profiles:
  walk:
    vx_scale: 1.0
    vx_min: -1.0
    vx_max: 1.0
    vy_scale: 0.5
    yaw_scale: 1.5

When a state writes speed_profile: walk, it is automatically resolved to the current Mod's mod-id/walk. State code gets the processed velocity through self.get_cmd_vel(ctx).

Routes

All edges go in routes, not in states.*.transitions:

routes:
  - from: com.bxi.basic_actions/normal
    event: activate
    to: wave
    transition: soft_switch

  - from: wave
    event: com.bxi.basic_actions/normal
    to: com.bxi.basic_actions/normal
    transition:
      profile: dual_running_blend
      duration: 0.8

  - from: wave
    event: stop
    to: com.bxi.basic_actions/zero_torque
    delay: 0.2

Rules:

  • Local from/event/to are automatically qualified to the current Mod.
  • Values containing / are treated as full names.
  • A route must contain to and must not contain action.
  • transition can be a profile name, an inline object or {profile: ..., override fields...}.
  • The shared default ramp of first_frame_switch is 1.0s. Routes that need faster switching should override steps completely with {profile: first_frame_switch, steps: [...]}; lists aren't deep-merged by index. The built-in normal_depth entry route explicitly overrides the ramp to 0.02s.
  • The same source state and event can have only one route or action.

Action

Event handling that doesn't switch state goes separately in actions, not mixed into routes:

actions:
  - from: wave
    event: toggle_pause
    action: toggle_pause
    manifest:
      label: Pause/Resume

The namespace rules for from/event are the same as for routes. Each action must contain action and a non-empty manifest.label, and must not contain to/transition/delay; when triggered, the state machine calls the current state's action handler.

The state machine information publishes the normalised from/event/action and the expanded manifest in graph.actions[], and consumers can read label directly to display the operation name.

Mod-private transition profiles

transition_profiles:
  wave_entry:
    type: entry_gain_ramp
    duration: 0.6
    kp_from: zero
    kd_from: target

The run-time name is mod-id/wave_entry. Writing transition: wave_entry in a route of the current Mod is resolved automatically; other Mods use the full name and declare a dependency.

Graph validation and export

graph.validate: true validates targets, events, transition capabilities and graph structure at startup. The exported files can be used to track down unreachable states or wrong edges:

sed -n '1,120p' /tmp/elf3_state_machine.mmd
dot -Tsvg /tmp/elf3_state_machine.dot -o /tmp/elf3_state_machine.svg

Complete example

The most complete production example at present is:

src/bxi_example_py_elf3/config/elf3_state_machine.yaml
src/bxi_example_py_elf3/mods/com.bxi.basic_actions/mod.yaml

For the full set of fields see YAML Field Reference; for Mod loading rules see Mod System.

Architecture overview

The current architecture layers platform adaptation, the control framework, motion implementations and model assets. BxiExample only handles the ROS and hardware boundary; RobotControlFramework owns Mods, states, Transitions, the Context and the state machine. The deployment unit on the state side is the Mod, with no more dependence on a central state class file.

The current bxi_example_demo.py is one platform adaptation implementation for VKH6, not the framework itself. To connect other robot messages, SDKs or hardware buses, implement a new ControlPlatformAdapter following the Robot Platform Integration Guide; don't write hardware differences into the state machine or the shared policy runtime.

Overall data flow

Gamepad / keyboard / CRSF / custom device
  -> InputDeviceManager
  -> InputDriver
  -> sources -> controls -> outputs
  -> communication/msg/MotionCommands
  -> BxiExample's ROS subscription
  -> BxiExample collects RobotObservation by message joint names and queues raw events
  -> RobotControlRuntime's dedicated control thread
       -> BxiExample.snapshot_control_inputs()
       -> first frame establishes the complete Robot Layout
       -> RemoteEventAdapter / RobotStateMachine inside RobotControlFramework
       -> optional JointCommandComposer merges model, topic, IK, trajectory and other command sources
       -> RobotControlState outputs its own natural 29/31/N MotorFrame
       -> JointCommandResolver fills out the complete Robot Layout
       -> Transition interpolates on the complete layout
       -> BxiExample.publish_motor_frame()
       -> optional actuators_cmds_override overrides the final command by name
  -> BxiExample converts the MotorFrame into ActuatorCmds
  -> robot hardware

The core agreement at this boundary is simple: each cycle the platform gives the framework a complete observation and events, and the framework returns the final motor frame. The framework doesn't create hardware messages, doesn't publish motor topics and isn't responsible for robot reset. So when the message type, bus or hardware platform changes, the state graph and Mods don't have to change with it.

When a route requires a state switch, RobotStateMachine runs a Transition between the source and target states. It is responsible for motor frames during the switch, avoiding the jumps that swapping frames directly would cause when the two sides' MIT command fields are discontinuous; only after it completes does the target RobotControlState take over normal updates.

Loading flow of configuration and code:

elf3_state_machine.yaml (system configuration)
  + built-in mods/
  + customer Mods in mod_paths
  -> discover mod.yaml
  -> validate and sort dependencies
  -> load entrypoint
  -> register startup/on-demand resources, state factories and Python nodes
  -> compose states/events/routes/actions/nodes/profiles
  -> build RobotStateMachine
  -> manage nodes by Mod/State lifecycle

File layering

src/remote_controller/
  config/xbox_default.yaml
  include/remote_controller/
  src/

src/bxi_example_py_elf3/
  config/elf3_state_machine.yaml       # system-level configuration
  mods/
    com.bxi.basic_actions/
      mod.yaml                         # state graph contribution
      plugin.py                        # factory and resource registration
      *_state.py                       # state implementation
      assets/                          # this Mod's private assets
    com.bxi.back_flip/
    com.bxi.forward_flip/
    com.bxi.ballet/
    com.bxi.normal_depth/
      depth.py                       # private policy of the depth-walking Mod
  bxi_example_py_elf3/
    framework/                       # portable motion-control framework separate from the ELF3 deployment code
      inference/                     # backends, history frames, policy contracts and inference runtime
      joints/                        # named layouts, default targets, resolvers, mapping and calibration
      platform/                      # robot integration protocol, joint I/O and control Runtime
      mod_api/                       # public API for Mod authors
      runtime/                       # state machine, loader, scheduler and control kernel
      transitions/                   # general Transitions
    policies/                        # built-in ELF3 inference policies
      joints.py                     # model joint contracts and policy-internal order
      normal.py
      amp.py
      beyondmimic.py
    bxi_example_demo.py             # ELF3 ROS adaptation layer and platform default targets
    bxi_example_mjlab.py            # original MJLab example entry

Run-time objects

Object Responsibility
RobotControlRuntime Holds the control scheduler, Framework, maintenance thread and platform adaptation boundary
RobotControlFramework Receives RobotObservation/events, advances the state machine and returns MotorFrame
ModRuntime Stores the composed configuration, state factories, resource manager, loaded Mods and dynamic modules
ResourceManager Registers, asynchronously prepares, caches, reports status of and closes resources
StateBuildContext Provides state factories with names, stable state ids and strongly typed parameter reading
RobotStateMachine Handles events, delays, transitions, state lifecycles and graph export
RemoteEventAdapter Turns MotionCommands slot changes into Mod events
JointCommandComposer Merges several named command sources inside a state, checks override ownership and reuses the output frame
JointCommandResolver Resolves a state's natural output by name into the full Robot Layout; the mapping is compiled only once

The Robot Layout is no longer passed to the Runtime as a fixed 29-joint constant. The first valid complete snapshot of a named message decides whether the current robot has 29, 31 or N joints; the policy class's own PolicyJointContract still fixes the model's input and output, and neither rewrites the other. New joints missing from old models get explicit targets from the platform's JointCommandDefaults. Model output dimensions don't equal state output dimensions either: a state can use JointCommandComposer to combine model targets with topics, IK, trajectories or other controllers, then hand its natural output to the Resolver to fit the actual robot. For the full rules on input selection, output filling/trimming, Transitions and fixed-order hardware, see Joint Layout and Mapping.

Mods may only depend on bxi_example_py_elf3.framework.mod_api; BxiExample uses the motion-control kernel through framework.platform.RobotControlRuntime and no longer assembles the scheduler, loader, states and state machine itself. The project keeps no compatibility forwarding modules for old paths, so wrong dependencies are exposed directly during development.

Namespaces

Local names in a Mod manifest are qualified automatically:

Mod id:       com.example.wave
state:        wave
event:        activate
resource:     com.example.wave/policy

Run-time state:  com.example.wave/wave
Run-time event:  com.example.wave/activate

from: wave, to: wave and event: activate within the same Mod are qualified automatically. Cross-Mod references must use full names and declare the dependency through requires.

Where to make changes

Adding a motion:

  • Create or extend a Mod.
  • Declare states, events, routes and actions in mod.yaml.
  • Simple states use factory: module:Class; only when resources and extension registration are needed does plugin.py return factories.
  • Put models into that Mod's assets/ and register resources.
  • Output the btn_N=value the manifest uses in the remote controller YAML.

Adding a transition:

  • General framework transitions go in framework/transitions/.
  • Business-specific transitions go in the corresponding Mod and are registered explicitly through ModDefinition.transition_plugins.
  • Profiles can go in the system YAML; Mod-private profiles go in mod.yaml and get a namespace automatically.

Adding an input protocol:

  • First decide whether the remote controller YAML alone can do it.
  • Only implement InputDriverBase and a factory when a new device must be read.
  • Drivers only produce raw signals and never write state names directly.

Public release:

  • Set visibility: protected in the manifest of any Mod to be removed as a whole.
  • tools/sanitize_release.py deletes the whole directory and verifies the dependency closure of the retained Mods.

Next steps

Framework internals

This page describes the current implementation in startup and per-frame execution order.

1. remote_controller

Read YAML
  -> validate sources/controls/outputs
  -> register and create candidate InputDrivers
  -> InputDeviceManager probes periodically
  -> select the single active device
  -> InputMapper computes controls
  -> MotionCommandsAdapter writes the message
  -> publish motion_commands

Device selection considers priority, ready_timeout_ms, loss_timeout_ms, cooldown_ms and the global scan/stability times. Drivers only produce raw signals; business combinations stay in the YAML.

edge only triggers when a condition goes from false to true; level continuously reflects the condition; analog writes a continuous value every frame.

2. Platform adaptation layer and framework startup

BxiExample
  -> read ROS parameters and the system state machine YAML
  -> create ROS subscriptions / publishers / service clients
  -> implement the three platform methods of ControlPlatformAdapter
  -> create RobotControlRuntime

RobotControlRuntime
  -> create RobotControlFramework
       -> load_mod_runtime()
       -> build_robot_states()
       -> bind states and create RobotStateMachine
       -> create RemoteEventAdapter
  -> create ControlScheduler and the low-frequency maintenance thread

BxiExample no longer holds ModRuntime, state instances or the state machine, and no longer proxies framework capabilities such as set_motor_target(), request_state() and model warm-up. These are all provided by RobotControlFramework as the implementation of RobotControlContext. BxiExample only implements startup checks, observation snapshots and motor frame sending; for how to migrate, see the Robot Platform Integration Guide.

RobotControlRuntime isolates sensors and the motor bus through ControlPlatformAdapter, while keeping one direct per-cycle call path. The control clock is managed by a dedicated ControlScheduler, not driven by a ROS Timer.

3. Mod dynamic modules

Each manifest is first validated for schema, id, version and API. After dependency topological sorting, the entry module or factory: module:Class reference is imported under a private package name determined by the Mod id, so relative imports work and the module namespaces of different Mods are isolated.

A loading failure closes the new resources, removes the dynamic modules, restores the transition plugin registry, and reverts Python exports and the corresponding sys.path changes.

4. Configuration composition

The system YAML is first copied as the base config, and mod_paths doesn't go into the final state machine configuration. Then, in dependency order, the following are composed:

  • states
  • remote_events
  • speed_profiles
  • Mod transition_profiles
  • states.*.transitions.on_event generated from routes/actions
  • Python node specifications generated from nodes

All local names are qualified as mod-id/local-name at this stage. Input conflicts, unused events, unknown targets, priority/index, profiles and the initial state are all validated before returning to the runtime.

5. State construction

The builder no longer scans classes. It walks the composed states:

  1. Use the explicit id, or compute a CRC32 int31 from the full name.
  2. Create a StateBuildContext.
  3. Call the explicit Mod factory, or generate a conventional factory from the class's dataclass Params.
  4. Reject unknown parameters.
  5. Set the speed profile and manifest.

6. ResourceManager

Registration stores the key, owner, Mod root, factory and startup/on_demand policy. The resource worker thread does the actual construction: startup resources are prepared together before the control loop starts, and on_demand resources are prepared the first time the state machine requests a target state that needs them. ResourceHandle.get() only returns ready instances, never starts loading and never waits. context.asset() enforces that assets must be inside this Mod's assets/. Shutting down the runtime waits for resources being prepared and calls close() on created instances in reverse order.

7. Each control cycle

RobotControlRuntime reaches an absolute-time release point
  -> call BxiExample.snapshot_control_inputs()
       -> update the long-lived JointStateBuffer and sensor buffers under the same observation lock
       -> return a stable RobotObservation and take the queued events
  -> framework.update(observation, events, dt)
       -> update the current-cycle snapshot of RobotControlContext
       -> state_machine.update(dt, events)
       -> the Transition or current state produces the final MotorFrame
  -> call BxiExample.publish_motor_frame()
       -> apply any still-valid actuators_cmds_override by name
       -> write the MotorFrame into ActuatorCmds and publish
  -> BxiExample publishes state_machine_info at its rate

RobotObservation.joints is a JointStateView with a JointLayout. The platform adaptation layer holds the observation and arrays long-term and only updates them in place each cycle; they must not reference ROS message memory with an uncertain lifetime. The Framework compiles the name mapping the first time it sees an input layout and afterwards only performs array mapping. The framework returns MotorFrame | None, where MotorFrame.layout states the output joint semantics explicitly; when there is output, the platform adaptation layer decides how to send it, and when there isn't, no new motor command is sent.

8. State switching

A Transition is a switching Session the state machine creates between a source state and a target state. Before the target state formally enters, it temporarily takes charge of motor output each cycle, handling hold, gain ramping or frame blending when the two sides' MIT command fields are discontinuous; an instant Session completes immediately.

Request target state
  -> check is_available()
  -> check required_resources
       -> unloaded: async request, record preparing, current state keeps running
       -> loading: keep waiting
       -> failed: cancel the request and report the resource error
       -> ready: continue
  -> prepare the Mod Nodes the target state needs
  -> target.on_prepare(ctx, source)
  -> plan.validate_states(source, target)
  -> session = plan.create_session(...)

Each frame: session.update(ctx, dt)

Done:
source.on_exit(ctx)
current = target
target.on_enter(ctx)

When an active transition is interrupted or the Session throws, the target's on_prepare_cancel() is called, and the current state remains the source state.

9. action

The top-level actions in mod.yaml generate event rules containing only action, with no state switch. Each action must declare a non-empty manifest.label. The state machine first looks for a global handler, then calls the current state's on_action(ctx, name); if neither handles it, an error is raised.

10. Graph validation and state information

The state machine validates unknown targets, undeclared events, transition capabilities, unreachable states and states with no outgoing edges. DOT/Mermaid exports come from the same composed configuration.

The state information topic contains the current state, pending, preparing, the active transition, this cycle's events, and snapshots of states, actions, profiles and remote events. preparing.resources[] gives the id, status and errors of the target state's resources. The manifest in graph.actions[] is expanded just like a state manifest, and label can be used directly for display in the interface.

Mod node status is in the top-level nodes[]. In-process nodes join the main MultiThreadedExecutor; standalone process nodes have a runner load the same Mod entrypoint. State-lifecycle nodes start before the target state is prepared, are reclaimed when the transition is cancelled, and nodes the source state no longer needs are released after the switch completes.

11. Fixed runtime

Mods, resources, dynamic modules and the state graph are only built at node startup. A startup failure cleans up resources, modules and registrations already created; after a successful startup the runtime stays unchanged. After changing the system YAML, a Mod or assets, the node must be restarted; the control loop doesn't scan files or replace the state machine dynamically.

12. Extension boundaries

  • New motion: Mod state + factory + manifest.
  • New model: Mod resource factory.
  • New business transition: registered explicitly through the Mod's ModDefinition.transition_plugins.
  • New background ROS node: Mod nodes + Python NodeBuildContext factory.
  • New general transition: framework/transitions/.
  • New device: InputDriverBase factory.
  • New message adaptation: MotionCommandsAdapter.

13. Public API boundary

Customer Mods only import bxi_example_py_elf3.framework.mod_api. framework/runtime holds RobotControlFramework, the Mod loader, ResourceManager, the state builder, the state machine and the Transition registration/compilation logic. The public lifecycle uses the RobotControlContext Protocol and doesn't bind directly to BxiExample. Old package paths have been removed, with no compatibility forwarding layer.

ctx.ros_node is an explicit escape hatch kept for advanced Mods that must create ROS subscriptions, services or timers. Ordinary states shouldn't use it; once used, that Mod has actively chosen ROS integration, rather than the framework's main control chain depending on ROS.

Advanced configuration patterns

The following snippets are all based on the current Mod architecture.

Each Transition below is the policy responsible for motor output during the switch, after a route has already decided the target state. It handles MIT command fields that may be discontinuous between the source and target states; without a suitable transition the frame is swapped directly and the robot may move suddenly.

Minimal cross-Mod switch

requires:
  - id: com.bxi.basic_actions
    version: ">=1,<2"

events:
  activate:
    slot: btn_10
    value: 11

states:
  custom:
    manifest:
      label: Custom
      priority: 100

routes:
  - from: com.bxi.basic_actions/normal
    event: activate
    to: custom
  - from: custom
    event: com.bxi.basic_actions/normal
    to: com.bxi.basic_actions/normal

Supporting several devices for the same event

The state side declares only one slot:

events:
  activate:
    slot: btn_10
    value: 11

The remote controller YAML can make different controls on the keyboard, gamepad and CRSF all output btn_10=11. The state Mod doesn't need to know the input device. The example value 11 isn't a default binding; before deployment, confirm across the whole Mod tree that the slot and value are unique, then add the corresponding output.

Delayed switching

routes:
  - from: custom
    event: stop
    to: com.bxi.basic_actions/zero_torque
    delay: 0.2

A new event can override a pending transition; safety events should use immediate routes.

In-state actions

events:
  toggle_pause:
    slot: btn_9
    value: 1
actions:
  - from: custom
    event: toggle_pause
    action: toggle_pause
    manifest:
      label: Pause/Resume

A state's on_action() returning true means it was handled.

One-off override transition

transition:
  profile: dual_running_blend
  duration: 1.0
  curve: smootherstep
  sample_from: false

Mod-private transitions

transition_profiles:
  safe_entry:
    type: sequence
    steps:
      - type: hold
        duration: 0.02
      - type: entry_gain_ramp
        duration: 0.8
        kp_from: zero
        kd_from: target

The run-time profile name automatically becomes mod-id/safe_entry.

Shared resource Mod

A resource provider can use:

schema: 1
id: com.example.shared_policy
name: Shared Policy Resource
version: 1.0.0
api: ">=4,<5"
enable: true
entrypoint: plugin:create_mod
visibility: public
requires: []
conflicts: []
python_exports: []
runtime_requirements:
  python: []
  ros: []
  system: []
states: {}

Consuming Mods depend on it through requires and use the same full ResourceKey. Public resource Mods shouldn't depend on protected features.

External deployment of customer Mods

System YAML:

mod_paths:
  - /opt/bxi/mods

Customer packages can be copied independently into that directory, with no need to modify the ROS Python package. Ids must avoid clashing with built-in Mods.

Exporting public Python packages

python_exports:
  - customer_common

Suits pure-Python helpers shared by several Mods. The directory must contain __init__.py, and the export name must be globally unique. For simpler sharing, prefer a resource Mod.

Release protection for high-risk motions

visibility: protected

Protect the whole package rather than listing class names, model keys and paths. If a public Mod references it, the sanitizer refuses to generate output.

Index planning

Ordinary states are ordered with manifest.priority, and the framework generates unique indices. Only declare manifest.index explicitly when an external protocol really requires a fixed position, and keep it unique across the whole state tree; two duplicate explicit indices block startup outright and are never automatically shifted back.

Engineering checklist

  1. Every cross-Mod reference has a requires.
  2. Resource paths are all inside the owning assets/.
  3. Parameters are consumed with strong typing by StateBuildContext.
  4. Actions have handlers, and every event has at least one route or action.
  5. The advance semantics of running_blend are correct.
  6. on_bind/on_unbind and resource close() are symmetrical.
  7. After changing a Mod, restart the node and verify that it loads successfully and that bad configurations fail clearly at startup.
  8. Run the sanitizer with --self-check before release.

Release protection and public version sync

Release protection currently works in units of whole Mods. The tooling no longer deletes Python classes, central YAML fragments or individual model files.

Marking a protected Mod

schema: 1
id: com.example.dangerous_action
name: High-risk Motion
version: 1.0.0
api: ">=4,<5"
enable: true
entrypoint: plugin:create_mod
visibility: protected
requires: []
conflicts: []
python_exports: []
runtime_requirements:
  python: []
  ros: []
  system: []

It still loads normally at run time; visibility is interpreted by the release tooling. The field must be filled in explicitly. The current built-in protected Mods are com.bxi.back_flip, com.bxi.ballet and com.bxi.normal_depth; com.bxi.forward_flip is currently public.

Generating the public tree

python3 tools/sanitize_release.py \
  --out /tmp/public_release \
  --self-check

Temporarily exclude additional public Mods:

python3 tools/sanitize_release.py \
  --exclude com.example.customer_feature \
  --out /tmp/public_release

Extra roots can be given by repeating --mod-root.

Tool behaviour

  1. Recursively discover manifests from the Mod roots.
  2. Read explicit requires.
  3. Derive implicit dependencies from cross-Mod routes.from/to/event, actions.from/event and nodes.states.
  4. Collect protected Mods and command-line exclusions.
  5. Verify that the dependency closure of public Mods doesn't include Mods to be deleted.
  6. Copy the repository, ignoring the version control directory, Wiki, build directories and caches.
  7. Delete the complete directories of protected Mods and the private sync tools.
  8. --self-check rediscovers the output Mods and confirms the set is exact.

It fails outright when a public Mod depends on a protected Mod. Adjust the dependency direction, or split the shared resource into a public, stateless resource Mod.

GitHub Action

.github/workflows/sync_public_main.yml generates and self-checks the public tree on a dev push or manual trigger, syncs it to public/main-sync, creates/updates a PR targeting main and tries to merge it.

The repository secret PUBLIC_RELEASE_TOKEN needs Contents, Pull requests and Workflows write permissions.

Local check

find /tmp/public_release/src/bxi_example_py_elf3/mods -name mod.yaml -print
test ! -d /tmp/public_release/src/bxi_example_py_elf3/mods/com.bxi.back_flip
test ! -d /tmp/public_release/src/bxi_example_py_elf3/mods/com.bxi.ballet

The basic actions package must be kept complete; the tooling never trims individual states from inside a Mod.

Migrating from 0f90a49 to the current Mod architecture

This page summarises the main changes affecting users since 0f90a49c539e0efcec0d6fbc481f634890742c78.

Migrating from Mod API 3 to API 4

The current framework exposes MOD_API_VERSION = "4.0.0", and manifests must change to:

api: ">=4,<5"

API 4 moves model loading out of the control lifecycle into an asynchronous Resource preparation flow:

API 3 API 4
loading="eager" policy="startup"
loading="lazy" policy="on_demand"
handle.get() loads synchronously on first call handle.get() only reads instances already ready
A state only discovers the model isn't loaded in on_prepare() The state declares the dependency at construction with resources=(handle,)
PolicyState.create_policy() A Resource factory creates the policy, and the constructor receives the handle

Custom core states should declare resources like this:

class MotionState(RobotControlState):
    def __init__(self, name, state_id, policy):
        super().__init__(name, state_id, resources=(policy,))
        self._policy_handle = policy

PolicyState and MotionReplayState declare the dependency automatically after receiving the handle. When a state using an on_demand resource is requested, the state machine keeps the current state, prepares the resource asynchronously and publishes progress in state_machine_info.preparing; only once it is ready is the target state's on_prepare() called.

The velocity parameter of ctx.preheat_model() is now unified as command=..., and with_cmd_vel or cmd_vel are no longer accepted. The displayed run-time loggers are also shortened to fw.* and <mod-id>.*, but the logging.levels configuration still uses the logical scopes framework.* and mod.*.

Removed entry points

The following old entry points no longer exist:

bxi_example_py_elf3/robot_states.py
config/release_protection.yaml
data/isaaclab_model/
data/mjlab_model/

states, remote_events and speed_profiles in the central state YAML are no longer configuration sources either.

New correspondences

Old way Current way
Add a State class in a central file Add a state module in a Mod directory
The builder scans all State subclasses plugin.py returns explicit state_factories
Central YAML declares states and edges mod.yaml declares states/events/routes/actions
Models hung on dynamic ctx attributes ResourceKey + ResourceHandle
Models in data/*_model Models in the owning Mod's assets/
Release deletion per class/model visibility: protected deletes the whole Mod
Hot-reload of the central state module Run-time reload no longer supported; restart the control node after changes

State name changes

The basic actions have been merged into:

com.bxi.basic_actions

For example:

Old: com.bxi.normal/normal
New: com.bxi.basic_actions/normal

Old: com.bxi.zero_torque/zero_torque
New: com.bxi.basic_actions/zero_torque

Basic events have also become action names:

com.bxi.basic_actions/normal
com.bxi.basic_actions/zero_torque
com.bxi.basic_actions/dance

Back flip, forward flip and ballet are still separate Mods, and their entry events are their own activate.

Migrating an old state

  1. Create mods/com.example.action/.
  2. Move the state class into state.py.
  3. Move models and motion data into assets/.
  4. Create plugin.py, register resources and return state factories.
  5. Explicitly fill in schema/id/name/version/api/enable/entrypoint/visibility/requires/conflicts/python_exports/runtime_requirements; write [] for empty lists, and fill in all three python/ros/system categories of runtime_requirements explicitly.
  6. Rewrite the states, events and edges from the central YAML as the states/events/routes/actions of mod.yaml.
  7. Change cross-package references to full names and add them to requires; put Mods that can't coexist in conflicts.
  8. Remote controller output slots can stay unchanged.

For complete templates see Hands-on Custom State and Model Motion Mod.

Release migration

The old deletion lists of class names, model keys and paths have all been removed. Now you only need to write in the high-risk Mod:

visibility: protected

Then run:

python3 tools/sanitize_release.py --out /tmp/public_release --self-check

The tooling checks dependencies derived from cross-Mod routes and explicit requires, preventing public Mods from depending on deleted Mods.

How the runtime is updated

The /hot_reload parameter has been removed. After the system YAML, Mod manifests, state code, Transitions or model assets change, restart the control node. All discovery, dependency sorting, resource registration and state graph validation happen at startup; nothing scans files or replaces state machine objects while running.

State display order

Ordinary Mods no longer maintain manifest.index by hand, and instead declare an integer manifest.priority: larger values come first, equal priorities are sorted by full state name ascending, and the framework generates unique indices automatically. When a fixed position is really needed, a non-negative index can still be declared explicitly, but two duplicate explicit indices terminate startup outright.

Remapping

This document is currently under construction. Custom configuration guides for control command remapping and joint mapping will be recorded here.

Others

This document is currently under construction. Other system tools, firmware upgrade guides, and Frequently Asked Questions (FAQ) will be recorded here.

VKH6 人形机器人

VKBOTS Library:开箱、操作、编程与扩展 VKH6 所需的一切,按书的形式编排,可从头读到尾,也可按章节查阅。

31自由度
1450mm身高
~38kg重量
518Wh快换电池
1kHz+全身控制频率
ROS 2Ubuntu 22.04 SDK

本书结构

从这里开始

  1. 阅读安全须知开机和站立前需要检查的事项。
  2. 按照操作指南上手充电、开机并用手柄操控 VKH6。
  3. 配置开发环境网络、SSH、关节编号与软件结构。
  4. 运行 31 自由度最简示例通过 SDK 发送第一条关节指令。
  5. 在 3D 中查看机器人摆动 VKH6 真实模型,确认关节范围、坐标系与连杆名称。

VKH6

VKH6是中型尺寸的人形机器人,身高 1.45 m,运动参数与同等身高的人类接近,提供完整、开放的二次开发环境和支持。

VKH6正面 VKH6侧面
正面 侧面

核心亮点

  • 高性能电机:全身 31 个 VKBOTS 中空行星关节电机,支持奔跑、跳跃、空翻、跑酷等极限动作;
  • 骨架式轻量化设计:极致减重;可通过加装外壳自定义外观;
  • 强壮手臂:单臂平举末端负载超过5公斤;
  • 高可靠性:中空走线大幅减少线束;
  • 高速总线:PCIE-CANFD 通信架构,全身控制频率 > 1000 Hz
  • 电池热插拔:不断电更换电池,保障持续作业能力
  • 开放开发接口:CANFD MIT 协议直控电机 + ROS2 SDK + MuJoCo 仿真一键部署

整机规格

外观与运动性能

项目 规格
身高,宽度,厚度 1450 mm * 450 mm * 280 mm
大腿长,小腿长 320 mm, 320 mm
上臂长,下臂长 256 mm, 256 mm
整机重量 约 38 kg
全身自由度 31,不含手
关节电机 VKBOTS 中空行星系列
单腿自由度 6
单手臂自由度 7
腰自由度 3
头 2
单臂负载 平举 5 kg(连续 10 次);肘支撑举起 10 kg(连续 10 次)
最高移动速度 5 m/s(约 18 km/h)

全身关节参数

详细电机参数 见 关节电机模组

关节 电机 最小角度 (rad) 最大角度 (rad) 峰值扭矩 (Nm) 峰值速度 (rad/s) 等效转动惯量 (kg·m²)
waist_y_joint VKBOTS7010并联 −0.5236 0.5236 90 20 0.0274702
waist_x_joint VKBOTS7010并联 −0.2618 0.2618 100 20 0.0412054
waist_z_joint VKBOTS8515 −2.8798 2.8798 150 20 0.044688
l_hip_y_joint VKBOTS8515 −2.8798 2.8798 150 20 0.044688
l_hip_x_joint VKBOTS8515 −0.48869 3.0543 150 20 0.044688
l_hip_z_joint VKBOTS7010 −2.8798 2.8798 45 20 0.0137351
l_knee_y_joint VKBOTS8515 −0.087266 2.618 150 20 0.044688
l_ankle_y_joint VKBOTS5018并联 −0.87266 0.7854 40 20 0.00848397
l_ankle_x_joint VKBOTS5018并联 −0.34907 0.34907 15 20 0.00551458
r_hip_y_joint VKBOTS8515 −2.8798 2.8798 150 20 0.044688
r_hip_x_joint VKBOTS8515 −3.0543 0.48869 150 20 0.044688
r_hip_z_joint VKBOTS7010 −2.8798 2.8798 45 20 0.0137351
r_knee_y_joint VKBOTS8515 −0.087266 2.618 150 20 0.044688
r_ankle_y_joint VKBOTS5018并联 −0.87266 0.7854 40 20 0.00848397
r_ankle_x_joint VKBOTS5018并联 −0.34907 0.34907 15 20 0.00551458
l_shoulder_y_joint VKBOTS7010 −2.8798 2.8798 45 20 0.0137351
l_shoulder_x_joint VKBOTS7010 −0.34907 3.0543 45 20 0.0137351
l_shoulder_z_joint VKBOTS5014 −2.8798 2.8798 21 20 0.00424198
l_elbow_y_joint VKBOTS7010 −0.95993 1.6581 45 20 0.0137351
l_wrist_x_joint VKBOTS5014 −2.8798 2.8798 21 20 0.00424198
l_wrist_y_joint VKBOTS5014 −1.309 1.309 21 20 0.00424198
l_wrist_z_joint VKBOTS5014 −0.7854 0.7854 21 20 0.00424198
r_shoulder_y_joint VKBOTS7010 −2.8798 2.8798 45 20 0.0137351
r_shoulder_x_joint VKBOTS7010 −3.0543 0.34907 45 20 0.0137351
r_shoulder_z_joint VKBOTS5014 −2.8798 2.8798 21 20 0.00424198
r_elbow_y_joint VKBOTS7010 −0.95993 1.6581 45 20 0.0137351
r_wrist_x_joint VKBOTS5014 −2.8798 2.8798 21 20 0.00424198
r_wrist_y_joint VKBOTS5014 −1.309 1.309 21 20 0.00424198
r_wrist_z_joint VKBOTS5014 −0.7854 0.7854 21 20 0.00424198
neck_z_joint VKBOTS5014 −1.57 1.57 21 20 0.00424198
neck_y_joint VKBOTS5014 −0.7854 0.7854 21 20 0.00424198

电气系统

项目 规格
最大电压 58.8 V
额定电流 50 A
最大电流 > 100 A
电池容量 518 Wh,锂电池
电池热插拔 支持
续航时间 步行约 1 小时

控制通信架构

项目 规格
控制通信架构 PCIE-CANFD, FPGA
系统控制频率 >1000Hz

计算单元 - CPU

项目 规格
CPU 第 13 代 Intel® Core™ i7-1370P
内核数 14(6 性能核 + 8 能效核)
线程数 20
最大睿频频率 5.20 GHz
处理器基础功耗 28 W
最大睿频功耗 64 W
内存 16 GB DDR4 3200 MHz
存储 512 GB
GPU Intel® Iris® Xe Graphics(96 EU)
显卡最大动态频率 1.50 GHz
指令集 64-bit(SSE4.1 / SSE4.2 / AVX2)

计算单元 - GPU

项目 规格
NPU/GPU 支持 NVIDIA Jetson 系列(选装或用户自行加装)

IMU

项目 规格
工作电压 3.3 ~ 5.5 V
工作温度 −40 ~ 85 ℃
通讯接口 UART / CAN
加速度计量程 ±12 g
加速度计分辨率 0.001 g
陀螺仪量程 ±2000 °/s
陀螺仪分辨率 0.001 °/s
磁力计量程 ±8 Gs
磁力计分辨率 0.25 mg
气压计量程 300 ~ 1100 hPa
气压计分辨率 0.06 Pa

传感器与外设

项目 规格
深度相机 Intel RealSense D435i
激光雷达 选配(Livox Mid360s)
麦克风 HAOKAI 8 阵列全向麦克风
扬声器 悦欣有源音箱(DC 5V)
WIFI / 蓝牙 板载集成

软件生态

项目 规格
操作系统 Ubuntu 22.04
电机控制接口 CANFD 通信 SDK,兼容 MIT 协议(扭矩 / 位置 / 速度 / 温度)
URDF 提供
机器人控制框架 基于 ROS2 的硬件控制节点 SDK
仿真环境 基于 MuJoCo 的强化学习训练与部署框架
预装算法 平地行走与奔跑运动控制

附件

项目 说明
灵巧手 付费选装(独立单元)
Xbox 兼容遥控手柄 随机赠送
平板控制 App 付费选配

在 3D 中查看 VKH6

直接在页面中旋转、缩放 VKH6 真实机器人模型并摆出姿态。每个关节都可以拖动,便于在编写控制代码之前确认运动范围、连杆名称和坐标系。

模型
全屏打开 ↗

正在加载 3D 模型…

拖动旋转 · 右键拖动平移 · 滚轮缩放 · 点击机器人部件并拖动即可转动该关节。

功能

  • 关节:用滑块或直接拖动机器人来转动每个关节;可在弧度与角度之间切换、开关限位,并用重置回到零位。
  • 碰撞、惯量、质心:显示每个连杆的碰撞几何、惯量盒和质心。
  • 坐标轴与关节轴:显示连杆坐标系和每个关节的旋转轴,便于与 SDK 中的关节编号对应。
  • 结构:连杆/关节树状图,点击节点即可在机器人上高亮。
  • 编辑:查看和编辑 URDF,修改会立即作用到模型上,点击下载可保存修改后的文件。
  • 测量:按住 Ctrl 点击机器人上的两个点,测量它们之间的距离。
  • 动画:在时间轴上为关节姿态设置关键帧并回放。

模型

31 自由度标准 VKH6,包含 2 自由度头部(偏航与俯仰)。
31 自由度 + 灵巧手安装了灵巧手的 31 自由度机器人。
29 自由度头部锁定的 VKH6,对应第五部分中的 29 关节策略。
29 自由度 + 灵巧手安装了灵巧手的 29 自由度机器人。

说明

  • 为了在手机上也能快速加载,网格做了轻量化处理;关节树、限位、惯量和坐标系与机器人原始 URDF 完全一致。
  • 完整精度的 URDF 与网格随强化学习运控仓库提供,位于 resources/elf3_dof29、resources/elf3_dof31 及对应的 _hand 目录(见第五部分)。
  • 也可以把自己的 URDF、Xacro 或 MJCF 文件夹拖入全屏查看器中查看。
  • 查看器基于范子琦开发的开源项目 Robot Viewer(Apache-2.0)构建。

操作指南

本文档包含 VKH6VKH6 机器人的开箱、基础操作、安全注意事项及二次开发相关说明。
在操作机器人之前请务必阅读并遵守《机器人安全须知及安全准则》


开箱说明

  1. 摆放与取出:正面朝上开箱,移除四周泡沫,至少两人配合抬出机器人。

    • 取出过程中一定注意线缆位置,避免压折或扯断。
    • 取出后,建议使用支架吊起机器人;或以平躺姿势放在平的地面上。
  2. 背板结构介绍:

    • 下图为机器人背板结构((待补充背板及充电口实物图))。
    • 上侧显示屏:为电压、参考电量和温度显示屏。按动显示屏右侧按钮亮屏,10秒后自动熄灭。
      • 电压值是判断电池状态的主要依据;屏幕上的电量百分比 / 电量格仅作参考,可能与实际剩余电量不一致。
    • 右下方:为整机电池的开关按钮。
    • 身体上方:为充电接口。
  3. 主机系统信息:

    • 机器人的主机操作系统为 Ubuntu 22。
    • Username: bxi
    • Password: 联系供应商获取

开机运行步骤

1. 打开电池电源 & 主机开机

  • 按电池电源按钮,电池正常供电,同时主机也会随之开机。此时请查看背板显示屏的电压值,电量百分比 / 电量格可能不准,以电压值为准。
  • 电压说明:
    1. 58V 新机器:背板显示屏显示的是电池组当前电压。充满电时,电压约 58.8V;随着使用时间增加,电压会逐步下降。若电压明显偏低(低于 50V),请先停止操作并充电。
    2. 48V 老机器:背板显示屏显示的是电池组当前电压。充满电时,电压约 48.8V;随着使用时间增加,电压会逐步下降。若电压明显偏低(低于 40V),请先停止操作并充电。

充电说明

验证充电器输出电压:可直接将充电器接上电源(不接机器人),检查充电器显示电压是否在供应商指定范围内:

  1. 48V 电池的老机器:推荐范围为 48.8V。若超出此范围,请先调节后再连接机器人充电。
  2. 58V 电池的新机器:推荐范围为 58.8V。若超出此范围,请先调节后再连接机器人充电。

注意:电量百分比 / 电量格显示可能不准确,开机和运动前请优先以电压值判断电池状态。

机器人背板充电口 充电器示意图
机器人背板充电口 充电器示意图

2. 连接遥控器手柄

将遥控器手柄和机器人 PC 机通过蓝牙连接。手柄出厂时已提前配对好。 - 直接长按 Xbox 按钮。 - 等待按钮下方指示灯常亮,即代表手柄和机器人 PC 机连接成功。

3. 运行控制程序

详细观看操作说明视频。
机器人自带的控制程序有若干模式:走路、零力矩、初始姿态、零位、高速奔跑、中速奔跑、跳舞、起身、前空翻 (不带假手运行) 、鼓掌、挥手等,并会持续更新。

重要:机器人起身运动前准备

  • 为了防止意外摔落,确保机器人通过挂绳挂在龙门架、或坐在椅子上、或正坐在地上。强烈建议使用吊架,并将机器人悬挂到合适高度。
  • 移除机身所有电线(例如充电头等),以防止在运动时发生拉扯;
  • 确保电池电压充足(以背板显示屏的电压值为准,55V以上为宜,不以电量百分比 / 电量格为准),以避免机器人因电池功率不足无法完成某些动作造成的摔落;
  • 运行过程中一定注意安全,机器人运动范围禁止有人,避免机器人的关节挥舞击中身体;

3.1 启动程序

重要:切换初始姿态前检查

  • 确保机器人的四肢未处于切换初始姿态时可能堵转的姿态。

(建议此时仍处于吊装状态):机器人开机后,等待约 30 秒,待系统启动完成后,向下点按右摇杆 (RS/R3) 启动机器人。观察机器人胸前灯,灯亮表明控制程序已经开始运行。此时默认进入零力矩模式。胸前灯亮起后,等待约 10 秒 完成自检,再控制机器人切换初始姿态、走路等模式。

3.2 初始姿态初始化

(建议此时仍处于吊装状态): - 同时按 RB + B,使机器人进入初始姿态。 - 检测机器人是否正常:简单观察各电机是否有异常(例如没有反应或发出异响等)。 - 将机器人站起:若一切正常,在此状态下将机器人站立起,双脚接触地面。操作人员应协助保持机器人初始姿态站立状态,避免外力破坏姿态初始化。

3.3 切换到运动状态

(此步骤初始姿态初始化已完成,最好仍处于吊装状态,切换成功并稳定后可以放开吊绳): - 走路状态:同时按 RB + X。机器人进入走路状态,此时可以在平地上全向移动。


停机与失能

4.1 终止停机 (失能按键)

  • 按start,控制程序会自动退出,机器人电机将立即失能 (掉电),机器人将因为重力自然摔倒。 > 注意:正常停机前,应该将椅子放置于机器人下方,或将机器人挂到龙门架/吊架上,确保机器人失能后不会重摔在地。
  • 再次启动:需要回到第 3.1 节重新启动程序。

手柄运动按键说明

remote_controller_front_view

遥控器电源指示灯颜色说明:常亮表示连接成功。白色表示 2.4G 无线连接,蓝色表示蓝牙连接,绿色表示 USB 有线连接;电池指示灯红色闪烁表示电量低。

遥控器档位切换说明:模式拨动开关位于遥控器底部/背面、USB-C 接口附近,共有 USB、BT、RF 三个档位。

  • USB:USB 有线连接模式,使用 USB-C 数据线连接 PC。
  • BT:蓝牙连接模式,用于通过蓝牙连接机器人 PC。
  • RF:2.4G 无线连接模式,需配合 2.4G USB 接收器使用。2.4G USB 接收器默认位于遥控器盒内。

remote_controller_vertical_view

移动方向控制

在走路、高速奔跑和中速奔跑状态下,可使用以下输入控制机器人移动:

键位 操作 控制效果
右摇杆 向前或向后推动 前进 / 后退
左摇杆 向左或向右推动 左平移 / 右平移
方向键 按下 ← 或 → 左旋转 / 右旋转

速度说明

机器人运动速度与摇杆推动幅度有关:摇杆推动幅度越大,速度越快;推动幅度越小,速度越慢。

模式等级 模式名称 按键组合 可切换的模式 备注
普通 走路 RB + X (除起身之外)所有模式 全向运动,一定的越障能力 (10-15厘米台阶)
普通 零力矩 RB + A 初始姿态 / 零位 关节无力矩输出,可随意转动
普通 初始姿态 RB + B 走路 / 零力矩 / 零位 / 起身 关节固定在初始姿态
普通 零位 RB + Y 初始姿态 / 零力矩 所有关节保持在零位
进阶 跳舞 LB + X 走路 / 零力矩 / 单按“X”键暂停或继续 结束后自动切回走路;暂停时机器人会移动来保持平衡(请确保机器人周围1米范围内没有障碍物)
进阶 起身 LB + A 零力矩 需机器人趴着或躺在地上时切换;起身后自动切回走路(请确保机器人周围1米范围内没有障碍物)
进阶 高速奔跑 LB + Y 走路 最高约 4 m/s,没有越障能力
进阶 中速奔跑 LB + B 走路 最高约 2 m/s,没有越障能力
进阶 前空翻 LT + Y 零力矩 需要前方 3 米范围内无障碍物;完成后自动切回走路 (不带假手运行)
普通 鼓掌 RT + B 走路 / 单按“X”键暂停或继续 完成后自动切回走路
普通 挥手 RT + A 走路 / 单按“X”键暂停或继续 不会自动回到走路

新手操作建议

首次操作时由于对机器人不熟悉,建议全程用手牵住机器人身上的挂绳,防止机器人在遇到障碍物或发生误操作时摔倒受损。操作之前务必熟悉遥控器按键位置。在机器人运行过程中若有任何异常,请及时按停止按钮,避免对人员、周围物体和机器人本身造成损坏。


使用自定义程序 (SDK) 控制机器人

本条适用于不使用预制程序及遥控器手柄,希望通过自定义算法、ROS 等程序控制机器人运动的开发者。

机器上的运行环境以及底层程序已经准备好,完全支持“开箱即用”。 - 配套 SDK 与 ROS2 示例链接: https://github.com/bxirobotics/bxi_rl_controller_ros2_example


装箱与运输说明

【补充:此处待插入装箱指导图片】

在闲置打包或运输时,请务必注意以下几点: - 避免限位:尽量使关节不要处于机械死区或极端的限位位置。 - 隔离保护:通过塞入原厂的泡沫缓冲件,避免金属壳体(特别是两个电机壳体之间)发生直接接触。以免在长途运输过程中因颠簸造成硬碰撞与壳体变形,进而引发内部电气故障。

安全须知及安全准则

一、安全须知

  1. 熟悉产品特性:首次使用机器人前,须完整查阅相关说明资料,全面掌握其功能参数、操作流程、限位范围及安全注意事项。
  2. 使用环境要求:将机器人放置于平坦、干燥、稳固且无障碍物的场地运行,严禁在以下环境使用:超出产品额定范围的高温、低温环境,潮湿、多尘、坡度超标、高低落差明显、地面易塌陷打滑、承载脆弱或振动强烈的区域。
  3. 定期维护:应定期对机器人进行状态检查,重点排查关节电机、传感器、电源系统等关键部件;发现部件老化、松动、损坏或运行异常时,须立即停机维修更换,严禁设备带故障运行。
  4. 掌握急停操作:使用前请提前确认并熟悉急停的触发方式,以便在突发情况下迅速停止机器人。急停触发后,机器人全身关节会失去支撑并软倒在地,因此需特别注意现场安全,急停后需要全程借助保护架进行防护。非必要情况下,请勿随意启用急停。
  5. 预留安全作业区域:机器人运行期间,应保证周围具备充足活动范围(建议半径>2米),与墙壁、固定障碍物、人员及贵重物品保持安全距离,避开狭小密闭空间、人员密集区域、杂物堆放区域,有效降低碰撞、夹挤、剐蹭等安全风险。
  6. 注意用电安全:开机前仔细检查供电线缆、插头、插座及设备供电接口是否完好,无破损、短路、松动等异常;设备运行过程中,若出现机身异常发热、线缆发烫、异味异响等情况,须立即切断总电源,排查排除故障后,方可重新启动设备。
  7. 避免不规范用途:请确保机器人仅用于合规、合理的应用场景,不得投入危险、违规或法律法规禁止的用途之中。

二、安全准则

1. 运行前检查

  • 开机启动或执行动作指令前,须彻底清理作业区域内的无关人员、杂物及各类障碍物,重点排查机械臂、活动关节、末端执行装置等运动部件周边,确保无任何干扰遮挡,杜绝运行中碰撞、误伤人员、损坏设备的风险。
  • 启动设备前,须核实机器人状态,确认系统上电自检流程全部顺利完成、无故障报错提示。

2. 操作规范与培训

参与操作的人员应事先接受必要培训,熟悉机器人的使用规范、操作方法以及异常情况处置流程,以减少因操作不当带来的安全风险。

3. 保持安全防护间隔

机器人运行期间,不得直接对其动作进行人为干预。所有人员须与机器人运行区域保持不小于1米的安全间隔。机器人执行快速运动、重载作业动作时,严禁人员停留在设备预期运动轨迹范围内,禁止近距离观察、伸手触碰运动部件。

调整、检修或手动处理机器人,必须先确保机器人已经完全停止,并处于断电状态后方可进行。

4. 额定负载与配件使用

  • 机器人应在其额定承载范围内使用,不得进行超出设计能力的负载操作。
  • 在使用末端执行装置、抓取机构或其他功能部件时,应保证其与目标物体相适配,避免因不匹配造成额外挤压、受力异常或部件损伤。

5. 异常情况应急处置

若机器人出现运行卡顿、动作异常、机身失控、异响异味、系统报错或其他突发危险状况,应第一时间通过遥控器执行紧急停机操作,以尽快终止设备动作。

6. 远程控制安全准则

  • 若机器人具备或正在使用远程操控功能,应尽量在可靠、安全的网络条件下进行操作,避免因网络中断、延迟或外部入侵影响控制稳定性。
  • 开展远程控制时,操作人员应配备实时监测手段,确保能够持续掌握机器人运行状态及现场环境情况,从而提升远程作业安全性。

三、声明

  1. 违反本安全须知及安全准则,造成人身伤害、设备损坏、财产损失及其他安全事故的,由相关责任人承担全部对应责任。
  2. 本安全规范将根据VKBOTS产品升级、场景拓展、规范更新适时修订。

控制系统架构

VKBOTS 提供全栈开放架构:

  • 基于CANFD的电机硬件控制|调试接口;
  • 基于Mujoco的仿真环境、机器人URDF/xml等;
  • 基于ROS2的硬件管理节点,控制策略无缝部署到仿真/真机硬件;
  • 基于强化学习的运控控制训练示例代码;

系统架构

CAN 总线与 CAN ID

机器人全身共有 31 个关节电机,分布在 5 路 CANFD 总线上。每路总线对应一个身体部位:

CAN 总线 接口名称 对应部位 电机数量
0 CANFD_0 腰部 / 颈部 Waist & Neck 5
1 CANFD_1 左腿 L_leg 6
2 CANFD_2 右腿 R_leg 6
3 CANFD_3 左臂 L_arm 7
4 CANFD_4 右臂 R_arm 7

下图为机器人 URDF 可视化模型,图上标注了各关节索引:

【补充:此处待插入标注关节索引的 URDF 可视化图片】

下表给出每个电机的关节索引、关节名称、CAN 总线与 CAN ID。其中:

  • 关节索引即控制程序中关节/电机数组的索引,从 0 开始全身连续编号;
  • CAN ID 为电机在所属总线上的地址,在每条总线内独立从 1 开始递增。
关节索引 关节名称 CAN 总线 CAN ID
0 waist_y_joint 0 1
1 waist_x_joint 0 2
2 waist_z_joint 0 3
3 l_hip_y_joint 1 1
4 l_hip_x_joint 1 2
5 l_hip_z_joint 1 3
6 l_knee_y_joint 1 4
7 l_ankle_y_joint 1 5
8 l_ankle_x_joint 1 6
9 r_hip_y_joint 2 1
10 r_hip_x_joint 2 2
11 r_hip_z_joint 2 3
12 r_knee_y_joint 2 4
13 r_ankle_y_joint 2 5
14 r_ankle_x_joint 2 6
15 l_shoulder_y_joint 3 1
16 l_shoulder_x_joint 3 2
17 l_shoulder_z_joint 3 3
18 l_elbow_y_joint 3 4
19 l_wrist_x_joint 3 5
20 l_wrist_y_joint 3 6
21 l_wrist_z_joint 3 7
22 r_shoulder_y_joint 4 1
23 r_shoulder_x_joint 4 2
24 r_shoulder_z_joint 4 3
25 r_elbow_y_joint 4 4
26 r_wrist_x_joint 4 5
27 r_wrist_y_joint 4 6
28 r_wrist_z_joint 4 7
29 neck_z_joint 0 4
30 neck_y_joint 0 5
关节索引与电机型号 CAN ID 分配

Domain ID

作用

机器人控制系统基于 ROS2 构建,ROS2 底层采用 DDS 进行节点通信。ROS_DOMAIN_ID 用于划分通信域:

  • 处于相同 Domain ID 的节点可以相互发现并收发话题/服务;
  • 处于不同 Domain ID 的节点彼此隔离,互不干扰。

当同一局域网内存在多台机器人,或同时连接多台调试主机时,如果它们使用相同的 Domain ID,话题数据会相互串扰,导致控制异常。为每台机器人分配独立的 Domain ID,即可将各机器人的 ROS2 通信网络相互隔离。

默认 Domain ID

机器人出厂已按以下规则配置默认 Domain ID,启动方式不同取值不同:

  • 手柄启动:ROS_DOMAIN_ID = 机器人代数 × 10 + 机器人序号。 VKH6 为第三代产品,代数为 3,因此 Domain ID 为 30 + 序号。
    • 例:elf3-15 → 3 × 10 + 15 = 45
    • 例:elf3-20 → 3 × 10 + 20 = 50
  • APP 启动:ROS_DOMAIN_ID 固定为 22。

设置方法

Domain ID 通过环境变量设置。在机器人主机或开发主机的终端中执行:

export ROS_DOMAIN_ID=45

如需开机自动生效,可将上述命令写入 ~/.bashrc:

echo "export ROS_DOMAIN_ID=45" >> ~/.bashrc
source ~/.bashrc

提示

  • ROS_DOMAIN_ID 取值建议范围为 0–101。
  • 上位机(开发主机)需与目标机器人设置相同的 Domain ID 才能与其通信。
  • 修改后需重新启动相关 ROS2 节点才能生效。

文档目录

  • 基于ROS2的控制策略部署框架,无缝部署到仿真/真机硬件:https://github.com/bxirobotics/bxi_rl_controller_ros2_example
  • 机器人URDF:https://github.com/bxirobotics/bxi_rl_controller_ros2_example/tree/main/resources

运动控制开发指南

本文档介绍 VKH6机器人运动控制的开发说明。

项目仓库地址(请仔细阅读 README):bxi_rl_controller_ros2_example

机器人主控根目录下的 bxi_ws 文件夹包含运动控制程序。


启动机器人程序

自启动逻辑说明

机器人主控上电后,默认由 systemd 自启动服务 ros_elf_launch.service 拉起机器人程序。启动链路分为以下两个环节:

  1. 自启动服务:ros_elf_launch.service 是开机入口,负责在后台启动遥控器程序remote_controller/remote_conroller_launch.py。
  2. 真机程序:遥控器程序remote_conroller_launch.py里面有启动真机程序的部分(即按下遥控器右遥杆启动),自启动的真机程序默认都在~/bxi_ws/bxi_rl_controller_ros2_example中

提示:调试单个 launch 或自定义节点前,建议先停止 ros_elf_launch.service,避免后台默认节点和手动节点同时运行产生冲突。

自启动服务管理

若当前不是 root 用户,请在 systemctl 前加 sudo。

# 查看服务状态
systemctl status ros_elf_launch.service

# 启动服务
systemctl start ros_elf_launch.service

# 重启服务
systemctl restart ros_elf_launch.service

# 停止服务
systemctl stop ros_elf_launch.service

# 设置开机自动启动
systemctl enable ros_elf_launch.service

# 取消开机自动启动
systemctl disable ros_elf_launch.service

手动启动 launch 或节点

绕过自启动服务手动调试前,建议先停止默认服务:

systemctl stop ros_elf_launch.service

启动仿真程序

source /opt/bxi/bxi_ros2_pkg/setup.bash
cd bxi_ws/bxi_rl_controller_ros2_example
source install/setup.bash
ros2 launch bxi_example_py_elf3 example_demo.launch.py

启动真机程序(注意安全)

与电机交互的程序需要 root 权限:

sudo su
source /opt/bxi/bxi_ros2_pkg/setup.bash
cd /home/bxi/bxi_ws/bxi_rl_controller_ros2_example
source install/setup.bash
ros2 launch bxi_example_py_elf3 example_demo_hw.launch.py

启动后电机状态

启动后电机会上电,全身电机指示灯变绿。机器人进入自检,若约 6 秒后绿灯未熄灭,说明自检通过。

启动遥控器程序

# 真机
sudo su
source /opt/bxi/bxi_ros2_pkg/setup.bash
cd /home/bxi/bxi_ws/bxi_rl_controller_ros2_example
source install/setup.bash
ros2 launch remote_controller remote_controller_launch.py

# 仿真
source /opt/bxi/bxi_ros2_pkg/setup.bash
cd ~/bxi_ws/bxi_rl_controller_ros2_example
source install/setup.bash
ros2 launch remote_controller remote_controller_launch.py

如果只需要启动单个节点,完成环境加载后使用:

ros2 run <package_name> <executable_name>

二次开发指南

选择合适的修改层级

需求 建议修改层级
需要自己控制机器人移动 新增自定义控制节点,向 /motion_commands 发布命令
需要修改机器人运动控制的模型 修改bxi_example_demo.py和程序example_demo_hw.launch.py

推荐从第 1 层级开始:保留官方运动控制程序,只替换发布 /motion_commands 的控制节点。仅在需要改变开机默认行为时,才修改自启动服务或其启动脚本。

各层级操作说明:

  1. 自定义控制节点:调试时先停止 ros_elf_launch.service 或默认遥控器节点,避免多个节点同时发布控制命令。
  2. 修改 launch文件和主程序:机器人启动的默认程序都在~/bxi_ws//bxi_rl_controller_ros2_example/src/bxi_example_py_elf3里面
    修改后重新编译、source 工作空间,再用 ros2 launch 或重启服务验证。

快速新增自定义控制器节点

第一步:停止自启动服务

systemctl stop ros_elf_launch.service
# 或者
killall remote_controller

消息类型说明

机器人启动后会订阅 /motion_commands 话题,消息类型为 communication/msg/MotionCommands(定义在 bxi_ros2_pkg 中):

std_msgs/Header header
    builtin_interfaces/Time stamp
        int32 sec
        uint32 nanosec
    string frame_id
geometry_msgs/Vector3 vel_des
    float64 x
    float64 y
    float64 z
float32 height_des
float32 yawdot_des
int32 mode
int32 btn_1  ... int32 btn_10
int32 axis_1 ... int32 axis_10

第二步:创建一个发布者

C++ 示例

1. 创建功能包

# 将 my_cpp_pkg 替换为你的包名
ros2 pkg create my_cpp_pkg --build-type ament_cmake --dependencies rclcpp std_msgs

2. 编写节点代码

在 src/ 目录下创建 main.cpp:

#include "rclcpp/rclcpp.hpp"
#include "std_msgs/msg/string.hpp"
#include <communication/msg/motion_commands.hpp>

using namespace std::chrono_literals;

class MotionCtrl : public rclcpp::Node
{
public:
    MotionCtrl() : Node("motion_ctrl")
    {
        publisher_ = this->create_publisher<communication::msg::MotionCommands>("/motion_commands", 20);
        timer_ = this->create_wall_timer(500ms, std::bind(&MotionCtrl::timer_callback, this));
    }

private:
    void timer_callback()
    {
        auto message = communication::msg::MotionCommands();
        message.header.stamp = this->get_clock()->now();
        message.header.frame_id = "";
        message.vel_des.x = 0.5;  // 前后速度
        message.yawdot_des = 0.5; // 旋转速度
        publisher_->publish(message);
    }

    rclcpp::Publisher<communication::msg::MotionCommands>::SharedPtr publisher_;
    rclcpp::TimerBase::SharedPtr timer_;
};

int main(int argc, char **argv)
{
    rclcpp::init(argc, argv);
    rclcpp::spin(std::make_shared<MotionCtrl>());
    rclcpp::shutdown();
    return 0;
}

修改 CMakeLists.txt,添加以下内容:

find_package(communication REQUIRED)
add_executable(cpp_node src/main.cpp)
ament_target_dependencies(cpp_node rclcpp std_msgs communication)

install(TARGETS
  cpp_node
  DESTINATION lib/${PROJECT_NAME}
)

3. 编译并运行

colcon build
source install/setup.bash
ros2 run my_cpp_pkg cpp_node

Python 示例

1. 创建功能包

# 将 my_py_pkg 替换为你的包名
ros2 pkg create my_py_pkg --build-type ament_python --dependencies rclpy std_msgs

2. 编写节点代码

创建 my_py_pkg/motion_ctrl.py(即 main.py):

import rclpy
from rclpy.node import Node
from communication.msg import MotionCommands


class MotionCtrl(Node):
    def __init__(self):
        super().__init__('motion_ctrl')
        self.publisher_ = self.create_publisher(MotionCommands, '/motion_commands', 20)
        self.timer = self.create_timer(0.5, self.timer_callback)

    def timer_callback(self):
        message = MotionCommands()
        message.header.stamp = self.get_clock().now().to_msg()
        message.header.frame_id = ''
        message.vel_des.x = 0.5   # 前后速度
        message.yawdot_des = 0.5  # 旋转速度
        self.publisher_.publish(message)


def main(args=None):
    rclpy.init(args=args)
    node = MotionCtrl()
    try:
        rclpy.spin(node)
    finally:
        node.destroy_node()
        rclpy.shutdown()


if __name__ == '__main__':
    main()

在 package.xml 中添加依赖:

<depend>communication</depend>

在 setup.py 中注册入口:

entry_points={
    'console_scripts': [
        'motion_ctrl = my_py_pkg.motion_ctrl:main',
    ],
},

3. 编译并运行

colcon build
source install/setup.bash
ros2 run my_py_pkg motion_ctrl

常见问题

1. 真机程序启动失败后如何查看日志

官方程序日志存放在 /var/log/bxi_log/,按时间排序,直接查找最新日志文件即可。

2. 自启动服务状态确认

systemctl status ros_elf_launch.service

服务状态示例

最简控制 VKH6 的 31 自由度

本文提供两种关节控制方式:只控制头部时,直接向 actuators_cmds_override 发布具名关节命令,不需要写代码;需要完整控制 31 自由度时,再创建一个只有 state.py 和 mod.yaml 的 Mod,在 on_update() 中直接生成轨迹。

示例基于 Mod API 4.0:

以下命令默认在框架代码仓库根目录执行。

运行前确认:真机默认是 29 自由度

真机硬件 launch 默认使用 enable_head:=auto,并从 /opt/bxi/robot_config.yaml 读取机器人模块配置。只有同时满足以下条件,才会启用两个头部关节并启动完整的 31 自由度硬件:

  1. /opt/bxi/robot_config.yaml 文件存在且能够正常读取;
  2. 配置中包含 modules.head.enabled: true。

最小配置结构如下。正式配置应使用 bxi_robot_config_tool 生成:

modules:
  head:
    enabled: true

以下任一情况都会使用内置默认值,启动不含头部电机的 29 自由度模式:

  • /opt/bxi/robot_config.yaml 不存在、不可读或内容格式错误;
  • 配置中没有 modules.head.enabled;
  • modules.head.enabled 为 false。

当前实现无论是否启用头部都使用同一个 hardware_elf3 包。启动日志中的 motor_disable 掩码可以确认头部电机是否启用:

# 启用头部;未叠加其他电机禁用位时
[bxi hardware config] package=hardware_elf3, motor_disable=0x00000000, ...

# 禁用头部;未叠加其他电机禁用位时
[bxi hardware config] package=hardware_elf3, motor_disable=0x60000000, ...

如果配置还禁用了其他电机,motor_disable 可能不是上面的完整示例值。判断头部状态时 只检查对应掩码:motor_disable & 0x60000000 == 0 表示头部启用, motor_disable & 0x60000000 == 0x60000000 表示头部禁用。不要再根据 hardware_elf3_head 与 hardware_elf3 的包名区别判断自由度模式。

29 自由度模式下,运行时关节布局中没有 head_z_joint 和 head_y_joint,因此下面的头部覆盖命令会因关节名未知而被拒绝。需要先生成正确的 /opt/bxi/robot_config.yaml,再重新启动真机程序。仿真使用的 VKH6 模型本身包含两个头部关节,不受这项真机硬件配置限制。

手动覆盖仅用于调试

硬件 launch 也支持 enable_head:=true 或 enable_head:=false 强制覆盖自动判定,但标准部署应以 /opt/bxi/robot_config.yaml 为准,避免软件配置与实际硬件不一致。

先在仿真中验证并选择正确的测试方式

关节覆盖和自定义 Mod 都会直接生成电机命令。真机测试前必须清空周围人员和障碍物、准备急停,并先使用小角度和较低增益验证关节方向。

机器人落地承重时,如需覆盖手臂或手部关节,必须先进入不依赖手臂维持平衡的模型,例如 com.bxi.basic_actions/hello(挥手)或 com.bxi.basic_actions/applause(鼓掌)。另一种方式是将机器人可靠吊装;使用 actuators_cmds_override 吊装测试时,底层状态只允许使用零位模式 initial_pos 或 PD 模式 pd_brake,禁止进入走路、挥手、鼓掌、跳舞等其他任何模式。

1. 无需写代码:覆盖头部关节

控制程序会在最终输出阶段读取 communication/msg/ActuatorCmds 类型的覆盖命令,并根据 actuators_name 只替换指定关节。其他关节仍由当前状态或策略控制,因此仅控制头部时不必创建 Mod,也不必发送完整的 31 维数组。

覆盖手臂或手部前先处理底层模型

actuators_cmds_override 只替换指定关节,不能让原有平衡模型自动适应新的手臂动作。机器人落地时,应先切换到不依赖手臂的 hello 或 applause,再开始发布手臂/手部覆盖命令。机器人吊装时不要进入这两个动作,只能停留在 initial_pos 或 pd_brake。

覆盖话题带有启动时的 topic_prefix:

环境 话题
仿真 /simulation/actuators_cmds_override
真机 /hardware/actuators_cmds_override

覆盖在零力矩状态下默认禁用。启动机器人并等待关节状态初始化后,先进入零位模式或正常控制状态。例如进入零位模式:

ros2 topic pub --once /motion_commands \
  communication/msg/MotionCommands "{btn_4: 1}"

ros2 topic pub --once /motion_commands \
  communication/msg/MotionCommands "{btn_4: 0}"

按钮事件触发后必须复位为 0

MotionCommands 的按钮事件采用上升沿检测,程序会保存每个事件上一次收到的值。通过 ROS 手工发送任意非零按钮值后,必须再向同一按钮槽位发送 0,使其回到释放状态。否则下一次使用该按钮槽位时可能无法产生新的上升沿。

以下命令以 20 Hz 覆盖两个头部关节。head_z_joint 和 head_y_joint 的目标位置分别为 0.20 rad 和 -0.10 rad:

# 仿真
ros2 topic pub -r 20 \
  /simulation/actuators_cmds_override \
  communication/msg/ActuatorCmds \
  '{
    actuators_name: ["head_z_joint", "head_y_joint"],
    pos: [0.20, -0.10],
    kp: [16.747, 16.747],
    kd: [1.066, 1.066]
  }'

真机使用相同消息,只需替换话题:

# 真机;执行前必须完成吊装并准备急停
ros2 topic pub -r 20 \
  /hardware/actuators_cmds_override \
  communication/msg/ActuatorCmds \
  '{
    actuators_name: ["head_z_joint", "head_y_joint"],
    pos: [0.20, -0.10],
    kp: [16.747, 16.747],
    kd: [1.066, 1.066]
  }'

actuators_name 决定命令中每个数组的关节顺序;pos、kp 和 kd 的长度必须与关节名数量相同。此处省略的 vel 和 torque 会按零处理。

默认覆盖超时为 0.2 s,因此不能使用 --once 长时间保持目标。停止上面的 20 Hz 发布命令后,覆盖会自动超时,并在 0.2 s 内混合回当前状态的输出。也可以主动发送空消息释放覆盖:

# 仿真;真机时将 simulation 替换为 hardware
ros2 topic pub --once \
  /simulation/actuators_cmds_override \
  communication/msg/ActuatorCmds '{}'

需要发布随时间变化的头部轨迹时,让自己的 ROS 节点持续发布相同消息即可;每条新消息会原子替换上一条覆盖命令。若需要状态机集成、全身轨迹或更复杂的控制逻辑,再使用下面的 Mod 方式。

2. 31 关节顺序

MotorFrame 的 qpos、kp 和 kd 必须使用同一个关节布局。示例的公式数组采用以下顺序,角度单位为弧度:

下标 关节名 下标 关节名
0 waist_y_joint 16 l_shoulder_x_joint
1 waist_x_joint 17 l_shoulder_z_joint
2 waist_z_joint 18 l_elbow_y_joint
3 l_hip_y_joint 19 l_wrist_x_joint
4 l_hip_x_joint 20 l_wrist_y_joint
5 l_hip_z_joint 21 l_wrist_z_joint
6 l_knee_y_joint 22 r_shoulder_y_joint
7 l_ankle_y_joint 23 r_shoulder_x_joint
8 l_ankle_x_joint 24 r_shoulder_z_joint
9 r_hip_y_joint 25 r_elbow_y_joint
10 r_hip_x_joint 26 r_wrist_x_joint
11 r_hip_z_joint 27 r_wrist_y_joint
12 r_knee_y_joint 28 r_wrist_z_joint
13 r_ankle_y_joint 29 head_z_joint
14 r_ankle_x_joint 30 head_y_joint
15 l_shoulder_y_joint

示例会给 MotorFrame 显式绑定这个布局。运行时布局只要包含相同的 31 个具名关节,顺序可以不同;框架会按关节名把命令映射到实际顺序。

3. 创建 Mod

此 Mod 没有平衡能力

本例的 on_update() 只生成各关节的目标位置和增益,没有使用 IMU、足底接触或平衡策略,也不具备站立平衡、抗扰动或跌倒保护能力。它只能让关节按照写死的公式运动,不能让机器人自行站稳。

为避免把“无平衡状态”和“吊装时只能保持零位或 PD”的规则混在一起,本教程只要求在仿真中运行该公式 Mod。真机只想验证关节动作时,使用上一节的 actuators_cmds_override:吊装机器人,并让底层状态始终保持 initial_pos 或 pd_brake。

cd ~/bxi_ws/bxi_rl_controller_ros2_example
mkdir -p src/bxi_example_py_elf3/mods/com.example.elf3_31dof

目录中只需要两个文件:

src/bxi_example_py_elf3/mods/com.example.elf3_31dof/
├── mod.yaml
└── state.py

4. 编写 state.py

import math

import numpy as np

from bxi_example_py_elf3.framework.mod_api import JointLayout, RobotControlState


ELF3_JOINT_NAMES = (
    "waist_y_joint", "waist_x_joint", "waist_z_joint",
    "l_hip_y_joint", "l_hip_x_joint", "l_hip_z_joint",
    "l_knee_y_joint", "l_ankle_y_joint", "l_ankle_x_joint",
    "r_hip_y_joint", "r_hip_x_joint", "r_hip_z_joint",
    "r_knee_y_joint", "r_ankle_y_joint", "r_ankle_x_joint",
    "l_shoulder_y_joint", "l_shoulder_x_joint", "l_shoulder_z_joint",
    "l_elbow_y_joint", "l_wrist_x_joint", "l_wrist_y_joint",
    "l_wrist_z_joint", "r_shoulder_y_joint", "r_shoulder_x_joint",
    "r_shoulder_z_joint", "r_elbow_y_joint", "r_wrist_x_joint",
    "r_wrist_y_joint", "r_wrist_z_joint", "head_z_joint",
    "head_y_joint",
)
ELF3_LAYOUT = JointLayout(ELF3_JOINT_NAMES, label="ELF3 31-DoF")


class Elf31DofState(RobotControlState):
    # 顺序与 ELF3_JOINT_NAMES 完全一致。前 29 项沿用零位模式增益,
    # 最后两项是头部关节增益。
    KP = np.array([
        500, 500, 300,
        300, 100, 100, 300, 50, 50,
        300, 100, 100, 300, 50, 50,
        100, 80, 80, 100, 20, 20, 20,
        100, 80, 80, 100, 20, 20, 20,
        16.747, 16.747,
    ], dtype=np.float32)
    KD = np.array([
        3, 3, 3,
        2.5, 2, 2, 2.5, 2, 2,
        2.5, 2, 2, 2.5, 2, 2,
        2.5, 2, 2, 2.5, 1, 1, 1,
        2.5, 2, 2, 2.5, 1, 1, 1,
        1.066, 1.066,
    ], dtype=np.float32)

    def __init__(self, name, state_id):
        super().__init__(name, state_id)
        self.elapsed = 0.0
        self.qpos = np.zeros(31, dtype=np.float32)

    def on_enter(self, ctx):
        if frozenset(ctx.robot_layout.names) != frozenset(ELF3_JOINT_NAMES):
            raise RuntimeError(
                "ELF3 关节集合不匹配: "
                f"expected={ELF3_JOINT_NAMES}, actual={ctx.robot_layout.names}"
            )
        self.elapsed = 0.0

    def on_update(self, ctx, dt):
        # 每周期从零位重新生成目标,避免把偏移逐帧累加。
        self.qpos.fill(0.0)
        phase = 2.0 * math.pi * 0.25 * self.elapsed

        # 写死的 31 自由度示例轨迹:腰腿保持零位,双臂和头部小幅摆动。
        self.qpos[15] = 0.15 * math.sin(phase)        # 左肩 y
        self.qpos[18] = 0.12 * math.sin(phase)        # 左肘 y
        self.qpos[22] = -0.15 * math.sin(phase)       # 右肩 y
        self.qpos[25] = -0.12 * math.sin(phase)       # 右肘 y
        self.qpos[29] = 0.10 * math.sin(phase)        # 头部 z
        self.qpos[30] = 0.06 * math.sin(2.0 * phase)  # 头部 y

        frame = self._motor_frame(
            ctx, self.qpos, self.KP, self.KD, layout=ELF3_LAYOUT
        )
        self._apply_frame(ctx, frame)
        self.elapsed += dt

关键点只有四个:

  1. qpos、KP、KD 都是长度为 31 的 float32 数组,并按 ELF3_LAYOUT 解释,因此该状态每周期都给完整机器人布局发送命令。
  2. phase 使用框架传入的 dt 累计,不依赖控制循环恰好运行了多少次。
  3. _motor_frame() 复用状态内部的 MotorFrame 缓冲,_apply_frame() 将其交给框架。
  4. 没有实现 EntryFrameProvider 或 RunningFrameProvider;所有轨迹只在 on_update() 中产生。

当前 MotorFrame 还支持 MIT 命令中的 vel 和 torque。本例调用 _motor_frame() 时没有提供这两个字段,框架会明确将它们填为零。

当前公式只让 6 个关节运动,但其余 25 个关节同样由 qpos=0 以及对应的 kp/kd 主动控制。需要改变动作时,直接修改 on_update() 中对应下标的公式;不要改变数组顺序。

5. 编写 mod.yaml

schema: 1
id: com.example.elf3_31dof
name: ELF3 31 自由度公式轨迹
version: 1.0.0
api: ">=4,<5"
enable: true
entrypoint: null
visibility: public
requires:
  - id: com.bxi.basic_actions
    version: ">=1,<2"
conflicts: []
python_exports: []
runtime_requirements:
  python: []
  ros: []
  system: []

events:
  activate:
    slot: btn_10
    value: 99

states:
  formula_31dof:
    factory: state:Elf31DofState
    label: 31 自由度公式轨迹
    priority: 100
    group: Customer
    icon: waves
    confirm: true
    confirm_message: 此示例没有平衡能力,仅限仿真运行

routes:
  - from: com.bxi.basic_actions/initial_pos
    event: activate
    to: formula_31dof

  - from: formula_31dof
    event: com.bxi.basic_actions/initial_pos
    to: com.bxi.basic_actions/initial_pos

两条 route 都故意不写 transition。项目的 elf3_state_machine.yaml 将 default_transition 配置为 instant,所以状态会立即切换,并从下一个控制周期开始执行目标状态的 on_update()。这就是本例“不用过渡”的含义;如果项目修改了系统默认值,可在两条 route 上显式写 transition: instant。

示例只允许从 com.bxi.basic_actions/initial_pos(零位模式)进入。这不仅用于减小即时切换时的目标差异,也是因为该公式轨迹没有平衡能力;不要为它增加从 normal、走路或其他动作状态进入的 route。btn_10=99 用于进入本状态;按零位模式键可返回。这里不使用 btn_10=10,因为该组合已经由 com.bxi.any_motion/activate 占用。

6. 构建和运行

colcon build --packages-select bxi_example_py_elf3 \
  --symlink-install --merge-install
source install/setup.bash

先启动仿真:

ros2 launch bxi_example_py_elf3 example_demo.launch.py

启动后先发送零位模式命令:

ros2 topic pub --once /motion_commands \
  communication/msg/MotionCommands "{btn_4: 1}"

ros2 topic pub --once /motion_commands \
  communication/msg/MotionCommands "{btn_4: 0}"

机器人进入零位模式后,发送 btn_10=99 进入公式轨迹状态:

ros2 topic pub --once /motion_commands \
  communication/msg/MotionCommands "{btn_10: 99}"

# 必须释放 btn_10,否则后续 btn_10 动作可能无法触发
ros2 topic pub --once /motion_commands \
  communication/msg/MotionCommands "{btn_10: 0}"

发送 btn_10=0 只负责恢复按钮的释放状态,不会退出已经进入的公式轨迹状态。

加载成功时日志中应出现:

[com.example.elf3_31dof]: loaded v1.0.0: .../com.example.elf3_31dof

状态完整名为 com.example.elf3_31dof/formula_31dof。

本教程中的公式轨迹 Mod 仅用于仿真演示,不应作为真机站立控制器。真机只需验证关节动作时,请改用 actuators_cmds_override;机器人吊装后底层状态只能保持 initial_pos 或 pd_brake。真机程序需要 root 权限,并应先停止后台自启动服务,避免两个控制程序同时向电机发送命令。启动方法见运动控制开发指南。

常见问题

提示关节布局不匹配

先查看 ctx.robot_layout.names 的实际值。顺序不同不影响控制,框架会按照 ELF3_LAYOUT 中的关节名自动映射;只有缺少关节或出现不同关节名时才需要按照实际硬件版本更新布局和三个 31 维数组。

状态可以进入但机器人不动

确认已经执行最新工作空间的 source install/setup.bash,并检查启动日志是否加载了 com.example.elf3_31dof。如果使用非 --symlink-install 构建,修改 Mod 后需要重新构建。

切换瞬间有突跳

这是即时切换的预期风险。先将机器人切到零位模式,并让 on_update() 在 elapsed=0 时生成与零位一致的 qpos。若需要从任意姿态平滑进入,应改用 Transition;这不属于本最简示例。

使用 Pinocchio 最简求解 VKH6 手臂 IK

本文使用 Pinocchio 的阻尼最小二乘法,将手腕目标位姿转换为 VKH6 单臂 7 个关节角。页面同时提供左臂和右臂资源。示例只做离线逆运动学计算,不启动 ROS,也不会直接控制电机。

IK 结果不能未经验证直接发送到真机

本例只应用 URDF 关节限位,不检查自碰撞、环境碰撞、速度、加速度、力矩或奇异位形。必须先检查是否收敛,并在仿真中验证轨迹连续性和安全性。

1. 下载示例资源

下载以下左右臂脚本和 URDF,并放在同一个目录中:

目录结构应为:

elf3_arm_ik/
├── elf3_arm_l.urdf
├── elf3_arm_r.urdf
├── pinocchio_ik_solve.py
└── pinocchio_ik_solve_r.py

两个 URDF 中都包含 STL 可视化和碰撞网格路径,但本例调用的是 pin.buildModelFromUrdf(),只构建运动学模型,不加载几何模型,因此运行最简 IK 不需要下载 STL 文件。

2. 安装 Pinocchio

建议在开发电脑的独立 Python 虚拟环境中运行,避免 Pinocchio 安装的 NumPy 版本影响 ROS 环境:

cd elf3_arm_ik
python3 -m venv .venv
source .venv/bin/activate
python -m pip install --upgrade pip
python -m pip install pin scipy

安装名与导入名不同

PyPI 包名是 pin,代码中的导入名是 pinocchio。不要把安装命令误写成 pip install pinocchio。

验证安装:

python -c "import pinocchio as pin; print(pin.__version__)"

本文已使用 pin 4.1.0、numpy 2.2.6 和 scipy 1.15.3 验证。其他兼容版本也可以使用。

3. 完整求解代码

左臂完整代码

下面的代码与可下载的 pinocchio_ik_solve.py 完全一致:

import numpy as np
import pinocchio as pin
from scipy.spatial.transform import Rotation as R


if __name__ == "__main__":
    # 从 URDF 创建机器人模型
    model = pin.buildModelFromUrdf("elf3_arm_l.urdf")
    data = model.createData()

    # 选择末端坐标系
    frame_id = model.getFrameId("l_wrist_z_link")

    # 设置目标位置和目标姿态
    target = pin.SE3(
        R.from_euler("xyz", [10, 0, 0], degrees=True).as_matrix(),
        np.array([0.1, 0, 0]),
    )

    # 初始关节角
    q = np.zeros(model.nq)

    max_iterations = 1000
    error_tolerance = 1e-5
    step_size = 0.1
    damping = 1e-6

    for i in range(max_iterations):
        # 正运动学,计算当前末端位姿
        pin.forwardKinematics(model, data, q)
        pin.updateFramePlacements(model, data)
        current = data.oMf[frame_id]

        # SE(3) 位姿误差:当前末端坐标系到目标坐标系的变换
        current_to_target = current.actInv(target)
        error = pin.log6(current_to_target).vector

        # 判断是否收敛
        if np.linalg.norm(error) < error_tolerance:
            break

        # 计算末端在局部坐标系下的雅可比矩阵
        jacobian = pin.computeFrameJacobian(
            model,
            data,
            q,
            frame_id,
            pin.ReferenceFrame.LOCAL,
        )

        # 将末端雅可比转换为 SE(3) 位姿误差的雅可比
        jacobian = -pin.Jlog6(current_to_target.inverse()) @ jacobian

        # 阻尼最小二乘法,计算关节角增量
        velocity = -jacobian.T @ np.linalg.solve(
            jacobian @ jacobian.T + damping * np.eye(6),
            error,
        )

        # 更新关节角,并限制在 URDF 给出的关节范围内
        q = pin.integrate(model, q, velocity * step_size)
        q = np.clip(q, model.lowerPositionLimit, model.upperPositionLimit)

    print(q)

用同一求解流程计算右臂

正文只保留一份完整代码。右臂的求解流程完全相同;可以直接下载 pinocchio_ik_solve_r.py,或者复制上面的左臂代码并只替换两处:

  • elf3_arm_l.urdf 改为 elf3_arm_r.urdf;
  • l_wrist_z_link 改为 r_wrist_z_link。

两个脚本的求解流程相同:

  1. 通过正运动学计算当前末端位姿。
  2. 使用 pin.log6() 得到 6 维 SE(3) 位姿误差。
  3. 计算末端局部坐标系中的雅可比矩阵。
  4. 使用阻尼最小二乘公式计算关节速度:
v = -Jᵀ (J Jᵀ + λI)⁻¹ e
  1. 使用 pin.integrate() 更新关节角,并裁剪到 URDF 限位。

末端坐标系的原点和朝向

左臂末端坐标系是 l_wrist_z_link,右臂是 r_wrist_z_link。根据随本文提供的简化 URDF:

  • 末端原点位于腕部 X、Y、Z 三个转轴的交点,不是手掌中心或指尖。wrist_y_joint 和 wrist_z_joint 的 <origin> 都是 xyz="0 0 0" rpy="0 0 0",因此这三个腕关节共用同一原点。
  • 这里的 base_link 是简化单臂模型的根坐标系,原点就在该侧肩部第一个转轴中心,并不是完整机器人位于躯干或地面的 base_link。所以计算结果若要用于完整机器人模型,必须先做坐标变换。
  • 当 7 个关节角全部为 0 时,末端原点相对这个 base_link 位于 (0.256, 0, -0.256) m:先从肩部沿 -Z 到肘部 0.256 m,再沿 +X 到腕部 0.256 m。左右臂的简化 URDF 在零位下相同。
  • 所有关节的固定 rpy 都是 0,因此零位时末端坐标轴与 base_link 完全平行:末端 +X/+Y/+Z 分别指向 base_link 的 +X/+Y/+Z。按 VKH6 使用的 ROS 机身坐标约定,即 +X 向前、+Y 向机器人左侧、+Z 向上。关节转动后,末端轴会随腕部一起旋转。

target.translation 的单位是米,表示目标末端原点在上述简化 base_link 中的位置。target.rotation 表示目标末端坐标轴相对 base_link 的朝向。示例中的 R.from_euler("xyz", [10, 0, 0], degrees=True) 表示目标末端绕 X 轴旋转 10°,不是只给某一个腕关节增加 10°。

4. 运行并读取结果

必须在资源文件所在目录运行,因为脚本使用相对路径读取 URDF:

cd elf3_arm_ik
source .venv/bin/activate

# 左臂
python pinocchio_ik_solve.py

# 右臂
python pinocchio_ik_solve_r.py

左右臂脚本使用相同的目标位姿,当前都输出:

[-0.18420714  0.14130363 -0.02609032 -0.95993     0.14621128  1.309
 -0.14385886]

左臂数组顺序由 elf3_arm_l.urdf 决定:

下标 关节名 结果(rad)
0 l_shoulder_y_joint -0.18420714
1 l_shoulder_x_joint 0.14130363
2 l_shoulder_z_joint -0.02609032
3 l_elbow_y_joint -0.95993
4 l_wrist_x_joint 0.14621128
5 l_wrist_y_joint 1.309
6 l_wrist_z_joint -0.14385886

右臂输出使用相同的 7 个数值,但按 elf3_arm_r.urdf 对应到:

r_shoulder_y_joint, r_shoulder_x_joint, r_shoulder_z_joint,
r_elbow_y_joint, r_wrist_x_joint, r_wrist_y_joint, r_wrist_z_joint

当前目标没有达到配置的收敛容差

使用原始参数运行 1000 次后,误差范数约为 0.1787,高于 1e-5。肘关节到达下限 -0.95993 rad,腕部 Y 关节到达上限 1.309 rad。脚本仍会打印最后一次迭代结果,因此“得到数组”不代表“成功到达目标”。

实际项目应在循环结束后重新计算误差,并且只有误差小于容差时才接受结果。若未收敛,可调整目标位姿、初始关节角、步长或阻尼。

5. 修改目标位姿

修改目标位置:

target_position = np.array([x, y, z])  # 单位:m,base_link 坐标系

修改目标姿态:

target_rotation = R.from_euler(
    "xyz",
    [roll, pitch, yaw],
    degrees=True,
).as_matrix()

组合为 Pinocchio 位姿:

target = pin.SE3(target_rotation, target_position)

7 自由度手臂对 6 维末端位姿存在冗余,同一目标可能有多组解。初始值 q、阻尼和步长会影响最终结果;连续轨迹通常应以上一帧解作为下一帧初值,避免关节角跳变。

6. 将结果用于关节覆盖

IK 结果只是关节目标。需要在仿真中验证时,可以使用 actuators_cmds_override 按关节名覆盖左臂。发布频率必须高于覆盖超时要求;当前默认超时为 0.2 s。

ros2 topic pub -r 20 \
  /simulation/actuators_cmds_override \
  communication/msg/ActuatorCmds \
  '{
    actuators_name: [
      "l_shoulder_y_joint", "l_shoulder_x_joint",
      "l_shoulder_z_joint", "l_elbow_y_joint",
      "l_wrist_x_joint", "l_wrist_y_joint", "l_wrist_z_joint"
    ],
    pos: [
      -0.18420714, 0.14130363, -0.02609032, -0.95993,
      0.14621128, 1.309, -0.14385886
    ],
    kp: [54.224, 54.224, 16.747, 54.224, 16.747, 16.747, 16.747],
    kd: [3.452, 3.452, 1.066, 3.452, 1.066, 1.066, 1.066]
  }'

按 Ctrl+C 停止持续发布后,覆盖会超时并混合回当前状态。也可以主动释放:

ros2 topic pub --once \
  /simulation/actuators_cmds_override \
  communication/msg/ActuatorCmds '{}'

真机使用 /hardware/actuators_cmds_override。控制右臂时,将命令中的 7 个 l_ 关节名替换为对应的 r_ 关节名。由于当前示例解包含两个限位值,不应直接用于真机。

头部屏幕说明

VKH6 头部显示屏用于显示机器人基础状态信息,可以做一些可爱的表情让机器人显的更活泼,二次开发时,该屏幕支持蓝牙和WIFI通信,可以无线传输数据,同时也支持触摸交互。

功能概览

头部显示屏可用于:

  • 机器人表情:做一些可爱的表情让机器人显的更活泼。
  • 数据显示:支持蓝牙和WIFI通信,可以无线传输数据。
  • 触摸交互:屏幕支持触摸,可编写交互程序。

硬件平台

头部显示屏基于 Waveshare ESP32-S3-Touch-LCD-2.1 触摸屏开发板,适合作为机器人状态显示和简单交互界面。

项目 说明
主控 ESP32-S3R8,Xtensa 32 位 LX7 双核处理器,最高 240MHz
屏幕 2.1 英寸触摸屏,480 × 480 分辨率,262K 色
存储 16MB Flash,8MB PSRAM
无线连接 2.4GHz Wi-Fi,Bluetooth 5 (BLE)
常用接口 USB Type-C、UART、I2C、Micro SD 卡座
板载资源 QMI8658 六轴传感器、RTC等

接口注意

进行硬件调试时,请先参考 Waveshare 官方手册确认接口使用限制,避免错误编写程序导致屏幕程序卡死,如果卡死无法烧录程序,可以参考官方手册里的步骤重新烧录固件

屏幕使用

在实机上,头部显示屏通过 USB 线 与机器人主控连接。该 USB 连接可用于屏幕程序烧录、调试

基本使用流程如下:

  1. 确认机器人整机电池电源已打开。
  2. 检查头部显示屏与机器人主控之间的 USB 连接是否可靠。
  3. 显示屏点亮就没问题

通信方式

当前实机默认采用 USB 有线连接,适合烧录、调试。屏幕硬件本身也支持 Bluetooth 5 (BLE) 和 2.4GHz Wi-Fi,但无线通信链路、通信协议和主控侧数据发送程序需要根据项目需求自行开发。

通信方式 当前用途 说明
USB 烧录、调试、主控连接 推荐作为默认开发和调试方式
Bluetooth 5 (BLE) 可扩展无线通信 需自行开发配对、数据协议和显示逻辑
2.4GHz Wi-Fi 可扩展无线通信 需自行开发网络连接、数据协议和异常恢复逻辑

二次开发指南

头部显示屏程序维护在 https://github.com/Luckyt1/bxi_show 仓库中。需要修改显示内容、页面布局、背光策略、通信方式或重新烧录固件时,建议按以下顺序处理:

  1. 阅读 bxi_show 仓库中的构建、烧录和依赖说明。
  2. 根据项目实际使用的开发框架,参考 Waveshare 的 Arduino 或 ESP-IDF 开发文档配置环境。
  3. 使用 USB 连接屏幕与开发主机,完成编译、烧录和串口调试。
  4. 烧录完成后,先在机器人静止状态下检查数据刷新是否正常,再进入运动调试流程。

常见可开发内容包括: - 有LVGL图形库,可以编写表情动作 - 调整电压、电量、温度等字段的显示布局。 - 增加机器人状态、网络状态或调试状态提示。 - 修改屏幕亮度、息屏时间和唤醒逻辑。 - 扩展BLE 或 Wi-Fi 数据通信。 - 增加异常状态的颜色、图标或文字提醒。

调试检查项

现象 可能原因 处理建议
屏幕不亮 整机电源未打开、屏幕未供电、USB 连接松动或固件未运行 检查电池电源、屏幕供电和 USB 线缆,必要时重启设备
屏幕亮起但数据不更新 主控侧数据未发送、通信异常或显示程序异常 检查 主控侧程序状态,必要时重启屏幕
烧录失败 USB 线异常、端口占用、驱动或下载模式异常 更换 USB 线或端口,关闭占用串口的程序,并按仓库说明重新进入烧录流程

参考资料

外接灵巧手

本文档面向需要在 VKH6 上快速接入 Revo2 灵巧手的客户,重点说明接线、依赖安装、编译运行和验收方法。二次开发接口、SDK 细节和完整示例代码请进入示例仓库查看:

安全提示

注意只有Revo2进阶版和触觉版支持58V电压,切勿把基础版接入机器人

运行示例程序会驱动灵巧手执行握拳、张开、捏合、单指运动、速度/电流/PWM 控制等动作。请先确认手指活动范围内没有人体、线缆和易损物体,不要在抓取物体时直接运行完整 demo。

适用环境

项目 要求
机器人 VKH6,已正常启动机器人硬件节点
灵巧手 Revo2 进阶版 && 触觉版
通信方式 VKBOTS 主控板 CANFD
ROS 版本 ROS 2 Humble
示例包 bxi_revo2_example
Python SDK bc-stark-sdk==1.5.1

示例包通过 ROS 2 的 communication/msg/CANFDPacket 与 VKBOTS CANFD 硬件节点通信,因此需要先加载机器人自带的 bxi_ros2_pkg 环境。

硬件连接

按默认配置接入时,不需要修改示例代码:

灵巧手 VKBOTS 主控板接口 默认 ID 协议 master_id
左手 CAN5 126 / 0x7E CANFD 1
右手 CAN6 127 / 0x7F CANFD 1

Revo2 灵巧手接线示意图

接线完成后,正常启动机器人。机器人硬件节点启动成功后,灵巧手通常会自动张开,可作为硬件链路的第一步检查。

快速部署

1. 获取示例包

在机器人主控或已配置 ROS 2 环境的开发主机上执行:

cd ~/bxi_ws
git clone https://github.com/konodoki/bxi_revo2_example.git

如果现场网络无法访问 GitHub,可提前下载仓库并复制到 ~/bxi_ws/bxi_revo2_example。

2. 下载 C++ SDK 文件

C++ 示例编译前必须下载官方 SDK 动态库和头文件,否则会因缺少 dist/ 目录构建失败。

cd ~/bxi_ws/bxi_revo2_example
./download-lib.sh

脚本会按当前系统架构下载对应文件,并生成:

  • dist/include/
  • dist/shared/linux/libbc_stark_sdk.so
  • VERSION

3. 安装 Python SDK

如果需要运行 Python 示例,安装固定版本 SDK:

pip install bc-stark-sdk==1.5.1 --index-url https://pypi.org/simple/

4. 编译示例包

cd ~/bxi_ws/bxi_revo2_example
source /opt/ros/humble/setup.bash
source /opt/bxi/bxi_ros2_pkg/setup.bash
colcon build
source install/setup.bash

提示

如果 communication 消息包位于其他工作空间,请先 source 对应工作空间的 install/setup.bash,再执行 colcon build。

启动与验收

1. 设置 CANFD 通信环境

灵巧手示例通过 /canfd_packet/rx 和 /canfd_packet/tx 与机器人硬件节点通信。由于硬件节点通常在 root 用户下运行,必须在 root shell 中设置相同的 ROS 2 Domain 和 CycloneDDS 网络配置,并在同一个 shell 中启动示例程序:

sudo su
export ROS_DOMAIN_ID=机器人的DOMAIN_ID
export RMW_IMPLEMENTATION=rmw_cyclonedds_cpp
export ROS_LOCALHOST_ONLY=0
export CYCLONEDDS_URI='<CycloneDDS><Domain Id="any"><General><Interfaces><NetworkInterface name="lo" multicast="true"/></Interfaces><AllowMulticast>true</AllowMulticast></General></Domain></CycloneDDS>'

将 机器人的DOMAIN_ID 替换为机器人实际使用的数字。不要只在普通用户终端设置这些变量后再切换到 root;sudo su 不会自动继承所有 ROS 环境变量。

2. 启动机器人硬件节点

先按 VKH6 正常流程启动机器人。可参考运动控制开发指南中的启动方式。

启动后检查 CANFD 通信话题是否存在:

source /opt/ros/humble/setup.bash
source /opt/bxi/bxi_ros2_pkg/setup.bash
ros2 topic list | grep canfd_packet

正常情况下应能看到类似话题:

/canfd_packet/rx
/canfd_packet/tx

3. 运行示例程序

运行 C++ 示例:

cd ~/bxi_ws/bxi_revo2_example
source /opt/ros/humble/setup.bash
source /opt/bxi/bxi_ros2_pkg/setup.bash
source install/setup.bash
ros2 run bxi_revo2_example bxi_revo2_example

或运行 Python 示例:

cd ~/bxi_ws/bxi_revo2_example
source /opt/ros/humble/setup.bash
source /opt/bxi/bxi_ros2_pkg/setup.bash
source install/setup.bash
ros2 run bxi_revo2_example bxi_revo2_example.py

3. 验收现象

程序运行后,终端会打印设备信息、手指位置、速度、电流和配置参数。灵巧手会依次执行:

  1. 基本位置控制:握拳、张开、单指移动;
  2. 速度、电流、PWM 控制;
  3. Revo2 高级控制:单位模式、位置+时间、位置+速度、多指联动;
  4. 内置动作序列:Open、Fist、Pinch、Point 等;
  5. 设备信息和参数查询。

默认程序会先运行左手,再运行右手。两只手均能完成上述动作且终端无持续报错,即表示基础部署完成。

修改默认接线或 ID

如果现场接线不是默认的 CAN5/CAN6,或灵巧手 ID 被修改过,需要在示例代码中同步修改总线和 ID。

Python 示例位置:

~/bxi_ws/bxi_revo2_example/src/bxi_revo2_example.py

默认配置:

left_ctx = await init_bxipci_device(5, 126, master_id=1, is_canfd=True, ...)
right_ctx = await init_bxipci_device(6, 127, master_id=1, is_canfd=True, ...)

C++ 示例位置:

~/bxi_ws/bxi_revo2_example/src/bxi_revo2_example.cpp

默认配置:

init_bxipci_device(&left_ctx_, 5, 126, true);
init_bxipci_device(&right_ctx_, 6, 127, true);

修改后重新编译并加载环境:

cd ~/bxi_ws/bxi_revo2_example
colcon build
source install/setup.bash

常见问题

编译时报缺少 stark-sdk.h 或 libbc_stark_sdk.so

未下载 C++ SDK。进入示例包目录执行:

./download-lib.sh

然后重新编译。

Python 运行时报 No module named bc_stark_sdk

Python SDK 未安装或安装到错误的 Python 环境。执行:

pip install bc-stark-sdk==1.5.1 --index-url https://pypi.org/simple/

运行时报 communication.msg.CANFDPacket not found

未加载 VKBOTS ROS 2 消息包环境。执行:

source /opt/bxi/bxi_ros2_pkg/setup.bash
source ~/bxi_ws/bxi_revo2_example/install/setup.bash

灵巧手无响应或读取超时

按以下顺序检查:

  1. 左手是否接在 CAN5,ID 是否为 126;
  2. 右手是否接在 CAN6,ID 是否为 127;
  3. 机器人硬件节点是否已启动,/canfd_packet/rx 和 /canfd_packet/tx 是否存在;
  4. 线缆和供电是否正常;
  5. 是否有其他程序正在同时控制同一只灵巧手。
  6. 若为出厂自带硬件节点请检查ROS_DOMAIN_ID是否一致

二次开发入口

客户部署时通常不需要修改底层通信桥接代码。若需要在自己的 ROS 2 节点中控制灵巧手,请参考示例仓库 README 中的 “在自己的 ROS 2 Node class 中使用” 章节:

https://github.com/konodoki/bxi_revo2_example

半身遥操

com.bxi.upper_body_teleop 是独立的 VKH6 Mod,自带 PICO 接入、MediaMTX、头部相机 RTSP、Pinocchio 双臂 IK 和运行库,仅依赖 com.bxi.basic_actions。不需要旧版 bxi_teleop_v2 或额外的 bringup 节点。

安全提示

真机运行前必须完成仿真验证,使用吊架或其他保护措施,清空双臂运动范围并保持急停可达。首次操作从小幅、低速动作开始。

安装

将 Mod 安装到不会被 App 更新覆盖的独立目录:

sudo mkdir -p /opt/bxi/mods
sudo git clone https://github.com/konodoki/com.bxi.upper_body_teleop.git /opt/bxi/mods/com.bxi.upper_body_teleop

更新已有仓库:

cd /opt/bxi/mods/com.bxi.upper_body_teleop
git pull --ff-only

旧项目若在内置 mods 或 private_git_mods 中已有同一个 Mod,必须备份并移出扫描目录,否则会因重复 Mod ID 拒绝启动。

启动

启动方式 工程目录 说明
手柄启动 ~/bxi_ws/bxi_rl_controller_ros2_example 源码目录;更新主工程后重新编译,Mod 从 /opt/bxi/mods 加载。
App 启动 /opt/bxi/bxi_rl_controller_ros2_example App 自动下载的预编译目录,不需手动编译,Mod 从 /opt/bxi/mods 加载。

正常启动机器人和控制程序后,进入 com.bxi.upper_body_teleop/upper_body_teleop 状态时,Mod 节点会自动启动。不要再运行旧版 elf3_arm_bringup_nohand.launch.py、pico_bxi_server 或 bxi_teleop_v2 脚本。

PICO 连接与校准

PICO 的连接和体感校准流程与 Sonic 相同:

  1. 将两个体感追踪器分别固定在左右腿上,按钮和指示灯一侧朝上并开机。
  2. 在 PICO 主界面打开 体感追踪器,确认两个追踪器已连接,点击 开始校准 并完成引导。
  3. 校准完成后点击 调整地面,将虚拟地面对齐实际地面。
  4. 打开 XRoboToolkit,在 Network → PC Service 中输入机器人的局域网 IP 并连接。
  5. 确认以下选项:
区域 选项 设置
Tracking Head 勾选
Tracking Controller 勾选
PICO Motion Tracker Mode Full-body
PICO Motion Tracker High-Acc 勾选
PICO Motion Tracker Num 2
Data & Control Send 勾选
  1. 确认 Network 状态为 WORKING,并且日志没有持续报错。之后再进入 Mod 状态并执行按键校准。

操作

  1. 在 normal 状态按遥控器 LB + LT + X(btn_10=17)进入半身遥操。
  2. PICO 开启 Body Tracking、Controller 和 Send,确认 XRoboToolkit 状态为 WORKING。
  3. 保持标准站姿,同时按 A+B+X+Y 校准;成功后自动进入 POSE,不需要按 A+X。
  4. 握紧左/右 grip 后,对应手臂开始跟随;松开 grip 后平滑回到 PD 站立姿态。
  5. 左右 trigger 控制对应夹爪。每次进入状态后夹爪会先进行低速限位校准。
  6. 需要重新校准时再次按 A+B+X+Y;校准期间双臂回到 PD 姿态。
  7. 退出使用系统标准事件返回 normal、PD brake、recover 或 zero-torque。

A+X 在当前 Mod 中不再切换跟随模式。PICO 暂时断连时,下半身继续由步态策略控制,双臂保持 PD 姿态。

图传

MediaMTX 和头部相机节点由 Mod 自动管理,默认地址为 rtsp://<机器人IP>:2212/video。PICO 应用在局域网中选择该地址即可,不需要单独运行图传脚本。

验收与故障排查

  • 日志应显示 mediamtx_server、head_camera_rtsp、pico_manager 和 arm_ik_bridge 自动启动;
  • A+B+X+Y 后自动进入 POSE,握 grip 时对应手臂跟随;
  • trigger 能控制对应夹爪,退出状态后子节点自动停止。

若提示重复 Mod ID,只保留 /opt/bxi/mods/com.bxi.upper_body_teleop,移出工程内旧副本。若没有 PICO 数据,唤醒头显、开启 Body Tracking 和 Send,并确认状态为 WORKING。

Sonic 全身遥操

本文档介绍如何在 VKH6 上部署和使用 Sonic 全身遥操功能,包括机器人端依赖安装、PICO 体感追踪器校准、XRoboToolkit 网络配置,以及全身动作跟随和退出流程。

安全提示

全身遥操会同时驱动机器人的腿部、躯干和双臂,操作不当可能导致机器人失稳或与周围人员、物体发生碰撞。首次使用前应清空机器人和操作者周围的活动区域,确认急停装置可用,并安排人员在机器人旁保护。

操作者应从幅度小、速度慢的动作开始,避免跳跃、快速转身、单脚站立以及超过机器人关节活动范围的动作。机器人出现抖动、姿态异常或失稳趋势时,应立即停止跟随;必要时按下急停按钮。

适用环境

项目 要求
机器人 VKH6,已正常启动运动控制程序
机器人端工程 手柄启动:~/bxi_ws/bxi_rl_controller_ros2_example;App 启动:/opt/bxi/bxi_rl_controller_ros2_example
输入设备 机器人遥控器、PICO 头显及左右手柄
体感设备 2 个腿部体感追踪器
PICO 应用 XRoboToolkit-PICO 1.1.1
网络 PICO 与机器人位于同一局域网,且可相互通信

选择工程目录

请根据机器人的启动方式选择对应工程目录。Sonic Mod 不要放入 App 工程目录或其 private_git_mods,而应安装到独立目录 /opt/bxi/mods;该目录不属于 App 下载包,App 更新时不会被覆盖。

旧项目迁移

部分旧版本工程已经在 src/bxi_example_py_elf3/mods 或 private_git_mods 内置了 Sonic。如果该旧副本和 /opt/bxi/mods/com.bxi.sonic 同时被扫描,运行时会发现重复的 Mod ID com.bxi.sonic 并拒绝启动。迁移前请先确认旧副本位置;建议先备份,再将旧副本移出扫描目录,然后只保留 /opt/bxi/mods/com.bxi.sonic:

mv ~/bxi_ws/bxi_rl_controller_ros2_example/src/bxi_example_py_elf3/mods/private_git_mods/com.bxi.sonic \
  ~/bxi_ws/bxi_rl_controller_ros2_example/com.bxi.sonic.backup

App 工程中的旧副本也应采用同样方式处理。不要在两个位置各保留一份可扫描的 Sonic。

启动方式 工程目录 编译要求
机器人手柄启动 ~/bxi_ws/bxi_rl_controller_ros2_example 源码目录;Mod 安装到 /opt/bxi/mods,更新 Mod 后重新编译。
App 启动 /opt/bxi/bxi_rl_controller_ros2_example App 自动下载的预编译目录;Mod 仍从 /opt/bxi/mods 加载,不需要手动重新编译。

下面命令中的工程路径应替换为与你的启动方式对应的目录。Sonic Mod 必须克隆到独立目录 /opt/bxi/mods/com.bxi.sonic。

机器人端准备

0. 克隆 Sonic Mod

Sonic Mod 独立维护在单独的仓库中。编译运动控制工程前,需要客户手动将其克隆到工程的私有 Mod 目录:

sudo mkdir -p /opt/bxi/mods
sudo git clone https://github.com/konodoki/com.bxi.sonic.git /opt/bxi/mods/com.bxi.sonic

如果目录已经存在,应单独更新该仓库:

cd /opt/bxi/mods/com.bxi.sonic
git pull --ff-only

主工程不会跟踪该目录。运行时会从配置的 /opt/bxi/mods 递归发现其中的 Mod;因此 App 更新工程后该 Mod 仍会保留。

1. 更新运动控制工程

将机器人上的 bxi_rl_controller_ros2_example 更新到最新版本:

cd /home/bxi/bxi_ws/bxi_rl_controller_ros2_example
git pull --ff-only

更新代码后,按照仓库 README 重新编译工程并加载环境:

source /opt/ros/humble/setup.bash
source /opt/bxi/bxi_ros2_pkg/setup.bash
cd /home/bxi/bxi_ws/bxi_rl_controller_ros2_example
bash build.sh
sudo systemctl restart ros_elf_launch.service

提示

如果现场版本通过其他方式统一部署,请使用对应的更新和编译流程。不要在工作区存在未提交修改时直接执行更新,以免覆盖现场配置。

2. 安装 Sonic 依赖

首次使用 Sonic 时,在机器人端进入 root 用户并安装 PICO 接入所需的 Python 依赖:

sudo su
python3 -m pip install -r /opt/bxi/mods/com.bxi.sonic/requirements-pico.txt

如果未配置代理,或使用默认 PyPI 源时下载缓慢、超时,可在上述 root 终端中使用清华大学 PyPI 镜像重试。以下命令将超时时间设为 120 秒,并禁用缓存:

python3 -m pip install \
  -r /opt/bxi/mods/com.bxi.sonic/requirements-pico.txt \
  -i https://mirrors.tuna.tsinghua.edu.cn/pypi/web/simple \
  --no-cache-dir \
  --timeout 120

依赖只需安装一次;更新工程后如果 requirements-pico.txt 发生变化,应重新执行该命令。

3. 安装 PICO 应用

下载 XRoboToolkit-PICO-1.1.1.apk,并将 APK 安装到 PICO 头显。安装完成后,可在 PICO 资源库的 未知来源 中找到 XRoboToolkit。

进入 Sonic 就绪状态

  1. 正常启动 VKH6,确认机器人已完成自检,并使用遥控器让机器人进入行走模式。此时机器人应保持正常站立姿态。

VKH6 处于正常站立状态

  1. 同时按下遥控器的 LB + RB + X,请求进入 Sonic 全身遥操状态。

  2. 等待机器人完成状态切换。进入 Sonic 就绪状态后,机器人会切换到下图所示姿态;机器人姿态稳定后,再开始 PICO 校准和动作跟随。

VKH6 进入 Sonic 全身遥操就绪状态

没有进入 Sonic 状态

请先确认机器人已经处于正常行走模式,再同时按下 LB + RB + X。如果仍无响应,请检查运动控制工程是否已更新、重新编译并正确加载。

校准 PICO 体感追踪器

每次开始全身遥操前都建议重新校准体感追踪器,以减少人体姿态和地面高度偏差。

  1. 将两个体感追踪器分别固定在左右腿上。追踪器的按钮和指示灯一侧应朝向身体上方,然后按下按钮开启追踪器。

  2. 戴好 PICO 头显并拿起左右手柄。在 PICO 主界面点击右下角的 体感追踪器。

在 PICO 主界面打开体感追踪器

  1. 确认两个腿部追踪器均已连接,然后点击 开始校准,按照头显中的引导完成校准动作。

确认追踪器连接并开始校准

  1. 校准完成后,点击 调整地面,按照提示将虚拟地面调整到实际地面位置。

调整 PICO 体感追踪的地面高度

  1. 观察界面中的虚拟人物。操作者活动头部、双手和双腿时,虚拟人物应同步变化,且双脚应基本贴合地面。

确认虚拟人物与操作者动作同步

连接 XRoboToolkit

  1. 返回 PICO 资源库,在 未知来源 中打开 XRoboToolkit。

在未知来源中打开 XRoboToolkit

  1. 确认 PICO 与机器人连接到同一局域网,并获取机器人的局域网 IP 地址。

  2. 在 XRoboToolkit 的 Network 区域点击 PC Service 右侧的 Enter,输入机器人的 IP 地址并连接。

  3. 按下表检查追踪和发送选项:

区域 选项 设置
Tracking Head 勾选
Tracking Controller 勾选
PICO Motion Tracker Mode 选择 Full-body
PICO Motion Tracker High-Acc 勾选
PICO Motion Tracker Num 设置为 2
Data & Control Send 勾选
  1. 确认 Network 区域的 Status 显示为 WORKING,日志中没有持续报错。

配置 XRoboToolkit 全身追踪和数据发送

校准姿态并开始跟随

  1. 操作者面向与机器人一致的方向,全身保持直立。双臂自然下垂,肘关节弯曲约 90°,前臂水平向前,使身体和双臂呈下图所示姿态。

Sonic 全身遥操初始校准姿态

  1. 保持姿态稳定,同时按下左右 PICO 手柄上的 A + B + X + Y 四个按键,完成 PICO 三点追踪与机器人参考姿态的对齐。

  2. 校准完成后,继续保持与机器人姿态和朝向一致,确认头显中的人体追踪没有明显漂移。

  3. 同时按下 PICO 手柄的 A + X,机器人开始跟随操作者的全身动作。开始跟随后先缓慢移动双臂,再小幅移动身体和双腿,确认动作方向正确。

  4. 需要暂停跟随并恢复默认姿态时,再次同时按下 A + X。

  5. 确认机器人已经停止实时跟随后,同时按下机器人遥控器的 RB + X,使机器人返回正常行走模式。

常用按键如下:

设备 按键 功能
机器人遥控器 LB + RB + X 从行走模式进入 Sonic 就绪状态
PICO 左右手柄 A + B + X + Y 校准人体追踪与机器人参考姿态
PICO 左右手柄 A + X 开始跟随;再次按下时恢复默认姿态
机器人遥控器 X 在未按肩键或扳机键时重置朝向对齐
机器人遥控器 RB + X 退出 Sonic 并返回正常行走模式

验收检查

完成部署后,应能观察到以下现象:

  1. PICO 体感追踪器界面中,两个腿部追踪器均显示已连接;
  2. 虚拟人物的头部、双手和双腿能够与操作者同步运动;
  3. XRoboToolkit 的状态显示为 WORKING,Mode 为 Full-body,且 Send 已勾选;
  4. 按下 LB + RB + X 后,机器人能够稳定进入 Sonic 就绪姿态;
  5. 完成 A + B + X + Y 校准并按下 A + X 后,机器人能够低延迟地跟随小幅动作;
  6. 再次按下 A + X 后机器人恢复默认姿态,按下 RB + X 后能够返回正常行走模式。

常见问题

XRoboToolkit 无法连接机器人

  • 确认 PICO 与机器人位于同一局域网;
  • 确认 PC Service 中填写的是机器人 IP,而不是 PICO IP;
  • 检查 IP 地址是否因网络切换发生变化;
  • 确认 XRoboToolkit 状态为 WORKING,并查看日志中的连接错误。

虚拟人物的腿部不跟随或脚底悬空

  • 检查两个腿部追踪器是否均已连接且电量充足;
  • 确认追踪器的按钮和指示灯一侧朝向身体上方;
  • 重新执行 开始校准 和 调整地面;
  • 确认 XRoboToolkit 中 Mode 为 Full-body、Num 为 2。

机器人无法进入 Sonic 就绪状态

  • 确认机器人已经完成自检并处于正常行走模式;
  • 确认按下的是 LB + RB + X 三键组合;
  • 确认工程已更新到最新版本并重新编译;
  • 首次使用时,确认 requirements-pico.txt 中的依赖已安装到机器人实际运行使用的 Python 环境。

完成校准后机器人不跟随

  • 确认 XRoboToolkit 的 Send 已勾选且状态为 WORKING;
  • 确认 PICO 体感追踪界面的虚拟人物可以正常跟随;
  • 保持初始姿态,重新按下 A + B + X + Y;
  • 等待校准完成后,再按下 A + X 开始实时跟随。

机器人动作方向与操作者不一致

先停止实时跟随,让操作者与机器人面向同一方向并重新校准。若仅朝向存在偏差,可在未按下肩键或扳机键时,单独按机器人遥控器的 X 重置朝向对齐。

跟随过程中出现卡顿或姿态跳变

停止大幅动作,并检查 PICO 与机器人的无线网络质量、追踪器连接状态和 XRoboToolkit 日志。恢复跟随前应重新确认初始姿态和周围安全;问题持续存在时,退出 Sonic 状态后重新校准和连接。

参考资料

VKH6 导航 App 使用教程

本文介绍如何为 VKH6 配置 Livox MID-360s 激光雷达,并通过 bxi_rc_app 完成建图、地图编辑和导览。

项目参考:bxi_nav

准备工作

  • 安装最新版 bxi_rc_app。
  • 准备一台已安装 Livox MID-360s 激光雷达的 VKH6 机器人。
  • 确保 bxi_rc_slam 包已更新至最新版本。
  • 使用网线连接电脑与雷达。
  • 确保作业区域安全、通道畅通,并尽量减少人员走动。

环境准备

本教程基于 Ubuntu 22.04 和 ROS 2 Humble。开始配置前,请先加载已安装 Navigation2 的 ROS 2 环境,并安装点云转激光扫描工具:

source /opt/ros/humble/setup.bash
sudo apt update
sudo apt install -y ros-humble-pointcloud-to-laserscan

安装完成后,可运行以下命令确认相关软件包已正确安装:

ros2 pkg prefix nav2_bringup
ros2 pkg prefix pointcloud_to_laserscan

如果命令能输出软件包的安装路径,说明环境准备完成。

1. 配置 Livox MID-360s 雷达

雷达无法启动时,通常是网络或雷达配置不正确。请先确认电脑与雷达处于同一网段,再检查配置文件。

1.1 配置静态 IP

将电脑网口设置为静态 IP,例如 192.168.1.51。建议使用网线直连雷达进行配置;在远程桌面环境中修改网络设置时,可能会遇到权限问题。

打开电脑的网络设置

将网口设置为静态 IP

1.2 修改雷达配置文件

配置文件路径:

bxi_rc_slam/src/livox_ros_driver2/config/MID360s_config.json

重点检查以下字段:

  • host_ip:电脑网口的静态 IP,例如 192.168.1.51。
  • ip:雷达 IP。MID-360s 的地址通常为 192.168.1.1xx,末尾两位可参考雷达机身二维码下方的数字。

如果无法查看机身信息,可在电脑与雷达处于同一网段后运行:

ros2 launch livox_ros_driver2 msg_MID360s_launch.py

从程序输出中确认雷达 IP,再填写到配置文件中。

配置示例:

{
  "lidar_summary_info": {
    "lidar_type": 8
  },
  "Mid360s": {
    "lidar_net_info": {
      "cmd_data_port": 56100,
      "push_msg_port": 56200,
      "point_data_port": 56300,
      "imu_data_port": 56400,
      "log_data_port": 56500
    },
    "host_net_info": [
      {
        "host_ip": "192.168.1.51",
        "cmd_data_port": 56101,
        "push_msg_port": 56201,
        "point_data_port": 56301,
        "imu_data_port": 56401,
        "log_data_port": 56501
      }
    ]
  },
  "lidar_configs": [
    {
      "ip": "192.168.1.128",
      "pcl_data_type": 1,
      "pattern_mode": 0,
      "extrinsic_parameter": {
        "roll": 0.0,
        "pitch": 0.0,
        "yaw": 0.0,
        "x": 0,
        "y": 0,
        "z": 0
      }
    }
  ]
}

修改配置后需要重新编译

保存配置后,请进入包含 install.sh 的工程目录,并使用 root 权限重新编译安装:

sudo /opt/bxi/bxi_rc_slam/install.sh

2. 使用导航 App

  1. 打开 bxi_rc_app,点击 我的设备。

在 bxi_rc_app 中打开我的设备

  1. 在设备列表中选择需要导航的机器人,进入机器人详情页。

在我的设备中选择需要导航的机器人

  1. 在机器人详情页中进入 地图管理。

在机器人详情页进入地图管理

2.1 建图

启动建图前保持机器人稳定

请将机器人头部摆正并保持机身稳定,避免大幅晃动导致 IMU 初始化异常。

  1. 进入 地图管理,点击 新建地图。

在地图管理页新建地图

  1. 启动机器人并保持走路模式。确认界面中能正常显示点云后,点击 开始建图。

确认点云后开始建图

  1. 站在机器人后方遥控机器人遍历目标区域,避免建图人员被扫描进地图。建图期间尽量减少现场人员走动。

  2. 地图覆盖目标区域后,点击 保存。等待界面确认地图保存成功,再退出建图页面。

完成建图并保存地图

2.2 编辑地图

  1. 在 地图管理 中选择刚刚保存的地图。

在地图管理页选择已保存的地图

  1. 进入导览编辑,切换到 航点,然后在地图上标记需要到达的位置。

在地图上添加航点

  1. 为每个航点设置机器人到达后的朝向,并根据需要填写航点名称。

设置航点名称和朝向

  1. (可选)如需机器人到达航点后执行指定行为,点击 添加动作,选择 语音、动作 或 延迟,完成配置后点击 添加。可根据任务需要为同一航点添加多个行为。

为航点添加到达动作

配置航点到达后的语音、动作或延迟

  1. 切换到 区域,点击 添加清除区。让清除区覆盖机器人的行走通道,用于清除地图中实际已不存在的障碍物。

为行走通道添加清除区

  1. 确认航点、朝向、到达行为和清除区设置无误,并等待地图保存成功。

2.3 开始导览

启动导览前保持机器人稳定

请将机器人头部摆正并保持机身稳定,避免大幅晃动导致 IMU 初始化异常。

  1. 返回机器人详情页,进入 运行模式,选择导览模式。

进入机器人的运行模式

  1. 选择需要使用的地图,并点击该地图的 开始。

选择地图并开始导览

  1. 点击 重定位。在地图上点击机器人的大致位置,并沿机器人当前朝向拖动定位标记。

  1. 检查机器人周围的红色点云是否与地图墙壁重合。重合后点击 确认;如果偏差明显,请重新调整位置和方向。

调整机器人位置和朝向完成重定位

  1. 点击 导航 开始执行导览任务。

启动导航任务

  1. 导览过程中如出现异常,立即点击 暂停 或 终止。也可以使用界面中的遥杆临时接管机器人,避免机器人继续偏离路线。

暂停、终止或手动接管导航

  1. 导览完成后,先停止导航,再退出当前页面。

常见问题

如何调整遥控速度

  1. 进入机器人遥控页面,点击右上角的 设置 图标。

在遥控页面打开设置

  1. 在设置页面中选择 控制,根据需要调整以下参数:

  2. 速度输出范围:限制前进和后退的线速度,同时作用于屏幕虚拟摇杆和外接手柄。

  3. 旋转输出范围:限制左右转向的旋转速度,同时作用于屏幕虚拟摇杆和外接手柄。

调整速度和旋转输出范围

调整后先在空旷、安全的区域低速测试,确认机器人运动符合预期后再逐步提高速度。

雷达无法启动

  • 确认电脑与雷达使用网线连接,并处于同一网段。
  • 确认 host_ip 与电脑网口的静态 IP 一致。
  • 确认 ip 与雷达实际 IP 一致。

地图中出现人员或动态障碍物

  • 建图人员应始终站在机器人后方。
  • 建图期间减少现场人员走动。
  • 对实际已不存在的障碍物,可在地图编辑中添加清除区。

重定位后点云与墙壁不重合

  • 重新选择机器人在地图中的位置。
  • 调整定位标记,使其方向与机器人实际朝向一致。
  • 确认红色点云与墙壁基本重合后,再开始导航。

任务操作算法开发

本文档包含 VKH6机器人manipulation开发说明。


pipeline简介

理论指引

训练环境

部署框架

VKBOTS Control App 使用指南(新版)

VKBOTS Control 是用于添加、连接和管理 VKBOTS 机器人的控制应用。本指南以当前 App 的页面与路由实现为准,适用于 Android 和 Windows 版本。

下载最新版本

Android 版本请从 VKBOTS 下载站的控制 App 页面 下载最新安装包。iOS 版本正在进行内部测试与优化,后续将正式开放。

安全第一

遥控、建图、导览、固件升级和远程协助都可能影响机器人状态。开始前请确认机器人周边无人、处于安全姿态,并保持供电和网络稳定。本指南的截图均来自测试环境;设备名称、地址和标识已脱敏。

第一次使用前先了解这些

如果这是你第一次使用机器人,建议先在有经验的现场人员指导下完成添加、配网和首次启动。本文中的“控制设备”指运行 App 的手机、平板或 PC;“机器人”指需要添加和控制的实体设备;“绑定”表示把该机器人保存到当前账号或当前控制设备中,以便后续重新连接。

首次使用时,请按下面顺序操作:

  1. 确认机器人已放在平整、开阔区域,周围没有人员、杂物或容易被碰倒的物品;
  2. 在控制设备上打开 VKBOTS Control,选择登录或本地模式;
  3. 使用 添加设备 扫描并绑定机器人,按提示完成 Wi-Fi 配网;
  4. 通过 Wi-Fi 连接 进入设备主页,先查看电量和状态自检;
  5. 如 App 提示固件较旧,请先完成固件升级;
  6. 仅在理解控制方式、现场安全且已获操作授权时,才进入遥控界面并启动机器人。

不确定时先不要启动

找不到机器人、看不懂某个提示、网络异常或机器人姿态异常时,先停止当前操作并联系现场负责人或技术支持。进入页面、查看状态或刷新列表通常不会让机器人运动;启动机器人、操作摇杆、升级固件和发起远程协助则可能改变机器人状态。

页面地图

入口 页面 用途 前置条件
首页 添加设备 查看开机、蓝牙和 Wi-Fi 配网引导 无
首页 我的设备 查看已绑定机器人,新增、连接和管理设备 本地模式或已登录
我的设备 连接方式 选择 Wi-Fi 或蓝牙直连 已选择机器人
设备主页 运行模式 进入遥控或导览模式 已建立连接
设备主页 状态自检 查看日志、电池、关节温度、3D 姿态和命令行 Wi-Fi 连接
设备主页 / 首页 固件管理升级 查看升级包、选择包并开始升级 设备在线、网络稳定
控制页 设置 配置控制、视频和开发者参数 无
首页 个人中心 工单、语言、检查更新、关于 VKBOTS 本地模式下部分服务需登录

地图管理

App 还提供地图列表、地图查看、地图编辑、建图、导览选择和导览执行页面。本轮文档按当前要求不继续操作或描述地图管理功能,后续可在具备独立测试环境时补充。

1. 首页

1.1 首次启动

首次启动时显示欢迎页。若已有 VKBOTS 账号,可填写手机号码、同意服务协议与隐私政策后获取验证码登录;首次在现场使用且暂时没有账号时,可点击底部的 进入本地模式。本地模式不会自动创建云端账号,但仍可连接已在本机绑定的机器人。

首次启动欢迎页

1.2 首页功能入口

完成登录或进入本地模式后进入首页。右侧依次提供 添加设备、我的设备、固件升级、状态自检 和 个人中心 入口;右上角的“本地模式”表示当前使用本机保存的设备绑定信息。

首页

云端模式与本地模式

项目 云端模式 本地模式
身份与数据 使用手机验证码登录;设备绑定关系从云端账号加载 无需登录;仅使用本机保存的绑定和维修凭据
设备协作 支持设备分享管理、扫码加入分享设备和账号服务 不支持通过分享码加入设备
服务功能 可使用工单、未读提醒和账号资料 工单会提示需要登录,账号服务不可用
控制能力 经账号授权后连接机器人 可直接连接已在本机绑定的局域网或蓝牙机器人
切换规则 登录后自动进入云端模式 必须先退出云端账号;切换时 App 会断开现有连接

本地模式适合离线或现场维护,设备关系主要保留在当前控制设备;云端模式适合多设备协作、账号管理和服务支持。首页右上出现 本地模式 标识时,表示当前处于本地模式。

2. 添加机器人

2.1 添加设备引导

点击首页的 添加设备。这一步是让控制设备认识并保存机器人,首次使用必须完成。开始前请准备:

  1. 开启机器人主控电源,并确保机器人处于安全位置。
  2. 在手机或平板上开启蓝牙与定位权限。
  3. 将控制设备连接到可用 Wi-Fi;Wi-Fi 控制时,控制设备与机器人应位于同一局域网。
  4. 点击 开始配对 进入附近机器人扫描页。

开机与蓝牙连接引导

2.2 扫描与选择蓝牙设备

扫描页会列出附近可发现的 VKBOTS 机器人及其信号强度。点击目标设备的 连接 后,按照页面指引完成配网或绑定。

找不到机器人

检查机器人是否已开机,控制设备的蓝牙和定位是否开启,并靠近机器人后点击 重新搜索。

选择要添加的机器人

2.3 配网与绑定流程

完成蓝牙连接后,App 会进入绑定流程:确认目标机器人、填写或选择 Wi-Fi 信息、等待机器人加入网络。可以把这一步理解为“先用蓝牙找到机器人,再告诉机器人要加入哪个 Wi-Fi”。绑定完成后,机器人会出现在 我的设备。

不要在配网过程中退出

凭据写入与网络切换期间请不要关闭 App、关闭蓝牙或给机器人断电;如失败,请从“添加设备”重新开始扫描。

3. 管理与连接设备

3.1 我的设备

我的设备 以卡片展示已绑定的机器人。点击卡片进入连接方式选择;右侧还可使用“配对新机器人”或“扫描维修凭证”等入口。卡片上的在线状态仅表示当前可发现性,不能替代现场安全检查。

我的设备

3.2 选择连接方式

选择机器人后,App 提供两种连接方式:

方式 适用场景 能力与限制
Wi-Fi 连接 控制设备与机器人在同一局域网 推荐方式;支持视频流、状态自检、地图和固件管理
蓝牙直连 无可用局域网或近距离基础控制 仅用于近距离基础控制;不支持视频流和部分网络功能

选择连接方式

3.3 Wi-Fi 自动扫描与切换网络

选择 Wi-Fi 连接(部分版本显示为“Wi-Fi 控制”)后,App 会先在手机、平板或 PC 当前连接的局域网内自动发现机器人。找到同网段的已绑定机器人后,即可建立控制会话并使用视频、状态自检及固件管理等网络功能。

若机器人需要切换到另一个 Wi-Fi 网络,无需先在 App 中手动填写旧网络信息:

  1. 先让手机或平板连接到目标 Wi-Fi;
  2. 回到该机器人的连接方式页,点击 Wi-Fi 连接 / Wi-Fi 控制;
  3. 当 App 发现机器人与控制设备不在同一网络时,会进入 Wi-Fi 配网流程;
  4. 按提示确认目标网络并完成配网,等待机器人接入后再重新发起 Wi-Fi 控制。

为什么先连接手机/平板的目标 Wi-Fi

App 以控制设备当前网络作为自动扫描和配网的目标网络来源。先切换控制设备网络,可减少手动输入 SSID 的需要,也能让 App 在完成配网后立即在目标局域网发现机器人。

3.4 设备主页

连接成功后进入设备主页。这里是当前机器人的功能入口。第一次连接成功后,建议先查看 固件管理升级,确认机器人状态与版本正常,再学习遥控:

  • 运行模式:选择遥控模式或导览模式;
  • 状态自检:查看机器人诊断数据;
  • 固件管理升级:检查并安装机器人软件包;
  • 右上角更多菜单:可进入设置或远程协助(视连接与权限而定)。

设备主页

4. 选择运行模式和遥控界面介绍

4.1 运行模式

在设备主页点击 运行模式,即可打开模式选择面板:

  • 遥控模式:使用虚拟摇杆或外接手柄控制机器人。第一次操作前,请先阅读下方遥控界面说明;
  • 导览模式:让机器人按预设路线巡游,需要先准备地图与路线。基础功能已经完成,正在进行内部测试和优化,后续将全量开放。

运行模式选择

4.2 遥控界面

进入 遥控模式 后,先不要操作摇杆。先确认视频或模型画面、网络和电量均正常,再按需要启用机器人。打开此页面不等同于启动机器人,也不会自动产生运动指令。

区域 说明
左上 返回控制入口;刷新视频 可在 Wi-Fi 控制时重新建立或刷新视频画面;状态检测 可进入机器人状态诊断。
顶部右侧 显示网络质量(Wi-Fi 时通常为 RTT,蓝牙时通常为 RSSI)和电池状态,并提供 启动机器人 / 停止机器人 按钮。
中央 主视图区域。可在实时视频与 3D 数字孪生模型视图之间切换,用于从不同角度观察机器人状态。它不是机器人型号切换。
左右下角 两个虚拟摇杆,用于平移、转向和高度等控制;仅在机器人已启动且操作环境安全时使用。
右侧功能岛 提供常用操作、控制设置,以及手柄状态覆盖层入口。

遥控界面

4.3 顶部功能与视图切换

左上角的 刷新视频 只用于刷新 Wi-Fi 控制下的视频流;画面未出现、卡住或网络恢复后需要重新拉取视频时可使用。蓝牙直连不提供视频流,因此不要将该按钮视为蓝牙连接诊断工具。

状态检测 是快速进入诊断的入口。它用于查看连接后机器人上报的状态;当发现电量、温度、关节或日志异常时,应先停止遥控操作、让机器人处于安全状态,再进入检查。

主视图旁的切换控件用于在 实时视频 与 3D 数字孪生模型 之间切换:

  • 视频视图更适合确认机器人周边环境、落脚区域和实际姿态;
  • 模型视图更适合观察姿态与关节状态;
  • 两种视图都是观察方式,不会改变机器人型号、运行模式或控制参数。

4.4 手柄、虚拟摇杆与控制设置

遥控页支持虚拟摇杆、键盘和外接手柄。外接手柄可使用 USB 或蓝牙连接到运行 App 的手机、平板或 PC;连接后,可从右侧功能岛打开手柄状态覆盖层,确认手柄已连接及输入是否正常。

在 设置 → 控制 中可配置手柄启用、灵敏度、死区、平移/旋转输出范围和握持模式。首次使用手柄时,建议先在机器人停止状态下查看输入反馈,再从低速度档位开始试用。

避免残留输入

切换页面、窗口失去焦点或改用其他控制方式后,请松开手柄或让虚拟摇杆回中,并确认机器人没有继续接收运动输入后再继续操作。

4.5 启动、停止与安全提醒

顶部右侧的 启动机器人 用于使机器人进入可执行控制指令的状态;按钮变为 停止机器人 后可用于结束该状态。网络质量和电池图标仅反映通信及电量信息,不能替代对现场与机械状态的判断。

启动前必检

仅当机器人位于空旷、平整且受控的区域时才可启动。启动前确认:人员和障碍物已离开运动范围;机器人姿态正常、无缠绕或悬空部件;电池和网络满足任务需要。启动后先以低速、小幅度验证控制方向。停止机器人后,也不要立即假定全部机械风险已消除,应等待机器人稳定并按现场安全规范处置。

启动与运动控制

只有在确认环境安全并了解摇杆映射后,才可点击 启动机器人 或操作摇杆。进入遥控页面本身不会启动机器人。

5. 设置

在遥控页右侧快捷设置入口,或从个人中心进入 设置。设置页含以下标签:

  • 控制:速度档位、摇杆灵敏度、摇杆死区、平移与旋转输出范围、手柄启用及握持模式;
  • 视频:视频质量和视频统计显示;
  • 开发者:仅在解锁开发者模式后显示,用于开发与排障。

左下角的 导入、导出与重置 可管理本地设置;导入前请确认配置来源可信。

控制参数设置

6. 状态自检

状态自检通过 Wi-Fi 连接读取机器人运行数据。它适合在第一次连接、遥控前或发现异常时确认机器人是否正常。首次进入时需要确认 DOMAIN_ID;这是机器人内部通信使用的编号,必须与机器人正在运行的 ROS 2 通信域一致。不确定该值时,请向现场技术人员确认,不要随意修改。

设置 DOMAIN_ID

诊断中心提供以下页面:

页面 内容 使用建议
日志 实时查看机器人日志 日志可能包含设备信息,导出前先检查内容
电池 电压、电流、温度与趋势 作为运行前检查的一部分
关节温度 各关节温度状态 出现异常温度时停止高负载操作
3D 姿态 数字孪生姿态视图 用于观察姿态和关节状态
命令行 SSH 终端 仅限具备维护权限的人员使用

电池诊断页

6.1 状态检测总览

左侧设备信息区用于确认当前诊断目标及数据流状态,右侧按“查看”和“工具”分组进入具体页面。若显示“等待数据”或某项显示暂无数据,通常表示机器人尚未上报对应诊断数据;此时应先检查 Wi-Fi 连接、DOMAIN_ID 和机器人服务状态,而不是反复执行遥控操作。

状态检测总览(设备信息已脱敏)

6.2 日志

进入 日志 可选择当前日志文件,并在页面内查看运行记录。日志常用于定位服务启动、连接、节点异常等问题;截图中的文件名和日志正文已脱敏。

日志包含敏感信息

日志可能包含机器人名称、IP 地址、目录、命令参数或运行标识。向售后或第三方发送日志前,请先确认其接收权限,并遮罩不必要的设备与网络信息。

日志页(内容已脱敏)

6.3 关节温度

关节温度 用于查看各关节上报的温度数据。页面的筛选和翻页控件可用于浏览温度记录;若出现持续高温、异常波动或无数据,应停止高负载运动并按维护流程检查。当前测试截图为“暂无数据”的正常空状态示例,实际数值取决于机器人是否已上报该数据。

关节温度页

6.4 SSH 命令行

点击 命令行 后,App 先显示 SSH 凭据页:填写已获授权的用户名和密码后,才可建立到机器人的安全命令行会话;“保存此机器人的密码”仅在需要本机记住凭据时选择。进入该页本身不会连接机器人,也不会执行命令。第一次使用机器人时通常不需要使用此功能。

仅限维护人员

SSH 命令可能修改机器人配置、停止服务或影响运行安全。仅在具备维护授权、清楚命令影响且机器人处于安全状态时使用;不要在文档、工单或聊天中分享密码、IP 地址、端口或完整终端输出。

SSH 命令行连接页(设备信息已脱敏)

7. 固件管理升级

设备主页的 固件管理升级 用于维护当前机器人;首页的 固件升级 提供多台设备的批量升级入口。

7.1 固件版本与加密要求

新版 App 检测到机器人仍使用旧版、未加密的固件时,会显示升级提示,并要求先进入固件升级流程。请先完成机器人固件升级,再使用连接、加密与共享等功能;升级过程中不要关闭 App、断开网络或移除机器人电源。

检测到旧版机器人时的升级提示(设备列表已脱敏)

加密与凭据保护

固件升级启用加密后,仍不要在截图、工单、日志或聊天中泄露 Wi-Fi 密码、SSH 密码、设备地址、蓝牙地址、令牌或会话标识。分享设备时,请使用 App 提供的授权与共享流程,并仅授予完成任务所需的访问权限。

7.2 检查升级包

进入页面后,App 读取每个软件包的当前版本、目标版本和下载大小。带有更新提示的软件包可单独升级,或加入“升级所选”。

固件管理升级

7.3 确认升级

点击单独升级或升级所选后,先核对将安装的软件包、版本和大小。确认页中的 开始升级 会实际向机器人提交升级任务。

确认升级

升级前检查

  • 机器人必须保持稳定供电和网络连接;
  • 升级时不要关闭 App、断开网络或强制重启机器人;
  • 升级完成后如页面提示需要重启,请在机器人静止且安全时执行;
  • 多台设备批量升级前,建议先在一台测试机器人上验证。

8. 远程协助

远程协助只在已通过 Wi-Fi 连接机器人时提供;蓝牙直连不显示该入口。

8.1 入口

  1. 进入目标机器人的设备主页;
  2. 点击右上角的 更多(三个点);
  3. 选择 远程协助。

App 会把当前机器人的地址、显示名称与序列号带入远程协助页,并尝试建立该机器人的网络会话。未选择当前机器人时,远程协助页会先显示局域网与历史设备列表,供用户选择目标设备。

设备主页中的远程协助入口

8.2 请求协助

远程协助页分为三个阶段:

  1. 连接机器人:确认目标设备在线并建立 WebSocket 会话;
  2. 检查状态:显示设备身份、机器人连接状态及网络连通性检查;
  3. 请求协助:阅读并同意授权说明后,点击“请求协助”向机器人发起协助请求,并在会话面板查看请求、进行中和关闭状态。

远程协助状态检查

点击 请求协助 后,App 会显示授权说明。说明中包含可授予给支持人员的权限:通过反向 SSH 隧道通信、读取必要的诊断信息(如系统日志、控制状态、传感器数据),以及在授权范围内启动或停止机器人服务。只有点击 同意并请求 才会真正创建会话。

远程协助授权说明

8.3 会话由机器人端维持

远程协助的通道在机器人端服务获授权后启动;手机、平板或 PC 端 App 负责发起授权、显示会话状态和提供关闭入口。会话可以跨 App 页面切换和网络重连恢复;即使 App 重启,只要机器人端会话仍有效,重新进入远程协助页后也能查询到状态。

这意味着协助建立后,控制设备无需一直停留在远程协助页面。但协助期间应保持网络可用,避免强制停止 App;要结束协助,请使用会话中的关闭操作。机器人下电或主动关闭会话后,通道会被销毁。

会话就绪后,状态面板会显示剩余可用时间,并提供 延时 +30 分 与 立即关闭。端口、剩余时间和连接标识均为动态会话信息,不应公开分享。

远程协助会话就绪状态

远程协助授权

请求协助前,请确认授权对象和现场状态。远程协助会开放排障所需的机器人会话;未明确授权时不要点击“请求协助”。会话进行中可隐藏状态面板,并通过页面浮动按钮再次打开。

9. 个人中心、关于与服务页

首页的 个人中心 包含以下功能:

  • 官网链接与工单入口;工单服务需要登录,且本地模式下会提示登录要求;
  • 语言切换;
  • 设置入口与手动检查 App 更新;
  • 关于 VKBOTS:应用版本、开源许可证、隐私政策、服务条款、导出个人数据和撤回隐私同意;
  • 已登录账户还可退出登录或注销账户。

开发者模式不会默认显示。当前实现中,连续点击“关于 VKBOTS”中的版本号可解锁开发者设置;该模式仅应由开发或维护人员使用。

9.1 工单服务

入口为 个人中心 → 工单服务。工单属于云端账号服务:本地模式会显示“需要登录”,登录后才可查看未读数、创建工单和与支持人员沟通。

工单列表显示工单号、主题、分类、关联机器人、状态和最后更新时间;支持人员有新回复时,个人中心会显示未读提示。打开工单详情会自动标记为已读。

创建工单时需要填写:

  1. 问题分类;
  2. 主题和详细问题描述;
  3. 联系邮箱;
  4. 关联机器人(从已绑定机器人选择,或手动填写机器人序列号);
  5. 可选附件,例如照片、日志文件。

提交后可在详情页查看处理状态和消息记录,继续回复并附加文件。问题解决后,用户可确认关闭已解决工单。

提交高质量工单

请写明机器人型号/序列号、App 版本、网络环境、复现步骤、发生时间和错误提示。上传日志或截图前请先移除密码、令牌、内网地址等敏感信息。

10. 页面覆盖与访问条件

当前 App 路由还包括登录、短信验证码、权限说明、设备绑定、单设备 OTA、批量 OTA、设备分享管理、远程协助、RL 控制器工作区、工单列表/新建/详情、隐私政策和服务条款页面。

这些页面受登录状态、设备是否已绑定、网络、机器人能力或开发者模式影响。若需要为这些受限页面补充发布级截图,请使用专用测试账户和隔离机器人,避免在生产机器人上触发绑定、分享、远程会话、升级或控制操作。


如遇连接或升级问题,请先记录 App 版本、机器人名称、网络环境和复现步骤,再通过个人中心的工单入口联系支持团队。

新版软件后端接口

本文说明自研 App 如何直接连接并控制 RC ROS2,以及 RC 在局域网和 BLE 上暴露的接口。本地控制方案不依赖账号登录、短信验证或 App 云服务。

阅读顺序

如果只是先把控制链路跑通,按下面顺序实现即可:

  1. 拿到 owner 凭据:有客户服务端时调用凭据接口,拿到 ownerKeyHex;不接入服务端时使用本地密码派生 deviceKey。
  2. 完成一次绑定:通过 BLE Provisioning,或使用第 5.3.1 节的加密 Wi-Fi 配对接口。
  3. 连接控制 WS:用 deviceKey 生成 HMAC query,连接 ws://<robot>:8081/。
  4. 发送控制帧:control.cmd_vel 的速度字段必须直接放在 payload 下;空闲时持续发送 control.heartbeat。

完整的 Python 示例在第 8 节。HTTP 地图、导航、OTA 等接口只需要复用同一个 deviceKey,但签名格式与 WS 不同。

安全边界

文档中的 UID、SN 和 key 都是示例。机器人云端凭据和服务端密钥不属于 App 控制接口,不得写入 App、源码或日志。

1. 接入架构与绑定状态

flowchart LR A[自研 App] S[客户服务端<br/>登录与凭据签发] R[RC ROS2<br/>本地网关] C[机器人云服务<br/>激活/心跳/日志] M[维修凭证] A -->|access token| S S -->|token + ownerKeyHex| A A -->|BLE BIND_START<br/>或加密 Wi-Fi bind| R A -->|WS/HTTP HMAC<br/>deviceKey| R A -.->|无服务端模式:密码派生 deviceKey| R M -->|临时鉴权覆盖| R R -.->|robot_token| C
  • 服务端凭据模式:App 登录客户服务端,服务端签发 token、ownerKeyHex 和 UID;App 只把绑定所需字段交给机器人。服务端的签名根密钥永远不下发。
  • 本地密码模式:App 不登录、不请求短信,也不调用任何服务端;使用本地密码派生 deviceKey,直接在 BLE 或加密 Wi-Fi 上绑定。
  • 绑定完成后,日常 WS、HTTP 和 BLE 控制都在 App 与 RC 之间进行,不需要每次访问服务端。
  • 机器人仍可使用自己的 robot_token 调用机器人云服务完成激活、心跳和日志上传;这条链路与 App 控制链路独立。
  • 本地绑定不需要在 RC 上打开环境变量开关,也没有临时认领时间窗。
  • App access token 和机器人 robot_token 都不能用作 RC 控制签名。

RC 只有三种持久绑定状态:

状态 binding_mode 含义
未绑定 unbound 可以进行首次云端绑定或本地密码绑定
云端绑定 cloud 由官方服务端签发 binding credential 完成绑定
本地绑定 local 由 App 和 RC 直接完成密码绑定,不创建云端用户关系

维修模式不是第四种绑定。它是有有效期的临时鉴权覆盖层,可以在机器人处于 unbound、cloud 或 local 时使用,不修改原绑定;维修凭证失效后自动回到原绑定的鉴权状态。

2. BLE Provisioning 协议

2.1 Provisioning GATT

UUID 基址:…-b1a1-4003-8000-000000000000。

服务/特征 UUID 尾号 属性 用途
Provisioning Service 00000001 service 配网与绑定
PROV_CMD 00000002 write App → RC TLV 帧
PROV_EVT 00000003 read/notify RC → App 响应

BLE legacy connectable ADV 会广播完整 Provisioning Service UUID 00000001-b1a1-4003-8000-000000000000,scan response 携带 Complete Local Name。App 应优先按该 UUID 筛选设备,再连接 GATT 并发送 HELLO;Control Service UUID 不在广播包中,需在连接后通过 GATT service discovery 获取。

默认广播名为 BXI_<hostname>;hostname 只保留字母、数字、- 和 _,名称最多 29 个 UTF-8 字节,超出部分会被截断。广播名只用于展示,不能作为设备身份;真实身份以 HELLO_ACK 返回的 SN 为准。

帧格式:

[version u8=0x03][op u8][seq u8][TLV...]
短 TLV: [tag][len<=0xFE][value]
长 TLV: [tag][0xFF][len u16 little-endian][value]
请求/响应 opcode
HELLO / HELLO_ACK 0x01 / 0x81
WIFI_SCAN / WIFI_LIST 0x10 / 0x90
WIFI_JOIN / WIFI_STATE 0x11 / 0x91
BIND_START / BIND_OK / BIND_FAIL 0x20 / 0xA0 / 0xA1
BIND_CANCEL 0x21
BIND_STATUS_GET / BIND_STATUS 0x22 / 0xA2
UNBIND / UNBIND_ACK 0x23 / 0xA3

2.2 HELLO_ACK

App 应先发送 HELLO,从 HELLO_ACK 读取真实 SN 和绑定状态:

TLV 类型 含义
0x01 UTF-8 SN
0x02 u8 bound_flag,0 未绑定,1 已绑定
0x03 16B device key fingerprint,右侧零填充
0x04 UTF-8 当前 IP
0x05 UTF-8 RC 固件版本
0x06 u32 LE 支持的 opcode bitmap
0x07 u8 binding_mode:0 未绑定,1 云端,2 本地
0x08 bytes 本地绑定 KDF salt;非本地绑定为空
0x09 u32 LE 本地绑定 KDF 迭代次数;非本地绑定为 0
0x0A u8 KDF ID;非本地绑定为 0

BIND_STATUS_GET 返回的 BIND_STATUS 使用以下字段:

TLV 类型 含义
0x01 u8 bound_flag
0x02 UTF-8 SN
0x03 u64 LE owner UID
0x04 u64 LE Unix 绑定时间
0x05 8B device key fingerprint
0x06 u8 binding_mode:0 未绑定,1 云端,2 本地
0x07 bytes KDF salt
0x08 u32 LE KDF 迭代次数
0x09 u8 KDF ID

3. 本地密码绑定

3.1 固定身份与密码派生

本地绑定使用固定 owner UID:

ownerUid = 2147483646

用户设置的密码必须为 8 到 64 个可打印 ASCII 字符,即每个字节均在 0x20..0x7e 范围。App 使用密码派生 32 字节 deviceKey:

KDF        = PBKDF2-HMAC-SHA256
password   = 密码的 UTF-8 字节
salt       = 密码学安全随机生成的 16 字节
iterations = 200000
dkLen      = 32 字节
KDF ID     = 1

credentialId 是本次本地绑定的唯一标识,长度为 1 到 128 个字符。它不包含密钥,可使用 UUID 或同等唯一随机字符串。

App 必须把 deviceKey 保存到系统安全存储,例如 Android Keystore、iOS Keychain 或 Windows Credential Locker。不能把密码、派生 key 或维修凭证写入日志、analytics 或普通明文配置。

3.2 BIND_START

App 必须先用 HELLO 读取 HELLO_ACK 返回的真实 SN,再发送:

BIND_START op=0x20
TLV 0x01 = 空;仅云端绑定使用 binding credential
TLV 0x02 = credentialId UTF-8
TLV 0x03 = HELLO_ACK.sn UTF-8
TLV 0x04 = deviceKey raw bytes,正好 32B
TLV 0x05 = bindMode u8 = 1,表示本地绑定请求
TLV 0x06 = ownerUid u64 LE = 2147483646
TLV 0x07 = KDF salt raw bytes,正好 16B
TLV 0x08 = iterations u32 LE = 200000
TLV 0x09 = KDF ID u8 = 1

RC 仅在机器人已经激活且当前为 unbound 时接受本地绑定。它不会用本地请求覆盖已有的 cloud 或 local 绑定,也不会因为云端同步而覆盖本地绑定。

成功后,RC 写入 binding_mode=local、sync_state=local_only 和 bind_method=ble_local_password_v1。BIND_OK 返回 SN、owner UID、credential ID、binding nonce、绑定时间和 key fingerprint,但不会返回 key。App 必须校验响应与本次请求一致后,才保存设备关系。

常见 BIND_FAIL:

码 含义
1 本地绑定字段、UID、key 或 KDF 参数不合法
4 已被其他 UID 绑定
5 机器人未激活
6 内部错误
8 持久化失败

3.3 已绑定机器人重新连接

另一台 App 要连接本地绑定机器人时,从 HELLO_ACK 或 BIND_STATUS 读取 salt、iterations 和 KDF ID,使用用户输入的同一密码重新派生 deviceKey,并校验返回的 fingerprint。校验成功后才能保存凭据并开始控制。

密码和 key 不会上传到云端,因此本地模式没有云端找回能力。丢失密码后,只能使用仍持有原 key 的客户端授权解绑,或通过受控维护流程清除本地绑定后重新绑定。

3.4 解绑与云端定向清除

已绑定时,持有当前 deviceKey 的 owner 可以发送经鉴权的 BLE UNBIND:

UNBIND op = 0x23
TLV 0x01  = ts,Unix 秒,u64 little-endian
TLV 0x02  = mac,16 bytes

payload = "unbind|" || UTF8(sn) || "|" || ts_le_8B
mac = HMAC-SHA256(deviceKeyRaw, payload)[0:16]

RC 接受与当前机器人时间相差不超过 60 秒的请求。已绑定时,TLV 缺失、时间超窗或 HMAC 不匹配都会被静默拒绝,RC 不返回 UNBIND_ACK,发送端应按超时处理;App 当前默认等待 5 秒。处于未绑定/factory 状态时,RC 直接返回 UNBIND_ACK。解绑成功后,RC 删除 binding.json 并清空本地分享授权记录。

  • 本地 App 解绑不会创建、删除或同步任何云端用户关系。
  • RC 心跳会报告 bindingMode;本地绑定时还会报告 localBindingCredentialId。
  • 管理端远程清除本地绑定时,RC 只接受 binding_mode=local 且 credential ID 与当前绑定完全一致的命令。陈旧命令不会删除后来重新创建的绑定。

4. 绑定后的 HMAC 鉴权

RC 的控制鉴权使用凭据 UID、机器人 SN 和 32 字节 key,不接受 App access token,也不使用机器人的 robot_token。普通控制使用绑定记录中的 owner 凭据;维修控制使用第 6 节的临时维修凭据。

4.1 WebSocket HMAC

message = ws|user_id|sn|ts|nonce
sig = Base64(HMAC-SHA256(deviceKeyRaw, UTF8(message)))

连接 query:

user_id=<UID>&client_id=<client-id>&sn=<SN>&ts=<Unix毫秒>&nonce=<随机值>&sig=<URL编码后的Base64签名>
ws://<robot>:8081/?user_id=42&client_id=app&sn=BXI-A1&ts=...&nonce=...&sig=...
ws://<robot>:8081/ws/signaling?user_id=42&client_id=video_v1&sn=BXI-A1&ts=...&nonce=...&sig=...

时间偏差不得超过 60 秒;每次连接使用新的 nonce。SN 必须与绑定记录一致,UID 必须在授权列表中。

4.2 HTTP v2 HMAC

bodyHash = lowercaseHex(SHA256(exactRawBodyBytes))
message = http.v2|UPPER_METHOD|PATH|bodyHash|user_id|sn|ts|nonce
sig = Base64(HMAC-SHA256(deviceKeyRaw, UTF8(message)))

请求 query 包含:

auth_v=2&user_id=<UID>&sn=<SN>&ts=<Unix毫秒>&nonce=<随机值>&sig=<URL编码后的Base64签名>

PATH 不包含 query。空 body 也必须计算 SHA-256。签名必须使用最终实际发送的原始 body 字节,不能在签名后重新格式化 JSON。

4.3 BLE 控制 HMAC

协议版本为 0x03,所有多字节字段为小端:

22B header: <BBHffffH>
            ver, auth, seq, vx, vy, wz, height, buttons

24B header: <BBHffffHBB>
            基础头 + btn_slot + btn_val

tag = first8Bytes(HMAC-SHA256(deviceKeyRaw, headerBytes))
frame = headerBytes + tag

auth:0 无 tag、1 HMAC4、2 HMAC8。生产使用 auth=2。每个 BLE 连接维护递增的 u16 seq,RC 使用半窗 0x8000 处理回绕和防重放。

4.4 离线分享访客鉴权

Owner 可以在本地签发 BXIS1.<base64url(JSON)> 分享码,让访客在不知道 owner deviceKey 的情况下使用 WS、HTTP 和 BLE。载荷字段为:

{
  "v": 1,
  "sn": "BXI-EXAMPLE-0001",
  "role": "co_owner",
  "iat": 1780000000,
  "exp": 1780000120,
  "epoch": 0,
  "jti": "每张分享码的唯一随机值",
  "k": "64位十六进制subkey",
  "sig": "Base64 HMAC-SHA256签名",
  "conn": {"i": "192.168.88.162", "p": 8081}
}

conn 是可选的连接提示,不参与签名。k 是交付给访客的连接子密钥;机器人不信任该字段,而是用本机 owner key 独立派生并比较握手签名:

shareKey = HMAC-SHA256(deviceKeyRaw, "bxi-share-key-v1|<epoch>")
tokenSig = Base64(HMAC-SHA256(shareKey,
           "bxishare.v1|<sn>|<role>|<iat>|<exp>|<epoch>|<jti>"))
subkey   = HMAC-SHA256(shareKey, "bxi-share-tx-v1|<jti>")
  • WS/HTTP 按第 4.1、4.2 节生成签名,但 key 改为 subkey,query 额外携带完整 share_token。
  • BLE 先向 CONTROL_GUEST_AUTH 写入 {user_id,sn,ts,nonce,sig,share_token} JSON proof;成功后该连接的 HMAC8 改用 subkey。
  • epoch 必须等于机器人 binding.json 中的 share_epoch;owner 增加 epoch 可一次吊销所有旧分享。
  • 首次在 exp 前成功连接后,机器人会登记该 jti。已加入访客之后可在滑动授权期内重连,当前默认 30 天,可由 BXI_SHARE_GRANT_TTL_SEC 调整;从未成功加入的过期分享码会被拒绝。
  • 分享码本身包含访客控制子密钥,应按密码处理,不得上传日志或 analytics。

5. RC ROS2 暴露的接口

接口 地址 鉴权 用途
控制 WebSocket ws://<robot>:8081/ WS HMAC 控制、遥测、状态
WebRTC signaling ws://<robot>:8081/ws/signaling WS HMAC 视频协商
HTTP REST http://<robot>:8082 HTTP v2 HMAC OTA、地图、导航、建图、巡游
加密 Wi-Fi 配对 http://<robot>:8082/api/v1/pairing/* X25519 + AES-256-GCM 建立配对会话、绑定、解绑
UDP 发现 UDP :8083 无 发现 IP、端口和 SN
BLE Provisioning GATT …0001 近场认领条件 配网、绑定、解绑
BLE Control GATT …0010 HMAC8 近场遥控
ROS 2 离线 TTS /tts/say、/tts/result ROS 2 Domain 提交播报请求并接收播放结果

5.1 UDP 局域网发现

App 向 UDP :8083 广播:

{"type":"discover"}

RC 每 2 秒广播,并对 discover 单播回复:

{
  "type": "beacon",
  "hostname": "robot_elf3_02",
  "port": 8081,
  "seq": 42,
  "sn": "BXI-EXAMPLE-0001",
  "pairing_protocol": 1
}

beacon 只用于发现,不能证明设备身份;后续连接仍必须验证 HMAC。

pairing_protocol=1 表示机器人支持第 5.3.1 节的加密 Wi-Fi 配对。局域网扫描还可建立一次无需 HMAC 的 ws://<robot>:8081/?user_id=probe 探测连接;RC 返回 {type:"welcome",user_id:"probe",session_id,hostname} 后立即关闭。该连接只能探测设备,不能发送控制命令。

5.2 WebSocket 控制

普通消息信封:

{
  "type": "control.cmd_vel",
  "ts": 1780000000000,
  "seq": 1,
  "payload": {}
}

App → RC:

type 主要 payload 用途
control.cmd_vel vx,vy,wz,height,mode,btn_1..btn_14 遥控;发送者成为当前控制者
control.heartbeat 无 保持控制链活跃
control.authz_set authorized_users[] owner 更新授权列表
control.preflight_abort 无 取消启动冲突操作
video.client_stats fps,loss_percent,rtt_ms,bitrate_kbps,width,height,freeze_count 每秒上报接收端视频质量,仅用于诊断和 video.stats;不会修改固定编码码率
ping / health ts? / 无 RTT 和健康检查
system.reboot / system.shutdown 无 特权电源操作
offer / candidate / bye WebRTC 字段 signaling
assist.request/cancel/status/extend 协助参数 远程协助
logs.list/open/close name/path/tail 日志查看
peek.set_domain / peek.clear domain_id / 无 设置或清除跨 ROS domain 查看

速度控制字段必须平铺:

{
  "type": "control.cmd_vel",
  "payload": {
    "vx": 0.2,
    "vy": 0.0,
    "wz": 0.1,
    "height": 1.0,
    "mode": "manual",
    "btn_1": 0,
    "btn_5": 1
  }
}

没有 control.acquire 或 control.release。通过鉴权的客户端发送 control.cmd_vel 即成为活动控制者;控制连接断开会触发安全停车。客户端应以小于 500ms 的间隔发送控制帧或 control.heartbeat。heartbeat 会生成 heartbeat_only ControlIntent,只刷新 deadman,不用零速覆盖正在运行的自主导航。

网关不再实现软急停或锁存复位:mode=2 和 safety_state=3 永久空缺,急停/冻结完全由运控处理。网关只保留链路 deadman:默认 1500ms 无 ControlIntent 后进入 STATE_TIMEOUT=2 并归零;叠加 2-tick 抗抖和 slew 减速后,最坏停车约 2.1 秒。

/ws/signaling 只接受 offer、candidate、bye、ping。logs.*、peek.*、电源和控制命令必须走普通 / 控制通道。

RC → App 常用消息:

type 用途
welcome 会话和机器人信息
telemetry.frame 电池、位姿、速度、模式、故障
control.status safety、启停和输入限制
control.manifest 动态按钮和状态机定义
control.state 状态机实时状态
control.authz_ack 授权列表更新结果
control.preflight_conflict 启动前检测到的冲突进程
control.controller_disconnected 当前控制者断开,通知其他客户端刷新控制状态
system.reboot.ack / system.shutdown.ack 电源命令受理结果
assist.status 远程协助隧道状态
logs.list_response / logs.chunk / logs.error 日志列表、内容分片和错误
peek.error 跨 ROS domain 查看启动失败
pong / health / error 通用响应
nav.* 地图、定位、路径、建图和巡游数据,详见下表
offer/answer/candidate/peer_failed/stop WebRTC signaling
video.stats / video.degraded 视频状态

nav.* 的完整类型:

nav.map                 nav.scan
nav.pose                nav.path.global
nav.costmap.global      nav.costmap.local
nav.footprint           nav.cloud
nav.status              nav.tour.status
nav.mapping.status      nav.runtime.status
nav.reloc_required

栅格和点云 payload 使用 gzip+base64。新控制连接建立时,网关会补发最近一份具有 latched 语义的导航状态。

数字孪生遥测使用长度前缀二进制帧而不是 JSON,首字节 tag 为:

tag 内容
0xB0 BMS
0xB1 关节温度
0xB2 关节位置,约 20Hz
0xB3 IMU 朝向

5.3 HTTP REST(端口 8082)

除 CORS OPTIONS 和下表三条 /api/v1/pairing/* 精确路由外,业务路由均使用 HTTP v2 HMAC。配对路由在尚无 deviceKey 时无法使用 HTTP HMAC,因此改用第 5.3.1 节的 X25519 会话和 AES-256-GCM 载荷保护:

请求 body 上限按路由区分:普通和 OTA 路由 64KB,地图与建图路由 8MB,gzip 栅格解压后最多 64MB。超过限制会被拒绝。

方法 路径 用途
POST /api/v1/pairing/session 创建 60 秒加密配对会话;无需 HTTP HMAC
POST /api/v1/pairing/bind 在配对会话内提交加密绑定载荷
DELETE /api/v1/pairing/binding 在配对会话内提交加密 owner 解绑证明
GET /api/v1/ota/releases?robot=ELF3 OTA 目录
GET /api/v1/ota/status OTA 状态
POST /api/v1/ota/start {robot,version,reboot_after,package_names?}
POST /api/v1/ota/reboot/precheck 重启前检查
POST /api/v1/ota/reboot {robot} 重启
GET /api/v1/maps 地图列表
GET /api/v1/maps/{id} 完整地图
GET /api/v1/maps/{id}/thumbnail.png 缩略图
GET /api/v1/maps/{id}/tile/{z}/{x}/{y}.png 地图瓦片
GET/PUT /api/v1/maps/{id}/{waypoints\|regions\|topology} sidecar 读写;waypoints 是默认路线
GET /api/v1/maps/{id}/routes 路线列表:{routes:[{id,name,updated_sec,waypoint_count}]}
POST /api/v1/maps/{id}/routes {name,source_route_id?} 复制路线,源路线默认 default;每张地图最多 64 条自定义路线,超限返回 409 route_limit_reached
GET /api/v1/maps/{id}/routes/{route_id} 读取 {id,name,updated_sec,waypoints,segments}
PUT /api/v1/maps/{id}/routes/{route_id} {name?,waypoints,segments?} 写入路线,返回 204
POST /api/v1/maps/{id}/routes/{route_id}/rename {name} 重命名路线
DELETE /api/v1/maps/{id}/routes/{route_id} 删除自定义路线;default 返回 409
POST /api/v1/maps/{id}/activate 激活定位和导航;返回 202 时仍在 localizing
POST /api/v1/maps/{id}/rename {name}
DELETE /api/v1/maps/{id} 删除地图;活动版本或存在子版本时返回 409
POST /api/v1/nav/initial_pose {x,y,yaw,frame_id?,cov?}
POST /api/v1/nav/goal {x,y,yaw?,frame_id?}
POST /api/v1/nav/cancel 取消导航
POST /api/v1/nav/pause {data:bool}
POST /api/v1/nav/retry 取消旧目标、清全局/局部 costmap,并重发最后一个单点导航目标
POST /api/v1/tour/start {map_id,waypoint_ids,route_id?,loop?,speed_scale?,waypoint_headings?};route_id 默认 default,速度比例 [0.2,1.0],waypoint_headings 将选中航点 ID 映射到有限弧度值
POST /api/v1/tour/{pause\|resume\|stop\|skip\|retry} 巡游控制;retry 保留当前航点并清图重规划
GET /api/v1/tour/status 巡游状态
GET /api/v1/tour/actions 当前 control.manifest 派生的导航动作目录
POST /api/v1/mapping/start {base_map_id?}
POST /api/v1/mapping/stop 停止建图
POST /api/v1/mapping/save {name,base_map_id?}
POST /api/v1/mapping/pause {data:bool}
POST /api/v1/mapping/clear_terrain {radius};radius 必须为正有限数
GET /api/v1/mapping/status 建图状态
PUT /api/v1/runtime/mode {mode,map_id?,request_id?};mode 为 idle、new_mapping、navigation 或 extend_mapping,后两者必须提供 map_id
GET /api/v1/runtime/status 运行模式和定位质量

地图 bundle 固定包含 manifest.json、map.pcd、map.pgm 和 map.yaml。只有旧二维 PGM/YAML 的 legacy_2d_only 地图不能激活、导航或续建,必须重新完成三维建图。续建会生成不可变子版本,并继承父版本的 waypoints、regions、topology 和自定义路线快照。

路线 ID 必须匹配 [A-Za-z0-9_-]{1,64}。默认路线 default 继续读写旧接口 /maps/{id}/waypoints,自定义路线保存在 <id>.routes/<route_id>.json;默认路线可重命名但不可删除。tour/status 和 WS nav.tour.status 都包含 route_id,旧状态缺少该字段时按 default 处理。新 App 遇到旧固件的 routes API 返回 404 时,只使用默认路线。

GET /api/v1/runtime/status 与 WS nav.runtime.status 的主要字段为:

current_mode, desired_mode, transition_id, active_map_id,
localized, fitness_score, inlier_ratio, driver_healthy, last_error

POST /api/v1/maps/{id}/activate 返回 202 只表示运行模式切换已接受,不表示定位完成。App 必须继续等待 active_map_id 正确、driver_healthy=true,并以 nav.reloc_required.required=false 作为重定位成功的权威信号;localized=false 时不得发送导航目标或启动巡游。

5.3.1 加密 Wi-Fi 配对

只有下列三个精确的方法与路径绕过 HTTP v2 HMAC;其他 /api/v1/pairing/* 请求不会获得配对旁路。应用层载荷仍经过加密和认证。

POST /api/v1/pairing/session 的明文握手 body:

字段 说明
protocol 固定为 1
mode cloud 或 local
client_public_key Base64 编码的 32B X25519 公钥
client_nonce Base64 编码的 16B 随机数
capability_payload 未绑定机器人使用 cloud 模式时必填;云端绑定 token 的 payload 部分
auth 已绑定且非恢复会话时必填;见下方 HMAC
recover 仅本地绑定恢复读取时可设为 true;该会话不能绑定或解绑

已绑定会话的 auth 为小写十六进制 HMAC-SHA256:

HMAC(deviceKey, "wifi-session-v1|" || mode || "|" ||
     client_public_key_bytes || "|" || client_nonce_bytes)

成功响应包含 protocol、32 位十六进制 session_id、Base64 robot_public_key、Base64 robot_nonce、expires_at、Base64 12B nonce 和 ciphertext。会话密钥按以下规则派生:

shared = X25519(client_private_key, robot_public_key)
session_key = HKDF-SHA256(
  IKM  = shared || PSK,
  salt = client_nonce || robot_nonce,
  info = "bxi-wifi-pairing-v1|" || hex_decode(session_id),
  len  = 32
)

PSK 取值:已绑定且非恢复会话使用 deviceKey;未绑定 cloud 会话使用绑定 token 的 Base64 签名字节;未绑定 local 或只读恢复会话为空。

POST /api/v1/pairing/bind 和 DELETE /api/v1/pairing/binding 的请求与响应均使用以下信封:

{"session_id":"32位十六进制","nonce":"Base64 12B","ciphertext":"Base64 AES-GCM 密文与 tag"}

AES-256-GCM 的明文必须是 UTF-8 JSON 对象;RC 生成响应时使用无空白、键排序的规范 JSON。AAD 必须逐字节为:

bxi.pairing.v1|<HTTP_METHOD>|<PATH>|<session_id>

bind 解密后的载荷:

  • cloud:sn、credential_id、32B 十六进制 owner_key、完整 token;
  • local:sn、owner_uid、credential_id、32B 十六进制 owner_key、kdf_salt、kdf_iterations、kdf_id。

binding 解绑载荷为 proof,其值是以下 HMAC-SHA256 的十六进制结果:

HMAC(deviceKey, "wifi-unbind-v1|" || session_id || "|" || sn)

会话有效期为 60 秒;执行一次 bind 或 binding 请求后即被消费,不能重放。

5.4 BLE Control GATT

服务/特征 UUID 尾号 属性 用途
Control Service 00000010 service BLE 控制
CONTROL_CMD 00000011 write/write-without-response HMAC 控制帧
CONTROL_GUEST_AUTH 00000012 write 访客授权证明
CONTROL_STATUS 00000013 read/notify 3B 状态帧
CONTROL_MANIFEST 00000014 read/notify 动态按钮 manifest
CONTROL_SM_STATE 00000015 read/notify 状态机状态

CONTROL_CMD 推荐发送 24B 扩展头;RC 仅为兼容旧 App 继续接受没有 btn_slot、btn_val 的 22B 基础头:

[ver u8=0x03][auth u8][seq u16 LE]
[vx f32 LE][vy f32 LE][wz f32 LE][height f32 LE]
[buttons u16 LE][btn_slot u8][btn_val u8][HMAC tag]

auth=0/1/2 分别表示无 tag、HMAC-SHA256 截断 4B、截断 8B;HMAC 覆盖完整的 22B 或 24B 头。默认已绑定机器人要求 auth=2,未绑定出厂态只接受 auth=0。seq 为防重放的单调 u16;普通按钮使用 buttons 位图,多值动作使用 btn_slot 和 btn_val。

CONTROL_MANIFEST 和 CONTROL_SM_STATE 使用分块传输,每块约 180B:

[total_len:u16 little-endian][offset:u16 little-endian][chunk...]

接收端按 offset 写入缓冲区,累计到 total_len 后再解析完整 JSON。

状态帧:

[ver u8=0x03][flags u8][safety u8]

flags:0x01 RUNNING、0x02 LOCKED、0x04 FAILED、0x08 PENDING、0x10 UNAUTHORIZED、0x20 PREFLIGHT_CONFLICT。PREFLIGHT_CONFLICT 表示启动前检测到残留机器人进程,App 应先确认,再重发强制启动动作。

5.5 ROS 2 离线 TTS

bxi_offline_tts 订阅 /tts/say,消息类型为 std_msgs/msg/String。直接发送文本时默认使用女声;如需显式选择音色,请将 data 设置为 JSON 字符串。

JSON 字段 类型 说明
text string 要播报的文本,必填
voice string female(女声)或 male(男声);默认 female
speed number 语速范围 0.5~2.0;默认 1.0
# 女声(默认)
ros2 topic pub --once /tts/say std_msgs/msg/String "{data: '欢迎参观'}"

# 显式指定女声
ros2 topic pub --once /tts/say std_msgs/msg/String \
  "data: '{\"text\":\"欢迎参观\",\"voice\":\"female\",\"speed\":1.0}'"

# 指定男声
ros2 topic pub --once /tts/say std_msgs/msg/String \
  "data: '{\"text\":\"欢迎参观\",\"voice\":\"male\",\"speed\":1.0}'"

实际播放结束或失败后,节点通过 /tts/result 发布 std_msgs/msg/String JSON 结果:

{"text":"欢迎参观","success":true,"message":""}

导览路线的 waypoint actions 也可选择音色:

{"id":"say-welcome","type":"voice","content":"欢迎参观","voice":"male"}

voice 省略时按 female 处理;导览语音动作当前固定使用 speed=1.0。

6. 维修模式

维修模式用于出厂测试、返修和现场服务。它不关心机器人当前是未绑定、云端绑定还是本地绑定,也不会改写 binding.json、云端成员或原 owner。维修凭证有效时优先用于该维修会话;凭证失效后,机器人继续使用原有绑定鉴权。

6.1 在机器人上生成凭证

在机器人终端使用随部署安装的包装脚本:

sudo /opt/bxi/bxi_rc_ros2/scripts/bxi_maintenance.sh enable
sudo /opt/bxi/bxi_rc_ros2/scripts/bxi_maintenance.sh enable --minutes 120
  • 默认有效期为 1440 分钟,即 24 小时。
  • 可设置 30 到 10080 分钟,即最长 7 天。
  • 命令生成 /var/lib/bxi/maintenance.json,文件权限为 0600,并只在创建时输出一次 BXIM1. 开头的文本凭证。
  • stdout 是交互式终端且已安装 qrencode 时,命令还会输出完整 ANSI UTF-8 二维码;文本凭证始终会输出。
  • App 可通过扫码或受保护的复制方式导入完整凭证;不需要账号登录、短信验证码或云端批准。

包装脚本默认使用 /opt/bxi/bxi_rc_ros2,CI 或自定义安装可通过 BXI_RC_ROS2_INSTALL_DIR 覆盖。已 source ROS2/安装环境时,也可直接运行 bxi-maintenance。

查看状态不会再次输出 key:

sudo /opt/bxi/bxi_rc_ros2/scripts/bxi_maintenance.sh status

立即撤销:

sudo /opt/bxi/bxi_rc_ros2/scripts/bxi_maintenance.sh disable

删除 App 中保存的维修码只会清理该 App 的本地副本,不会撤销机器人上的维修凭证。需要提前撤销时必须在机器人上执行 disable,或生成一份新凭证替换旧凭证。

6.2 VKBOTSM1 凭证

凭证格式为:

BXIM1.<base64url(JSON,无 padding)>

解码后的 JSON 字段如下:

{
  "version": 1,
  "credential_id": "32位小写十六进制字符串",
  "user_id": 2147483645,
  "sn": "BXI-EXAMPLE-0001",
  "key_hex": "编码32字节key的64位十六进制字符串",
  "created_at": 1780000000,
  "expires_at": 1780007200
}

App 导入时必须严格校验前缀、字段集合、UID、SN、key 长度、创建时间和有效期。维修码本身包含控制密钥,必须按密码处理,不得上传、记录或长期明文保存。

6.3 维修鉴权

WebSocket 和 HTTP 使用第 4 节完全相同的 HMAC 格式,只需改用维修凭证中的:

user_id = 2147483645
sn      = token.sn
key     = hexDecode(token.key_hex)

BLE 维修控制先向 CONTROL_GUEST_AUTH 写入 UTF-8 JSON,签名仍使用 WS 消息格式:

{
  "maintenance": true,
  "user_id": "2147483645",
  "sn": "BXI-EXAMPLE-0001",
  "ts": "1780000000000",
  "nonce": "每次新的随机值",
  "sig": "Base64 HMAC-SHA256 签名"
}

连接级维修鉴权成功后,再用维修 key 发送第 4.3 节的 HMAC8 控制帧。维修凭证过期、被删除或被新凭证替换后,已经建立的 WS 和 BLE 维修会话也会失效。

6.4 权限边界

维修凭证允许:

  • 运动控制、状态、视频和遥测;
  • 日志查看、系统重启和关机;
  • 远程协助;
  • OTA 和 HTTP 管理操作;
  • 地图、导航、建图和巡游。

维修凭证不允许:

  • control.authz_set;
  • 分享设备或修改授权用户;
  • 以 owner 身份解绑;
  • 创建、覆盖或改变 cloud / local 绑定。

7. 最小接入流程

本地密码绑定:

  1. App 通过 BLE HELLO_ACK 读取真实 SN、绑定状态和 KDF 元数据。
  2. 仅当状态为 unbound 时,提示用户设置本地密码并生成 16 字节 salt。
  3. 使用 PBKDF2 派生 key,发送完整的本地 BIND_START,并校验 BIND_OK。
  4. 绑定成功后再保存 SN、BLE 设备映射、credential ID 和系统安全存储中的 key。
  5. 通过 UDP beacon、BLE HELLO 或已保存地址找到机器人。
  6. 使用 UID、SN 和 key 生成 WS、HTTP 或 BLE HMAC。
  7. 连接 :8081 接收状态并发送控制消息,按需调用 :8082,或发送 BLE HMAC8 控制帧。

维修接入:

  1. 在机器人上生成限时 BXIM1 凭证。
  2. App 本地导入并校验凭证,不请求 App 云端。
  3. 使用维修 UID、SN 和 key 建立 WS、HTTP 或 BLE 鉴权会话。
  4. 完成维修后在机器人上执行 sudo /opt/bxi/bxi_rc_ros2/scripts/bxi_maintenance.sh disable。

8. 开发者快速开始

本节按“获取凭据 → 建立配对会话 → 连接 WS → 发送控制”展开。服务端凭据接口与机器人接口是两套接口;机器人只接收绑定后的 deviceKey 派生签名。示例中的地址、UID、SN 和 key 都是占位值。

8.1 从服务端获取 owner key

客户可以自定义登录方式和域名,但响应字段应保持下面的关系。accessToken 只发给客户服务端,绝不能放进机器人请求:

POST /api/app/binding/credential/issue
Authorization: Bearer <app-access-token>
Content-Type: application/json

{"sn":"<BLE HELLO_ACK 返回的 SN>"}

推荐响应:

{
  "token": "<payload_b64>.<sig_b64>",
  "credentialId": "<payload.cid>",
  "ownerKeyHex": "<64 位小写 hex>",
  "ownerUid": 42,
  "fingerprint": "<16 位小写 hex>",
  "issuedAt": 1780000000,
  "expiresAt": 1780003600,
  "ttlSeconds": 3600
}

App 收到响应后应检查 ownerUid、credentialId、fingerprint、有效期和 SN,再把 ownerKeyHex 解码成 32 字节保存到系统安全存储。fingerprint 的计算是 SHA256(UTF8(ownerKeyHex))[0:8].hex()。首次绑定把完整 token、credentialId、SN 和 raw key 交给 BLE BIND_START,或按第 5.3.1 节交给 Wi-Fi bind;成功后机器人不会再次返回 key。

服务端签发逻辑(只放在服务端,不放进 App)可直接参考:

import base64
import hashlib
import hmac
import json
import secrets
import time


def issue_binding_credential(secret: str, uid: int, sn: str,
                             ttl_seconds: int = 3600) -> dict:
    if len(secret.encode("utf-8")) < 32:
        raise ValueError("binding secret must be at least 32 UTF-8 bytes")
    if type(uid) is not int or not 1 <= uid <= 2**63 - 1:
        raise ValueError("uid must be in signed 64-bit positive range")
    if not sn or ttl_seconds <= 120:
        raise ValueError("invalid sn or ttl_seconds")
    now = int(time.time())
    owner_key_hex = secrets.token_hex(32)
    payload = {
        "v": 3, "uid": uid, "sn": sn,
        "cid": secrets.token_urlsafe(24),
        "fp": hashlib.sha256(owner_key_hex.encode()).digest()[:8].hex(),
        "n": secrets.token_urlsafe(24),
        "iat": now, "exp": now + ttl_seconds,
    }
    payload_b64 = base64.b64encode(
        json.dumps(payload, separators=(",", ":")).encode()
    ).decode("ascii")
    sig_b64 = base64.b64encode(hmac.new(
        secret.encode(), payload_b64.encode(), hashlib.sha256
    ).digest()).decode("ascii")
    return {
        "token": f"{payload_b64}.{sig_b64}",
        "credentialId": payload["cid"], "ownerKeyHex": owner_key_hex,
        "ownerUid": uid, "fingerprint": payload["fp"],
        "issuedAt": payload["iat"], "expiresAt": payload["exp"],
        "ttlSeconds": ttl_seconds,
    }

不要把 secret 交给 App。机器人端的 BXI_BINDING_CREDENTIAL_SECRET 必须与签发服务一致;泄露后需要同时轮换服务端和机器人配置。

8.2 本地密码派生 key

不接入服务端时,使用固定的本地 owner UID 和 PBKDF2 参数。下面的函数同时用于首次本地绑定和重装后的恢复:

# device_key_from_password
import hashlib


def device_key_from_password(password: str, salt_hex: str,
                             iterations: int = 200_000) -> bytes:
    raw = password.encode("utf-8")
    if not 8 <= len(raw) <= 64 or any(b < 0x20 or b > 0x7E for b in raw):
        raise ValueError("password must be 8..64 printable ASCII bytes")
    salt = bytes.fromhex(salt_hex)
    if len(salt) != 16 or iterations != 200_000:
        raise ValueError("invalid local KDF parameters")
    return hashlib.pbkdf2_hmac("sha256", raw, salt, iterations, 32)

8.3 加密 Wi-Fi 配对示例

Wi-Fi 配对是机器人 :8082 上的三个精确路由,不走 HTTP v2 HMAC;其他 /api/v1/pairing/* 路径仍按普通鉴权处理。安装示例依赖:pip install cryptography。每个 session 60 秒有效,bind 或 binding 尝试后立即消费。

# wifi_pairing.py
import base64
import hashlib
import hmac
import json
import secrets
from urllib.parse import urlencode
from urllib.request import Request, urlopen

from cryptography.hazmat.primitives import hashes, serialization
from cryptography.hazmat.primitives.asymmetric.x25519 import (
    X25519PrivateKey, X25519PublicKey,
)
from cryptography.hazmat.primitives.ciphers.aead import AESGCM
from cryptography.hazmat.primitives.kdf.hkdf import HKDF

PATH_SESSION = "/api/v1/pairing/session"
PATH_BIND = "/api/v1/pairing/bind"
PATH_UNBIND = "/api/v1/pairing/binding"
PAIRING_HOST = "192.168.88.162"


def _b64(raw: bytes) -> str:
    return base64.b64encode(raw).decode("ascii")


def _unb64(value: str, size: int | None = None) -> bytes:
    raw = base64.b64decode(value, validate=True)
    if size is not None and len(raw) != size:
        raise ValueError("invalid byte length")
    return raw


def _aad(method: str, path: str, session_id: str) -> bytes:
    return f"bxi.pairing.v1|{method}|{path}|{session_id}".encode("ascii")


def _json(value: dict) -> bytes:
    return json.dumps(value, ensure_ascii=False,
                      separators=(",", ":"), sort_keys=True).encode()


def post(path: str, body: dict) -> dict:
    request = Request(f"http://{PAIRING_HOST}:8082{path}", data=_json(body),
                      headers={"Content-Type": "application/json"},
                      method="POST")
    with urlopen(request, timeout=10) as response:
        return json.loads(response.read())


def open_session(mode: str, device_key: bytes | None = None,
                 token: str | None = None,
                 recover: bool = False):
    private = X25519PrivateKey.generate()
    public = private.public_key().public_bytes(
        serialization.Encoding.Raw, serialization.PublicFormat.Raw)
    client_nonce = secrets.token_bytes(16)
    request = {
        "protocol": 1, "mode": mode,
        "client_public_key": _b64(public),
        "client_nonce": _b64(client_nonce),
    }
    if recover:
        request["recover"] = True
    if token:
        request["capability_payload"] = token.split(".", 1)[0]
    if device_key is not None:
        request["auth"] = hmac.new(
            device_key,
            b"wifi-session-v1|" + mode.encode() + b"|" + public + b"|" + client_nonce,
            hashlib.sha256,
        ).hexdigest()
    response = post(PATH_SESSION, request)
    robot_public = _unb64(response["robot_public_key"], 32)
    robot_nonce = _unb64(response["robot_nonce"], 16)
    if device_key is not None:
        psk = device_key
    elif token:
        psk = base64.b64decode(token.rsplit(".", 1)[-1])
    else:
        psk = b""
    key = HKDF(algorithm=hashes.SHA256(), length=32,
               salt=client_nonce + robot_nonce,
               info=b"bxi-wifi-pairing-v1|" +
               bytes.fromhex(response["session_id"])).derive(
                   private.exchange(X25519PublicKey.from_public_bytes(robot_public)) + psk
               )
    status = AESGCM(key).decrypt(
        _unb64(response["nonce"], 12), _unb64(response["ciphertext"]),
        _aad("POST", PATH_SESSION, response["session_id"]),
    )
    return key, response["session_id"], json.loads(status)


def seal(key: bytes, method: str, path: str, session_id: str,
         payload: dict) -> dict:
    nonce = secrets.token_bytes(12)
    return {
        "session_id": session_id, "nonce": _b64(nonce),
        "ciphertext": _b64(AESGCM(key).encrypt(
            nonce, _json(payload), _aad(method, path, session_id)))
    }


def unseal(key: bytes, method: str, path: str, session_id: str,
           response: dict) -> dict:
    return json.loads(AESGCM(key).decrypt(
        _unb64(response["nonce"], 12), _unb64(response["ciphertext"]),
        _aad(method, path, session_id)).decode())

未绑定机器人:local 直接创建本地密码绑定;cloud 需要把 token 的 payload 段作为 capability_payload,并在 bind 密文中提交完整 token。已绑定机器人:必须用当前 deviceKey 计算 auth;本地绑定可用 mode=local,recover=true 创建只读恢复 session,读取 KDF 元数据后再回到 BLE 或正常鉴权流程。recover session 不能 bind 或 unbind。

未绑定机器人的完整 local bind

下面这段代码接在上面的 wifi_pairing.py 后面即可运行。前提是机器人已经激活,并且 App 能访问机器人 :8082;如果机器人还没有 IP,先通过 BLE Provisioning 的 WIFI_SCAN / WIFI_JOIN 配置网络,再执行这里的 HTTP 绑定。

import secrets

SN = "BXI-EXAMPLE-0001"  # 必须来自 BLE HELLO_ACK,不要信任广播名
PASSWORD = "my-robot-password"
SALT = secrets.token_bytes(16)
CREDENTIAL_ID = secrets.token_urlsafe(24)

# 1. 本地密码 -> 32B owner key
owner_key = device_key_from_password(PASSWORD, SALT.hex())

# 2. 创建未绑定 local session;status 应为 bound=false
session_key, session_id, status = open_session(mode="local")
assert status == {
    "bound": False, "sn": SN, "binding_mode": "unbound",
}, status

# 3. 将 local claim 放进 AES-GCM 信封并提交
request = seal(session_key, "POST", PATH_BIND, session_id, {
    "sn": SN,
    "owner_uid": 2147483646,
    "credential_id": CREDENTIAL_ID,
    "owner_key": owner_key.hex(),
    "kdf_salt": SALT.hex(),
    "kdf_iterations": 200000,
    "kdf_id": 1,
})
response = post(PATH_BIND, request)
result = unseal(session_key, "POST", PATH_BIND, session_id, response)
assert result["status"] == "bound"
assert result["sn"] == SN

# 4. 只有校验 result 后,才把 owner_key 写入系统安全存储
print(result["credential_id"], result["fingerprint"])

owner_key 只在绑定请求中发送一次;RC 返回 BIND_OK 等价的结果时只回传 SN、UID、credential ID、绑定时间和 fingerprint,不回传 key。密码或 key 不要写日志。绑定成功后,使用同一个 owner_key 生成第 8.4 节的 WS HMAC query。

8.4 连接 WS 并发送控制参数

下面的 ws_control.py 只负责传输层签名和控制消息。DEVICE_KEY_HEX 应来自 8.1 的响应并安全保存;不要把示例 key 用于真实机器人。

# ws_control.py
import asyncio
import base64
import hashlib
import hmac
import json
import secrets
import time
from urllib.parse import urlencode
import urllib.request

import websockets

HOST = "192.168.88.162"
UID = "2147483646"
SN = "BXI-EXAMPLE-0001"
DEVICE_KEY_HEX = "11" * 32
DEVICE_KEY = bytes.fromhex(DEVICE_KEY_HEX)


def _hmac_b64(message: str) -> str:
    return base64.b64encode(
        hmac.new(DEVICE_KEY, message.encode(), hashlib.sha256).digest()
    ).decode("ascii")


def ws_url(path: str = "/", client_id: str = "py_demo") -> str:
    ts = str(int(time.time() * 1000))
    nonce = secrets.token_urlsafe(18)
    query = {
        "user_id": UID, "client_id": client_id, "sn": SN,
        "ts": ts, "nonce": nonce,
        "sig": _hmac_b64(f"ws|{UID}|{SN}|{ts}|{nonce}"),
    }
    return f"ws://{HOST}:8081{path}?{urlencode(query)}"


def http_json(method: str, path: str, payload):
    method = method.upper()
    body = (b"" if payload is None else
            json.dumps(payload, ensure_ascii=False,
                       separators=(",", ":")).encode())
    ts = str(int(time.time() * 1000))
    nonce = secrets.token_urlsafe(18)
    body_hash = hashlib.sha256(body).hexdigest()
    message = f"http.v2|{method}|{path}|{body_hash}|{UID}|{SN}|{ts}|{nonce}"
    query = {
        "auth_v": "2", "user_id": UID, "sn": SN, "ts": ts,
        "nonce": nonce, "sig": _hmac_b64(message),
    }
    request = urllib.request.Request(
        f"http://{HOST}:8082{path}?{urlencode(query)}",
        data=body if payload is not None else None,
        headers={"Content-Type": "application/json"}, method=method,
    )
    with urllib.request.urlopen(request, timeout=10) as response:
        return json.loads(response.read())


async def control() -> None:
    async with websockets.connect(ws_url()) as ws:
        await ws.send(json.dumps({
            "type": "control.cmd_vel",
            "ts": int(time.time() * 1000), "seq": 1,
            "payload": {
                "vx": 0.2, "vy": 0.0, "wz": 0.1,
                "height": 1.0, "mode": "manual",
                "btn_1": 0, "btn_5": 1,
            },
        }))
        await ws.send(json.dumps({
            "type": "control.heartbeat",
            "ts": int(time.time() * 1000), "seq": 2, "payload": {},
        }))
        print(await ws.recv())


if __name__ == "__main__":
    asyncio.run(control())
    print(http_json("GET", "/api/v1/maps", None))

vx、vy、wz、height 和 btn_1..btn_14 必须平铺在 payload 中,不能再包一层 cmd_vel。发送 control.cmd_vel 会隐式取得控制权;连接断开或超过约 1.5 秒没有新的控制意图时,网关进入超时停车。移动时持续发送控制帧,空闲时每 500ms 内发送一次 heartbeat。网关没有 control.acquire、control.release、mode:"estop" 或急停复位语义。

HTTP v2 的签名要对最终发送的原始 body 计算 SHA-256;WS 和 HTTP 共用 key,但不能共用签名串。访客连接使用分享码派生的 subkey,并额外携带完整 share_token。

8.5 地图激活、重定位和导航

推荐流程:

maps = http_json("GET", "/api/v1/maps", None)
http_json("POST", "/api/v1/maps/demo_map/activate", None)

# 继续消费控制 WS,不要固定 sleep 20 秒:
# 1. 等 nav.runtime.status.payload.active_map_id == "demo_map"
# 2. 等 current_mode in {"localizing", "navigation"}
# 3. 确认 driver_healthy == true;last_error 为空

http_json("POST", "/api/v1/nav/initial_pose",
          {"x": 0.0, "y": 0.0, "yaw": 0.0, "frame_id": "map"})

# 等 nav.reloc_required.payload.required == false,且最新
# nav.runtime.status.payload.localized == true 后再发送目标。
http_json("POST", "/api/v1/nav/goal",
          {"x": 2.0, "y": 1.0, "yaw": 0.0, "frame_id": "map"})

导航进度通过 nav.status 跟踪。地图激活、初始位姿和定位状态任一步失败时,应展示 last_error 并停止后续请求,而不是继续发目标让服务端重复拒绝。

9. 安全要求

  • 不得把机器人云端凭据或任何服务端密钥放入 App。
  • deviceKey 和维修 key 只能保存在 App 系统安全存储和机器人本地,不得写入日志或 analytics。
  • 每次 WS/HTTP 请求使用当前时间和新的随机 nonce。
  • HTTP 必须对最终实际发送的 body bytes 签名。
  • 发布版本必须保持 WS、HTTP 和 BLE HMAC 鉴权开启。
  • 本地密码绑定只能绑定未绑定机器人,不能强行覆盖 owner。
  • 本地模式没有云端 key 恢复能力;应用应提供安全备份提示和设备重置入口。
  • App 应在密码验证或 BIND_OK 成功后再保存 BLE 设备映射,取消密码设置不应留下已绑定或可恢复的假记录。
  • BXIM1 凭证应尽量短期使用;任务完成后主动撤销,而不是只等待过期。

VKBOTS Tool 使用指南

一、软件介绍

基本信息

  • 名称:BXI_Tool
  • 图标:logo
  • 版本:Latest
  • 语言:中文与英文(右上角可切换)
  • 下载链接:点击跳转下载站

界面介绍(左侧菜单)

界面介绍
菜单项 功能说明
串口终端(Serial) 简单查看电机输出
调试界面(Debug) 使用 MIT 模式控制电机
电机校准(Calibration) 完成磁编校准
参数配置(Config) 修改配置参数
固件烧录(Firmware) 升级电机固件

二、使用 bxi_usb2can 连接电机

1)连接串口

通过 USB 转 Type-C 线连接调试器与电脑:

  • Type-C 接调试器
  • USB 接电脑

查找端口号:

  • Windows:右键开始图标 → 设备管理器 → 展开"端口(COM 与 LPT)"
  • 查找"USB 串行设备"对应端口(例如 COM20、COM31)

COM示意图

打开 bxi_tool 后,在左上角端口下拉框选择对应端口。若无选项,点击右侧刷新按钮。

连接刷新示意图

2)选择目标

接线示意图

首次连接调试器时,会输出目标选择菜单:

  • 输入 1~8:与 can_id 等于对应数字的电机通信
  • 输入 9:接收 CAN 总线上所有电机输出,并将最后一次接收到的 can_id 作为输出 ID

示例:选择 9:

实例示意图

3)连接电机

电机与调试器通过 2+2 接口连接:

  • 较粗线:电源线
  • 较细线:信号线(红色对应 H,黑色对应 L)

供电建议:

  • 输入电压:24~48V
  • 输入电流:3~5A

上电后观察电机串口输出:

电机上电输出示例


三、串口界面(Serial)

用于查看电机输出与基础通信信息。

串口界面截图


四、调试界面(Debug)

用于 MIT 控制调试、参数下发与状态观察。

调试界面截图


五、配置界面(Config)

用于修改电机参数与通信设置。

配置界面截图

连接上电机后,进入左侧菜单 Config 页面可修改参数。

5.1 CAN BUS 配置

下翻至 CAN BUS 区域可修改 CAN 通信参数。

关键参数:

  • can_id:电机 ID(电机接收该 ID 的控制帧)
  • master_id:发送目标 ID(电机向该 ID 回传信息)

常用操作:

  • 读取 ID:上箭头
  • 写入 ID:下箭头

规则说明:

  • 写入 can_id 时,会同步写入 master_id = can_id | 0x010
  • 也支持单独写入 master_id
  • 如果希望只改 can_id 而保留特定 master_id,需在改完 can_id 后重新写入 master_id

CAN BUS 参数区截图

5.2 参数保存

若希望参数掉电不丢失,请在修改后使用右下角"保存参数"功能。

保存参数按钮截图


六、校准界面(Calibration)

用于执行磁编校准流程。

校准界面截图


七、固件烧录(Firmware)

用于升级电机固件。

固件烧录界面截图

烧录流程

  1. 在界面中间选择需要烧录的固件文件路径。
  2. 开始烧录后,等待进度条走完。烧录过程中请勿断开电源或通信连接。
  3. 烧录完成后,点击“跳转 APP”按钮,使电机跳转到 APP。
  4. 返回串口终端,查看电机的上电输出是否正常。

VKBOTS5014-19 关节电机

VKBOTS 中空行星系列电机参数介绍


工程图

  • 安装外径:64.00 mm
  • 高度:66.50 mm
  • 中空直径:6 mm

VKBOTS50 工程图


关节电机参数表

参数项 规格值 单位
额定电压 24–58 V
空载转速 200 RPM
输出端额定转速 100 RPM
额定扭矩 7 Nm
峰值扭矩 25 Nm
峰值相电流 17 A(rms)
减速比 19.5 —
转动惯量 0.00424198 kg·m²
重量 0.5 kg

注:以上参数均为理论值,实际值可能因工况有所偏差。


接口与传感器定义

项目 规格说明
通信接口 CAN / CANFD
控制协议 兼容 MIT 协议
控制模式 力矩/速度/位置 混合控制模式
轴承类型 交叉滚子轴承
双绝对值编码器 支持
输入端编码器 磁编(16位)
输出端编码器 电感编

性能曲线

扭矩-电流曲线

50 扭矩电流曲线

测试条件:电压 57 V ; 转速 50 RPM

扭矩-速度曲线

50 扭矩速度曲线

测试条件:电压 57 V


参数数值可能有所调整升级。如需查询更多产品信息,请访问 vkbots.com。

VKBOTS5018-19 关节电机

VKBOTS 中空行星系列电机参数介绍(VKBOTS50 加长版)


工程图

  • 安装外径:64.00 mm
  • 高度:70.50 mm
  • 中空直径:6 mm

VKBOTS50L 工程图


关节电机参数表

参数项 规格值 单位
额定电压 24–58 V
空载转速 200 RPM
输出端额定转速 100 RPM
额定扭矩 11 Nm
峰值扭矩 35 Nm
峰值相电流 22 A(rms)
减速比 19.5 —
转动惯量 0.00524292 kg·m²
重量 0.55 kg

注:以上参数均为理论值,实际值可能因工况有所偏差。


接口与传感器定义

项目 规格说明
通信接口 CAN / CANFD
控制协议 兼容 MIT 协议
控制模式 力矩/速度/位置 混合控制模式
轴承类型 交叉滚子轴承
双绝对值编码器 支持
输入端编码器 磁编(16位)
输出端编码器 电感编

性能曲线

扭矩-电流曲线

50L 扭矩电流曲线

测试条件:电压 57 V ; 转速 50 RPM

扭矩-速度曲线

50L 扭矩速度曲线

测试条件:电压 57 V


参数数值可能有所调整升级。如需查询更多产品信息,请访问 vkbots.com。

VKBOTS7010-19 关节电机

VKBOTS 中空行星系列电机参数介绍


工程图

  • 安装外径:81.00 mm
  • 高度:68.00 mm
  • 中空直径:9 mm

VKBOTS70 工程图


关节电机参数表

参数项 规格值 单位
额定电压 24–58 V
空载转速 200 RPM
输出端额定转速 100 RPM
额定扭矩 15 Nm
峰值扭矩 48 Nm
峰值相电流 40 A(rms)
减速比 19.5 —
转动惯量 0.0137351 kg·m²
重量 0.8 kg

注:以上参数均为理论值,实际值可能因工况有所偏差。


接口与传感器定义

项目 规格说明
通信接口 CAN / CANFD
控制协议 兼容 MIT 协议
控制模式 力矩/速度/位置 混合控制模式
轴承类型 交叉滚子轴承
双绝对值编码器 支持
输入端编码器 磁编(16位)
输出端编码器 电感编

性能曲线

扭矩-电流曲线

70 扭矩电流曲线

测试条件:电压 57 V ; 转速 50 RPM

扭矩-速度曲线

70 扭矩速度曲线

测试条件:电压 57 V


参数数值可能有所调整升级。如需查询更多产品信息,请访问 vkbots.com。

VKBOTS8515-19 关节电机

VKBOTS 中空行星系列电机参数介绍


工程图

  • 安装外径:99.00 mm
  • 高度:73.00 mm
  • 中空直径:10 mm

VKBOTS85 工程图


关节电机参数表

参数项 规格值 单位
额定电压 24–58 V
空载转速 200 RPM
输出端额定转速 100 RPM
额定扭矩 40 Nm
峰值扭矩 150 Nm
峰值相电流 125 A(rms)
减速比 19.5 —
转动惯量 0.044688 kg·m²
重量 1.4 kg

注:以上参数均为理论值,实际值可能因工况有所偏差。


接口与传感器定义

项目 规格说明
通信接口 CAN / CANFD
控制协议 兼容 MIT 协议
控制模式 力矩/速度/位置 混合控制模式
轴承类型 交叉滚子轴承
双绝对值编码器 支持
输入端编码器 磁编(16位)
输出端编码器 电感编

性能曲线

扭矩-电流曲线

85 扭矩电流曲线

测试条件:电压 57 V ; 转速 50 RPM

扭矩-速度曲线

85 扭矩速度曲线

测试条件:电压 57 V


参数数值可能有所调整升级。如需查询更多产品信息,请访问 vkbots.com。

夹爪介绍

夹爪模组采用 VKBOTS 夹爪电机固件,面向夹持、开合和末端执行器应用。

主要特性

  • 使用 CAN / CAN FD 总线通信。
  • 支持 MIT 控制模式。
  • MIT 控制帧直接使用位置、速度和夹爪力等物理量。
  • 位置单位为 mm,速度单位为 mm/s,前馈力单位为 N。
  • 支持运行状态、温度和 AUX 轮询数据反馈。

主要参数

参数 范围或规格 推荐值 说明
位置 闭合为 0 mm,张开约 70 mm — 实际位置以夹爪机构为准
协议编码范围 0~90 mm — 固件协议映射范围
最大力 50:约 16.37 N;50L:约 24.03 N — 正力闭合,负力张开
kp 0~5 2 位置刚度参数
kd 0~1 0.05 速度阻尼参数
MIT 控制帧 8 字节 — 标准 11 位 CAN ID

50 和 50L 夹爪的理论前馈力范围不同,实际可用夹持力还会受到机械结构、供电和温度保护影响。具体通信范围、帧格式和寄存器定义请参阅夹爪通信说明。

使用建议

  1. 首次使用前确认夹爪零位、开合方向和机械限位。
  2. 初始控制参数建议使用 kp=2、kd=0.05。
  3. 从较低目标速度和较小前馈力开始调试,再根据实际响应调整参数。
  4. 使用位置 0 mm 表示闭合,约 70 mm 表示张开;不要将协议位置上限 90 mm 直接当作机械开合位置。
  5. 多个夹爪同时使用时,应为每个设备配置不冲突的 CAN ID。

相关文档

夹爪通信说明

内容根据 bxi_motor_source 固件源码整理,通信接口采用标准 11 位 CAN ID,协议使用 MIT 控制帧。

本通信手册适用于夹爪固件 0.3.x 和 1.4.x 的所有版本。

1. 固件与参数说明

夹爪与普通关节电机的主要区别是 MIT 帧使用夹爪物理量:

字段 普通关节电机 夹爪电机
位置 rad mm
速度 rad/s mm/s
kp 由配置决定 0~5
kd 由配置决定 0~1
t_ff / 回复 torque N·m 夹爪力,单位 N

2. CAN 总线参数

夹爪使用与关节模组一致的 CAN/CAN FD 通信方式。通用通信概述请参考关节模组 CANFD 通信说明。

夹爪当前通信配置为:FDCAN 名义速率 1 Mbps,数据段速率 5 Mbps,并启用 CAN FD BRS。MIT 控制帧和回复帧均为 8 字节。

项目 配置
总线接口 FDCAN / CAN FD
标准 ID 11 位标准帧 ID
名义速率 1 Mbps
数据段速率 5 Mbps(CAN FD BRS)
MIT 帧长度 8 字节
字节序 位字段按高字节在前;寄存器多字节数据按小端

固件回复帧会沿用接收到的帧格式。因此主控发送 MIT 控制帧时,应保持总线两端的 CAN/CAN FD、BRS 配置一致。

3. CAN ID

CAN ID、MIT 单播、广播和回复 ID 的通用规则与关节模组一致,详细说明请参考:

以下仅列出夹爪的默认 ID 和使用方式。

3.1 MIT 单播控制

MIT 控制帧发送到夹爪自身的 can_id。默认配置为:

can_id    = 1
master_id = can_id | 0x010 = 0x011

夹爪回复帧发送到 master_id,回复数据中的 data[0] 为夹爪自身的 can_id。

帧类型 CAN ID 说明
MIT 单播控制 can_id 例如节点 1 使用 0x001
MIT 广播控制 0x7FF 一帧最多携带多个节点的 8 字节控制块
MIT 回复 master_id 默认节点 1 回复到 0x011

广播帧中,节点 n 使用偏移量 (n - 1) × 8 的 8 字节数据。使用广播时,帧 DLC 必须覆盖目标节点对应的数据区。

3.2 配置寄存器 CAN ID

配置寄存器命令使用以下规则:

CAN ID = (cmd << 4) | can_id

以默认节点 can_id=1 为例:

命令 cmd CAN ID 请求 DLC
REG_READ 0x17 0x171 4
REG_WRITE 0x18 0x181 8
REG_SAVE 0x19 0x191 0
REG_INFO 0x1A 0x1A1 0

配置寄存器命令只响应目标节点的单播 ID,不使用 0x7FF 广播读取或写入寄存器。

4. MIT 控制帧格式

MIT 控制帧的字节布局、位宽和打包方式与关节模组一致,请直接参考MIT 模式主控控制帧及位宽说明。

夹爪的物理量范围和正负方向与普通关节电机不同,具体使用本页夹爪通信范围中的定义。

5. 夹爪通信范围

5.1 位置

夹爪 MIT 总线的位置含义为:

p_des = 0 mm  -> 闭合
p_des ≈ 70 mm -> 张开

当前夹爪的实际使用位置建议为闭合 0 mm、张开约 70 mm。源码中的协议和保护范围为:

协议编码范围:0~90 mm
固件保护范围:0~80.55 mm

固件会将目标位置和反馈位置限制在 0~80.55 mm 的保护范围内,但上位机应以实际机构的约 70 mm 张开位置作为应用目标,不要直接把 90 mm 当作实际开合位置。

位置编码公式:

p_raw = uint16((p_des / 90.0) × 65535)
p_des = p_raw / 65535 × 90.0 mm

5.2 速度

夹爪速度的 CAN 映射范围由配置寄存器 max_vel 计算:

v_limit = round(89.5 × max_vel / 2π) mm/s
v_des   = -v_limit ~ +v_limit mm/s

源码默认 max_vel=45 rad/s,对应通信速度范围约为:

v_des = -642 ~ +642 mm/s

速度编码公式:

v_raw = uint12((v_des + v_limit) / (2 × v_limit) × 4095)
v_des = v_raw / 4095 × (2 × v_limit) - v_limit

5.3 kp 与 kd

当前夹爪通信范围和推荐值如下:

参数 通信范围 推荐值 说明
kp 0~5 2 位置刚度参数
kd 0~1 0.05 速度阻尼参数

编码公式:

kp_raw = uint12(kp / 5.0 × 4095)
kd_raw = uint12(kd / 1.0 × 4095)

推荐初始控制参数:

kp = 2.00
kd = 0.05

首次调试时建议从较低速度和较低前馈力开始,确认运动方向、零位和机械限位后,再逐步调整 kp 和 kd。

5.4 前馈力 t_ff

夹爪 MIT 帧中的 t_ff 表示夹爪力,单位为 N。通信范围由当前构建版本的电流限幅换算得到:

F_limit = current_limit × 0.07 × 1 / (2 × 0.007125)
t_ff    = -F_limit ~ +F_limit N

当前源码默认构建的理论通信范围如下:

构建版本 默认电流限幅 理论力范围
50 夹爪 10/3 A 约 -16.37~+16.37 N
50L 夹爪 14.6667/3 A 约 -24.03~+24.03 N

符号约定:

  • 正力/正扭矩:夹爪闭合。
  • 负力/负扭矩:夹爪张开。
  • 最大力的绝对值:50 夹爪约 16.37 N,50L 夹爪约 24.03 N。

实际可用夹持力还受到机械结构、摩擦、供电、温度保护和电流降额影响。不要仅根据协议范围判断夹爪的安全夹持力。

力编码公式:

t_raw = uint12((t_ff + F_limit) / (2 × F_limit) × 4095)
t_ff  = t_raw / 4095 × (2 × F_limit) - F_limit

当 t_raw 为 0x7FF 或 0x800 时,固件将其解析为精确的零前馈力。

6. MIT 回复帧

回复帧的通用布局和 master_id 规则请参考关节模组电机响应帧。夹爪的位置、速度和力字段使用本页第 5 节的物理量范围。

data[6] 和 data[7] 的 NTC 默认解析、AUX 轮询格式和轮询顺序请参考 MIT 轮询回复说明。通过寄存器 0x6D 将 mit_aux_enable 写为 1 后,最后两个字节切换为 AUX 轮询数据。

7. 配置寄存器通信

夹爪的寄存器配置功能与关节模组一致,寄存器命令、读写格式、保存操作、信息查询、数据类型和写入等级请参考电机寄存器通信协议。下文仅补充夹爪使用时的常用寄存器和参数范围。

7.1 请求与回复格式

寄存器请求使用小端字节序,float 使用 IEEE754 单精度格式。

REG_READ 请求:
  data[0..3] = address

REG_WRITE 请求:
  data[0..3] = address | (value_type << 8)
  data[4..7] = value_raw

回复:
  data[0..3] = status | (value_type << 8)
  data[4..7] = value_raw

value_type 定义:

值 类型
0 int32_t
1 bool
2 float
3 uint32_t
4 version

7.2 夹爪常用寄存器

地址 参数 类型 通信范围 说明
0x60 can_id int32_t 菜单/错误状态可写 夹爪自身节点 ID
0x61 master_id int32_t 菜单/错误状态可写 回复帧目标 ID,默认 can_id \| 0x010
0x63 can_timeout_ms int32_t 运行中可读写 CAN 超时保护,0 表示关闭
0x66 mit_mode bool 菜单/错误状态可写 MIT 协议开关
0x67 max_pos float 运行中可读写 普通电机位置映射参数;夹爪位置总线范围固定为 0~90 mm
0x68 max_vel float 运行中可读写 参与夹爪速度范围换算,默认 45 rad/s
0x69 max_tor float 运行中可读写 扭矩限幅配置
0x6A kp_max float 运行中可读写 kp 映射上限;夹爪协议上限为 5
0x6B kd_max float 运行中可读写 夹爪 kd 映射上限为 1
0x6D mit_aux_enable bool 运行中可读写 data[6..7] 切换为 AUX 轮询
0x7C config_version version 只读 配置布局版本

7.3 写入配置的通信范围

配置寄存器写入等级如下:

Level 含义
0 运行中可读写
1 仅菜单状态或错误状态可写
2 系统通信参数,仅菜单状态或错误状态可写
3 只读

寄存器写入只修改 RAM。需要掉电保持时,应确认回复 status=0 后,再发送 REG_SAVE。mit_aux_enable 是运行时开关,上电、读取配置和保存配置后会恢复为 0。

8. 配置示例

以下示例以节点 1 为例,将 kd_max 设置为当前版本的 1.0。float 1.0 的 IEEE754 小端表示为 00 00 80 3F:

CAN ID: 0x181
DLC:    8
DATA:   6B 02 00 00 00 00 80 3F

其中:

address       = 0x6B
value_type    = 2(float)
value         = 1.0

读取 kd_max:

CAN ID: 0x171
DLC:    4
DATA:   6B 00 00 00

发送一个示例 MIT 控制帧,目标位置 40 mm、速度 0 mm/s、kp=2、kd=0.05、前馈力 0 N:

CAN ID: 0x001
DLC:    8
DATA:   71 C6 7F F6 66 0C C7 FF

该示例使用 12 位量化值 p_raw=0x71C6、v_raw=0x7FF、kp_raw=0x666、kd_raw=0x0CC,零前馈力使用 t_raw=0x7FF。

9. 使用建议与安全注意事项

  1. 首次使用前先读取 can_id、master_id、config_version 和 kd_max,确认主控使用的是当前固件参数。
  2. 确认夹爪零位、开合方向和机械限位;0 mm 为闭合,约 70 mm 为张开,协议范围 0~90 mm 不等于实际开合位置。
  3. 先使用推荐参数 kp=2、kd=0.05,并从较低目标速度、较小 t_ff 开始调试。
  4. MIT 控制帧应持续发送;如果配置了非零 can_timeout_ms,应保证发送周期小于超时时间。
  5. 多个夹爪使用广播控制时,必须为每个节点预留对应的 8 字节数据区,并避免节点 ID 冲突。
  6. 修改 can_id、master_id 或 MIT 模式等系统参数时,应在菜单状态或错误状态下操作,并在确认写入成功后再保存配置。

CANFD 通信说明

本文档说明 VKBOTS 关节模组在 MIT 控制模式下的 CAN/CANFD 通信协议。

1. 通信概述

电机使用 CANFD 通信,并兼容传统 CAN。电机会按收到的帧格式返回相同格式的响应帧,因此通常不需要单独配置帧类型与可变波特率。

  • CANFD 速率最高:1M + 5M
  • 不使用可变波特率时:1M

按功能划分,数据帧分为:

  • 主控控制帧:上位控制器下发给电机的控制命令
  • 电机响应帧:电机上传给上位控制器的状态反馈

2. MIT 模式主控控制帧(8 字节)

2.1 数据布局

控制报文 D[0] D[1] D[2] D[3] D[4] D[5] D[6] D[7]
ID p_des[15:8] p_des[7:0] v_des[11:4] v_des[3:0] \| Kp[11:8] Kp[7:0] Kd[11:4] Kd[3:0] \| t_ff[11:8] t_ff[7:0]

2.2 字段说明

  • 帧 ID:等于目标电机 can_id,默认 1;广播帧使用 0x7FF
  • p_des:位置给定值
  • v_des:速度给定值
  • Kp:位置比例系数
  • Kd:位置微分系数
  • t_ff:转矩给定值

2.3 默认参数范围

Kp / Kd 范围(可由上位机修改)

参数 适用对象 范围
Kp 通用 [0, 500]
Kd MOTOR_50 [0, 5]
MOTOR_50_L [0, 5]
MOTOR_70 [0, 5]
MOTOR_85 [0, 20]
MOTOR_J3505 [0, 5]
MOTOR_J3510 [0, 5]

p_des / v_des / t_ff 范围(可由上位机修改)

参数 适用对象 范围
p_des 通用 [-12.5, 12.5]
v_des 通用 [-45.0, 45.0]
t_ff MOTOR_50 [-40.0, 40]
MOTOR_50_L [-40, 40]
MOTOR_70 [-80, 80]
MOTOR_85 [-160, 160]
MOTOR_J3505 [-18, 18]
MOTOR_J3510 [-18, 18]

温度通信范围:[-30.0, 150.0] ℃。

2.4 位宽说明

标准 CAN 单帧仅 8 字节。MIT 控制命令将 5 个参数打包进 8 字节:

  • Position:16 位(2 字节)
  • Velocity:12 位
  • Kp:12 位
  • Kd:12 位
  • Torque:12 位

3. CANFD 广播多电机控制

CANFD 单帧最多可携带 64 字节。多电机控制时:

  • 帧 ID 固定为 0x7FF
  • 第 id 个电机数据位于对应 8 字节区间:(id - 1) * 8 到 id * 8 - 1

即每个电机都使用一段完整的 8 字节 MIT 控制块,按电机 ID 顺序拼接到同一帧中。

示例(前 16 字节,控制 M[1] 与 M[2]):

控制报文(ID=0x7FF) D[0] D[1] D[2] D[3] D[4] D[5] D[6] D[7]
M[1] p_des[15:8] p_des[7:0] v_des[11:4] v_des[3:0] \| Kp[11:8] Kp[7:0] Kd[11:4] Kd[3:0] \| t_ff[11:8] t_ff[7:0]
控制报文(ID=0x7FF) D[8] D[9] D[10] D[11] D[12] D[13] D[14] D[15]
M[2] p_des[15:8] p_des[7:0] v_des[11:4] v_des[3:0] \| Kp[11:8] Kp[7:0] Kd[11:4] Kd[3:0] \| t_ff[11:8] t_ff[7:0]

后续电机以 8 字节为步长顺延。

例如第 3 台电机使用 D[16]~D[23],第 4 台电机使用 D[24]~D[31],以此类推,最多可扩展到 64 字节。


4. 特殊控制帧(8 字节)

以下命令均为 8 字节固定值:

  • 电机使能:0xFF 0xFF 0xFF 0xFF 0xFF 0xFF 0xFF 0xFC
  • 电机失能:0xFF 0xFF 0xFF 0xFF 0xFF 0xFF 0xFF 0xFD
  • 保存零点:0xFF 0xFF 0xFF 0xFF 0xFF 0xFF 0xFF 0xFE
  • 打开终端输出:0xFF 0xFF 0xFF 0xFF 0xFF 0xFF 0xFF 0xFB
  • 关闭终端输出:0xFF 0xFF 0xFF 0xFF 0xFF 0xFF 0xFF 0xFA

5. 电机响应帧

电机响应帧 ID 可通过上位机设定,默认 0x11(电机内字段为 master_id)。

主要反馈:位置、速度、扭矩、驱动温度与电机温度。

5.1 数据布局

反馈报文 D[0] D[1] D[2] D[3] D[4] D[5] D[6] D[7]
MST_ID ID POS[15:8] POS[7:0] VEL[11:4] VEL[3:0] \| T[11:8] T[7:0] T_MOS T_Motor

5.2 字段说明

  • ID:电机 ID
  • POS:位置信息
  • VEL:速度信息
  • T:扭矩信息
  • T_MOS:驱动 MOS 温度(℃)
  • T_Motor:电机内部线圈温度(℃)

位置、速度、扭矩采用线性映射,将浮点数转换为有符号定点数:

  • 位置:16 位
  • 速度:12 位
  • 扭矩:12 位

5.3 master_id 与 can_id 关系

  • 默认关系:master_id = can_id | 0x010
  • 修改 can_id 时,会同步更新 master_id
  • 也可以通过上位机单独写入 master_id

电机寄存器通信协议

本文说明如何通过 CAN 对 VKBOTS 电机程序中的配置寄存器进行读取、写入、保存和信息查询。不同电机固件版本的寄存器表并不完全一致,操作前建议先确认电机的软件版本、硬件/程序型号和配置版本。

除特别说明外,本文中的 CAN ID、寄存器地址、数据字节和示例数值均使用十六进制。其他进制会单独标出。

1. 先确认版本

电机上电后会输出启动信息,可用 bxi_tool 查看,常见字段如下:

========== BOOT INFO ==========
STATE : 00 STARTUP
BUILD : Aug 31 2026 10:00:00
VER   : code=1.4.1 config=1.4
CAN   : id=1(boot)

---------- DEVICE CHECK ----------
HW    : Bxi_motor_85
PRO   : NORMAL
CON   : same
字段 含义
VER code 电机软件程序版本。
VER config 电机配置内容版本,也就是寄存器表版本。也可以通过 CAN 读取 0x7C 获取。需要与软件版本对应。
CAN id 当前电机节点 ID,后续 CAN 命令中的 node_id 使用这个值。默认使用 boot 的 ID,可通过寄存器修改 ID 来源。
HW 电机硬件识别结果。
PRO 当前编译目标/程序型号。
CON 配置版本与程序版本是否匹配。

Note

软件版本的前两位需要与配置版本对应。例如软件版本 1.4.1 对应配置版本 1.4,软件版本 0.3.1 对应配置版本 0.3。CAN 寄存器接口目前直接公开的是配置版本 config_version,不是完整 code=x.y.z 软件版本。完整软件版本建议从启动信息、固件文件名或升级包信息确认。

2. CAN 命令格式

寄存器命令使用标准 CAN ID 的高位表示命令,低 4 位表示电机节点:

CAN ID = (cmd << 4) | node_id

例如电机 can_id = 1 时,读取寄存器命令 REG_READ 的 cmd = 0x17,其中 0x17 是十六进制。发送 CAN ID 为:

(0x17 << 4) | 0x01 = 0x171
命令 cmd node_id=1 时 CAN ID DLC 作用
REG_READ 0x17 0x171 4 读取一个寄存器
REG_WRITE 0x18 0x181 8 写入一个 RAM 寄存器
REG_SAVE 0x19 0x191 0 保存 RAM 配置到 Flash
REG_INFO 0x1A 0x1A1 0 查询当前公开寄存器数量

3. 读取的发送和解析

读取寄存器使用 REG_READ,cmd = 0x17。

3.1 发送帧

字段 内容
CAN ID 0x17 为十六进制命令号。左移 4 位后,将电机 node_id 合并到低 4 位
DLC 4
data[0..3] address,寄存器地址,按 32 位小端格式发送,见文末“小端法解析说明”。地址通常用十六进制表示

CAN ID 由两部分组成:

高位:cmd << 4,其中 cmd 是十六进制命令号
低位:node_id,也就是电机当前 CAN id;node_id 占低 4 位
最终 CAN ID:(cmd << 4) | node_id

读取命令的 cmd 固定为十六进制 0x17,所以先得到命令高位:

0x17 << 4 = 0x170

再把电机节点 ID 合并到低 4 位。下表中的计算过程均为十六进制按位或:

电机 node_id 十六进制节点值 计算过程 发送 CAN ID
1 0x01 0x170 与 0x01 按位或 0x171
3 0x03 0x170 与 0x03 按位或 0x173
8 0x08 0x170 与 0x08 按位或 0x178

因此,电机节点不是 1 时,需要替换 CAN ID 的低 4 位。例如 node_id=3 时,读取命令 CAN ID 为 0x173。

3.2 回复解析

电机使用相同 CAN ID 回复,回复长度为 8 字节:

data[0..3] = status | (value_type << 8)
data[4..7] = value_raw

所有多字节字段均为小端,见文末“小端法解析说明”。

字段 解析方式
status data[0],0 表示成功。
value_type (data[1] & 0x07),表示 value_raw 的数据类型。
value_raw data[4..7],按 value_type 解析为实际值。

status 含义:

status 含义
0 OK
1 地址无效,或请求 header 保留位非 0
2 只读,或当前状态不允许写入
3 保存失败
4 DLC 不足
5 写入类型不匹配

value_type 含义:

value_type 解析方式
0 int32_t,小端有符号整数,见文末“小端法解析说明”
1 bool,0=false,非 0 为 true
2 float,IEEE754 单精度浮点数
3 uint32_t,小端无符号整数,见文末“小端法解析说明”
4 version,先按 uint32_t 读取,再按 major=(value>>8)&0xFF、minor=value&0xFF 解析

3.3 解析示例

读取 0x7C 后,如果收到:

171#0004000004010000

按字节拆开:

data[0..3] = 00 04 00 00
data[4..7] = 04 01 00 00

解析过程:

项目 结果
status 0x00,成功
value_type 0x04,版本号
value_raw 0x00000104
配置版本 major=1,minor=4,即 1.4

读取 0x60 后,如果收到:

171#0000000001000000

value_type=0 表示 int32_t,value_raw=0x00000001,说明当前 can_id = 1。

4. 写入的发送和解析

写入寄存器使用 REG_WRITE,cmd = 0x18。写入只修改 RAM 中的配置值;需要掉电保存时,还需要再发送 REG_SAVE。

4.1 发送帧

字段 内容
CAN ID 0x18 为十六进制命令号。左移 4 位后,将电机 node_id 合并到低 4 位
DLC 8
data[0..3] address 与 value_type << 8 按位或,小端格式,见文末“小端法解析说明”
data[4..7] value_raw,按目标寄存器类型编码,小端格式,见文末“小端法解析说明”

写入时 value_type 必须与目标寄存器表中的类型一致。bool 类型写入 0 表示关闭,写入非 0 表示开启;float 使用 IEEE754 单精度浮点数。

4.2 回复解析

写入成功或失败都会返回 8 字节回复:

data[0..3] = status | (value_type << 8)
data[4..7] = value_raw

status=0 表示写入成功。回复中的 value_type 为目标寄存器的实际类型;value_raw 为写入后该寄存器当前值。若 status=5,说明请求中的 value_type 与寄存器类型不匹配;若 status=2,说明该寄存器只读,或电机当前状态不允许写入。

5. 保存的发送和解析

保存配置使用 REG_SAVE,cmd = 0x19。它会把当前 RAM 配置写入 Flash。

5.1 发送帧

字段 内容
CAN ID 0x19 为十六进制命令号。左移 4 位后,将电机 node_id 合并到低 4 位
DLC 0
Data 空

5.2 回复解析

回复长度为 8 字节:

data[0..3] = status | (3 << 8)
data[4..7] = register_count

status=0 表示保存成功,status=3 表示保存失败。data[4..7] 为当前公开寄存器总数,按 uint32_t 小端解析,见文末“小端法解析说明”。

6. 信息查询的发送和解析

查询寄存器数量使用 REG_INFO,cmd = 0x1A。上位机需要适配不同固件时,建议先查询 REG_INFO,再根据 0x7C 配置版本选择对应寄存器表。

6.1 发送帧

字段 内容
CAN ID 0x1A 为十六进制命令号。左移 4 位后,将电机 node_id 合并到低 4 位
DLC 0
Data 空

6.2 回复解析

回复长度为 8 字节:

data[0..3] = status | (3 << 8)
data[4..7] = (writable_count << 16) | register_count

其中 value_type=3,表示 value_raw 按 uint32_t 解析。例如 value_raw = 0x00280036 表示公开寄存器总数为 0x0036 = 54,可写寄存器数量为 0x0028 = 40。

7. 版本差异与寄存器表选择

本文只说明寄存器命令的发送和解析方式,不展开具体寄存器表。不同程序版本的寄存器表会单独给出,使用时应先确认电机当前配置版本,再查找对应版本的寄存器表。

查找寄存器表时,建议按下面顺序确认:

  1. 从启动信息读取 VER code 和 VER config。
  2. 也可以通过 CAN 读取 0x7C,确认当前 config_version。
  3. 使用与 VER config 一致的寄存器表。例如软件版本 1.4.1 使用 1.4.1 寄存器表,软件版本 0.3.1 使用 0.3.1 寄存器表。
  4. 如需做上位机自动适配,可先发送 REG_INFO 查询公开寄存器数量,再结合 0x7C 的配置版本选择对应寄存器表。

Warning

不同程序版本的寄存器表会变化。上位机不要只根据地址硬编码全部参数,应先确认配置版本,并使用对应版本的寄存器表。

8. 小端法解析说明

小端法是多字节数据的排列方式:低位字节放在低地址,也就是先发送低字节,再发送高字节。本文的寄存器地址、status | (value_type << 8)、value_raw 都按小端法发送和解析。

以 32 位数据 0x0000007C 为例,按小端法发送时字节顺序为:

7C 00 00 00

因此读取寄存器 0x7C 时,data[0..3] 写成:

data[0] = 0x7C
data[1] = 0x00
data[2] = 0x00
data[3] = 0x00

再以回复中的 value_raw 为例,如果 data[4..7] 为:

04 01 00 00

按小端法还原为 32 位值:

value_raw = 0x00000104

如果该字段的 value_type=4,表示版本号,则解析为:

major = (value_raw >> 8) & 0xFF = 1
minor = value_raw & 0xFF = 4
配置版本 = 1.4

不同 value_type 的最终解释方式不同:int32_t 按有符号整数解析,uint32_t 按无符号整数解析,float 按 IEEE754 单精度浮点数解析,version 按上面的版本号规则解析。

MIT 轮询回复说明

本文说明 VKBOTS 电机在 MIT 模式下的回复帧格式,以及 mit_aux_enable 打开后的 AUX 轮询回复解析方式。上位机周期发送 MIT 控制帧后,电机会返回一帧状态反馈;AUX 轮询数据复用回复帧最后两个字节。

除特别说明外,本文中的 CAN ID、数据字节、原始值和示例数值均使用十六进制。物理量、频率和单位换算结果会按十进制标出。

1. 使用前确认

MIT 回复由上位机发送 MIT 控制帧触发。电机会响应下面两类控制帧:

控制帧 CAN ID 说明
can_id 发给当前电机的单播 MIT 控制帧
0x7FF 广播 MIT 控制帧,电机按自身 can_id 取对应的 8 字节控制块

电机回复帧使用 master_id 作为 CAN ID。默认情况下:

master_id = can_id | 0x010

例如 can_id=1 时,默认 master_id=0x11,上位机应接收 CAN ID 为 0x11 的回复帧。修改 can_id 时,程序默认会同步更新 master_id;也可以通过寄存器单独修改 master_id。寄存器命令和寄存器表选择见“电机寄存器通信协议”和对应版本的寄存器表。

Warning

多电机同时使用 MIT 轮询时,应保证各电机的 master_id 不冲突。否则多个电机可能使用同一个 CAN ID 回复,上位机无法可靠区分来源。

2. MIT 回复帧格式

MIT 回复帧长度固定为 8 字节:

字段 内容
CAN ID master_id
DLC 8
data[0] 当前电机 can_id
data[1..5] 位置、速度、扭矩反馈
data[6..7] 默认温度反馈;打开 mit_aux_enable 后为 AUX 轮询数据

字节布局如下:

回复帧 data[0] data[1] data[2] data[3] data[4] data[5] data[6] data[7]
mit_aux_enable=0 ID POS[15:8] POS[7:0] VEL[11:4] VEL[3:0] 和 TOR[11:8] TOR[7:0] NTC1 NTC2
mit_aux_enable=1 ID POS[15:8] POS[7:0] VEL[11:4] VEL[3:0] 和 TOR[11:8] TOR[7:0] aux[15:8] aux[7:0]

这里的位置、速度、扭矩和 AUX 都是按位段拼接。具体拼接方式见文末“位段解析说明”。

3. 基础反馈解析

先从 data[1..5] 解析出原始值:

id_raw  = data[0]
pos_raw = (data[1] << 8) | data[2]
vel_raw = (data[3] << 4) | (data[4] >> 4)
tor_raw = ((data[4] & 0x0F) << 8) | data[5]

再按线性映射还原物理量:

value = raw * (max - min) / ((1 << bits) - 1) + min

各字段使用的范围如下。范围值来自电机配置,不同型号或配置可能不同,解析前建议读取对应配置或查看对应版本寄存器表。

字段 位宽 默认范围
POS 16 bit [-max_pos, max_pos],默认 [-12.5, 12.5] rad
VEL 12 bit [-max_vel, max_vel],默认 [-45.0, 45.0] rad/s
TOR 12 bit [-max_tor, max_tor],默认值随电机型号不同

常用解析公式:

position_rad = uint_to_float(pos_raw, -max_pos, max_pos, 16)
velocity_rad_s = uint_to_float(vel_raw, -max_vel, max_vel, 12)
torque_Nm = uint_to_float(tor_raw, -max_tor, max_tor, 12)

Note

正常运行时 TOR 表示扭矩反馈。打开电流测试相关功能时,该字段可能被程序用于返回 q 轴电流,具体以当前程序功能状态为准。

4. AUX 轮询回复解析

mit_aux_enable 控制 MIT 回复最后两个字节:

mit_aux_enable = 0 -> 旧协议:data[6]=NTC1,data[7]=NTC2,均为 8 bit 编码
mit_aux_enable = 1 -> AUX 轮询:data[6..7] 携带 aux_id + payload

mit_aux_enable 上电默认关闭,且不保存到 Flash。需要 AUX 轮询数据时,上位机需要在本次运行中写入 mit_aux_enable=1。当前查看到的程序中该配置项地址为 0x6D,不同配置版本仍应以对应寄存器表为准。

打开后,data[6..7] 解析为一个 16 bit AUX 字段:

aux = (data[6] << 8) | data[7]
aux_id = (aux >> 12) & 0x0F
payload = aux & 0x0FFF

等价拆法:

aux_id = data[6] >> 4
payload = ((data[6] & 0x0F) << 8) | data[7]

不要按“第几帧”固定判断数据类型;每帧都应先解析 aux_id,再按 aux_id 解释 payload。

5. AUX 轮询顺序和频率

AUX ID 按下面顺序轮询:

0x0 -> 0x1 -> 0x2 -> 0x3 -> 0x4 -> 0x5 -> 0x6 -> 0x7 -> 0x8 -> 0x9 -> 0xF -> 0x0

AUX 总频率等于 MIT 回复频率;单项更新频率约为 MIT 回复频率除以 11。

MIT 回复频率 单项更新频率
1000 Hz 90.9 Hz
500 Hz 45.5 Hz
100 Hz 9.1 Hz

6. AUX 数据解析

aux_id 数据 payload 解析 通信范围 分辨率
0x0 NTC1 温度 temp_C = payload / 10.0 - 30.0 -30.0..150.0 C 0.1 C
0x1 NTC2 温度 temp_C = payload / 10.0 - 30.0 -30.0..150.0 C 0.1 C
0x2 绕组温度观测器 temp_C = payload / 10.0 - 30.0 -30.0..150.0 C 0.1 C
0x3 总线电压 v_bus v_bus = payload / 10.0 0.0..100.0 V 0.1 V
0x4 母线电流 i_bus_filt current_A = payload / 10.0 - 150.0 -150.0..150.0 A 0.1 A
0x5 q 轴电流 i_q_filt current_A = payload / 10.0 - 150.0 -150.0..150.0 A 0.1 A
0x6 d 轴电流 i_d_filt current_A = payload / 10.0 - 150.0 -150.0..150.0 A 0.1 A
0x7 程序状态和运行标志 见下方 bit 定义 0x000..0xFFF bitfield
0x8 温控降额系数 temper_coefficient coeff = payload / 1000.0 0.000..1.000 0.001
0x9 电压利用率 util = payload / 1000.0 0.000..2.000 0.001
0xF 心跳计数 heartbeat = payload 0..4095,循环 1

payload = 0xFFF 表示该数据无效或当前程序不支持。心跳 0xF 例外,因为它正常会循环到 0xFFF。

解析 payload 时,先通过 aux_id 判断数据类型,再把 payload 作为无符号整数代入对应公式。表中的除法、偏移量和单位换算使用十进制计算。

温度类数据包括 aux_id=0x0、0x1、0x2:

payload = 0x02BC = 700
temp_C = 700 / 10.0 - 30.0 = 40.0 C

电压数据 aux_id=0x3:

payload = 0x0F0 = 240
v_bus = 240 / 10.0 = 24.0 V

电流类数据包括 aux_id=0x4、0x5、0x6:

payload = 0x05DC = 1500
current_A = 1500 / 10.0 - 150.0 = 0.0 A

系数类数据包括 aux_id=0x8 和 0x9:

payload = 0x02EE = 750
coeff = 750 / 1000.0 = 0.750
util = 750 / 1000.0 = 0.750

心跳 aux_id=0xF 不需要单位换算,payload 就是当前心跳计数。该计数会递增并在 12 bit 范围内循环,可用于判断 MIT 回复是否持续更新。

7. 状态字 0x7

当 aux_id=0x7 时,payload 为状态字:

bit0..3   FSM state
bit4      FOC armed
bit5      ENCI calib_valid
bit6      ENCO calib_valid
bit7      field_weaken_mode
bit8      mit_mode
bit9..11  control_mode

bit6 与外部输出编码器有关,在不支持该硬件或功能的程序中可能始终为 0。

FSM state 常见取值:

0  STARTUP
1  MENU
2  MOTOR
3  ENCI_AUTO
4  ENCI
5  ENCO
6  ENCI_SLS_AUTO
7  SETUP
8  ERROR
9  OPEN
10 SLS

8. 默认协议温度解析

当 mit_aux_enable=0 时,data[6] 和 data[7] 不是 AUX 字段,而是两个 8 bit 温度值:

ntc1_C = data[6] * 180.0 / 255.0 - 30.0
ntc2_C = data[7] * 180.0 / 255.0 - 30.0

这种模式下只能从 MIT 回复直接得到 NTC1 和 NTC2 温度;其他 AUX 数据需要打开 mit_aux_enable 后读取。

9. 解析示例

假设收到一帧:

11#017FFF7FF7FF30F0

其中 CAN ID 0x11 是 master_id,数据拆开为:

data[0] = 0x01
data[1] = 0x7F
data[2] = 0xFF
data[3] = 0x7F
data[4] = 0xF7
data[5] = 0xFF
data[6] = 0x30
data[7] = 0xF0

基础反馈原始值为:

pos_raw = 0x7FFF
vel_raw = 0x7FF
tor_raw = 0x7FF

如果 mit_aux_enable=1,最后两个字节解析为:

aux_id = 0x3
payload = 0x0F0

aux_id=0x3 表示总线电压,所以:

v_bus = 0x0F0 / 10.0 = 24.0 V

10. 位段解析说明

MIT 回复帧中的 POS、VEL、TOR 和 aux 使用高位在前的位段拼接方式。解析时应按位移和掩码恢复原始值。

例如 data[6]=0x30、data[7]=0xF0 时:

aux = (0x30 << 8) | 0xF0 = 0x30F0
aux_id = (0x30F0 >> 12) & 0x0F = 0x3
payload = 0x30F0 & 0x0FFF = 0x0F0

再按 aux_id 对应的公式解析 payload,即可得到实际物理量或状态字段。

1.4.1

软件版本:1.4.1,配置版本:1.4。

寄存器参数类型 地址 参数 type 数据类型 范围 简单解释
电机参数 0x01 motor_pole_pairs 0 int32_t 1 菜单/错误状态可写 电机极对数
电机参数 0x02 motor_phase_resistance 2 float 1 菜单/错误状态可写 相电阻,单位 ohm
电机参数 0x03 motor_phase_inductance 2 float 1 菜单/错误状态可写 相电感,单位 H
电机参数 0x04 inertia 2 float 1 菜单/错误状态可写 控制器前馈惯量参数
电机参数 0x05 reduction_ratio 2 float 3 只读 减速比,由版型编译配置决定
编码器参数 0x10 encoder_dir_rev 0 int32_t 1 菜单/错误状态可写 ENCI 方向反转标志,0/1
编码器参数 0x11 encoder_offset 0 int32_t 1 菜单/错误状态可写 ENCI 电角度零偏,通常由校准写入
编码器参数 0x12 calib_valid 0 int32_t 3 只读 ENCI 校准有效标志
编码器参数 0x13 ENCO_calib_valid 0 int32_t 3 只读 ENCO 校准有效标志
编码器参数 0x14 usr_enc1_offset 0 int32_t 3 只读 ENCI 用户零位,通常由零位设置流程写入
编码器参数 0x15 usr_enc2_offset 2 float 3 只读 ENCO 用户零位,通常由零位设置流程写入
编码器参数 0x16 enc2_closed_loop_enable 1 bool 0 运行中可读写 输出端编码器闭环开关,0 关闭、非 0 开启
校准/测试 0x20 calib_current 2 float 0 运行中可读写 校准电流,单位 A
校准/测试 0x21 calib_max_voltage 2 float 0 运行中可读写 校准最大电压,单位 V
校准/测试 0x22 current_test_enable 1 bool 0 运行中可读写 电流测试开关,运行时使用
校准/测试 0x23 backlash_test_enable 1 bool 0 运行中可读写 回差测试开关,运行时使用
校准/测试 0x24 aging_test_enable 1 bool 0 运行中可读写 老化测试开关,可保存
控制参数 0x30 control_mode 0 int32_t 0 运行中可读写 控制模式:电流、速度、位置等
控制参数 0x31 pos_gain 2 float 0 运行中可读写 位置环比例增益
控制参数 0x32 vel_gain 2 float 0 运行中可读写 速度环比例增益
控制参数 0x33 vel_integrator_gain 2 float 0 运行中可读写 速度环积分增益
控制参数 0x34 vel_limit 2 float 0 运行中可读写 速度限幅,单位 turn/s
控制参数 0x35 current_limit 2 float 0 运行中可读写 q 轴电流限幅,单位 A
控制参数 0x36 torquet_limit 2 float 0 运行中可读写 MIT/扭矩控制的扭矩限幅
控制参数 0x37 current_ramp_rate 2 float 0 运行中可读写 电流斜坡速率,单位 A/s
控制参数 0x38 vel_ramp_rate 2 float 0 运行中可读写 速度斜坡速率,单位 turn/s^2
控制参数 0x39 traj_vel 2 float 0 运行中可读写 梯形轨迹目标速度,单位 turn/s
控制参数 0x3A traj_accel 2 float 0 运行中可读写 梯形轨迹加速度,单位 turn/s^2
控制参数 0x3B traj_decel 2 float 0 运行中可读写 梯形轨迹减速度,单位 turn/s^2
控制参数 0x3C field_weaken_mode 1 bool 0 运行中可读写 弱磁开关,0 关闭、非 0 开启
电流环参数 0x40 current_ctrl_p_gain 2 float 1 菜单/错误状态可写 电流环 P 增益
电流环参数 0x41 current_ctrl_i_gain 2 float 1 菜单/错误状态可写 电流环 I 增益
电流环参数 0x42 current_ctrl_bandwidth 0 int32_t 1 菜单/错误状态可写 电流环带宽参数
保护参数 0x50 protect_under_voltage 2 float 0 运行中可读写 母线欠压保护阈值,单位 V
保护参数 0x51 protect_over_voltage 2 float 0 运行中可读写 母线过压保护阈值,单位 V
保护参数 0x52 protect_over_speed 2 float 0 运行中可读写 超速保护阈值,单位 turn/s
保护参数 0x53 protect_temperature_low 2 float 0 运行中可读写 温控降额开始温度,单位 C
保护参数 0x54 protect_temperature_high 2 float 0 运行中可读写 过温停机温度,单位 C
保护参数 0x55 protect_i_abc_error 2 float 0 运行中可读写 三相电流和异常阈值,单位 A
CAN 参数 0x60 can_id 0 int32_t 2 系统通信参数 电机自身节点 ID
CAN 参数 0x61 master_id 0 int32_t 2 系统通信参数 MIT 回复帧目标 CAN ID
CAN 参数 0x62 sync_boot_id_flag 1 bool 2 系统通信参数 上电同步 boot ID 开关
CAN 参数 0x63 can_timeout_ms 0 int32_t 0 运行中可读写 CAN 控制超时,单位 ms,0 为关闭
CAN 参数 0x64 can_sync_target_enable 1 bool 0 运行中可读写 CAN 同步目标使能开关
CAN 参数 0x65 can_mode_switch 1 bool 0 运行中可读写 CAN 模式切换标志
MIT 参数 0x66 mit_mode 1 bool 1 菜单/错误状态可写 MIT 协议模式开关
MIT 参数 0x67 max_pos 2 float 0 运行中可读写 MIT 位置映射范围
MIT 参数 0x68 max_vel 2 float 0 运行中可读写 MIT 速度映射范围
MIT 参数 0x69 max_tor 2 float 0 运行中可读写 MIT 扭矩映射范围
MIT 参数 0x6A kp_max 2 float 0 运行中可读写 MIT kp 映射范围
MIT 参数 0x6B kd_max 2 float 0 运行中可读写 MIT kd 映射范围
MIT 参数 0x6D mit_aux_enable 1 bool 0 运行中可读写 MIT AUX 轮询回复开关
运行状态 0x70 runtime_state 0 int32_t 3 只读 当前 FSM 状态码
版本信息 0x7C config_version 4 version 3 只读 配置布局版本

0.3.1

软件版本:0.3.1,配置版本:0.3。

寄存器参数类型 地址 参数 type 数据类型 范围 简单解释
电机参数 0x01 motor_pole_pairs 0 int32_t 1 菜单/错误状态可写 电机极对数
电机参数 0x02 motor_phase_resistance 2 float 1 菜单/错误状态可写 相电阻,单位 ohm
电机参数 0x03 motor_phase_inductance 2 float 1 菜单/错误状态可写 相电感,单位 H
电机参数 0x04 inertia 2 float 1 菜单/错误状态可写 控制器前馈惯量参数
电机参数 0x05 reduction_ratio 2 float 3 只读 减速比,由版型编译配置决定
编码器参数 0x10 encoder_dir_rev 0 int32_t 1 菜单/错误状态可写 ENCI 方向反转标志,0/1
编码器参数 0x11 encoder_offset 0 int32_t 1 菜单/错误状态可写 ENCI 电角度零偏,通常由校准写入
编码器参数 0x12 calib_valid 0 int32_t 3 只读 ENCI 校准有效标志
编码器参数 0x13 enco_calib_valid 0 int32_t 3 只读 ENCO 校准有效标志
编码器参数 0x14 usr_enc1_offset 0 int32_t 3 只读 ENCI 用户零位,通常由零位设置流程写入
编码器参数 0x15 usr_enc2_offset 2 float 3 只读 ENCO 用户零位,通常由零位设置流程写入
编码器参数 0x17 enco_dir 0 int32_t 1 菜单/错误状态可写 ENCO 方向配置,0/1
编码器参数 0x18 enco_offset 2 float 1 菜单/错误状态可写 ENCO 原始零偏
校准/测试 0x20 calib_current 2 float 0 运行中可读写 校准电流,单位 A
校准/测试 0x21 calib_max_voltage 2 float 0 运行中可读写 校准最大电压,单位 V
校准/测试 0x22 current_test_enable 1 bool 0 运行中可读写 电流测试开关,运行时使用
校准/测试 0x24 aging_test_enable 1 bool 0 运行中可读写 老化测试开关,可保存
控制参数 0x30 control_mode 0 int32_t 0 运行中可读写 控制模式:电流、速度、位置等
控制参数 0x31 pos_gain 2 float 0 运行中可读写 位置环比例增益
控制参数 0x32 vel_gain 2 float 0 运行中可读写 速度环比例增益
控制参数 0x33 vel_integrator_gain 2 float 0 运行中可读写 速度环积分增益
控制参数 0x34 vel_limit 2 float 0 运行中可读写 速度限幅,单位 turn/s
控制参数 0x35 current_limit 2 float 0 运行中可读写 q 轴电流限幅,单位 A
控制参数 0x36 torquet_limit 2 float 0 运行中可读写 MIT/扭矩控制的扭矩限幅
控制参数 0x37 current_ramp_rate 2 float 0 运行中可读写 电流斜坡速率,单位 A/s
控制参数 0x38 vel_ramp_rate 2 float 0 运行中可读写 速度斜坡速率,单位 turn/s^2
控制参数 0x39 traj_vel 2 float 0 运行中可读写 梯形轨迹目标速度,单位 turn/s
控制参数 0x3A traj_accel 2 float 0 运行中可读写 梯形轨迹加速度,单位 turn/s^2
控制参数 0x3B traj_decel 2 float 0 运行中可读写 梯形轨迹减速度,单位 turn/s^2
控制参数 0x3C field_weaken_mode 1 bool 0 运行中可读写 弱磁开关,0 关闭、非 0 开启
电流环参数 0x40 current_ctrl_p_gain 2 float 1 菜单/错误状态可写 电流环 P 增益
电流环参数 0x41 current_ctrl_i_gain 2 float 1 菜单/错误状态可写 电流环 I 增益
电流环参数 0x42 current_ctrl_bandwidth 0 int32_t 1 菜单/错误状态可写 电流环带宽参数
保护参数 0x50 protect_under_voltage 2 float 0 运行中可读写 母线欠压保护阈值,单位 V
保护参数 0x51 protect_over_voltage 2 float 0 运行中可读写 母线过压保护阈值,单位 V
保护参数 0x52 protect_over_speed 2 float 0 运行中可读写 超速保护阈值,单位 turn/s
保护参数 0x53 protect_temperature_low 2 float 0 运行中可读写 温控降额开始温度,单位 C
保护参数 0x54 protect_temperature_high 2 float 0 运行中可读写 过温停机温度,单位 C
保护参数 0x55 protect_i_abc_error 2 float 0 运行中可读写 三相电流和异常阈值,单位 A
CAN 参数 0x60 can_id 0 int32_t 2 系统通信参数 电机自身节点 ID
CAN 参数 0x61 master_id 0 int32_t 2 系统通信参数 MIT 回复帧目标 CAN ID
CAN 参数 0x62 sync_boot_id_flag 1 bool 2 系统通信参数 上电同步 boot ID 开关
CAN 参数 0x63 can_timeout_ms 0 int32_t 0 运行中可读写 CAN 控制超时,单位 ms,0 为关闭
CAN 参数 0x64 can_sync_target_enable 1 bool 0 运行中可读写 CAN 同步目标使能开关
CAN 参数 0x65 can_mode_switch 1 bool 0 运行中可读写 CAN 模式切换标志
MIT 参数 0x66 mit_mode 1 bool 1 菜单/错误状态可写 MIT 协议模式开关
MIT 参数 0x67 max_pos 2 float 0 运行中可读写 MIT 位置映射范围
MIT 参数 0x68 max_vel 2 float 0 运行中可读写 MIT 速度映射范围
MIT 参数 0x69 max_tor 2 float 0 运行中可读写 MIT 扭矩映射范围
MIT 参数 0x6A kp_max 2 float 0 运行中可读写 MIT kp 映射范围
MIT 参数 0x6B kd_max 2 float 0 运行中可读写 MIT kd 映射范围
MIT 参数 0x6D mit_aux_enable 1 bool 0 运行中可读写 MIT AUX 轮询回复开关
运行状态 0x70 runtime_state 0 int32_t 3 只读 当前 FSM 状态码
版本信息 0x7C config_version 4 version 3 只读 配置布局版本
版本信息 0x7D crc 3 uint32_t 3 只读 Flash 配置 CRC

强化学习运控框架

关于本部分

本部分介绍 VKH6 强化学习运控框架:ROS 2 示例仓库(bxi_rl_controller_ros2_example)及其开发者 Wiki。包名、命令、路径和代码均与软件保持一致。

项目概览

本仓库提供 VKBOTS 机器人控制器开发示例框架,包含:

  • 基于强化学习控制策略的示例控制程序;
  • 基于 ROS2 的 Mujoco 仿真环境;
  • 基于 ROS2 的 VKBOTS 硬件环境;
  • 读取手柄或键盘输入的 ROS2 遥控器节点。

包结构

ROS2 环境和 Mujoco 的二进制 ROS2 包位于 bxi_ros2_pkg。

在二进制 ROS2 包 bxi_ros2_pkg/ 目录中:

  1. communication:机器人通信包,包含自定义通信消息格式。
  2. description:机器人描述文件,包括 URDF、XML 和 mesh 文件。
  3. mujoco:基于 ROS2 的 Mujoco 仿真器。控制程序建议先在 Mujoco 中验证,再部署到机器人硬件。
  4. hardware:机器人硬件包。该节点发布机器人所有传感器数据,并接收控制命令。
  5. hardware_arm:机器人上半身版本的硬件控制包。该节点发布机器人上半身手臂信息,并接收控制命令。

bxi_ros2_pkg 是仿真和硬件共用的统一框架:

ROS2 仿真结构:ROS2 structure simulation

ROS2 硬件结构:ROS2 structure hardware

src/ 目录包含:

  1. src/bxi_example_py_elf3:VKH6 学习控制策略示例。
  2. remote_controller:读取手柄或键盘输入并发布控制命令,可用于机器人硬件和仿真环境。

描述文件(URDF)

  1. elf3_dof29:VKH6,29 自由度。
  2. elf3_dof31:VKH6,31 自由度(头部 2 自由度)。

USD 或 XML 格式请参考:unofficial models。

使用说明

中文扩展文档 / Wiki

新增遥控器/输入控制器、添加机器人业务状态、配置状态转移、过渡行为、on_bind(ctx) 状态订阅和 get_cmd_vel(ctx) 速度处理,请参考项目 Wiki:

硬件和仿真环境切换

  1. hw 是 hardware 的缩写,所有带 hw 后缀的 launch 文件都会启动真实硬件,请谨慎使用。
  2. 仿真环境和机器人硬件共用同一套控制程序。只需要使用不同的 launch 文件即可在仿真和硬件之间切换。仿真代码的话题带有 simulation/ 前缀,硬件话题带有 hardware/ 前缀。详情请参考 src/bxi_example_py_elf3 中的话题参数配置。
  3. 仿真环境中的机器人启动时带有虚拟悬挂,启动后需要释放悬挂。机器人硬件运行时会忽略悬挂相关信号。
  4. 仿真环境中存在全局里程计话题 odm,硬件环境中没有该话题。

系统环境配置

  1. 使用 Ubuntu 22.04 和 ROS2 humble。mujoco 需要安装 libglfw3-dev。
  2. 遥控器默认使用设备路径 /dev/input/jsBattleDragon。个人开发者或本地调试环境需要先配置 udev 规则,才能稳定生成该设备别名。
  3. 安装 Battle Dragon 手柄链接脚本并添加执行权限:
sudo install -m 0755 ./script/bxi-battle-dragon-link /usr/local/bin/bxi-battle-dragon-link
  1. 安装 IMU、BAT 和遥控器三份 udev 规则,并重新加载。若已安装旧版 /etc/udev/rules.d/bxi-dev.rules,请先备份并移出该目录,避免与新规则同时生效:
sudo install -m 0644 ./script/udev/70-bxi-*.rules /etc/udev/rules.d/
sudo udevadm control --reload-rules
sudo udevadm trigger --subsystem-match=tty --action=add
sudo udevadm trigger --subsystem-match=input --action=add

规则按 uname -m 区分 x86_64 与 aarch64,分别使用 3-8/3-9 与 4-1.7/5-1。IMU 和 BAT 在各自架构的两个端口都可匹配,设备类型由 USB VID/PID 区分。

重新插拔 Battle Dragon 手柄后,应能看到 /dev/input/jsBattleDragon。如果只是本地调试,也可以临时将 src/remote_controller/config/xbox_default.yaml 中的 sources.gamepad.device 改成当前系统对应的 /dev/input/js0。

  1. 如需设置遥控器开机自启动,先根据实际路径和 ROS 配置编辑 ./script/ros_elf_launch.service,然后复制到 /etc/systemd/system/ 并启用服务:
sudo cp ./script/ros_elf_launch.service /etc/systemd/system/
sudo systemctl daemon-reload
sudo systemctl enable --now ros_elf_launch.service
sudo systemctl status ros_elf_launch.service

部署相关文件的用途见 script/README.md。

RK3588 / RKNN 发布包

ARM64 CI 默认生成包含 RKNN 的 *_arm64.tar.gz 和 SHA256 校验文件。 该 ARM64 包用于 RK3588、Ubuntu 22.04、ROS 2 Humble、Python 3.10,包含同一提交的 ARM64 编译产物、全部内置策略的非量化 RKNN 模型及 .rknn.build.json 契约、 RKNN Lite 2.3.2 wheel 和 librknnrt.so。原始 ONNX 保留用于回退和轨迹输出。

包解压到 /opt/bxi/ 后,在目标板执行以下依赖安装命令。板端需已有 ROS 2 Humble、 bxi_ros2_pkg 的 ARM64 版本及兼容的 RKNPU 内核驱动;此包不包含内核驱动。

安装会更新 Python 依赖并替换 /usr/lib/librknnrt.so,请先停止使用这些依赖的控制程序。 基础 Python 依赖仍需联网安装;--check 只检查导入和动态库加载,不代表 NPU 推理通过。

sudo -H /opt/bxi/bxi_rl_controller_ros2_example/deploy_environment.sh
/opt/bxi/bxi_rl_controller_ros2_example/deploy_environment.sh --check

运行时会优先尝试同名 RKNN,失败时回退 ONNX;确认日志中的 selected_backend=rknn。 CI 的 ARM64 runner 负责转换、契约验证和打包,板端推理精度与实机动作仍需单独验收。

在已安装 rknn-toolkit2==2.3.2 的 Python 3.10 环境中,可独立运行或复查转换:

python tools/build_rknn_release.py
python tools/build_rknn_release.py --check

在仿真器中运行示例控制程序

  1. 将 ROS2 二进制包 bxi_ros2_pkg 拉取到 /opt/bxi/bxi_ros2_pkg:
mkdir -p /opt/bxi/
cd /opt/bxi/
git clone https://github.com/bxirobotics/bxi_ros2_pkg.git

然后激活环境(在机器人硬件上请使用 root 用户执行):

source /opt/bxi/bxi_ros2_pkg/setup.bash
  1. 在 bxi_rl_controller_ros2_example 目录中运行 bash build.sh,编译 ./src 目录下的所有源码。若当前系统是 RK3588/aarch64,脚本会先检查每个 ONNX 的 RKNN 和构建契约;缺失时自动检查或安装匹配的 rknn-toolkit2==2.3.2,再生成 RKNN。编译完成后运行 source ./install/setup.bash 激活当前包环境。
  2. 运行全身控制策略:
ros2 launch bxi_example_py_elf3 example_launch_demo.py

该命令会启动仿真环境和基于学习的控制程序。

  1. 启动键盘控制节点:
ros2 launch remote_controller remote_controller_keyboard.launch.py

在硬件中运行示例控制程序

  1. 使用 root 用户登录。
  2. 将 ROS2 二进制包 bxi_ros2_pkg 拉取到 /opt/bxi/bxi_ros2_pkg:
mkdir -p /opt/bxi/
cd /opt/bxi/
git clone https://github.com/bxirobotics/bxi_ros2_pkg.git

然后激活环境(在机器人硬件上请使用 root 用户执行):

source /opt/bxi/bxi_ros2_pkg/setup.bash
  1. 在 bxi_rl_controller_ros2_example 目录中运行 bash build.sh,编译 ./src 目录下的所有源码。若当前系统是 RK3588/aarch64,脚本会先检查每个 ONNX 的 RKNN 和构建契约;缺失时自动检查或安装匹配的 rknn-toolkit2==2.3.2,再生成 RKNN。编译完成后运行 source ./install/setup.bash 激活当前包环境。
  2. 运行全身控制策略:
ros2 launch bxi_example_py_elf3 example_launch_demo_hw.py

该命令会启动机器人硬件和控制策略。

如果已经使用 bxi_robot_config_tool 生成 /opt/bxi/robot_config.yaml,硬件 launch 会自动读取该文件;文件不存在时继续使用内置默认值。也可以手动指定:

ros2 launch bxi_example_py_elf3 example_demo_hw.launch.py \
  robot_config_file:=/opt/bxi/robot_config.yaml \
  enable_head:=auto

enable_head:=auto 会读取 modules.head.enabled。如需覆盖配置,可使用 enable_head:=true 或 enable_head:=false。

控制程序运行提示

  1. 话题中的控制命令必须按照指定关节顺序发送。关节顺序请参考 src/bxi_example_py_elf3 中的示例。
  2. 仿真环境和硬件机器人都有失控保护。如果控制命令丢失超过 100 ms,保护会被触发,电机将失能,系统必须重新初始化后才能继续使用。
  3. 遥控器默认设备为 /dev/input/jsBattleDragon。如果 udev 规则尚未配置,或调试时只想使用系统当前识别到的手柄设备,可将配置中的设备路径临时改为 /dev/input/js0。

启动流程

在仿真和硬件环境中,启动时电机都处于失能状态,所有参数不可控。启动流程分为两步:

  1. 使能电机位置控制。电机可通过设置 pos kp kd 三个参数实现位置控制。以 VKBOTS 硬件为例,收到第 1 次 reset 命令后,关节会转到零位并保持 10 秒。
  2. 使能所有控制参数。电机可设置 pos vel tor kp kd。以 VKBOTS 硬件为例,收到第 2 次 reset 命令后,关节开始接收控制输入。

启动示例请参考 src/bxi_example_py_elf3。

硬件保护

除通信超时保护外,硬件节点还包含力矩保护、超速保护和位置保护。

  1. 硬件节点内置错误计数器。当错误计数达到 1000 时,电机会退出使能状态。
  2. 错误计数逻辑:收到电机速度超限时错误计数增加 50;收到力矩超限时错误计数增加 100;收到正常电机消息时错误计数减少 1,最小值为 0。
  3. 触发位置超限保护时,不会增加错误计数。超限方向的控制会被禁止,电机只能向相反方向旋转。
  4. 详细超限值请联系我们获取。不建议在非必要情况下修改这些数值。

重要提示

大型机器人可能带来风险。操作前请仔细确认说明!

所有控制程序必须先经过仿真验证,再部署到机器人硬件。

如发生任何异常,请立即按下急停按钮!

VKBOTS 机器人运控框架文档

本 Wiki 覆盖机器人平台适配、控制调度、状态机与 Mod、模型推理、 输入系统、Sim2Real 和框架维护。Mod 是动作与业务能力的主要扩展机制,但不是整个框架 的边界。

框架能力一览

能力 当前提供的特性 深入阅读
模块化动作系统 动作、模型、状态、事件、路由和资产封装为独立 Mod;支持版本约束、依赖、冲突、启停、外置部署和发布可见性 Mod 系统
分层状态开发 API 以 RobotControlState 为核心,同时提供固定姿态、公式轨迹、在线策略和动作回放便捷基类;支持强类型 YAML 参数和完整生命周期 状态开发指南
安全状态切换 内置保持、增益渐变、序列过渡和双状态实时混合;支持进入帧、运行帧、取消准备及业务自定义 Transition 状态机配置、自定义过渡
具名关节与命令合成 按关节名处理 29/31/N 关节布局,支持局部模型输出、跨布局解析,以及模型、ROS、IK、轨迹等多来源命令的所有权校验与合成 关节布局与映射、多来源命令合成
MIT 命令与运行时覆盖 MotorFrame 完整携带位置、速度、PD 增益和前馈力矩;支持按关节名从 ROS 话题临时覆盖最终输出,并提供超时与平滑释放 运行时关节命令覆盖、平台适配指南
模型推理与资源管理 支持 ONNX Runtime、OpenVINO、RKNN 后端选择和回退;模型可在启动期准备或首次请求时异步加载,并统一预热、缓存和关闭 推理框架架构、模型与资源
仿真与真机统一接入 平台适配层隔离机器人消息和硬件 SDK;MuJoCo 与真机可使用一致的相机逻辑名和 ROS 话题契约,仅切换 simulation/hardware 前缀 平台适配指南、Sim2Real
深度感知策略 独立相机进程发布 Image + CameraInfo,策略根据真实内参裁剪 FOV、缩放和旋转;支持相机新鲜度检查与失联安全退出 深度感知行走
多设备输入映射 键盘、Xbox/兼容手柄和 CRSF 统一映射到业务 control;支持组合键、互斥 released 条件、曲线、优先级和自定义 UDP/串口 Driver 输入映射、自定义 Input Driver
受管辅助进程 Mod 可声明 Python、原生可执行文件、ROS 包节点和普通命令;支持按状态启停、依赖顺序、CPU 角色、环境隔离、异常重启和分阶段关闭 Mod 子节点
AI 辅助开发 源码内置 elf3-feature-development Skill,引导 AI 依据当前框架代码、生产 Mod 和 Wiki 规划功能边界、按键、App 展示、关节命令、依赖和分层验证 使用项目内置 Skill
实时控制与工程交付 提供周期预算、deadline 统计、CPU 亲和性和实时调度;启动期完成状态图、输入冲突和依赖校验,并支持分级日志、公开版裁剪与自检 控制调度、调试、发布保护

先选择你的入口

你的目标 从这里开始 接下来阅读
新增姿态、轨迹或动作状态 用 Mod API 4.0 开发第一个动作 Mod 状态开发进阶指南
使用 AI 辅助实现或审查 VKH6 功能 使用项目内置 Skill Mod 公共 API
接入 ONNX、NPZ 或感知策略 把模型动作封装成 Mod 推理框架架构
接入自己的机器人消息、SDK 或硬件 机器人平台适配指南 Sim2Real
修改状态机、调度器或框架内部 架构总览 框架底层运行原理
当前程序加载或运行失败 调试、验证与常见问题 根据故障层进入对应参考手册

推荐阅读路线

不需要从头通读 Wiki。根据自己的工作选择一条路线即可。

路线 A:开发一个动作 Mod

  1. 用 Mod API 4.0 开发第一个动作:完成最小的 mod.yaml + state.py。

  2. Mod 状态开发进阶指南:选择 Pose、公式轨迹、模型 或完整状态 API。

  3. 绑定按键并接入路由:从键盘、手柄或 CRSF 触发状态。

  4. 工程化组合示例:加入资源、依赖、启动校验和发布边界。

路线 B:部署一个推理策略

  1. 把模型动作封装成 Mod:管理模型资产和生命周期。
  2. 推理框架架构:选择 ONNX Runtime、OpenVINO、RKNN,理解 历史帧和性能约束。

  3. 深度感知行走 Mod 开发实录:参考多输入感知策略的完整 工程实现。

  4. Sim2Real:核对 observation、action、控制频率和真机安全。

路线 C:接入自己的机器人程序

  1. 架构总览:理解平台适配层与运控内核的边界。
  2. 机器人平台适配指南:实现状态快照、关节映射和硬件输出。
  3. 框架控制调度:配置周期、deadline、绑核和实时优先级。
  4. Sim2Real:按断使能、吊架和落地阶段验证。

路线 D:扩展或维护框架

  1. 架构总览:先确认修改属于平台、Runtime、Mod、输入还是推理层。
  2. 框架底层运行原理:按启动、加载和每周期路径定位实现。
  3. Mod 公共 API:不要把 framework.runtime 内部接口泄漏给客户 Mod。
  4. 高级配置范式和版本迁移指南:处理复杂组合 与已有项目升级。

所有按步骤操作的课程集中在专题教程索引。

按任务查文档

我想完成的工作 直接阅读
新增固定姿态或公式轨迹 自定义状态参考
合并模型、话题、IK或轨迹关节命令 多来源关节命令合成
理解29/31/N关节输入输出映射 关节布局与映射
临时覆盖头部或其他指定关节 运行时关节命令覆盖
管理模型资产和 startup/on-demand 资源 模型、资源与 launch
新增状态之间的切换方式 自定义过渡教程
配置双状态实时混合 双状态运行混合
修改按键、组合键或摇杆映射 遥控器输入映射配置
接入 UDP、串口或新输入协议 自定义输入 Driver 教程
为 Mod 启动相机、感知或通信 ROS 节点 Mod 子节点声明与运行
查询某个 YAML 字段 YAML 字段参考
组织多个 Mod、启动校验和发布 工程化组合示例
使用 AI 规划、实现或审查项目功能 项目内置 AI 开发 Skill
生成公开发布树 发布保护与公开版同步

文档类型

类型 用法 例子
手把手教程 按顺序完成一个具体目标 专题教程索引
开发指南 解释选择、边界和完整工程方法 状态开发指南、平台适配指南
参考手册 已经知道要做什么时查询字段或接口 YAML 字段参考、Mod 公共 API
架构文档 修改框架或排查底层问题时阅读 架构总览、框架底层原理

核心边界

  1. bxi_example_demo.py 是 VKH6 的 ROS/硬件适配层,不是运控框架本体。
  2. RobotControlRuntime 管理控制调度和生命周期,RobotControlFramework 管理 Mod、 状态机、Transition 和每周期控制计算。

  3. 客户 Mod 的控制集成依赖 framework.mod_api,策略实现可依赖 framework.inference;两者都不依赖 framework.runtime。

  4. 新动作从 Mod 开始;新机器人从平台适配器开始;新推理设备从 inference backend 开始。
  5. Input Driver 只产生原始输入,业务状态切换由 Mod event 和 route 决定。

专题教程索引

本页是教程目录,不要求按编号全部阅读。第一次使用请先完成基础路径,再根据任务选择专题。

推荐起点: 用 Mod API 4.0 开发第一个动作

基础路径

顺序 教程 目标
1 用 Mod API 4.0 开发第一个动作 建立、校验并加载两文件 Mod,使用具名关节和长期缓冲
2 Mod 状态开发进阶指南 理解核心状态基类及其便捷封装和高级扩展点
3 绑定按键并接入 Mod 路由 用键盘、手柄或 CRSF 触发状态

完成这三项后,已经可以独立开发普通客户动作。

模型与真机部署

教程 何时需要
把模型动作封装成 Mod 接入 ONNX、NPZ、动作回放和模型预热
深度感知行走 Mod 开发实录 从外部 ROS 图像订阅逐步开发多输入感知策略状态
把模型从仿真带到真机 校验 observation、action、关节顺序和真机安全

接入自己的机器人平台

如果只是为现有机器人增加动作,继续使用 Mod 教程即可。只有机器人状态消息、关节契约、 电机命令或硬件 SDK 发生变化时,才需要平台适配:

指南 目标
机器人平台适配指南 把自己的状态和硬件命令接到 RobotControlRuntime
框架控制调度 配置控制周期、deadline、绑核和实时优先级
Sim2Real 验证策略契约与真实机器人安全性

状态切换

Transition 决定源状态到目标状态之间怎样生成电机帧,用来避免两边 MIT 命令字段不连续时直接切换产生突跳。普通动作优先使用内置过渡,只有切换算法有特殊需求时再阅读自定义教程。

教程 何时需要
在 Mod 内写自定义过渡 内置 transition 无法表达目标切换过程
使用双状态运行混合 切换期间需要同时采样两个动态状态

系统扩展与交付

教程 何时需要
编写 UDP 自定义输入 Driver 接入一种新的设备或通信协议
工程化组合示例 组合多个 Mod、资源、启动校验和发布保护

教程与参考手册的区别

  • 教程给出从文件创建到验证的完整操作顺序。
  • 参考手册用于查询字段、接口和边界条件。
  • 遇到报错先看 调试、验证与常见问题,不要从头重读所有教程。

手把手 1:用 Mod API 4.0 开发一个动作

本课创建 com.example.sin_wave,从基础走路状态进入正弦摆动,再按正常模式键返回。

适合第一次接触框架的开发者。 本课只涉及两个文件,不要求先理解 Resource、命令合成或状态机内部实现。示例使用当前的具名关节和长期复用缓冲,不依赖 VKH6 的数字关节下标。

本页是可按顺序操作的入门教程。需要查询完整生命周期和字段时转到 自定义状态参考;需要加入模型、Resource 或 ROS 实体时再进入 Mod 状态开发进阶指南。

完成结果

完成本课后,你将得到:

  • 一个可被自动发现的 com.example.sin_wave Mod;
  • 一个直接使用核心基类、带强类型参数的 RobotControlState;
  • 一个能适应机器人 29、31 或更多关节的具名关节动作;
  • 一组能够随节点启动完成加载和校验的状态与 routes。

先理解核心状态基类

RobotControlState 是框架的核心状态基类。状态机要求每个状态工厂最终返回它的实例,并通过它提供的 on_bind/on_prepare/on_enter/on_update/on_exit/on_unbind 生命周期执行控制逻辑。

本课直接继承 RobotControlState,并显式实现时间累计、电机帧输出和稳定进入帧。第一课 只使用进入帧过渡;双状态动态采样留到专门课程,避免同时引入过多概念。

1. 建立目录

先确认终端位于仓库根目录:

cd ~/bxi_rl_controller_ros2_example

手工建立 Mod 目录:

mkdir -p src/bxi_example_py_elf3/mods/com.example.sin_wave
src/bxi_example_py_elf3/mods/com.example.sin_wave/
  mod.yaml
  state.py

2. 写状态

state.py:

from dataclasses import dataclass
import math
import numpy as np

from bxi_example_py_elf3.framework.mod_api import (
    EntryFrameProvider,
    RobotControlState,
)


@dataclass(frozen=True)
class SinWaveParams:
    joint: str = "l_knee_y_joint"
    amplitude: float = 0.25
    frequency: float = 0.5


class SinWaveState(RobotControlState, EntryFrameProvider):
    Params = SinWaveParams

    def __init__(self, name, state_id, params: SinWaveParams | None = None):
        super().__init__(name, state_id)
        self.params = params or SinWaveParams()
        self.elapsed = 0.0
        self._joint_index = None
        self._base_position = None
        self._layout = None

    def on_prepare(self, ctx, from_state):
        layout = ctx.robot_layout
        if self._layout is not layout:
            # 首次进入或 Robot Layout 改变时才重新编译。
            self._joint_index = layout.index(self.params.joint)
            self._base_position = np.empty(
                layout.dof_num,
                dtype=np.float32,
            )
            self._layout = layout
        # 每次进入动作前捕获基准姿态,正弦值不会逐帧累加。
        np.copyto(self._base_position, ctx.last_motor_frame.qpos)

    def on_enter(self, ctx):
        self.elapsed = 0.0

    def _calculate_frame(self, ctx, elapsed):
        if self._joint_index is None:
            raise RuntimeError("sin wave state is not prepared")
        last = ctx.last_motor_frame
        frame = self._motor_frame(
            ctx,
            self._base_position,
            last.kp,
            last.kd,
        )
        frame.qpos[self._joint_index] = self._base_position[self._joint_index] + (
            self.params.amplitude * math.sin(
                2.0 * math.pi * self.params.frequency * elapsed
            )
        )
        return frame

    def get_entry_frame(self, ctx):
        return self._calculate_frame(ctx, 0.0)

    def on_update(self, ctx, dt):
        frame = self._calculate_frame(ctx, self.elapsed)
        self._apply_frame(ctx, frame)
        self.elapsed += dt

RobotControlState 提供核心生命周期、长期复用的 _motor_frame() 缓冲和 _apply_frame() 输出入口。示例实现 get_entry_frame(),满足 first_frame_switch 对目标状态的要求;正常控制只经过 on_update(),每周期推进一次 elapsed。

这个状态的自然输出布局是 ctx.robot_layout:目标关节由公式更新,其余机器人关节保持进入动作时的姿态。因此机器人从 29 关节增加到 31 或 N 关节时,不需要修改模型输入或硬编码新的数组长度。关节名和缓冲只在 on_prepare() 首次遇到一个 Robot Layout 时编译;基准数组和 _motor_frame() 的 MotorFrame 都长期复用,控制周期内没有 .copy(),也不会反复创建数组。

不要在 on_bind() 读取 ctx.robot_layout,因为绑定状态时首个机器人状态快照可能尚未到达。on_bind() 主要用于创建 ROS 实体;依赖机器人布局的准备工作放在 on_prepare()。

这里显式选择沿用上一控制帧的 kp/kd,所以本教程只从正常受控状态进入;如果状态可从零力矩模式进入,必须提供自己的非零安全增益。on_enter() 会在 Transition 完成、状态正式接管控制时重置时间,on_update() 则在每个控制周期推进时间并提交电机帧。

3. 写清单

mod.yaml:

schema: 1
id: com.example.sin_wave
name: 正弦摆动
version: 1.0.0
api: ">=4,<5"
enable: true
entrypoint: null
visibility: public
requires:
  - id: com.bxi.basic_actions
    version: ">=1,<2"
conflicts: []
python_exports: []
runtime_requirements:
  python: []
  ros: []
  system: []

events:
  activate:
    slot: btn_10
    value: 4

states:
  sin_wave:
    factory: state:SinWaveState
    label: 正弦摆动
    priority: 100
    group: Customer
    icon: waves
    params:
      joint: l_knee_y_joint
      amplitude: 0.25
      frequency: 0.5

routes:
  - from: com.bxi.basic_actions/normal
    event: activate
    to: sin_wave
    transition: first_frame_switch

  - from: sin_wave
    event: com.bxi.basic_actions/normal
    to: com.bxi.basic_actions/normal
    transition: first_frame_switch

这里的 Transition 描述的是:从状态机收到切换请求到目标状态正式进入之间,每个控制周期 应该怎样生成电机帧。两个状态的 MIT 命令字段可能不连续,直接换帧可能让机器人突然 动作。两条 route 都使用 first_frame_switch,它读取目标状态的稳定进入帧并逐步建立 控制力。本例只需实现 EntryFrameProvider;需要混合两个动态状态时,再阅读 双状态运行混合。

entrypoint: null 让约定 factory 根据类上的 Params 自动构造 dataclass,所以不需要 plugin.py;其余描述头字段同样需要显式填写。

4. 构建和验证

colcon build --packages-select bxi_example_py_elf3 \
  --symlink-install --merge-install
source install/setup.bash

启动日志应包含:

[com.example.sin_wave]: loaded v1.0.0: .../com.example.sin_wave

状态完整名是 com.example.sin_wave/sin_wave。当前遥控器已有 btn_10=4 的手柄/CRSF 组合,但还没有本课的键盘入口;可先测试该组合,或继续第 3 课补齐键盘绑定。

检查清单

  1. factory: state:SinWaveState 的模块和类存在。
  2. 跨 Mod 引用有完整名称和 requires。
  3. 参数名与 dataclass 字段一致、类型正确。
  4. on_update() 每周期只推进一次 elapsed。
  5. 代码通过关节名工作,没有把数字下标当成跨组件契约。
  6. 控制周期复用 MotorFrame,没有逐帧 .copy() 或创建数组。

如果一个动作的关节命令同时来自模型、ROS 话题、IK 或程序轨迹,不要继续在这个单来源例子里堆逻辑,使用多来源关节命令合成。如果策略输出关节数与机器人不同,阅读关节布局与映射。

下一课:模型动作状态。

要继续把这个状态逐步升级成模型、Resource、自定义 Transition、ROS 和 Driver,进入 Mod 状态开发进阶指南。

使用项目内置 Skill 进行 AI 辅助开发

项目源码内置了 elf3-feature-development Skill,用于约束 AI 按当前 VKH6 框架的真实 API、Mod 组织方式和工程规则开发功能:

.agents/skills/elf3-feature-development/
├── SKILL.md
├── agents/openai.yaml
└── references/
    ├── feature-planning.md
    ├── manifest-and-layout.md
    ├── state-and-lifecycle.md
    ├── models-resources-and-nodes.md
    ├── joints-transitions-and-inputs.md
    └── validation-and-release.md

它适用于新增、迁移、扩展、调试或审查以下内容:

  • 机器人功能、状态、动作和控制模式;
  • mod.yaml、event、route、action、speed profile 和 App manifest;
  • RobotControlState 及 Pose、Procedural、Policy、MotionReplay 状态;
  • 模型、Resource、Mod 子节点、ROS 话题和第三方运行依赖;
  • 29/31/N 关节适配、MIT 五字段命令、命令合成和 Transition;
  • 手柄按键规划、仿真验证、真机安全检查和 Mod 发布。

怎样使用

在项目仓库根目录启动支持项目级 Skill 的 AI 编程工具,然后直接描述需求即可。为了明确 要求使用本项目规则,也可以在请求中点名:

使用项目内置的 elf3-feature-development Skill,
新增一个订阅 /cmd_vel 的导航控制状态,并规划手柄进入、退出和模式切换。

支持 $SkillName 语法的工具也可以写成:

$elf3-feature-development 为 ELF3 增加一个可独立移植的视觉跟随功能。

能够扫描 .agents/skills 的 AI 会从 .agents/skills/elf3-feature-development/SKILL.md 发现该 Skill,并根据任务继续读取 references 中对应的资料。若使用的 AI 工具不支持 Skill 自动发现,应明确要求它:

  1. 完整阅读 .agents/skills/elf3-feature-development/SKILL.md;
  2. 按其中的任务路由阅读所需 reference;
  3. 再开始规划或修改代码。

不要只复制一小段 Skill 到提示词里。主文件和 references 共同构成完整开发约束,并且会 随项目代码更新。

Skill 会怎样组织功能

Skill 把“实现一个功能”作为目标,Mod 是默认的部署和移植边界,但不是为了创建 Mod 而 创建 Mod。AI 会先判断能否用一个额外 Mod 收齐状态、事件、路由、App 展示、依赖、节点 和资产;只有平台接入、全局 Input Driver、框架公共能力或已有功能缺陷才优先修改中央 代码。

典型规划链如下:

用户功能
  -> 单 Mod 边界与依赖
  -> 物理按键组合
  -> btn_* 槽位和值
  -> event
  -> route 或 action
  -> RobotControlState 行为
  -> App manifest
  -> 仿真和真机分层验证

项目的 Xbox 默认配置已经预留 LB/RB/LT/RT 的全部状态与 A/B/X/Y 组合。开发新功能时, AI 应先扫描启用 Mod 的 event 占用并复用预设 btn_* 值,不应每次重新修改遥控器配置。 App 的 state 图标和 action 图标应从 Google Fonts Icons 选择准确的 Material Symbols 名称。

API 查询顺序

Skill 要求 AI 不凭名称猜 API,按以下顺序查证:

  1. 当前工作树的 framework/mod_api 公共导出和实现;
  2. src/bxi_example_py_elf3/mods 中最接近需求的生产代码,以及仓库测试和加载校验;
  3. 与当前代码仓库匹配的 Wiki 仓库;
  4. Runtime 内部实现,仅用于理解行为或定位框架缺陷;
  5. 对 ROS 2、消息包和厂商 SDK,查询项目实际版本对应的官方资料。

若源码、生产 Mod、测试和 Wiki 不一致,以当前检出的框架代码及实际加载行为为准,并应 明确指出文档漂移。客户 Mod 只依赖 bxi_example_py_elf3.framework.mod_api;策略实现还可以依赖公开的 framework.inference,不能导入 framework.runtime 内部接口。

推荐的提问方式

一个可执行的请求最好包含目标和约束,不需要提前替 AI 选择内部 API:

使用 elf3-feature-development Skill,为机器人增加巡检功能。
它订阅 /inspection/target,在 normal 状态下通过一个未占用的预设组合键进入,
B 键切回手动控制;功能、节点和依赖尽量放在一个可移植 Mod 中。
先规划交互、故障退回和 App 展示,再实现并在仿真中验证。

也可以让 AI 先做只读审查:

使用 elf3-feature-development Skill 审查 com.example.inspection,
优先报告危险电机输出、关节布局错误、线程竞态和部署依赖遗漏,不要修改文件。

人工验收仍然必要

Skill 能减少 API 猜测、功能散落和部署遗漏,但 AI 生成代码仍必须经过人工审查。至少 确认:

  • event 的 slot/value 没有与启用 Mod 冲突;
  • 状态对所有目标关节给出了正确的 MIT 五字段;
  • callback 与控制线程之间没有不受保护的共享写入;
  • 断流、模型失败、动作结束和取消都有明确去向;
  • 构建、配置加载和所有进入/退出路径已在仿真验证;
  • 真机测试时急停可达,先使用吊架、低增益和清空场地。

进一步阅读:

调试、验证与常见问题

本文覆盖从输入设备、Mod 加载、状态切换、推理资源、Mod 子节点到构建部署的常见故障。 机器人状态订阅、电机输出或硬件看门狗问题请转到机器人平台适配指南; 控制周期超时请转到框架控制调度。

先定位故障层,再查看具体章节。 不要同时修改输入 YAML、Mod route、Transition 和状态代码。

快速定位

现象 首先检查
节点启动时 Mod 加载失败 Mod 清单、factory、依赖和参数
按键没有消息 sources -> controls -> outputs
有 /motion_commands 但不切状态 Mod events 和当前状态的 route
状态已切换但没有正确输出 on_enter/on_update 和 MotorFrame
切换过程跳变或报 capability 错误 Transition 与 Entry/RunningFrameProvider
修改后没有生效 是否重新构建并重启了对应节点
模型文件报错 Resource asset 路径、loader 和预热阶段

构建

colcon build --packages-select remote_controller bxi_example_py_elf3 \
  --symlink-install --merge-install
source install/setup.bash

若提示 install layout 不一致,使用匹配的 --merge-install,或换一组全新的 build/install/log 目录。旧构建缓存仍引用已删除模型目录时,只清理对应包缓存。

查看输入和状态

ros2 topic echo /motion_commands
ros2 topic echo /simulation/state_machine_info

硬件前缀时将 simulation/ 换成 hardware/。状态信息 JSON 包含 current、pending、 preparing、active transition、事件和图快照;action 的显示信息位于 graph.actions[], Mod 的 loaded/unavailable/disabled 状态位于 mods[],Mod 节点的 running/stopped/restarting/faulted/unavailable 状态位于 nodes[]。

Mod 没有被发现

  • mod.yaml 是否位于内置 mods/ 或 mod_paths 子树。
  • 安装后的 share/bxi_example_py_elf3/mods/ 是否包含文件。
  • 12 个描述头字段是否全部显式填写,runtime_requirements 是否包含 python/ros/system,schema 是否为 1,api 是否与当前框架兼容,name、id 和版本是否合法。
  • 是否出现重复 id。
  • 日志是否以 Mod logger 打印 loaded v<version>: <root>。

Mod 加载失败

  • needs factory: module:Class:使用 entrypoint: null 的状态漏写约定 factory。
  • factory ... must name a RobotControlState class:模块、类名或继承关系错误。
  • entrypoint module does not exist:entrypoint 与文件名不一致。
  • entrypoint is not callable:冒号后的工厂不存在。
  • state manifest/factory mismatch:states 和 state_factories 键不同。
  • requires missing/version:依赖缺失或版本不匹配。
  • dependency cycle:Mod 依赖形成环。
  • enabled Mods conflict:两个已启用 Mod 命中至少一方的 conflicts 声明。
  • missing Python module/ROS package/system library:runtime_requirements 不满足;检查 Mod 自带 vendor/ 或目标机器运行环境。
  • status: unavailable:依赖检查阶段未通过,框架没有导入对应 Mod 或节点模块,也不会消耗重启次数。
  • unknown params:清单参数未被 StateBuildContext 消费。
  • missing required param / must be ...:dataclass 参数缺失或 YAML 类型错误。

模型找不到或没有加载

  • 资产必须在当前 Mod 的 assets/。
  • context.asset() 路径应写 assets/file.onnx。
  • policy="startup" 的资源在控制循环启动前准备;失败会阻止启动。
  • policy="on_demand" 的资源在第一次请求目标状态时异步准备;状态信息会显示 preparing。
  • 状态必须通过 resources=(handle,) 声明依赖;ResourceHandle.get() 不会触发加载或阻塞等待。
  • 在 on_prepare() 预热,不要在插件 import 时创建推理 Session。
  • 替换模型后需要重启控制节点;启动失败时查看具体资源加载异常。

按键有输出但状态不切换

  1. /motion_commands 的槽位和值是否与 mod.yaml events 一致。
  2. 当前完整状态名是否存在对应 route。
  3. 跨 Mod名称是否含 / 且依赖存在。
  4. 是否正在等待 delay、资源 preparing 或处于活动过渡。
  5. 同一状态是否存在可同时触发的输入;加载器会提前拒绝。

priority 与 index

正常状态只写 manifest.priority。数值越大越靠前,相同 priority 按完整状态名升序排列,框架会自动生成 index。

ValueError: duplicate explicit state manifest index N: 'state-a' and 'state-b'

只有确实需要固定绝对位置时才显式写 manifest.index。两个显式 index 重复会直接终止启动;负数、布尔值和字符串同样是配置错误。

过渡错误

Transition 负责状态切换期间的电机帧,用来避免源、目标状态的 MIT 命令字段不连续时直接产生突跳。因此这类错误要同时检查 route 选用的过渡以及两端状态提供的帧能力。

  • must implement EntryFrameProvider:目标没有进入帧。
  • must implement RunningFrameProvider:动态采样侧没有运行帧能力。
  • unknown transition type:业务过渡模块未被 Mod entrypoint 导入。
  • unknown fields:ConfigReader.finish() 发现字段拼写错误。
  • 发生突跳:检查进入帧与 on_enter() 后第一帧是否一致。

修改后没有生效

  • Mod、系统 YAML、模型资产和遥控器 YAML 都只在对应节点启动时读取。
  • 修改源码后先重新构建工作区,再重启控制节点或 remote_controller。
  • 使用 --symlink-install 时 Python 源码可能直接生效,但仍然必须重启进程。
  • 已部署的非 symlink install/ 可以直接向 share/bxi_example_py_elf3/mods/ 复制完整 Mod 目录;重启后自动发现,不需要在目标机器重新构建。
  • 启动失败不会进入控制循环;根据首个加载异常修正清单、依赖、模块或资源路径。

发布树失败

python3 tools/sanitize_release.py --out /tmp/public_release --self-check

若报告公开 Mod 依赖 protected Mod,检查显式 requires 和跨 Mod route。共享资源应移到 public 资源 Mod。

离线加载检查

下面的检查会加载所有 startup 资源,但不会请求 on_demand 资源,可用于验证 Mod、 启动资源和状态图:

from pathlib import Path
import yaml
from bxi_example_py_elf3.framework.runtime.mod_loader import load_mod_runtime

package = Path("src/bxi_example_py_elf3")
base = yaml.safe_load((package / "config/elf3_state_machine.yaml").read_text())
runtime = load_mod_runtime(base, built_in_root=package / "mods")
print([mod.id for mod in runtime.mods])
print(sorted(runtime.state_factories))
runtime.close()

当前默认树应发现 7 个 Mod 和 17 个状态。

深度相机没有数据

com.bxi.normal_depth 不再内置 RealSense 节点。真机相机由独立 bxi_depth_camera 包管理,硬件示例 launch 默认包含其 cameras.launch.py。

先检查节点和标准话题:

ros2 node list
ros2 topic list | grep body_depth_camera
ros2 topic hz /hardware/body_depth_camera/depth/image_rect_raw
ros2 topic echo /hardware/body_depth_camera/depth/camera_info --once

仿真把 hardware 换成 simulation。继续确认:

  • cameras.body_depth_camera.serial_no 是否与实际设备对应;单相机回退只适合确实只连接一台设备的情况。
  • 深度图和 CameraInfo 是否同时存在,且属于相同分辨率 profile。
  • 图像编码是否为 16UC1、mono16 或 32FC1。
  • mod.yaml 中 camera_name、显式 topic/camera_info_topic 是否互相一致。
  • 日志是否出现 waiting for CameraInfo、非法内参、错误 shape 或深度超时。

状态不可进入时查看 /hardware/state_machine_info:相机数据不新鲜会让 is_available() 返回 False;模型资源仍在准备时会出现 preparing。两者不是同一个 问题,前者检查 ROS 数据,后者检查 Resource 状态和加载错误。

root 运行后普通用户无法重新构建

若运行用户是 root、构建用户是普通用户,旧版本可能在 Mod 或 vendor 目录生成 root 所有的 __pycache__/*.pyc,随后构建会报 Permission denied: '*.pyc'。当前框架禁止 Mod 主进程、依赖探测进程和内置节点子进程向 Mod 目录写 Python 字节码;升级前已经生成的文件仍需一次性修正工作区属主:

cd ~/bxi_ws/bxi_rl_controller_ros2_example
sudo chown -R bxi:bxi src build install log
./build.sh

不希望修改整个工作区时,可先用 find src build install log -user root -print 定位 root 所有的文件。运行命令也可显式加 PYTHONDONTWRITEBYTECODE=1,进一步阻止 ROS launch 自身生成缓存:

PYTHONDONTWRITEBYTECODE=1 ros2 launch \
  bxi_example_py_elf3 example_demo_hw.launch.py

相关文档

Mod 状态开发进阶指南

本指南对应 Mod API 4.0,采用渐进式开发路线,从固定姿态状态逐步扩展到自定义输入 Driver。每一阶段都可以作为独立的最终实现。我们始终维护同一个状态:

本页面向已经完成第一课的开发者。不要按顺序把所有便捷类叠加到一个状态中;先根据 “如何选择阅读终点”找到需求对应的章节,只实现一种清晰的状态方案。

com.example.wave/wave

先理解核心,再选择便捷类。 RobotControlState 是状态系统的主要抽象;PoseState、ProceduralState、PolicyState 和 MotionReplayState 都是它的子类,只是替常见场景实现了重复代码。

核心类与便捷类的关系

状态机构建和运行的始终是 RobotControlState:

RobotControlState                         核心生命周期与完整控制能力
├─ PoseState                              固定目标姿态封装
├─ ProceduralState                        带 elapsed 的轨迹封装
├─ PolicyState                            Resource 解析、预热和推理封装
└─ MotionReplayState                      固定动作回放封装

核心类定义 on_bind/on_prepare/on_enter/on_update/on_exit/on_unbind 等生命周期,并提供速度输入、MotorFrame 和电机输出辅助方法。便捷类通过继承核心类,进一步实现 on_update()、进入帧或运行帧等通用逻辑,让初学者只填写动作本身。

使用便捷类不会产生另一套运行时,也不会降低框架上限。当默认行为不适用时,可以改为直接继承 RobotControlState;只要保留构造契约和状态能力,Mod ID、状态名及 routes 都不需要变化。

便捷类的实现原理

  • PoseState 的 on_update() 调用 target_position(),使用 gains() 提供的 kp/kd 构造完整 MotorFrame,再把 frame 写给控制上下文。它用同一计算结果实现进入帧和运行帧。
  • ProceduralState 在 on_enter() 把 elapsed 清零。每次真实更新先调用 compute_frame(ctx, elapsed),随后推进时间;Transition 使用 advance=False 采样时只观察当前输出,不改变时间。
  • PolicyState 在 prepare/enter 阶段解析并重置策略,可调用模型预热;运行阶段由子类提供进入位置和推理位置,基类统一处理策略增益、ResourceHandle 和 MotorFrame。
  • MotionReplayState 面向符合 ReplayPolicy 接口的固定动作,统一处理预热、暂停、完成检测和显式结束状态请求。

这些封装的核心价值是复用正确的生命周期和 Transition 采样语义,而不是隐藏或替代 RobotControlState。开发者仍可覆盖继承方法,或者在需求复杂后直接实现核心类。

第一次开发普通动作:读到第 3 节即可。 后续章节只在需要模型、共享资源、自定义过渡、ROS 实体或新输入协议时阅读。

如何选择阅读终点

需求 阅读到 主要抽象
固定关节目标 第 1 节 PoseState
公式轨迹、插值或周期动作 第 3 节 ProceduralState + dataclass
在线策略推理或动作回放 第 4 节 PolicyState / MotionReplayState
自行控制完整状态生命周期 第 5 节 直接实现 RobotControlState
共享模型、数据或硬件对象 第 6 节 Resource
自定义状态切换算法 第 7 节 Transition
状态拥有 ROS 通信实体 第 8 节 on_bind/on_unbind
接入全新输入设备或协议 第 9 节 InputDriver

稳定契约

升级时,id、状态名、按键事件和 routes 都不需要改变;旧配置和遥控器绑定也不需要重写。只有当当前层确实不够用时,才进入下一层。

需要更多能力时,在同一个核心模型上继续引入 Resource、Transition、ROS 实体和 InputDriver。

0. 手工建立 Mod

建立目录:

mkdir -p ~/bxi_mods/com.example.wave

本指南将创建两个文件:

~/bxi_mods/com.example.wave/
  mod.yaml
  state.py

在 src/bxi_example_py_elf3/config/elf3_state_machine.yaml 追加搜索根:

mod_paths:
  - /home/你的用户名/bxi_mods

构建工作区并加载环境:

colcon build --packages-select bxi_example_py_elf3
source install/setup.bash

手工创建 ~/bxi_mods/com.example.wave/mod.yaml:

schema: 1
id: com.example.wave
name: 挥手示例
version: 1.0.0
api: ">=4,<5"
enable: true
entrypoint: null
visibility: public
requires:
  - id: com.bxi.basic_actions
    version: ">=1,<2"
conflicts: []
python_exports: []
runtime_requirements:
  python: []
  ros: []
  system: []

events:
  activate:
    slot: btn_10
    value: 11

states:
  wave:
    factory: state:WaveState
    label: 挥手示例
    priority: 100
    group: Customer
    icon: waving_hand
    confirm: true
    confirm_message: 请确保机器人手臂周围没有障碍物

routes:
  - from: com.bxi.basic_actions/normal
    event: activate
    to: wave
    transition: soft_switch
  - from: wave
    event: com.bxi.basic_actions/normal
    to: com.bxi.basic_actions/normal
    transition: dual_running_blend
  - from: wave
    event: com.bxi.basic_actions/zero_torque
    to: com.bxi.basic_actions/zero_torque

factory: state:WaveState 表示加载同目录 state.py 中的 WaveState;这种简单 Mod 使用显式的 entrypoint: null,不需要 plugin.py。描述 Mod 的头部字段即使为空也不能省略。

1. PoseState:只描述目标姿态

新概念:只返回关节目标,框架负责 kp/kd、进入帧、运行帧和电机输出。关节名称是组件间契约,数字下标只允许作为提前编译好的内部缓存。

只改 state.py:

import numpy as np

from bxi_example_py_elf3.framework.mod_api import PoseState


class WaveState(PoseState):
    def __init__(self, name, state_id):
        super().__init__(name, state_id)
        self._shoulder_index = None
        self._target = None
        self._layout = None

    def on_prepare(self, ctx, from_state):
        layout = ctx.robot_layout
        if self._layout is not layout:
            self._shoulder_index = layout.index("r_shoulder_y_joint")
            self._target = np.empty(layout.dof_num, dtype=np.float32)
            self._layout = layout
        np.copyto(self._target, ctx.last_motor_frame.qpos)
        self._target[self._shoulder_index] += 0.35

    def gains(self, ctx):
        return ctx.last_motor_frame.kp, ctx.last_motor_frame.kd

    def target_position(self, ctx):
        return self._target

这里在 on_prepare() 首次遇到 Robot Layout 时按名称解析关节并申请缓冲,同时捕获进入动作时的姿态。控制周期只返回同一个数组。不要在 on_bind() 读取布局,此时首个机器人状态可能还没到。首次调试仍须确认关节方向和安全范围。PoseState 自动实现 EntryFrameProvider 和 RunningFrameProvider,因此可直接使用 soft_switch、entry_gain_ramp 和 running_blend。

保持不变:mod.yaml、完整状态名、routes、按键绑定。

停在本级:目标是固定姿态、保持姿态或简单零位,不需要时间变化。

2. ProceduralState:加入时间和连续轨迹

新概念:用 elapsed 计算轨迹。框架只在真实更新时推进时间;过渡以 advance=False 采样时不会偷偷推进动作。

仍然只改 state.py:

import math
import numpy as np

from bxi_example_py_elf3.framework.mod_api import ProceduralState


class WaveState(ProceduralState):
    def __init__(self, name, state_id):
        super().__init__(name, state_id)
        self._shoulder_index = None
        self._elbow_index = None
        self._base_position = None
        self._layout = None

    def on_prepare(self, ctx, from_state):
        layout = ctx.robot_layout
        if self._layout is not layout:
            self._shoulder_index = layout.index("r_shoulder_y_joint")
            self._elbow_index = layout.index("r_elbow_y_joint")
            self._base_position = np.empty(layout.dof_num, dtype=np.float32)
            self._layout = layout
        np.copyto(self._base_position, ctx.last_motor_frame.qpos)

    def gains(self, ctx):
        return ctx.last_motor_frame.kp, ctx.last_motor_frame.kd

    def compute_frame(self, ctx, elapsed):
        frame = self.frame(ctx, self._base_position)
        frame.qpos[self._shoulder_index] += 0.35
        frame.qpos[self._elbow_index] += 0.25 * math.sin(
            2.0 * math.pi * 0.7 * elapsed
        )
        return frame

self.frame(ctx, qpos) 会调用当前状态的 gains(ctx);框架不再提供与具体机器人耦合的全局增益。这里明确沿用上一控制帧的 kp/kd。需要从零力矩状态进入或使用特殊增益时,应让状态返回自身经过验证的 kp/kd,也可传 self.frame(ctx, qpos, kp=..., kd=...)。

保持不变:mod.yaml 的全部内容。

停在本级:轨迹能由公式、插值或小型有限状态变量表达,不需要模型推理。

3. dataclass 参数:让 YAML 成为有类型的调节面板

新概念:参数拥有名字、类型和默认值;拼错字段或类型错误会在启动时失败,而不是在真机运行中暴露。

替换 state.py:

from dataclasses import dataclass
import math
import numpy as np

from bxi_example_py_elf3.framework.mod_api import ProceduralState


@dataclass(frozen=True)
class WaveParams:
    shoulder: str = "r_shoulder_y_joint"
    elbow: str = "r_elbow_y_joint"
    shoulder_offset: float = 0.35
    amplitude: float = 0.25
    frequency: float = 0.7
    duration: float | None = None


class WaveState(ProceduralState[WaveParams]):
    Params = WaveParams

    def __init__(self, name, state_id, params=None):
        super().__init__(name, state_id, params)
        self._shoulder_index = None
        self._elbow_index = None
        self._base_position = None
        self._layout = None

    def on_prepare(self, ctx, from_state):
        layout = ctx.robot_layout
        if self._layout is not layout:
            self._shoulder_index = layout.index(self.params.shoulder)
            self._elbow_index = layout.index(self.params.elbow)
            self._base_position = np.empty(layout.dof_num, dtype=np.float32)
            self._layout = layout
        np.copyto(self._base_position, ctx.last_motor_frame.qpos)

    def gains(self, ctx):
        return ctx.last_motor_frame.kp, ctx.last_motor_frame.kd

    def compute_frame(self, ctx, elapsed):
        frame = self.frame(ctx, self._base_position)
        frame.qpos[self._shoulder_index] += self.params.shoulder_offset
        frame.qpos[self._elbow_index] += self.params.amplitude * math.sin(
            2.0 * math.pi * self.params.frequency * elapsed
        )
        return frame

只在 mod.yaml 的 states.wave 下增加:

    params:
      shoulder: r_shoulder_y_joint
      elbow: r_elbow_y_joint
      shoulder_offset: 0.35
      amplitude: 0.20
      frequency: 0.8

约定工厂看到类上的 Params 是 dataclass 后,会自动调用 StateBuildContext.dataclass_params(),再构造 WaveState(name, state_id, params)。支持 int、float、bool、str 和这些类型的可选值;bool 不会被误当成整数。dataclass 默认值、default_factory 和未知字段检查都保留。

保持不变:类名、factory、状态名、events 和 routes。

停在本级:客户只需通过 YAML 调动作,不需要替换算法。

4A. PolicyState:把推理对象放入 Resource

API 4 的 PolicyState 不再在状态中调用 create_policy()。策略必须由 Resource 创建, 状态构造时接收 ResourceHandle;这样模型初始化不会落入控制线程,状态机也能在切换前 等待资源就绪。下面仍用纯 Python 策略解释接口。

state.py:

from dataclasses import dataclass
import math
import numpy as np

from bxi_example_py_elf3.framework.inference import PolicyOutput
from bxi_example_py_elf3.framework.mod_api import (
    JointLayout,
    JointTargetBuffer,
    PolicyState,
)


@dataclass(frozen=True)
class WaveParams:
    joint: str = "r_elbow_y_joint"
    amplitude: float = 0.20
    frequency: float = 0.8


class WavePolicy:
    def __init__(self, params: WaveParams):
        self.params = params
        self.elapsed = 0.0
        layout = JointLayout.create((params.joint,), label="wave policy")
        self.target = JointTargetBuffer(layout)
        self.output = PolicyOutput(self.target.view)
        self.base = np.empty(1, dtype=np.float32)

    def reset(self, base):
        self.elapsed = 0.0
        np.copyto(self.base, base)

    def infer(self, dt, *, advance):
        np.copyto(self.target.position, self.base)
        self.target.position[0] += self.params.amplitude * math.sin(
            2.0 * math.pi * self.params.frequency * self.elapsed
        )
        if advance:
            self.elapsed += dt
        return self.target.position


class WaveState(PolicyState[WavePolicy]):
    def __init__(self, name, state_id, policy, params):
        super().__init__(name, state_id, policy)
        self.params = params

    def _robot_joint_index(self, ctx):
        return ctx.robot_layout.index(self.params.joint)

    def gains(self, ctx):
        index = self._robot_joint_index(ctx)
        return (
            ctx.last_motor_frame.kp[index : index + 1],
            ctx.last_motor_frame.kd[index : index + 1],
        )

    def reset_policy(self, ctx, policy):
        index = self._robot_joint_index(ctx)
        policy.reset(ctx.last_motor_frame.qpos[index : index + 1])

    def policy_entry_position(self, ctx, policy):
        return policy.base

    def infer_position(self, ctx, policy, dt, *, advance):
        return policy.infer(dt, advance=advance)

新增 plugin.py,在状态工厂读取强类型参数,并为该状态注册一个按需资源:

from bxi_example_py_elf3.framework.mod_api import (
    ModDefinition,
    ResourceKey,
)

from .state import WaveParams, WavePolicy, WaveState


def create_mod(context):
    def build_state(state):
        params = state.dataclass_params(WaveParams)
        key = ResourceKey[WavePolicy](f"{state.name}/policy")
        context.register_resource(
            key,
            lambda _resource: WavePolicy(params),
            policy="on_demand",
        )
        return WaveState(
            state.name,
            state.state_id,
            context.resource(key),
            params,
        )

    return ModDefinition(state_factories={"wave": build_state})

同时把清单改为 entrypoint: plugin:create_mod,并删除 states.wave.factory。第一次请求 进入状态时,状态机异步准备 WavePolicy;资源 ready 后,PolicyState.on_prepare() 才会解析、重置和预热策略。advance=False 仍必须保证不推进策略时间。

停在本级:实时模型有自己的 observation/action 逻辑,或存在 recurrent state,但不属于固定动作回放。

4B. MotionReplayState:固定模型动作直接复用

如果策略提供当前 ReplayPolicy 契约——长期 output、reset(frame)、step(frame, dt, advance=...) 和 finished(trim)——优先复用 MotionReplayState,不要重复写播放、预热、暂停和结束返回逻辑。

状态最小形态:

from bxi_example_py_elf3.framework.mod_api import MotionReplayState


class WaveState(MotionReplayState):
    def __init__(self, name, state_id, policy):
        super().__init__(
            name,
            state_id,
            policy,
            finish_state="com.bxi.basic_actions/normal",
            finish_trigger="wave_finished",
            end_frame_trim=20,
            end_transition={
                "profile": "dual_running_blend",
                "duration": 0.6,
            },
        )

这时策略通常来自第 6 节的 Resource,因此会增加 plugin.py。完整可运行模型例子见 把模型动作封装成 Mod。

finish_state 是必填项。框架不知道哪个状态是某台机器人的基础状态,因此不会隐式返回 normal。模型的 action layout 也不等于机器人或状态的输出布局:29 关节模型可以运行在 31 关节机器人上,缺少的两个状态输出必须由其他命令 Layer 或平台默认值补齐。

停在本级:离线 motion + policy 的接口与 ReplayPolicy 一致。

4C. 模型之外还有命令来源

一个状态不必把所有关节都塞进模型 action。例如挥手动作可以由 29 关节策略提供基础命令, 再由程序轨迹覆盖右臂,并由 ROS 话题或头部控制器提供新增的两个颈部关节:

from bxi_example_py_elf3.framework.mod_api import (
    JointCommandComposer,
    JointCommandLayer,
    JointLayout,
    JointTargetBuffer,
)

HEAD_JOINTS = JointLayout(("neck_y_joint", "neck_z_joint"))

self.policy_target = self.policy.output.joints
self.state_output = JointLayout(
    (*self.policy_target.layout.names, *HEAD_JOINTS.names)
)
self.head = JointTargetBuffer(HEAD_JOINTS)
self.composer = JointCommandComposer(
    self.state_output,
    (
        JointCommandLayer("policy", self.policy_target),
        JointCommandLayer("head", self.head.view),
    ),
)

准备阶段创建 Layer、Buffer 和 Composer;控制周期只原地更新 self.head.position/kp/kd,然后 调用 self.composer.compose()。如果一个来源有意覆盖另一个来源已经控制的关节,后置 Layer 必须显式设置 override=True。完整例子、线程边界和所有权规则见 多来源关节命令合成,29/31/N 关节适配见 关节布局与映射。

5. 直接实现 RobotControlState

RobotControlState 从一开始就是所有状态的核心基类。本节不再使用便捷子类,而是直接实现核心生命周期、Transition capability 和电机输出。

把 state.py 改成:

from bxi_example_py_elf3.framework.mod_api import RobotControlState
from bxi_example_py_elf3.framework.mod_api.transition import (
    EntryFrameProvider,
    RunningFrameProvider,
)


class WaveState(RobotControlState, EntryFrameProvider, RunningFrameProvider):
    def __init__(self, name, state_id):
        super().__init__(name, state_id)
        self.elapsed = 0.0

    def on_enter(self, ctx):
        self.elapsed = 0.0

    def is_available(self, ctx):
        # 没有外部依赖的状态无需覆盖;基类默认返回 True。
        return True

    def _calculate(self, ctx, elapsed):
        last = ctx.last_motor_frame
        frame = self._motor_frame(ctx, last.qpos, last.kp, last.kd)
        # 在这里可以原地写 frame.qpos,读取传感器、做 IK、MPC 或滤波。
        return frame

    def get_entry_frame(self, ctx):
        return self._calculate(ctx, 0.0)

    def sample_running_frame(self, ctx, dt, *, advance):
        frame = self._calculate(ctx, self.elapsed)
        if advance:
            self.elapsed += dt
        return frame

    def on_update(self, ctx, dt):
        self._apply_frame(
            ctx,
            self.sample_running_frame(ctx, dt, advance=True),
        )

如果不使用需要进入帧/运行帧的过渡,可以不实现相应 Protocol。on_exit() 默认不做额外工作;只有状态确实拥有运行期资源或需要记录业务状态时才覆盖它。

依赖外部传感器或服务时可覆盖 is_available(ctx) -> bool。它是进入状态前的快速健康检查, 必须非阻塞、无副作用,只读取已由 callback 或后台节点维护的快照。返回 False 时状态机 保持现状,不调用目标状态的 on_prepare();ctx.request_state() 同时返回 False。默认实现 返回 True,因此现有状态不需要修改。

框架为罕见的维护和诊断操作保留 ctx.request_state(..., force=True)。它只跳过 is_available(),不会吞掉配置、节点启动或生命周期错误;业务动作不要默认开启。

保持不变:factory: state:WaveState 仍有效;无参数构造仍无需 plugin.py。

停在本级:你已经能实现任意状态内算法,但尚不需要共享、配置加载策略和统一释放大型对象。

6. 自定义 Resource:共享、配置加载策略并统一释放

新概念:把模型、数据集、硬件句柄等昂贵对象从状态生命周期中分离。此级新增 plugin.py,并把工厂改为显式入口。

目录变成:

com.example.wave/
  mod.yaml
  plugin.py
  state.py
  assets/
    wave.yaml

先建立 assets/wave.yaml:

shoulder: r_shoulder_y_joint
elbow: r_elbow_y_joint
shoulder_offset: 0.35
amplitude: 0.20
frequency: 0.8

把 state.py 替换为一个完整的 Resource 消费者:

from dataclasses import dataclass
import math
import numpy as np

from bxi_example_py_elf3.framework.mod_api import (
    EntryFrameProvider,
    RobotControlState,
    RunningFrameProvider,
)


@dataclass(frozen=True)
class WaveProfile:
    shoulder: str
    elbow: str
    shoulder_offset: float
    amplitude: float
    frequency: float


class WaveState(RobotControlState, EntryFrameProvider, RunningFrameProvider):
    def __init__(self, name, state_id, profile):
        super().__init__(name, state_id, resources=(profile,))
        self._profile_handle = profile
        self._profile = None
        self.elapsed = 0.0
        self._shoulder_index = None
        self._elbow_index = None
        self._base_position = None
        self._layout = None

    def on_prepare(self, ctx, from_state):
        profile = self._profile_handle.get()
        self._profile = profile
        layout = ctx.robot_layout
        if self._layout is not layout:
            self._shoulder_index = layout.index(profile.shoulder)
            self._elbow_index = layout.index(profile.elbow)
            self._base_position = np.empty(layout.dof_num, dtype=np.float32)
            self._layout = layout
        np.copyto(self._base_position, ctx.last_motor_frame.qpos)

    def on_enter(self, ctx):
        self.elapsed = 0.0

    def _calculate_frame(self, ctx, elapsed):
        profile = self._profile
        if profile is None:
            raise RuntimeError("wave resource has not been prepared")
        last = ctx.last_motor_frame
        frame = self._motor_frame(
            ctx,
            self._base_position,
            last.kp,
            last.kd,
        )
        frame.qpos[self._shoulder_index] += profile.shoulder_offset
        frame.qpos[self._elbow_index] += profile.amplitude * math.sin(
            2.0 * math.pi * profile.frequency * elapsed
        )
        return frame

    def get_entry_frame(self, ctx):
        return self._calculate_frame(ctx, 0.0)

    def sample_running_frame(self, ctx, dt, *, advance):
        frame = self._calculate_frame(ctx, self.elapsed)
        if advance:
            self.elapsed += dt
        return frame

    def on_update(self, ctx, dt):
        self._apply_frame(
            ctx,
            self.sample_running_frame(ctx, dt, advance=True),
        )

plugin.py 完整内容:

import yaml

from bxi_example_py_elf3.framework.mod_api import (
    ModDefinition,
    ResourceKey,
)

from .state import WaveProfile, WaveState


PROFILE = ResourceKey[WaveProfile]("com.example.wave/profile")


def create_mod(context):
    def load_profile(resource):
        path = resource.asset("assets/wave.yaml")
        with path.open("r", encoding="utf-8") as input_file:
            raw = yaml.safe_load(input_file)
        return WaveProfile(
            shoulder=str(raw["shoulder"]),
            elbow=str(raw["elbow"]),
            shoulder_offset=float(raw["shoulder_offset"]),
            amplitude=float(raw["amplitude"]),
            frequency=float(raw["frequency"]),
        )

    context.register_resource(PROFILE, load_profile, policy="on_demand")
    profile = context.resource(PROFILE)  # 这里只取得 handle
    return ModDefinition(
        state_factories={
            "wave": lambda state: WaveState(
                state.name,
                state.state_id,
                profile,
            )
        }
    )

state.py 中让状态接收 ResourceHandle,并通过 RobotControlState(..., resources=(profile,)) 声明进入依赖。第一次请求状态时,状态机 异步准备 on_demand 资源;资源就绪后才调用 on_prepare(),所以此处的 get() 不会 阻塞。控制周期也不会反复调用 get() 或查询名称。模型策略可直接把 ResourceHandle[Policy] 交给 PolicyState 或 MotionReplayState,这两个便捷类会自动 声明资源依赖。

mod.yaml 改两处:

entrypoint: plugin:create_mod

states:
  wave:
    # 删除 factory: state:WaveState
    label: 挥手示例
    priority: 100

其他字段全部不变。这个例子用 YAML 是为了能直接运行;换成 ONNX 时,只需让 loader 返回推理器。资源只能通过 resource.asset("assets/...") 访问本 Mod 的 assets/。资源对象有 close() 时,节点关闭会自动调用。启动时就必须可用的模型应把注册参数改为 policy="startup";框架会在控制循环启动前完成准备并检查失败。

停在本级:多个状态共享模型,或对象需要惰性初始化、缓存和可靠释放。

7. 自定义 Transition:让“怎么切换”也可插拔

新概念:状态描述自己运行时的行为,Transition 描述从状态机收到切换请求到目标状态正式进入之间如何生成电机帧。需要单独设计这段过程,是因为两边的 MIT 命令字段可能不连续,直接切换可能让机器人突然动作;内置实现可以保持、渐增增益或混合两边的运行帧。

只有内置策略不能表达业务需要时才自定义 Transition。下面新增 pose_gain_blend.py:

from collections.abc import Mapping
import numpy as np

from bxi_example_py_elf3.framework.mod_api.transition import (
    ConfigReader,
    MotorFrame,
    SingleClassTransition,
    require_entry_frame_provider,
)


class PoseGainBlend(SingleClassTransition):
    type_name = "com.example.wave.pose_gain_blend"

    def __init__(self, name, duration):
        super().__init__(name, duration)
        self.start = None
        self.target = None
        self.output = None

    @classmethod
    def from_config(cls, name: str, raw: Mapping[str, object]):
        reader = ConfigReader(raw, name)
        duration = reader.float("duration", minimum=0.0)
        reader.finish()
        return cls(name, duration)

    def validate_states(self, from_state, to_state):
        require_entry_frame_provider(to_state)

    def on_start(self, ctx, from_state, to_state):
        self.start = MotorFrame.create(
            ctx.robot_layout,
            ctx.last_motor_frame.qpos,
            ctx.last_motor_frame.kp,
            ctx.last_motor_frame.kd,
            vel=ctx.last_motor_frame.vel,
            torque=ctx.last_motor_frame.torque,
        )
        natural_target = require_entry_frame_provider(to_state).get_entry_frame(ctx)
        self.target = MotorFrame.empty(ctx.robot_layout)
        ctx.resolve_motor_frame(natural_target, self.target)
        self.output = MotorFrame.empty(ctx.robot_layout)

    def apply(self, ctx, dt, progress):
        if self.start is None or self.target is None or self.output is None:
            raise RuntimeError("pose gain blend has not started")
        alpha = progress * progress * (3.0 - 2.0 * progress)
        for start, target, output in (
            (self.start.qpos, self.target.qpos, self.output.qpos),
            (self.start.vel, self.target.vel, self.output.vel),
            (self.start.kp, self.target.kp, self.output.kp),
            (self.start.kd, self.target.kd, self.output.kd),
            (self.start.torque, self.target.torque, self.output.torque),
        ):
            np.subtract(target, start, out=output)
            output *= alpha
            output += start
        ctx.set_motor_target(self.output)

在 plugin.py 中显式加入 Mod 定义:

from .pose_gain_blend import PoseGainBlend


return ModDefinition(
    state_factories={
        "wave": build_wave_state,
    },
    transition_plugins={
        PoseGainBlend.type_name: PoseGainBlend,
    },
)

build_wave_state 表示上一节已经使用的状态工厂;这里只新增 transition_plugins,不要另写第二个 create_mod()。

在 mod.yaml 增加 profile,并只替换 route 的 transition:

transition_profiles:
  wave_entry:
    type: com.example.wave.pose_gain_blend
    duration: 0.6

routes:
  - from: com.bxi.basic_actions/normal
    event: activate
    to: wave
    transition: wave_entry

Transition 与其动态模块会在节点启动时一起加载;加载失败会清理已创建的资源、模块和注册项。完整字段、能力校验和测试方法见 手把手自定义过渡。

停在本级:内置 instant/hold/gain ramp/running blend/sequence 已不够表达切换过程。

8. 自定义 ROS subscriber、service、timer

新概念:状态可以拥有 ROS 实体,但创建与销毁必须成对。不要在 __init__() 创建 ROS 对象;构造时还没有绑定 node。

在 WaveState 增加:

from std_srvs.srv import SetBool
from std_msgs.msg import Float32


def on_bind(self, ctx):
    node = ctx.ros_node
    self.external_scale = 1.0
    self.enabled = True
    self.subscription = node.create_subscription(
        Float32,
        "/wave/amplitude_scale",
        self._on_scale,
        10,
    )
    self.service = node.create_service(
        SetBool,
        "/wave/enable",
        self._on_enable,
    )
    self.timer = node.create_timer(1.0, self._on_timer)

def _on_scale(self, message):
    # callback 只更新状态私有数据,不直接发电机命令。
    self.external_scale = max(0.0, min(float(message.data), 1.0))

def _on_enable(self, request, response):
    self.enabled = bool(request.data)
    response.success = True
    response.message = "wave enabled" if self.enabled else "wave disabled"
    return response

def _on_timer(self):
    # 低频维护工作;实时电机输出仍只在 on_update 中产生。
    pass

def on_unbind(self, ctx):
    node = ctx.ros_node
    node.destroy_timer(self.timer)
    node.destroy_service(self.service)
    node.destroy_subscription(self.subscription)
    self.timer = None
    self.service = None
    self.subscription = None

之后在 _calculate() 或 compute_frame() 中读取 enabled/external_scale。RobotControlContext 只通过 ctx.ros_node 暴露 ROS 节点,不代理 create_*/destroy_*。节点关闭时框架会对状态调用 on_unbind();忘记释放会让订阅、service 或 callback 无法按生命周期确定地销毁。

保持不变:Mod ID、状态名、routes、Resource 和 Transition。

停在本级:需要外部感知、业务服务或低频任务,但输入协议仍是现有键盘/手柄/CRSF。

如果 ROS 实体本身是可独立运行的后台能力,例如相机发布器、感知预处理或 Mod 专属服务,应优先声明为 mod.yaml 顶层 nodes。它可以选择与控制器同进程,也可以隔离在 Python 子进程;还可以随整个 Mod 常驻,或在一组状态准备前启动。只有明确属于单个状态对象的轻量订阅、service 或 timer 才放在 on_bind/on_unbind。

9. 自定义输入 Driver:接入一种全新设备或协议

这是状态 Mod 之外的系统扩展点。只有要接入 UDP、SBUS、新串口协议、蓝牙或自定义 HID 时才写 Driver;“换按键”“换手柄映射”“组合键”只改遥控器 YAML。

数据边界必须保持:

自定义 Driver
  -> raw signal(例如 udp.vx、udp.wave)
  -> sources
  -> controls
  -> outputs
  -> MotionCommands.btn_10=11
  -> com.example.wave/activate
  -> 原来的 route 和 wave 状态

因此 Driver 不应知道 com.example.wave/wave。实现步骤:

  1. 在 src/remote_controller/src/drivers/ 实现 InputDriverBase。
  2. is_available() 必须非阻塞,并依据设备/近期合法帧判断健康。
  3. start()/stop() 成对管理线程、fd/socket;is_ready() 只在收到完整安全初始帧后为真。
  4. 用 set_signal("udp.wave", 0.0/1.0) 发布 raw signal。
  5. 在 driver registry 注册 type: udp,并加入 CMake 源文件。
  6. 在遥控器 YAML 的 sources 声明设备,再由 controls/outputs 映射回原来的 btn_10=11。

最小 YAML 连接段:

sources:
  udp_remote:
    type: udp
    priority: 20
    bind: 0.0.0.0
    port: 14550
    ready_timeout_ms: 1000
    loss_timeout_ms: 500
    signals:
      udp.wave:
        from: udp.wave
        timeout_ms: 500
        failsafe: 0.0

controls:
  udp.wave_event:
    type: bool
    threshold: 0.5
    inputs:
      - source: udp.wave

outputs:
  edge:
    - output: btn_10=11
      when:
        any:
          - [udp.wave_event]

完整 C++ Driver、注册、断连抢占和发包验证见 手把手 UDP Driver。

10. 最终检查表

每次只证明当前层正确,再升一级:

  • 节点启动日志中没有 Mod 加载、参数、依赖或 route 校验错误。
  • 仿真中先验证关节顺序、范围、第一帧、退出帧和 advance=False。
  • dataclass 不保留无用参数;错误字段能在加载期失败。
  • 模型资源没有在 import 或状态 __init__() 阶段加载。
  • 自定义 Transition 对所需状态 capability 做加载期验证。
  • on_bind() 创建的 ROS 实体全部在 on_unbind() 释放。
  • Driver 只产生 raw signal,断连时归零并允许设备管理器安全切换。
  • 最后才进行低增益、急停可达、清空障碍物条件下的真机测试。

最重要的升级规则只有一句:保留 com.example.wave/wave 这份稳定契约,按需替换它背后的实现。基础 API 可以直接用于正式功能,高级扩展点则按实际需求逐步引入。

自定义状态

本页是 API 参考,不是第一篇入门教程。第一次开发动作请先完成 用 Mod API 4.0 开发一个动作,遇到具体生命周期、工厂、参数或 Transition 能力问题时再回到本页查阅。

自定义状态必须由某个 Mod 提供。最小组成只有状态类和 mod.yaml;共享资源或注册高级扩展时再增加 plugin.py。完整渐进路线见 Mod 状态开发进阶指南。

核心状态模型:RobotControlState

RobotControlState 是所有机器人状态的核心基类。状态构建器、状态机和 Transition 最终处理的都是 RobotControlState;其他状态基类只是建立在它之上的复用封装。

from __future__ import annotations

from bxi_example_py_elf3.framework.mod_api import RobotControlContext, RobotControlState


class HoldState(RobotControlState):
    def on_update(self, ctx: RobotControlContext, dt: float) -> None:
        last = ctx.last_motor_frame
        ctx.set_motor_target(
            self._motor_frame(ctx, last.qpos, last.kp, last.kd)
        )

构造函数若没有额外依赖,可以直接继承基类的 (name, state_id)。

便捷状态基类

这些类都继承 RobotControlState,不会改变状态机模型,也不会限制以后切换到完整 API:

类 开发者主要实现 基类代为实现 适用场景
PoseState target_position()、增益策略 固定姿态的 MotorFrame、进入帧、运行帧和 on_update() 保持姿态、零位、单一目标姿态
ProceduralState compute_frame(ctx, elapsed)、增益策略 时间重置与累计、无副作用采样和 on_update() 公式轨迹、插值、周期动作
PolicyState Resource handle、进入位置、推理和必要的增益策略 资源依赖声明、handle 解析、重置、预热和 frame 输出 在线策略、带 history 的模型
MotionReplayState 策略资源、finish_state 和结束配置 预热、暂停、完成检测、显式请求结束状态 固定模型动作回放

例如,固定姿态可以用最薄的 PoseState:

schema: 1
id: com.example.hold
name: 保持姿态
version: 1.0.0
api: ">=4,<5"
enable: true
entrypoint: null
visibility: public
requires: []
conflicts: []
python_exports: []
runtime_requirements:
  python: []
  ros: []
  system: []
states:
  hold:
    factory: state:HoldState
    label: 保持姿态
    priority: 100
from bxi_example_py_elf3.framework.mod_api import PoseState


class HoldState(PoseState):
    def gains(self, ctx):
        return ctx.last_motor_frame.kp, ctx.last_motor_frame.kd

    def target_position(self, ctx):
        return ctx.last_motor_frame.qpos

PoseState 的 on_update() 内部会调用 target_position() 和状态自己的 gains(),把结果 写入状态长期复用的 MotorFrame,再调用 ctx.set_motor_target(frame)。因此上例可以直接返回 已有数组,不需要 .copy()。它还提供稳定的进入帧和运行帧,可直接配合需要 EntryFrameProvider 或 RunningFrameProvider 的 Transition。

框架不提供隐藏的全局 kp/kd。上例明确选择沿用上一控制帧的增益,适合从正常受控状态进入;如果允许从零力矩状态进入,上一帧增益可能全为零,状态必须改为提供经过真机验证的自身增益。也可以不覆盖 gains(),在 self.frame(..., kp=..., kd=...) 中逐帧显式传入。

当需要自行控制生命周期、传感器处理、输出时序或特殊 capability 时,直接继承 RobotControlState。从便捷类切换到核心类不要求修改 Mod 清单中的状态名和 routes。

状态依赖相机、定位、外部服务或其他可能暂时失效的前置条件时,覆盖 is_available(ctx) -> bool。状态机在准备 Transition 之前调用它;返回 False 会拒绝本次 切换,当前状态和正在执行的 Transition 都保持不变,目标状态的 on_prepare() 也不会执行。 该方法必须非阻塞、无副作用,且不能在其中加载模型或等待消息。默认实现返回 True。

显式工厂

from bxi_example_py_elf3.framework.mod_api import ModDefinition, ModLoadContext

from .state import HoldState


def create_mod(context: ModLoadContext) -> ModDefinition:
    return ModDefinition(
        state_factories={
            "hold": lambda state: HoldState(state.name, state.state_id),
        }
    )

框架不再扫描所有 RobotControlState 子类。工厂键必须与清单的本地状态名完全一致。

清单声明

schema: 1
id: com.example.hold
name: 保持姿态
version: 1.0.0
api: ">=4,<5"
enable: true
entrypoint: plugin:create_mod
visibility: public
requires:
  - id: com.bxi.basic_actions
    version: ">=1,<2"
conflicts: []
python_exports: []
runtime_requirements:
  python: []
  ros: []
  system: []

events:
  activate:
    slot: btn_10
    value: 11

states:
  hold:
    manifest:
      label: 保持姿态
      priority: 100
      group: Customer
      icon: pause

routes:
  - from: com.bxi.basic_actions/normal
    event: activate
    to: hold
  - from: hold
    event: com.bxi.basic_actions/normal
    to: com.bxi.basic_actions/normal

运行时完整状态名是 com.example.hold/hold。

生命周期

方法 时机 用途
on_bind(ctx) 状态构建后一次 创建订阅、client、timer 等 ROS 资源
on_prepare(ctx, from_state) 过渡 Session 创建前 预热模型、选择动作、准备缓存;不要输出电机
on_prepare_cancel(...) 准备后的过渡被中断 撤销准备副作用
on_enter(ctx) 成为当前状态后 重置播放进度和状态私有变量
on_update(ctx, dt) 当前状态每个控制周期 生成电机输出
on_action(ctx, name) actions 规则触发时 执行动作并返回是否处理
on_exit(ctx) 成功切出时 释放状态运行期资源或记录业务状态;默认无操作
on_unbind(ctx) 节点关闭 释放 on_bind 创建的资源

不要在 __init__() 中访问 ROS node 上下文;构造阶段只有工厂依赖和清单参数。

强类型参数

简单 Mod 推荐 dataclass:

from dataclasses import dataclass

from bxi_example_py_elf3.framework.mod_api import PoseState

@dataclass(frozen=True)
class HoldParams:
    gain_scale: float = 0.5
    allow_motion: bool = False

class HoldState(PoseState[HoldParams]):
    Params = HoldParams

约定 factory 会自动构造参数对象,保留默认值并拒绝未知字段。显式 plugin.py 工厂仍可使用下面的逐字段 API:

states:
  hold:
    params:
      gain_scale: 0.5
      allow_motion: false
state_factories = {
    "hold": lambda state: HoldState(
        state.name,
        state.state_id,
        gain_scale=state.float_param("gain_scale", 1.0),
        allow_motion=state.bool_param("allow_motion", False),
    )
}

支持 int_param、float_param、string_param、bool_param 和通用 param。未知参数会在构建时失败。

MotorFrame 和过渡能力

从一个模型直接切到另一个模型时,qpos、kp 或 kd 可能在一帧内跳变,导致机器人猛地动一下。内置 Transition 有两种常用解法:

  • first_frame_switch 先取得目标状态的第一帧,再逐步增加控制增益;因此目标状态需要 EntryFrameProvider.get_entry_frame()。
  • dual_running_blend 分别采样两个运行中的状态,再混合两边的完整 MotorFrame;因此被配置为动态采样的两端需要 RunningFrameProvider.sample_running_frame(),目标状态还需要 entry frame 作为初始值和回退值。

状态切换期间由 Transition 暂时接管电机输出,所以它不能直接调用会发布命令、推进模型的 on_update()。get_entry_frame() 和 sample_running_frame() 正是为 Transition 提供可独立取得的帧数据,它们分别来自 EntryFrameProvider 与 RunningFrameProvider 协议,不是任意命名的辅助函数。

RobotControlState 仍是状态的主要抽象,它本身只要求正常运行所需的生命周期。Provider 是按 Transition 需要添加的可选能力;其他过渡方式也可以通过类似方式规定它需要的额外接口。当前内置过渡的对应关系如下:

Transition 配置 状态必须提供
instant、hold 无额外 Provider
entry_gain_ramp 的目标状态 EntryFrameProvider
running_blend 的目标状态 EntryFrameProvider
running_blend 且 sample_from: true 来源状态的 RunningFrameProvider
running_blend 且 sample_to: true 目标状态的 RunningFrameProvider

完整的因果链和命名解释见 深度感知行走 Mod 开发实录:Transition 能力。

需要进入帧的状态实现 EntryFrameProvider:

class HoldState(RobotControlState, EntryFrameProvider):
    def get_entry_frame(self, ctx: RobotControlContext) -> MotorFrame:
        last = ctx.last_motor_frame
        return self._motor_frame(
            ctx,
            last.qpos,
            last.kp,
            last.kd,
        )

需要 running_blend 动态采样时再实现 RunningFrameProvider:

def sample_running_frame(self, ctx, dt, *, advance):
    qpos = self._calculate(ctx, dt, advance=advance)
    last = ctx.last_motor_frame
    return self._motor_frame(ctx, qpos, last.kp, last.kd)

advance=False 必须是观察操作,不应推进 timestep 或 history。普通 on_update() 可用 _apply_frame() 发布采样结果。

多来源关节命令

模型、话题、IK、轨迹或状态逻辑同时控制不同关节时,不要把非模型命令伪装成模型输出, 也不要写进平台 JointCommandDefaults。每个生产者写入自己的长期 JointTargetBuffer,再用 JointCommandComposer 合成状态的自然 MotorFrame。显式 override=True 的后置 Layer 可以覆盖前面来源拥有的关节;普通 Layer 发生重叠会在构造时失败。

Composer 不订阅话题、不调用模型,也不决定数据超时策略。ROS callback 应先更新线程安全 快照,控制周期再把一份完整快照写入状态缓冲。完整 API、示例和性能约束见 多来源关节命令合成。

速度输入

清单给状态指定 speed_profile 后,状态调用 self.get_cmd_vel(ctx)。如需额外滤波,覆盖 process_cmd_vel()。不要直接读取遥控器按钮或绕过 profile。

主动切换和 action

accepted = ctx.request_state(
    "com.bxi.basic_actions/normal",
    trigger="motion_finished",
    transition={"profile": "dual_running_blend", "duration": 0.5},
)

request_state() 返回 bool。True 表示请求已被接受:它可能已经开始 Transition、进入 delay 队列,或正在异步准备 on_demand Resource;它不表示非瞬时 Transition 已经完成。 False 表示目标状态当前 is_available() 为假,或目标 Mod 节点未能启动,框架没有开始切换。未知状态、错误 Transition 等配置问题仍抛异常,不会用 False 隐藏。延迟请求在入队和延迟到期时各检查 一次,避免等待期间依赖失效。

极少数维护、诊断或明确的人工接管场景可以传 force=True:

ctx.request_state(
    "com.example.sensor/action",
    trigger="maintenance_override",
    force=True,
)

force 默认是 False,只绕过目标状态的 is_available();它不会忽略未知状态、Transition 配置错误、on_prepare() 异常或 Mod 节点启动失败。强制进入也不会关闭状态自己的运行期 安全保护,例如深度断流后退回 normal。普通动作和安全状态切换不应使用它。

def on_action(self, ctx, action_name):
    if action_name != "toggle_pause":
        return False
    self.playing = not self.playing
    return True

状态 id、priority 与界面 index

  • states.<local>.id:运行时 int32 id;默认由完整状态名稳定计算。
  • states.<local>.manifest.priority:界面顺序优先级,数值越大越靠前,默认 0。
  • states.<local>.manifest.index:框架生成的界面位置;仅在必须固定绝对位置时显式配置。

相同 priority 按完整状态名升序排列。两个显式 index 重复、index 非法或真正的 state id 冲突都会阻止加载。

完整可运行步骤见 手把手自定义状态。

手把手 2:把模型动作封装成 Mod

本课在独立 Mod 中放置 .npz 和 .onnx,通过可配置加载策略的资源交给状态使用。

1. 目录

mods/com.example.motion/
  mod.yaml
  plugin.py
  state.py
  assets/
    motion.npz
    motion.onnx

2. 先声明模型资产的真实关节顺序

不要从机器人消息顺序推断模型顺序。先查看 ONNX 的 joint_names metadata、训练导出脚本 和配套 NPZ 的定义,确定模型 observation 与 action 的真实具名布局:

from bxi_example_py_elf3.framework.inference import PolicyJointContract
from bxi_example_py_elf3.policies.joints import ELF3_ISAAC_JOINTS


class ExampleMotionPolicy:
    joint_contract = PolicyJointContract(
        observation=ELF3_ISAAC_JOINTS,
        action=ELF3_ISAAC_JOINTS,
    )

当前 DanceMotionPolicyGravityIsaaclab 已做了这个声明,并在加载时检查 ONNX metadata; back-flip、forward-flip 等 Isaac 模型可以直接使用它。recover 一类采用另一顺序的模型应使用 对应的 Mjlab Policy。声明错了就应在加载阶段失败,不能靠 ISAAC_TO_MUJOCO、 MUJOCO_TO_ISAAC 或看不出含义的数字切片补救。

如果模型只输入/输出局部关节,也要单独声明真实子布局。例如 15 关节 no-arm 模型使用 ELF3_LOWER_BODY_JOINTS。Policy 可以把这 15 个模型动作与默认姿态、话题、IK 或程序轨迹 合成为更大的 Policy Action,但 Model Action Layout 与 Policy Action Layout 必须分开说明。

NPZ 通常不带关节名。此时训练/导出方必须把其顺序作为代码中的 JointLayout 固化;若它 与 ONNX 不同,只能在初始化阶段用 CompiledJointMap 按名称编译一次映射。

关节顺序不仅约束 observation 和 action,也约束 default position、kp、kd 和 action scale。 不要在策略类中分别放四组 29 项裸数组。固定参数按关节逐行声明:

from bxi_example_py_elf3.framework.joints import JointParameterSet


PARAMETERS = JointParameterSet.from_rows(
    MODEL_JOINTS,
    (
        # name, default_position, kp, kd, action_scale
        ("joint_a", 0.0, 50.0, 2.0, 0.25),
        ("joint_b", 0.1, 40.0, 1.5, 0.20),
    ),
)

然后让 joint_contract 引用 PARAMETERS.layout,推理代码只读取 self._parameters.default_position/kp/kd/action_scale。若四列来自 ONNX metadata,先严格 校验 metadata 的 joint_names,再通过 JointParameterSet.from_arrays(MODEL_JOINTS, ...) 绑定。模型没有 joint_names 时,策略代码必须提供真实 MODEL_JOINTS;不能从数组长度、 机器人话题顺序或类名猜测。

3. 状态

复用框架的 MotionReplayState:

from bxi_example_py_elf3.policies import (
    DanceMotionPolicyGravityIsaaclab,
)
from bxi_example_py_elf3.framework.mod_api import ResourceHandle
from bxi_example_py_elf3.framework.mod_api import MotionReplayState


class ExampleMotionState(
    MotionReplayState[DanceMotionPolicyGravityIsaaclab]
):
    def __init__(self, name, state_id, policy):
        super().__init__(
            name,
            state_id,
            policy,
            finish_state="com.bxi.basic_actions/normal",
            finish_trigger="example_motion_finished",
            end_frame_trim=20,
            end_transition={
                "profile": "dual_running_blend",
                "duration": 0.6,
                "sample_from": True,
            },
        )

基类负责重置策略、预热、进入帧、运行采样、播放结束请求 finish_state 和暂停 action。结束目标必须显式声明;框架不会猜测哪个状态是当前机器人的“normal”。

MotionReplayState 从 policy.output.joints.layout 取得策略的具名输出布局,不假设固定 29 关节。策略输出少于状态最终需要的关节时,用 多来源关节命令合成接入话题、IK 或程序控制;状态输出与机器人 29/31/N 布局不同时,由关节布局与映射中的规则处理。

4. 注册资源及加载策略

plugin.py:

from bxi_example_py_elf3.policies import (
    DanceMotionPolicyGravityIsaaclab,
)
from bxi_example_py_elf3.framework.mod_api import (
    ModDefinition,
    ModLoadContext,
    ResourceKey,
    ResourceLoadContext,
)

from .state import ExampleMotionState

POLICY = ResourceKey[DanceMotionPolicyGravityIsaaclab](
    "com.example.motion/policy"
)


def _load(context: ResourceLoadContext):
    return DanceMotionPolicyGravityIsaaclab(
        str(context.asset("assets/motion.npz")),
        str(context.asset("assets/motion.onnx")),
        start_frame=0,
    )


def create_mod(context: ModLoadContext) -> ModDefinition:
    context.register_resource(POLICY, _load, policy="on_demand")
    policy = context.resource(POLICY)
    return ModDefinition(
        state_factories={
            "motion": lambda state: ExampleMotionState(
                state.name, state.state_id, policy
            )
        }
    )

这里选择 on_demand,所以加载 Mod 不会创建推理器。第一次请求进入 motion 时, MotionReplayState 声明的资源依赖会让状态机异步准备模型;当前状态继续控制机器人, 模型就绪后才开始 Transition。若希望启动时完成加载和失败检查,改为 policy="startup"。handle.get() 本身不会触发加载或阻塞等待。

5. 清单

schema: 1
id: com.example.motion
name: 模型动作
version: 1.0.0
api: ">=4,<5"
enable: true
entrypoint: plugin:create_mod
visibility: public
requires:
  - id: com.bxi.basic_actions
    version: ">=1,<2"
conflicts: []
python_exports: []
runtime_requirements:
  python: []
  ros: []
  system: []

events:
  activate:
    slot: btn_10
    value: 11
  toggle_pause:
    slot: btn_9
    value: 1

states:
  motion:
    manifest:
      label: 模型动作
      priority: 100
      group: Customer
      icon: animation
      confirm: true
      confirm_message: 请确保周围安全

routes:
  - from: com.bxi.basic_actions/normal
    event: activate
    to: motion
    transition: soft_switch
  - from: motion
    event: com.bxi.basic_actions/normal
    to: com.bxi.basic_actions/normal
    transition: dual_running_blend
  - from: motion
    event: com.bxi.basic_actions/zero_torque
    to: com.bxi.basic_actions/zero_torque

actions:
  - from: motion
    event: toggle_pause
    action: toggle_pause
    manifest:
      label: 暂停/继续

这里的 btn_10=11 是客户扩展值,不在默认遥控器绑定中。实际使用时应按 绑定按键并接入 Mod 路由的同样方法增加 output,并先确认 所有已启用 Mod 没有从同一来源状态占用该槽位和值。

Transition 是两个状态之间的临时控制过程:状态图已经决定要从哪里切到哪里,Transition 再决定切换期间怎样生成完整 MIT 电机帧。模型第一帧和当前电机帧可能差异很大,因此通常需要保持、增益渐变或双状态混合,避免直接换帧造成突跳。上例进入前使用短暂保持,返回 normal 时混合动作模型与行走模型的运行帧。

6. 调试顺序

  1. 先离线加载 Mod,确认资源状态是 unloaded。
  2. 仿真请求动作,确认状态信息短暂进入 preparing,随后开始 Transition。
  3. 确认 on_prepare() 只在资源就绪后执行,并完成模型预热。
  4. 检查第一帧、结束帧和 end_frame_trim。
  5. 用乱序具名状态和带额外关节的状态验证模型输入仍按声明布局排列。
  6. 检查安全退出与 normal 返回。
  7. 最后再进入真机低增益验证。

下一课:绑定按键。

模型、资源与 launch

模型和动作数据属于使用它们的 Mod,放在该 Mod 的 assets/。运行时通过资源管理器按声明的 startup/on_demand 策略准备,不再把模型对象动态挂到 BxiExample。

文件布局

mods/com.example.motion/
  mod.yaml
  plugin.py
  state.py
  assets/
    motion.npz
    policy.onnx

setup.py 会递归安装整个 mods/,同时跳过 __pycache__、.pyc 和 .pyo。

注册资源

from bxi_example_py_elf3.framework.mod_api import (
    ModDefinition,
    ModLoadContext,
    ResourceKey,
    ResourceLoadContext,
)

POLICY = ResourceKey[MotionPolicy]("com.example.motion/policy")


def _load(context: ResourceLoadContext) -> MotionPolicy:
    return MotionPolicy(
        str(context.asset("assets/motion.npz")),
        str(context.asset("assets/policy.onnx")),
    )


def create_mod(context: ModLoadContext) -> ModDefinition:
    context.register_resource(POLICY, _load, policy="startup")
    policy = context.resource(POLICY)
    return ModDefinition(
        state_factories={
            "motion": lambda state: MotionState(
                state.name, state.state_id, policy
            )
        }
    )

ResourceKey 必须全局命名。context.asset() 会拒绝逃出当前 Mod assets/ 的路径,并确认文件存在。

加载策略

context.resource(POLICY) 只返回 ResourceHandle。policy="startup" 在框架启动、 控制定时器开始前完成准备,适合初始状态和启动时必须校验的模型; policy="on_demand" 在第一次请求需要它的状态时由资源工作线程异步准备,适合 不常进入的动作。准备完成后 handle.get() 始终返回同一个实例;它不会触发加载, 也不会等待资源。准备策略硬编码在资源注册代码中,不写入 mod.yaml。

节点关闭时,资源管理器会按逆序调用已加载实例的 close()(若存在),然后清空缓存。

多个状态共享模型时,让它们持有同一个 handle。多个 Mod 共享模型时,优先拆出一个无状态资源 Mod,并用 requires 声明依赖。

状态内使用

from bxi_example_py_elf3.framework.mod_api import PolicyState


class MotionState(PolicyState[MotionPolicy]):
    def __init__(self, name, state_id, policy):
        super().__init__(name, state_id, policy)

    def reset_policy(self, ctx, policy):
        policy.reset(ctx.inference_frame)

    def policy_entry_position(self, ctx, policy):
        return policy.output.joints.position

    def policy_gains(self, ctx, policy):
        return policy.output.joints.kp, policy.output.joints.kd

    def infer_position(self, ctx, policy, dt, *, advance):
        output = policy.step(ctx.inference_frame, dt, advance=advance)
        return output.joints.position

PolicyState 自动把 handle 声明为状态资源依赖,并统一实现进入帧、运行帧、正常 on_update()、资源解析和预热。策略有特殊重置或预热要求时覆盖对应方法;不要在插件 加载或状态构造阶段执行推理。

当前资产路径

基础动作模型位于 mods/com.bxi.basic_actions/assets/。后空翻、前空翻、芭蕾舞和深度感知行走资产分别位于各自独立 Mod 的 assets/。

深度感知行走的模型和策略都属于 com.bxi.normal_depth Mod;策略实现位于 mods/com.bxi.normal_depth/depth.py,只依赖通用 framework/inference,公共 policies 不会 反向导入它。可替换的相机或感知节点通过标准 ROS 话题接入,不属于模型 Resource。

深度模型的 RKNN INT8 校准

量化校准必须使用模型真正收到的输入分布。不要拿随机数组或原始相机帧直接 校准:深度策略的输入还包含 observation history、深度裁剪、归一化和多帧选择。

使用通用采集工具包装控制器。它在应用进程外注入采集代理,并把样本写入指定目录:

python3 tools/benchmark/collect_calibration.py \
  --output /tmp/bxi_rknn_calibration \
  --every 5 \
  --max-samples 500 \
  --skip-first 10 \
  -- ros2 launch bxi_example_py_elf3 example_demo_hw.launch.py

参数含义:

  • --output:校准集根目录。
  • --every:每多少次真实推进的策略调用采一组。
  • --max-samples:每个模型最多保留多少组。
  • --skip-first:跳过启动后的前若干次推理。

每个模型独立生成 <root>/<model>/dataset.txt、capture.json 和每个输入对应的 .npy。一行严格对应一次推理,文件顺序就是 ONNX 输入顺序,因此同样支持未来 的 N 输入模型。预览过渡使用的 advance=False 不会污染校准集。

只有实际运行的策略才会产生样本。当前默认 mode: origin_camera 对应 dagger2.onnx;要采集 normal_depth.onnx,需切换为 mode: depth_walk 另跑一次。

把校准目录复制到安装了 RKNN Toolkit2 2.3.2 的 x86_64 转换机后执行:

PYTHONNOUSERSITE=1 python3 tools/benchmark/quantize_rknn.py \
  src/bxi_example_py_elf3/mods/com.bxi.normal_depth/assets/dagger2.onnx \
  src/bxi_example_py_elf3/mods/com.bxi.normal_depth/assets/normal_depth.onnx \
  --calibration-root /path/to/bxi_rknn_calibration \
  --install

工具会在转换前校验输入数量与顺序、shape、float32、NaN/Inf 和最少样本数, 然后强制重建 W8A8 缓存并原子安装到 ONNX 旁边。量化模型仍必须在 RK3588 上 重新做后端延迟测试和真实输入/闭环动作验证;校准成功不等于控制策略精度自动 合格。

example_walk.launch.py 和硬件版本中给独立 MJLab 节点使用的模型路径是:

mods/com.bxi.basic_actions/assets/model_normal.onnx

launch 的职责

launch 负责启动仿真或硬件、设置 /topic_prefix、覆盖 /state_machine_config 和状态信息参数。Mod 自己使用的模型路径不应硬编码进 launch;由资源加载函数相对 Mod 根解析。

验证

colcon build --packages-select bxi_example_py_elf3 --symlink-install --merge-install
find install/share/bxi_example_py_elf3/mods -name mod.yaml -o -path '*/assets/*'

若工作区此前使用过不同 install layout 或旧资产目录,请使用新的 build/install 路径,或只清理该包的旧构建缓存。

自定义过渡

过渡插件决定从状态机收到切换请求到目标状态正式进入之间,每个控制周期如何生成电机帧。需要这层机制,是因为两边的 MIT 命令字段不一定连续,直接换帧可能让机器人突然动作;保持当前帧、逐步建立增益或混合两端输出,适合的算法也会因状态而异。

当前有两种放置方式:

  • 业务专用:放在对应 Mod 中,由 entrypoint 模块在节点启动时导入。
  • 框架通用:放在 bxi_example_py_elf3/framework/transitions/,修改后需重启。

生命周期

plan.validate_states(source, target)
target.on_prepare(ctx, source)
session = plan.create_session(ctx, source, target)

每周期 session.update(ctx, dt)

完成:source.on_exit() -> current=target -> target.on_enter()

被中断或 Session 抛错时调用目标的 on_prepare_cancel()。

Mod 内最小插件

文件 pose_hold.py:

from __future__ import annotations

from collections.abc import Mapping
from bxi_example_py_elf3.framework.mod_api import RobotControlContext
from bxi_example_py_elf3.framework.mod_api.transition import (
    ConfigReader,
    MotorFrame,
    SingleClassTransition,
)

class PoseHoldTransition(SingleClassTransition):
    type_name = "com.example.motion.pose_hold"

    def __init__(self, name: str, duration: float):
        super().__init__(name, duration)
        self._frame: MotorFrame | None = None

    @classmethod
    def from_config(cls, name, raw: Mapping[str, object]):
        reader = ConfigReader(raw, name)
        duration = reader.float("duration", minimum=0.0)
        reader.finish()
        return cls(name, duration)

    def on_start(self, ctx, from_state, to_state):
        self._frame = MotorFrame.create(
            ctx.robot_layout,
            ctx.last_motor_frame.qpos,
            ctx.last_motor_frame.kp,
            ctx.last_motor_frame.kd,
            vel=ctx.last_motor_frame.vel,
            torque=ctx.last_motor_frame.torque,
        )

    def apply(self, ctx: RobotControlContext, dt: float, progress: float):
        if self._frame is None:
            raise RuntimeError("pose hold has not started")
        ctx.set_motor_target(self._frame)

Mod 的 plugin.py 显式注册该类型:

from bxi_example_py_elf3.framework.mod_api import ModDefinition
from .pose_hold import PoseHoldTransition


def create_mod(ctx):
    return ModDefinition(
        state_factories={
            "hold": build_hold_state,
        },
        transition_plugins={
            PoseHoldTransition.type_name: PoseHoldTransition,
        },
    )

build_hold_state 是该 Mod 原有的状态工厂。若已有 create_mod(),把 transition_plugins 合并到原返回值,不要定义第二个同名入口。

加载器会校验字典键与 type_name 一致、类型名全局唯一,并在启动失败或 Runtime 关闭时清理当前 Mod 的动态类型。仅导入 Transition 类不会注册;必须把它显式加入当前 Mod 的 transition_plugins。

配置 profile

在同一个 mod.yaml:

transition_profiles:
  pose_hold:
    type: com.example.motion.pose_hold
    duration: 0.1

routes:
  - from: source
    event: activate
    to: target
    transition: pose_hold

profile 运行时名称是 com.example.motion/pose_hold。route 内本地引用会自动解析。

ConfigReader

duration = reader.float("duration", minimum=0.0)
enabled = reader.boolean("enabled", default=True)
curve = reader.literal(
    "curve", ("linear", "smoothstep"), default="smoothstep"
)
steps = reader.mappings("steps")
reader.finish()

始终调用 finish(),让未知字段在加载阶段暴露。

Plan、Session 和状态能力

多数插件继承 SingleClassTransition:配置编译得到 plan 原型,每次切换浅复制为独立 Session。运行数据在 on_start() 初始化,apply() 每帧输出。

状态的自然输出可能是 29、31 或任意 N 个关节。要对两端做数值混合,先分别创建完整缓冲并 调用 ctx.resolve_motor_frame(natural_frame, full_frame);只有完整 Robot Layout 的数组才能 直接插值。仅保持 ctx.last_motor_frame 的 Transition 不需要解析。

目标需要进入帧时:

def validate_states(self, from_state, to_state):
    require_entry_frame_provider(to_state)

需要动态运行帧时使用 require_running_frame_provider()。状态只在确实需要时实现 EntryFrameProvider 或 RunningFrameProvider,不要把插件专有函数塞进公共状态基类。

当前内置类型

instant
hold
entry_gain_ramp
running_blend
sequence

sequence 的每个子 Session 在轮到它时才创建。

检查清单

  1. type_name 全局唯一;业务插件建议包含 Mod id。
  2. Mod entrypoint 已把插件加入 transition_plugins。
  3. 配置由 ConfigReader 严格读取。
  4. Session 数据只在 on_start() 初始化。
  5. 所需状态能力在 validate_states() 检查。
  6. 启动加载失败后的资源和注册项清理没有副作用。

手把手 4:在 Mod 内写自定义过渡

Transition 负责在状态切换期间临时生成电机帧。需要它是因为源状态和目标状态的 MIT 命令字段不一定连续,直接切换可能造成突跳;内置过渡可以保持、渐增增益或混合两个运行状态。

当这些内置策略无法表达业务需要的切换过程时,才需要自定义 Transition。本课为 com.example.sin_wave 增加 pose_gain_blend,平滑混合过渡开始帧和目标进入帧。

1. 新建模块

mods/com.example.sin_wave/pose_gain_blend.py
from collections.abc import Mapping
import numpy as np

from bxi_example_py_elf3.framework.mod_api.transition import (
    ConfigReader,
    MotorFrame,
    SingleClassTransition,
    require_entry_frame_provider,
)


class PoseGainBlendTransition(SingleClassTransition):
    type_name = "com.example.sin_wave.pose_gain_blend"

    def __init__(self, name, duration, curve):
        super().__init__(name, duration)
        self._curve = curve
        self._start = None
        self._target = None
        self._output = None

    @classmethod
    def from_config(cls, name: str, raw: Mapping[str, object]):
        reader = ConfigReader(raw, name)
        duration = reader.float("duration", minimum=0.0)
        curve = reader.literal(
            "curve", ("linear", "smoothstep"), default="smoothstep"
        )
        reader.finish()
        return cls(name, duration, curve)

    def validate_states(self, from_state, to_state):
        require_entry_frame_provider(to_state)

    def on_start(self, ctx, from_state, to_state):
        self._start = MotorFrame.create(
            ctx.robot_layout,
            ctx.last_motor_frame.qpos,
            ctx.last_motor_frame.kp,
            ctx.last_motor_frame.kd,
            vel=ctx.last_motor_frame.vel,
            torque=ctx.last_motor_frame.torque,
        )
        natural_target = require_entry_frame_provider(to_state).get_entry_frame(ctx)
        self._target = MotorFrame.empty(ctx.robot_layout)
        ctx.resolve_motor_frame(natural_target, self._target)
        self._output = MotorFrame.empty(ctx.robot_layout)

    def apply(self, ctx, dt, progress):
        if self._start is None or self._target is None or self._output is None:
            raise RuntimeError("pose gain blend has not started")
        alpha = progress
        if self._curve == "smoothstep":
            alpha = progress * progress * (3.0 - 2.0 * progress)
        for start, target, output in (
            (self._start.qpos, self._target.qpos, self._output.qpos),
            (self._start.vel, self._target.vel, self._output.vel),
            (self._start.kp, self._target.kp, self._output.kp),
            (self._start.kd, self._target.kd, self._output.kd),
            (self._start.torque, self._target.torque, self._output.torque),
        ):
            np.subtract(target, start, out=output)
            output *= alpha
            output += start
        ctx.set_motor_target(self._output)

2. 显式注册

在 plugin.py 导入类,并加入返回的 ModDefinition:

from bxi_example_py_elf3.framework.mod_api import ModDefinition
from .pose_gain_blend import PoseGainBlendTransition
from .state import SinWaveState


def create_mod(ctx):
    def build_sin_wave(state):
        params = state.dataclass_params(SinWaveState.Params)
        return SinWaveState(state.name, state.state_id, params)

    return ModDefinition(
        state_factories={
            "sin_wave": build_sin_wave,
        },
        transition_plugins={
            PoseGainBlendTransition.type_name: PoseGainBlendTransition,
        },
    )

注册关系属于当前 Mod,不存在“导入模块时修改全局注册表”的隐式副作用。遗漏 transition_plugins 会在加载配置时得到 unknown transition type,不会悄悄依赖导入顺序。

清单入口同时从约定加载改为显式插件,并删除原来的 factory 行:

entrypoint: plugin:create_mod

states:
  sin_wave:
    label: 正弦摆动
    priority: 100
    group: Customer
    icon: waves
    params:
      joint: l_knee_y_joint
      amplitude: 0.25
      frequency: 0.5

3. 目标状态提供进入帧

class SinWaveState(RobotControlState, EntryFrameProvider):
    def get_entry_frame(self, ctx):
        last = ctx.last_motor_frame
        return self._motor_frame(
            ctx,
            last.qpos,
            last.kp,
            last.kd,
            vel=last.vel,
            torque=last.torque,
        )

4. 清单 profile 和 route

transition_profiles:
  pose_blend:
    type: com.example.sin_wave.pose_gain_blend
    duration: 0.5
    curve: smoothstep

routes:
  - from: com.bxi.basic_actions/normal
    event: activate
    to: sin_wave
    transition: pose_blend

单次覆盖:

transition:
  profile: pose_blend
  duration: 1.0
  curve: linear

5. 验证

修改插件后重启控制节点;启动日志应显示 ModRuntime 构建成功。常见错误:

  • unknown transition type:插件没有加入 transition_plugins。
  • transition key ... does not match:字典键与类的 type_name 不一致。
  • duplicate transition type:名称未包含唯一 Mod 命名空间。
  • unknown fields:字段未被 reader 消费。
  • must implement EntryFrameProvider:某条目标边能力不足。

下一课:双状态运行混合。

手把手 5:使用双状态运行混合

Transition 描述从状态机收到切换请求到目标状态正式进入之间,电机帧应该怎样生成。如果两边都是持续运行的模型,直接切换可能让 MIT 命令字段突变;只向一个固定进入姿态缓慢靠近,又会丢失两边的动态输出。

running_blend 正是为这种情况准备的:它在过渡期间采样源状态和目标状态的运行帧,再逐字段混合两侧 qpos/vel/kp/kd/torque。

状态能力

class SinWaveState(RobotControlState, EntryFrameProvider, RunningFrameProvider):
    def get_entry_frame(self, ctx):
        return self._calculate_frame(ctx, 0.0)

    def sample_running_frame(self, ctx, dt, *, advance):
        frame = self._calculate_frame(ctx, self.elapsed)
        if advance:
            self.elapsed += dt
        return frame

    def on_update(self, ctx, dt):
        self._apply_frame(
            ctx, self.sample_running_frame(ctx, dt, advance=True)
        )

advance=False 时不得推进状态内部时间。

系统 profile

transition_profiles:
  dual_running_blend:
    type: running_blend
    duration: 0.3
    curve: smoothstep
    sample_from: true
    sample_to: true
    advance_from: true
    advance_to: true

此共享 profile 位于系统 elf3_state_machine.yaml。

当前共享 profile 让来源和目标都在交接期间推进时间、动作历史和步态相位,以混合两端 实时输出。目标状态必须保证过渡完成后的 on_enter() 不会把输出重置到不连续的旧帧。 如果目标需要在正式进入时重置 history,应在该 route 覆盖 advance_to: false,并保证 advance=False 采样完全无副作用。

Mod route

routes:
  - from: com.bxi.basic_actions/normal
    event: activate
    to: sin_wave
    transition:
      profile: dual_running_blend
      advance_to: false

  - from: sin_wave
    event: com.bxi.basic_actions/normal
    to: com.bxi.basic_actions/normal
    transition:
      profile: dual_running_blend
      duration: 1.0
      advance_to: false

SinWaveState.on_enter() 会把 elapsed 重置为 0,所以上面两条 route 都覆盖 advance_to: false。目标侧只预览入口时间点,Transition 完成后的第一帧不会因为时间轴 重置而跳回。

代码主动返回:

ctx.request_state(
    "com.bxi.basic_actions/normal",
    trigger="motion_finished",
    transition={
        "profile": "dual_running_blend",
        "duration": 0.5,
        "sample_from": False,
    },
)

混合和生命周期

from_frame = 源运行帧,或过渡开始前最后电机帧
to_frame   = 目标运行帧,或目标进入帧
alpha      = curve(progress)
output     = from + (to - from) * alpha

上式分别应用于 qpos/vel/kp/kd/torque,因此速度目标和前馈力矩不会在 Transition 结束时 突然切换。

内置实现会先把两侧自然布局解析到完整 Robot Layout,再执行上述公式。因此旧 29 关节状态 和新 31 关节状态可以互相混合;新增关节会平滑过渡到平台声明的默认目标。

目标先执行 on_prepare(),Session 再取进入帧。过渡完成才调用源 on_exit() 和目标 on_enter();被中断时调用目标 on_prepare_cancel()。

同一个控制周期内会依次采样来源和目标。这里不要求两个模型并行运行;只要两次推理总耗时小于控制周期预算,串行采样具有更简单、确定性更强的状态语义。

常见问题

  • 开启 sample_from 时源必须实现 RunningFrameProvider。
  • 开启 sample_to 时目标必须实现 RunningFrameProvider。
  • 目标始终需要 EntryFrameProvider。
  • 当前共享 profile 使用 advance_from: true、advance_to: true。若目标的 on_enter() 会重置 history 或时间轴,应对该 route 使用 advance_to: false,并检查 Transition 结束帧与目标第一帧连续。

  • 仅当来源动作已经结束、无法继续生成有效帧时,才使用 sample_from: false,让过渡从开始前最后一个电机帧混合。

  • 突跳时检查进入帧和目标进入后的首帧是否一致。

Mod 子节点声明与运行(mod.yaml 的 nodes 字段)

本文说明 VKBOTS ROS 2 控制框架中,一个 Mod 如何在自己的 mod.yaml 里声明、启动和 管理辅助 ROS 2 节点和普通后台命令。这里的“Mod 子节点”特指顶层 nodes: 字段中的 受管运行单元,例如相机发布器、感知节点、通信桥接程序或设备 SDK 服务。

本文不是整个工作区的 ROS 2 节点清单,也不是 states: 状态清单,更不是 inference 推理类清单。若你的 Mod 只有动作状态,不需要额外的 ROS 2 发布者或订阅者,可以完全 不写 nodes:。

本文对应哪里

项目 位置或含义
所属项目 src/bxi_example_py_elf3/ 中的 VKBOTS Mod 框架
配置入口 每个 Mod 自己的 <mod目录>/mod.yaml 顶层 nodes: 字段
公共类型 bxi_example_py_elf3/framework/mod_api/node.py 中的 NodeBuildContext
运行时实现 bxi_example_py_elf3/framework/runtime/mod_nodes.py 中的 ModNodeManager
管理范围 节点创建、按状态启停、独立进程、参数、重映射、异常重启和关闭

例如,一个带独立感知进程的客户 Mod 可以组织为:

com.example.perception Mod
├── nodes.detector                    # 发布感知结果的辅助 ROS 2 节点
│   └── detector_node:create_node
└── states.avoidance                  # 消费感知结果的控制状态

两者职责不同:detector 负责产生 ROS 消息,avoidance 是控制状态; Mod 节点管理器根据 lifecycle 决定前者何时启动和停止。这一页讲的是上图的 nodes 分支。关于 states 请阅读自定义状态,关于完整 Mod 结构请阅读 Mod 系统。

当前 com.bxi.normal_depth 不再内置相机节点。真机相机由独立 bxi_depth_camera 包管理,MuJoCo 负责仿真图像;深度状态只订阅标准 ROS 话题。

支持的节点运行时

Mod API 4.0 支持四种节点运行时,同时复用相同的生命周期、重启和展示字段:

  • python:Mod 内的 Python 工厂,返回一个 rclpy.Node。
  • executable:Mod 内随包分发的原生可执行文件,适用于 C++ ROS 2 节点。
  • ros:通过 ament index 查找已安装 ROS 2 包中的可执行文件,行为等价于 ros2 run。

  • command:执行 Mod 内的普通脚本或命令,不追加 ROS 参数;支持独立解释器、环境 变量、工作目录、依赖顺序和分阶段关闭。

使用 executable、ros 或 command 的 Mod 应声明当前公共 API 范围 api: ">=4,<5"。

可选运行环境 profile

不声明 runtime_profiles 时保持最低门槛:节点使用宿主 Python、ROS 和系统库,依赖由 用户自行通过 pip/apt 等方式准备。需要随目录移动依赖时,Mod 才选择 vendor 或 portable;三种模式最终进入同一个进程管理器:

mode 用途 是否携带 Python 是否允许 in_process
host 默认;使用宿主环境 否 是
vendor 宿主 Python 加 vendor/python、vendor/lib 否 是,但原生符号可能冲突
portable Mod 内完整运行根,适用于 Python/C++/厂商 SDK 可选 否,必须独立进程

Portable 示例:

runtime_profiles:
  device:
    candidates:
      - mode: portable
        root: runtime/{platform}
        python: python/bin/python3
        executable_paths: [bin, python/bin]
        library_paths: [lib, python/lib]
      - mode: host

nodes:
  device_manager:
    runtime: command
    entrypoint: scripts/device_manager.py
    interpreter: bundled-python
    execution: process
    runtime_profile: device
    lifecycle: mod
    manifest:
      label: 设备管理器

{platform} 使用框架当前的平台标签;也可在路径中使用 {python_tag}。所有路径都必须 是 Mod 内的安全相对路径,移动整个 Mod 后会按新根目录重新解析。Portable 目录不存在 时才会尝试后续 candidate;目录已经存在但 Python 不可执行、声明目录缺失或符号链接 逃出运行根时,节点直接标记为不可用,不会静默退回宿主环境。

bundled-python 表示使用选中 profile 的 python,框架会直接启动该解释器并向完整 进程树传播 BXI_RUNTIME_ROOT、BXI_PYTHON_EXECUTABLE、PATH、PYTHONHOME 和 LD_LIBRARY_PATH。Portable 默认清除继承的 PYTHONPATH/PYTHONHOME 并关闭 user site; 节点级 runtime_requirements 也使用同一个解释器和最终环境做真实 import 检查。

一个 Mod 可以按节点混用三种模式。例如控制状态和 ROS bridge 使用 Host,厂商 SDK manager 使用 Portable。自定义 Python 或原生依赖不能放进 in_process 节点;一个 进程无法同时拥有彼此隔离的 Python 解释器和动态库命名空间。

公共格式

nodes:
  detector:
    runtime: executable
    entrypoint: detector_node
    execution: process
    scheduling:
      cpu_affinity: compute
    lifecycle: state
    states: [detect]
    arguments: [--device, "0"]
    namespace: /vision
    remappings:
      image: /camera/image_raw
    params:
      threshold: 0.5
      enabled: true
    manifest:
      label: C++ 检测节点
    runtime_requirements:
      python: []
      ros:
        - package: sensor_msgs
      system: []
    restart:
      max_attempts: 3
      delay: 1.0
      non_retryable_exit_codes: [78]

字段说明:

  • runtime:python、executable、ros 或 command。为兼容旧 Mod,省略时默认为 python。

  • runtime_profile:可选的顶层 runtime_profiles 名称;省略时沿用 Host/既有 Vendor 行为。

  • entrypoint:其格式由 runtime 决定,具体见下文。

  • execution:Python 节点支持 in_process 和 process;原生节点必须是 process。原生节点省略该字段时默认使用 process。

  • scheduling.cpu_affinity:独立进程使用的跨平台 CPU 角色。省略时默认 shared; 常用值为 compute、background、shared。只适用于 execution: process。

  • lifecycle:mod 表示随 Mod 常驻,state 表示仅在 states 指定的状态 活跃或预加载时运行。

  • arguments:放在可执行文件之后、--ros-args 之前的普通程序参数。

  • namespace:空字符串或以 / 开头的绝对 ROS namespace。
  • remappings:ROS 名称重映射表。
  • params:节点参数。原生节点会收到自动生成的标准 ROS 2 参数文件。
  • restart:仅适用于进程节点,沿用现有退出监控和重启策略。 non_retryable_exit_codes 可声明确定性配置故障的退出码;命中后节点立即进入 faulted,不消耗重试次数。建议使用 sysexits 的 EX_CONFIG=78 表示配置错误,普通 运行时故障仍应使用其他非零退出码以保留自动恢复能力。

  • depends_on:依赖的节点名列表。框架按依赖拓扑顺序启动、逆序停止;局部名称会自动 加上当前 Mod ID。

  • shutdown:进程关闭策略,可设置初始信号、升级为 SIGTERM 的时间和最终 SIGKILL 时间。

所有原生节点都会收到框架生成的唯一节点名。实际命令形如:

<executable> <arguments...> --ros-args \
  -r __node:=com_example_detector_detector \
  -r __ns:=/vision \
  -r image:=/camera/image_raw \
  --params-file <temporary-file>

临时参数文件由节点管理器持有,在管理器关闭时删除。

CPU 调度角色

Mod 不应根据 RK3588、x86 或 Jetson 自己选择 CPU 编号。需要偏向计算核时只声明用途:

nodes:
  inference_worker:
    runtime: command
    entrypoint: bin/inference_worker
    execution: process
    scheduling:
      cpu_affinity: compute
    lifecycle: mod
    manifest:
      label: 推理工作进程

可用角色是 control、compute、background、shared、all 和 inherit;详细解析 规则见框架控制调度。独立节点默认 shared,通常无需配置。相机、 推理等持续计算节点可选择 compute,低频设备服务可选择 background。除非专门诊断, 不要给 Mod 写数字或 CPU 列表,也不要在 entrypoint 中再次执行 taskset。

in_process 节点与 Framework 共用进程和 executor,不能拥有独立的进程 affinity; 为其声明 scheduling 会在加载阶段报错。需要独立 CPU 角色时改用 execution: process。节点的 affinity 会发布为 cpu_affinity 和 resolved_cpu_affinity,便于在状态快照中确认角色及本机实际 CPU 集合。

Python 节点

nodes:
  camera:
    runtime: python
    entrypoint: camera_node:create_node
    execution: process
    lifecycle: mod
    arguments: []
    namespace: ""
    remappings: {}
    params:
      fps: 30
    manifest:
      label: Python 相机节点

Python 工厂通过 NodeBuildContext 获得 node_name、params、arguments、 namespace 和 remappings。Python 工厂负责在构造 rclpy.Node 时使用这些值。

普通命令节点

command 用于不实现 rclpy.Node、也不接受 --ros-args 的长期后台程序:

nodes:
  device_manager:
    runtime: command
    entrypoint: scripts/device_manager.py
    interpreter: "${DEVICE_PYTHON:-python3}"
    lifecycle: state
    states: [teleop]
    arguments: [--port, "${DEVICE_PORT:-5556}"]
    cwd: .
    environment:
      PYTHONUNBUFFERED: "1"
      LD_LIBRARY_PATH:
        prepend:
          - "${DEVICE_SDK_ROOT:-/opt/device}/lib"
        existing_only: true
    manifest:
      label: 设备管理器
    restart:
      max_attempts: 3
      delay: 2.0
      non_retryable_exit_codes: [78]
    shutdown:
      signal: SIGINT
      terminate_after: 3.0
      kill_after: 5.0

  protocol_bridge:
    runtime: command
    entrypoint: scripts/protocol_bridge.py
    interpreter: "${DEVICE_PYTHON:-python3}"
    lifecycle: state
    states: [teleop]
    depends_on: [device_manager]
    manifest:
      label: 协议桥

entrypoint 必须是 Mod 目录内的安全相对路径,不能包含 ..,符号链接解析后也不能 逃出 Mod。设置 interpreter 后脚本不要求可执行位;不设置时 entrypoint 自身必须 可执行。cwd 同样只能指向 Mod 内已有目录,默认是 Mod 根目录。

字符串支持只读环境展开:$NAME、${NAME} 和 ${NAME:-default}。框架不会经过 shell,因此不会执行命令替换、重定向或管道。子进程还会获得 BXI_MOD_ROOT,可在 arguments、interpreter 和 environment 中引用。

environment 的字符串值表示直接赋值;映射值支持:

  • set:先设置变量。
  • unset:从子进程环境删除变量;不能与 set、prepend 或 append 同时使用。
  • prepend / append:按 separator 拼接多个值;默认分隔符是平台路径分隔符。
  • existing_only:只保留当前文件系统上存在的 prepend/append 项,适合可选 SDK 路径。

command 不接收 ROS 参数,因此不能声明非空 params、namespace 或 remappings。 若程序本身需要 ROS 参数,应自行放入 arguments,或者改用其他三种运行时。

shutdown.signal 可为 SIGHUP、SIGINT、SIGQUIT、SIGTERM,默认 SIGTERM。到达 terminate_after 后框架发送 SIGTERM,到达 kill_after 后发送 SIGKILL。所有信号都发往该命令独立的进程组,以便清理其子进程。

独立进程的 stdout/stderr 由框架持续排空,并为每行添加来源:

[com.example.device/device_manager:out] device ready
[com.example.device/device_manager:err] connection lost

这同样覆盖 Python print()、C/C++ stdout、厂商 SDK 和 traceback。输出采集在独立 线程运行;超长单行会分段,日志洪泛会丢弃超额行并输出汇总。详细配置见 日志系统。

Mod 内原生节点

一个 Mod 可以同时携带多个平台的同名二进制:

com.example.detector/
├── mod.yaml
├── bin/
│   ├── linux-x86_64/
│   │   └── detector_node
│   └── linux-aarch64/
│       └── detector_node
└── vendor/
    └── lib/
        ├── linux-x86_64/
        └── linux-aarch64/

对应清单只写平台无关的文件名:

runtime: executable
entrypoint: detector_node

运行时使用与 runtime_platform_tag() 相同的平台标签,自动解析 bin/<platform>/<entrypoint>。不会回退到其他平台。文件缺失或没有执行权限时, 节点状态为 unavailable,其他可用节点仍可继续加载。

entrypoint 必须是相对于平台 bin 目录的安全路径;绝对路径、.. 和解析后 逃出该目录的符号链接都会被拒绝。Mod 私有动态库放在 vendor/lib/<platform>/,该目录会被优先加入子进程的 LD_LIBRARY_PATH。

已安装 ROS 包节点

nodes:
  detector:
    runtime: ros
    entrypoint: detector_package:detector_node
    execution: process
    lifecycle: mod
    arguments: []
    namespace: ""
    remappings: {}
    params: {}
    manifest:
      label: 系统检测节点

运行时通过 ament index 获取包前缀,并直接执行 <prefix>/lib/detector_package/detector_node。直接执行避免了监管 ros2 run 包装进程,停止和异常重启仍由同一个 Mod 节点管理器负责。

相关文档

手把手 7:工程化组合示例

本课把前几课的单状态示例升级成可独立部署的客户动作包。

推荐目录

/opt/bxi/mods/com.customer.motion_pack/
  mod.yaml
  plugin.py
  walk_state.py
  gesture_state.py
  transitions.py
  assets/
    locomotion.onnx
    gesture.npz
    gesture.onnx

系统 YAML 只追加根:

mod_paths:
  - /opt/bxi/mods

清单规划

schema: 1
id: com.customer.motion_pack
name: 客户动作包
version: 1.2.0
api: ">=4,<5"
enable: true
entrypoint: plugin:create_mod
visibility: public
requires:
  - id: com.bxi.basic_actions
    version: ">=1,<2"
conflicts: []
python_exports: []
runtime_requirements:
  python: []
  ros: []
  system: []

events:
  customer_walk:
    slot: btn_10
    value: 11
  customer_gesture:
    slot: btn_10
    value: 12
  toggle_pause:
    slot: btn_9
    value: 1

speed_profiles:
  customer_walk:
    vx_scale: 0.5
    vx_min: -0.3
    vx_max: 0.5
    vy_scale: 0.3
    yaw_scale: 0.5

transition_profiles:
  safe_entry:
    type: sequence
    steps:
      - type: hold
        duration: 0.02
      - type: entry_gain_ramp
        duration: 0.8
        kp_from: zero
        kd_from: target

states:
  customer_walk:
    manifest:
      label: 客户步态
      priority: 100
      group: Customer
    speed_profile: customer_walk
  customer_gesture:
    manifest:
      label: 客户动作
      priority: 90
      group: Customer
      confirm: true
      confirm_message: 请确保周围安全

routes:
  - from: com.bxi.basic_actions/normal
    event: customer_walk
    to: customer_walk
    transition: safe_entry
  - from: com.bxi.basic_actions/normal
    event: customer_gesture
    to: customer_gesture
    transition: safe_entry
  - from: customer_walk
    event: com.bxi.basic_actions/normal
    to: com.bxi.basic_actions/normal
    transition: dual_running_blend
  - from: customer_gesture
    event: com.bxi.basic_actions/normal
    to: com.bxi.basic_actions/normal
    transition: dual_running_blend
  - from: customer_gesture
    event: com.bxi.basic_actions/zero_torque
    to: com.bxi.basic_actions/zero_torque

actions:
  - from: customer_gesture
    event: toggle_pause
    action: toggle_pause
    manifest:
      label: 暂停/继续

btn_10=11/12 是客户扩展值,不在默认遥控器绑定中。部署这个动作包时需增加相应 output, 并把槽位/值冲突检查作为整机配置校验的一部分。

这里把 route 和 Transition 分开规划:route 决定事件触发后的目标状态,Transition 负责切换期间的电机帧。模型之间的 MIT 命令字段可能不连续,所以进入时逐步建立目标控制力,返回行走时混合两边的运行输出,避免直接换帧产生突跳。

插件边界

  • 资源 factory 只解析 Mod 内资产。
  • 两个状态共享的模型只注册一次。
  • 所有清单参数由 StateBuildContext 消费。
  • 业务过渡类由 ModDefinition.transition_plugins 显式注册。
  • 状态的 ROS 资源在 on_bind/on_unbind 对称管理。

安全策略

  • 高风险入口使用 manifest.confirm。
  • 姿态异常时主动请求 com.bxi.basic_actions/zero_torque。
  • 模型完成时明确返回基础 normal 或 pd_brake。
  • 进入模型前预热,过渡取消时撤销临时状态。
  • 真机默认速度 profile 从保守范围开始。

重启与加载失败验证

分别测试:

  1. 修改清单参数并重启,确认新参数生效。
  2. 替换模型并重启,确认新模型加载成功。
  3. 故意制造工厂/状态键不匹配,确认节点启动失败并给出明确错误。
  4. 恢复上一个有效 Mod 目录并重启,确认系统恢复运行。
  5. 删除一个 Mod 后重启,确认保留 Mod 的依赖闭包和初始状态仍然有效。

发布策略

整个客户包需要从公开版删除时添加:

visibility: protected

随后运行 sanitizer 自检。若只保护其中一个动作,应先把它拆成独立 Mod;发布工具不会裁剪包内单个状态。

工程化检查

  1. Mod id、资源 key、过渡 type 全局唯一。
  2. 跨 Mod route 均有依赖。
  3. 普通状态只写 priority;确需固定 index 时保证全局唯一,重复值会阻止启动。
  4. 输入输出槽位已与遥控器配置对齐。
  5. 所有状态能力满足实际 transition profile。
  6. 仿真、启动失败清理、重启恢复和公开树都已验证。

推理框架与具名关节架构

推理框架的目标是让策略类只保留“如何组织观测、如何解码动作”这两类代码,同时统一 后端选择、关节映射、历史帧、预热和资源释放。配置使用 Python 类,不使用 YAML 描述模型或关节契约。

目录边界

bxi_example_py_elf3/
  framework/                   # 可移植的运控框架
    inference/
      api.py                   # InferenceFrame / PolicyOutput
      contract.py              # PolicyJointContract / JointInputBinding
      policy.py                # JointPolicy 和 Builder/Decoder 组合方式
      history.py               # 无逐帧申请的历史环形缓冲
      model.py                 # 可扩展 ModelArtifact / ModelSpec
      runtime.py               # 后端注册、选择和回退
      backends/                # ONNX Runtime / OpenVINO / RKNN
    joints/                    # Layout、JointParameterSet、默认值和命令解析器
    platform/                  # 机器人接入边界和关节 I/O 编码器
  policies/                    # ELF3 内置的具体策略
    joints.py                  # 模型关节契约与策略内部顺序
    normal.py
    amp.py
    beyondmimic.py
  mods/com.bxi.normal_depth/
    depth.py                   # 深度行走 Mod 私有策略

framework/ 不导入任何 VKH6 策略或关节表;policies/ 和各 Mod 私有策略可以依赖通用框架 及项目的 policies/joints.py。完整机器人布局由平台首个合法的具名状态快照建立,不由策略关节表 决定。迁移到另一台机器人时,可以整体复用 framework/,再提供目标机器人的平台适配器、 策略、缺失关节默认目标和 Mod。

JointParameterSet 是可移植的容器,因此定义在 framework/joints/parameters.py; ELF3_ISAAC_PARAMETERS 是 VKH6 的具体数据,因此定义在 policies/joints.py。通用类不能 反向放进 VKH6 策略目录,否则其他机器人会被迫依赖 VKH6 包内实现。

八个关节布局边界

消息输入布局 Incoming Message Layout
  -> 完整机器人布局 Robot Layout
  -> 策略观测布局 Policy Observation Layout
  -> 模型观测布局 Model Observation Layout
  -> backend tensor
  -> 模型动作布局 Model Action Layout
  -> 策略动作布局 Policy Action Layout
  -> 状态自然输出布局 State Output Layout
  -> 可选的硬件固定布局 Hardware Fixed Layout

布局由不可变的 JointLayout 表示,关节名称是跨组件的语义主键。数字索引只在首次绑定 或消息顺序改变时编译,不能作为组件间的隐式协议。

  • Incoming Message Layout 可以任意排序,由平台归一化到稳定 Robot Layout。
  • Robot Layout 是平台当前实际具有的完整关节集合,也是最终 MotorFrame 的布局。
  • Policy Observation Layout 是策略从机器人状态读取的关节及顺序。
  • Model Observation Layout 是写入模型输入张量的真实关节顺序。
  • Model Action Layout 是模型输出张量中动作元素的真实关节顺序。
  • Policy Action Layout 是策略解码、补充或合成后对外输出的关节顺序,可以与前三者不同。
  • State Output Layout 是 Policy 与话题、IK、轨迹等来源合成后的自然输出,可多于或少于 Robot。
  • Hardware Layout 只用于不携带关节名称、只能接收固定数组顺序的接口。

多数单模型策略中 Policy Observation 就是 Model Observation,Model Action 也就是 Policy Action,因此只需要一个 PolicyJointContract。但它们不是概念上的同一个边界:例如 withoutarm.onnx 的模型输入和输出都是 15 个腰腿关节,AMP Policy 可以为剩余关节补默认 目标后对外输出完整 29 关节。此时 15 关节的 model observation/action layout 也必须用 JointLayout 明确声明,不能藏在 [:15] 里。

每周期的实际路径是:

完整 RobotObservation(N)
  -> PolicyJointContract 按名称选择 policy observation(P)
  -> 按具名 model observation 组织输入张量(M)
  -> backend 输出具名 model action(K)
  -> 策略解码/合成自己的 action JointTargetView(A)
  -> 可选 JointCommandComposer 合成 State Output MotorFrame(S)
  -> JointCommandResolver:S + 平台显式默认目标 -> 完整 Robot Frame(N)
  -> Transition:两端都先解析成 N,再插值
  -> 具名消息直接发布,或映射到 Hardware Layout

P、M、K、A、S 和 N 可以不同。policy observation 名称必须存在于 Robot Layout;状态输出少于 Robot 时必须为缺失硬件关节提供平台默认目标,状态输出多于 Robot 时按名称裁剪并 warning 一次。 模型输出、Policy Action、State Output 与 Hardware Layout 的完整区别见 关节布局与映射。

策略类中的具名声明是唯一权威。下面这个模型的 metadata 明确采用 Isaac 顺序,因此不能 为了迎合 VKH6 消息顺序把 contract 写成 ELF3_POLICY_JOINTS:

from bxi_example_py_elf3.framework.inference import PolicyJointContract
from bxi_example_py_elf3.policies.joints import ELF3_ISAAC_PARAMETERS


class WalkPolicy:
    joint_contract = PolicyJointContract(
        observation=ELF3_ISAAC_PARAMETERS.layout,
        action=ELF3_ISAAC_PARAMETERS.layout,
    )

模型 metadata 只能校验该声明,不能在运行时反过来修改契约。声明和 metadata 不一致应在 加载时失败,不能猜测顺序。没有 joint metadata 的资产必须由策略代码声明一个有名字的 JointLayout;同一策略内部的 NPZ、动作 clip 和 ONNX 如果顺序不同,也要分别声明布局并在 初始化时用 CompiledJointMap 编译映射。

禁止再维护 ISAAC_TO_MUJOCO、MUJOCO_TO_ISAAC 之类的手写数字表。这类表没有方向类型, 也无法证明某个数组究竟属于哪一侧。数字索引只能由两个 JointLayout 编译得到,并且只能 保存在组件内部作为热路径缓存。

调用策略

平台每周期更新一个长期复用的 InferenceFrame:

InferenceFrame(
    joints=joint_state_view,       # JointStateView(layout, position, velocity)
    quat_wxyz=quat_wxyz,
    angular_velocity=omega,
    command=command,
    base_linear_velocity=None,
    world_position=None,
    depth=None,
    depth_frame_id=None,
)

所有内置策略使用同一调用形式:

policy.reset(frame)
output = policy.step(frame, dt=0.02, advance=True)

output.joints.layout
output.joints.position
output.joints.kp
output.joints.kd
output.estimated_velocity
output.completed

调用者不再把裸 q, dq, quat, omega 按约定顺序传入。JointInputBinding 根据策略类声明 自动取得关节;来源布局与策略布局完全相同时直接使用原 view,不发生复制。布局不同或 来源包含额外关节时,映射写入策略长期持有的 float32 缓冲。

advance=False 用于预热和 Transition 双侧采样。策略不得在这种调用中推进时间、动作帧 或历史索引;HistoryBuffer.preview_append_into() 可以预览“如果追加当前帧”的连续输入, 但不修改环形缓冲状态。

一个可落地的 AMP 策略

下面是当前公共 API 的精简示例。关节契约、后端、稳定输入、历史和稳定输出均完整保留; 实际项目可继续加入相位、VAE 速度或不同 observation 字段。

import numpy as np

from bxi_example_py_elf3.framework.inference import (
    HistoryBuffer,
    InferenceFrame,
    InferenceRuntime,
    JointPolicy,
    ModelSpec,
    PolicyJointContract,
    PolicyOutput,
    default_runtime,
)
from bxi_example_py_elf3.policies.joints import ELF3_ISAAC_PARAMETERS


class AmpPolicy(JointPolicy):
    joint_contract = PolicyJointContract(
        observation=ELF3_ISAAC_PARAMETERS.layout,
        action=ELF3_ISAAC_PARAMETERS.layout,
    )

    def __init__(
        self,
        model_path: str,
        *,
        runtime: InferenceRuntime | None = None,
        backend: str = "auto",
    ) -> None:
        super().__init__()  # 创建具名输入绑定和稳定 PolicyOutput
        self._runtime = runtime or default_runtime()
        self._parameters = ELF3_ISAAC_PARAMETERS
        model = ModelSpec.portable_onnx(
            model_path,
            input_names=("obs",),
            output_names=("actions",),
        )
        self._backend = self._runtime.open_backend(model, backend=backend)

        count = self._parameters.layout.dof_num

        self._single = np.empty(96, dtype=np.float32)
        self._obs = np.empty((1, 960), dtype=np.float32)
        self._inputs = {"obs": self._obs}  # 字典和数组身份始终稳定
        self._history = HistoryBuffer(10, 96, dtype=np.float32)
        self._action = np.zeros(count, dtype=np.float32)
        self._scaled = np.empty(count, dtype=np.float32)
        self._joint_delta = np.empty(count, dtype=np.float32)
        self._gravity = np.empty(3, dtype=np.float32)

        # 直接在 JointPolicy 的输出缓冲中生成位置,不增加一次复制。
        self._target = self._target_buffer.position
        np.copyto(self._target, self._parameters.default_position)
        self.publish_output(
            self._target,
            self._parameters.kp,
            self._parameters.kd,
        )

    def reset(self, frame: InferenceFrame) -> None:
        joints = self.bind_joints(frame)  # 自动按类契约选取和排列
        self._action.fill(0.0)
        self._build_single(frame, joints.position, joints.velocity)
        self._history.fill(self._single)
        self._history.write_into(self._obs[0])
        np.copyto(self._target, self._parameters.default_position)

    def step(
        self,
        frame: InferenceFrame,
        dt: float,
        *,
        advance: bool = True,
    ) -> PolicyOutput:
        del dt
        joints = self.bind_joints(frame)
        self._build_single(frame, joints.position, joints.velocity)
        if advance:
            self._history.append(self._single)
            self._history.write_into(self._obs[0])
        else:
            self._history.preview_append_into(self._single, self._obs[0])

        raw = self._backend.run(self._inputs)["actions"]
        np.copyto(self._action, np.asarray(raw).reshape(-1))
        np.multiply(
            self._action,
            self._parameters.action_scale,
            out=self._scaled,
        )
        np.add(
            self._parameters.default_position,
            self._scaled,
            out=self._target,
        )
        return self.publish_output(self._target)

    def _build_single(self, frame, q, dq) -> None:
        if frame.command is None:
            raise ValueError("AMP policy requires frame.command")
        obs = self._single
        obs[0:3] = frame.angular_velocity
        self._project_gravity(frame.quat_wxyz, self._gravity)
        obs[3:6] = self._gravity
        obs[6:9] = frame.command
        np.subtract(
            q,
            self._parameters.default_position,
            out=self._joint_delta,
        )
        obs[9:38] = self._joint_delta
        obs[38:67] = dq
        obs[67:96] = self._action

    @staticmethod
    def _project_gravity(quat, out) -> None:
        w, x, y, z = quat
        out[0] = 2.0 * (w * y - x * z)
        out[1] = -2.0 * (w * x + y * z)
        out[2] = 2.0 * (x * x + y * y) - 1.0

    def close(self) -> None:
        self._backend.close()

这里没有四组脱离关节名的构造参数。ELF3_ISAAC_PARAMETERS.layout 同时作为模型契约, default_position、kp、kd 和 action_scale 永远跟着这个布局。内置表按行维护:

from bxi_example_py_elf3.framework.joints import JointParameterSet


ELF3_ISAAC_PARAMETERS = JointParameterSet.from_rows(
    ELF3_ISAAC_JOINTS,
    (
        # name, default_position, kp, kd, action_scale
        ("l_shoulder_y_joint", 0.2, 54.224, 3.452, 0.231),
        ("r_shoulder_y_joint", 0.2, 54.224, 3.452, 0.231),
        # 其余关节继续逐行声明;名称和布局不一致会在导入时失败
    ),
)

真实完整的 29 行表位于 policies/joints.py。这里的省略只用于解释格式,不能原样复制为 可运行配置。若参数来自 ONNX metadata,也必须先校验 metadata 的 joint_names 与 contract 完全一致,再用 JointParameterSet.from_arrays(layout, ...) 把四列绑定到同一个布局。 禁止在推理类中维护四组无名称的平行数组。

这是“手写策略”的方式。希望进一步拆分单元测试时,也可以使用 InputBuilder + OutputDecoder + Policy 组合模板;两种方式共享完全相同的 InferenceFrame、PolicyOutput、关节契约和后端运行时。

29 策略与 31 关节机器人

本节只说明推理侧契约;完整的 29→31 补齐、31→29 裁剪、多来源合成和硬件输出规则见 关节布局与映射。

31 关节状态进入 29 关节策略是安全的:策略 observation 是 source 的子集,绑定时按名称 抽取 29 个关节。反方向不能默认成立:29 个动作不足以形成 31 关节完整硬件命令。

policies/joints.py 中的 ELF3_POLICY_JOINTS 只固定旧模型的 29 维契约;完整 Robot Layout 直接来自首个合法的 ActuatorStates.name。因此机器人增加两个关节不会改变旧模型 的输入宽度。新 31 关节模型只需声明自己的 31 关节 observation/action layout。

旧模型没有输出的新关节必须在平台类配置中给出固定安全目标:

from bxi_example_py_elf3.framework.joints import (
    JointCommandDefaults,
    JointDefault,
)

ROBOT_COMMAND_DEFAULTS = JointCommandDefaults(
    {
        "left_gripper_joint": JointDefault(position=0.0, kp=20.0, kd=0.5),
        "right_gripper_joint": JointDefault(position=0.0, kp=20.0, kd=0.5),
    }
)

把它传给 RobotControlRuntime(command_defaults=ROBOT_COMMAND_DEFAULTS)。状态和策略产生的 MotorFrame 保留自己的自然布局;JointCommandResolver 在该布局第一次出现时完成以下 工作:

  1. 对模型输出中机器人不存在的关节发出一次 warning,并在编译映射中裁剪。
  2. 为 Robot Layout 中缺失的关节查找显式默认目标。
  3. 编译 source→robot 数字索引并缓存。
  4. 控制周期只向长期复用的完整输出缓冲写入,不查名称、不申请数组。

若模型缺少机器人关节且缺少任一默认项,首次绑定立即报错;不能静默补零或沿用上帧。 若模型输出多于机器人,则只发布名称交集并明确 warning。裁剪索引和复用缓冲只编译一次, 因此后续周期不会重复名称查找、日志输出或申请数组。

Transition 也先把源状态和目标状态各自解析到完整 Robot Layout,再执行插值。因此从 31 关节状态切到旧 29 关节状态时,新增关节会从源状态平滑过渡到显式默认目标,而不是 在切换开始时突跳。

输出到 ROS 或固定顺序硬件

携带名称的消息无需强制变成硬件固定顺序:

publish(names=frame.layout.names, position=frame.qpos)

框架最终返回的 MotorFrame 已经是完整 Robot Layout。只有绕过状态机、直接处理 PolicyOutput 且下游协议确实支持局部命令时,才使用:

encoder = NamedJointCommandEncoder(supports_partial=True)

不携带名称的硬件数组必须声明固定布局并编码:

encoder = FixedOrderJointCommandEncoder(hardware_layout)
hardware_target = encoder.encode(policy_output.joints)

encoder 在 source layout 首次出现时编译索引,之后复用输出数组。

后端模型与回退

ModelSpec 保存按优先级排列的开放 ModelArtifact,没有固定的“onnx/openvino/rknn 字段”。 增加后端只需实现新的 artifact 和 factory,不需要扩大策略接口。 策略类传入 ONNX 路径时统一使用 ModelSpec.portable_onnx(...),默认顺序是 rknn -> openvino -> onnxruntime:先找同名 .rknn,需要时在显式环境变量授权下 由 ONNX 转换,再回退到 OpenVINO 和 ONNX Runtime。

from bxi_example_py_elf3.framework.inference import (
    ModelSpec, OnnxArtifact, OpenVinoArtifact, RknnArtifact,
)

model = ModelSpec(
    artifacts=(
        RknnArtifact(
            "walk.rknn",
            source_onnx="walk.onnx",
            target="rk3588",
            input_shapes=(("obs", (1, 960)),),
            output_shapes=(("actions", (1, 29)),),
        ),
        OpenVinoArtifact("walk.onnx", device="CPU"),
        OnnxArtifact("walk.onnx"),
    ),
    input_names=("obs",),
    output_names=("actions",),
)

运行时按 artifacts 顺序选择第一个可用后端。缺少库时会给出安装命令并继续回退;显式 指定不可用后端则抛错。平台上真正的优先顺序应以 benchmark 为准,不能只根据“已安装” 推断速度。

OpenVINO 的 Intel GPU 插件可能枚举到 NVIDIA GPU。框架会拒绝这种设备,避免 CL_INVALID_COMMAND_QUEUE 导致进程崩溃;NVIDIA 应使用 ONNX Runtime CUDA/TensorRT。

RKNN 按需转换

ONNX 到 RKNN 是构建步骤,不是每帧推理步骤。默认绝不转换;只有显式设置环境变量才在 加载时检查缓存并按需转换:

BXI_RKNN_CONVERT_ON_LOAD=rk3588 python3 your_program.py

BXI_RKNN_CONVERT_ON_LOAD='{
  "target": "rk3588",
  "do_quantization": true,
  "dataset": "/data/calibration.txt",
  "force_rebuild": false,
  "outputs": ["actions"],
  "config": {"optimization_level": 3}
}' python3 your_program.py

转换缓存通过源模型和设置指纹判断是否有效。x86 是否能转换取决于 Rockchip 提供的 rknn-toolkit2 wheel;真正执行 .rknn 通常使用目标板上的 rknn-toolkit-lite2。 outputs 用于裁剪 RKNN 中实际需要的输出,也会进入缓存指纹。benchmark 默认只转换 actions;这既减少无用图节点,也避开 RKNN Toolkit 2.3.2 在合并不同 shape 的并行 Gather 输出时可能触发的优化器错误。需要多个运行时输出的策略必须显式列出全部名称。

RKNN 多输入 / 多输出注意事项

框架层面支持 N 个输入和 N 个输出,但 RKNN Lite 的运行时接口只返回按顺序排列的 list,不携带输出名。因此策略类必须把真实需要的输入、输出名称声明清楚:

model = ModelSpec.portable_onnx(
    "policy.onnx",
    input_names=("obs", "depth", "command"),
    output_names=("actions", "value", "latent"),
)

portable_onnx(...) 会从 ONNX 读取模型描述,生成同名 .rknn artifact,并把 output_names 作为 RKNN 转换时的 outputs。运行时再按相同顺序把 RKNN 返回的 list 映射回字典。只要转换时的 outputs 顺序和策略声明一致,N 输入 / N 输出不会因为框架 结构本身出错。

部署时仍需注意这些边界:

  1. 只声明策略实际使用的输出。只需要 actions 就不要保留调试输出,RKNN 会裁掉无用图, 转换更稳,推理也更轻。

  2. 多输出模型如果触发 RKNN Toolkit 优化器 bug,框架会回退 OpenVINO / ONNX Runtime; 这属于具体 Toolkit 和 ONNX 图结构兼容性问题,不是控制周期逻辑错误。

  3. RKNN 转换更适合静态 shape。动态 batch 或动态空间尺寸需要先导出成固定 shape,或通过 artifact / 环境变量明确转换参数。

  4. RKNN artifact 本身不保存 ONNX metadata。框架会从 source_onnx 读取关节名、增益、 shape 等信息;部署 .rknn 时建议保留旁边的 .onnx,至少保留同源 metadata 文件的能力。

  5. 如果某个输出只用于训练或离线分析,不要放进 output_names。运行时输出越少,后端选择 和跨平台 benchmark 越可控。

热路径性能规则

  1. JointLayout 和映射只在启动、首次绑定或消息名称顺序变化时创建。
  2. 相同 observation layout 使用零复制 fast path;不同布局使用 np.take(..., out=...)。
  3. 状态输出布局第一次出现时编译命令映射;后续只写预分配的完整 Robot Frame。
  4. InferenceFrame、PolicyOutput、输入字典、输入数组、历史存储和目标数组长期复用。
  5. 不在控制周期创建 Session、InferRequest、深拷贝或按名称执行 list.index()。
  6. ONNX Runtime 使用 I/O Binding;OpenVINO 使用持久 InferRequest 和共享输入 Tensor。
  7. 监控默认关闭,关闭时不读取性能时钟。

验证与 benchmark

# 所有发现到的模型 × 本机可用后端,子进程隔离 native driver 崩溃
python3 tools/benchmark/backend_benchmark.py --quick

# 策略级 Git 基线、分位延迟和 Python allocation
python3 tools/benchmark/inference_benchmark.py --baseline-ref HEAD

# 31→29 观测映射、29→31 默认补齐、31 关节重排和完整布局 fast path
python3 tools/benchmark/joint_mapping_benchmark.py

跨平台对比时保持模型、warmup、iterations、电源模式和 CPU 负载一致。报告目录 tools/benchmark/results/ 被 Git 忽略,benchmark 程序本身纳入版本管理。

深度感知行走 Mod 开发实录

本文按当前实现说明 com.bxi.normal_depth 怎样消费仿真或真机深度相机。相机采集与 机器人控制已经解耦:bxi_depth_camera 管理真机,MuJoCo 发布仿真图像,深度行走 Mod 只订阅统一的 ROS 2 图像和 CameraInfo。

完成后的结构

真机:bxi_depth_camera
仿真:MuJoCo camera sensor
             │
             │ Image + CameraInfo
             ▼
NormalDepthState
  ├─ 解码完整深度图
  ├─ 根据真实内参裁剪策略 FOV
  ├─ 缩放、距离限幅和旋转
  ├─ 按策略频率选择深度帧
  └─ RobotControlState 输出 MotorFrame

当前边界如下:

  • 相机包负责发现设备、序列号映射、SDK 滤波和标准 ROS 流发布。
  • 深度行走 Mod 不导入 pyrealsense2,也不打开相机设备。
  • 仿真与真机使用相同逻辑相机名和流级目录。
  • simulation 与 hardware 只由 /topic_prefix 区分。
  • 策略裁剪依赖每一帧配置对应的真实 CameraInfo,不硬编码输入相机内参。

1. 启动相机

真机可单独启动相机管理器:

ros2 launch bxi_depth_camera cameras.launch.py

硬件示例启动文件已经默认包含它:

ros2 launch bxi_example_py_elf3 example_demo_hw.launch.py

MuJoCo 不需要启动真机相机包。仿真包会发布 XML 中声明的 camera-backed user sensor。

2. 统一话题契约

逻辑相机名默认为 body_depth_camera。状态实际使用两条深度流:

/simulation/body_depth_camera/depth/image_rect_raw
/simulation/body_depth_camera/depth/camera_info

/hardware/body_depth_camera/depth/image_rect_raw
/hardware/body_depth_camera/depth/camera_info

图像要求:

  • 类型:sensor_msgs/msg/Image;
  • 编码:16UC1、mono16 或 32FC1;
  • 16UC1/mono16 默认按毫米解释;
  • 32FC1 按米解释;
  • 允许 step 包含行尾 padding;
  • 无效深度保持为 0。

相机信息要求:

  • 类型:sensor_msgs/msg/CameraInfo;
  • width、height 为正数;
  • k 含 9 个有限值;
  • fx=k[0]、fy=k[4] 为正数;
  • 必须与当前深度流的分辨率和内参对应。

状态不会订阅旧的 /camera/depth/image_36x48 或 /camera/depth/image_64x36。策略尺寸由状态内部生成。

3. 真机逻辑名称与序列号

策略配置只写安装位置的逻辑名称:

camera_name: body_depth_camera

每台真机在 bxi_depth_camera 配置中把该名称映射到实际设备序列号:

/depth_camera_manager:
  ros__parameters:
    single_camera_name: body_depth_camera
    cameras:
      body_depth_camera:
        serial_no: "实际序列号"

显式序列号映射始终优先。如果只连接一台未映射的受支持相机,它会使用 single_camera_name(默认 body_depth_camera);连接多台未映射相机时,各设备使用 SN_<serial>,因此多相机部署应显式配置逻辑名称,不能依赖 USB 枚举顺序。

4. 状态参数

当前 mod.yaml 的核心配置是:

states:
  normal_depth:
    params:
      mode: origin_camera
      camera_name: body_depth_camera
      topic: ""
      camera_info_topic: ""
      depth_uint16_scale: 0.001
      depth_timeout_sec: 0.5
      horizontal_fov: 45.2
      vertical_fov: 58.0616969
      min_dist: 0.2
      max_dist: 3.0

当 topic 和 camera_info_topic 都为空时,状态使用 /topic_prefix 和 camera_name 自动解析话题。两者必须同时为空或同时填写,不能只覆盖一条:

camera_name: ""
topic: /recorded_camera/depth/image_rect_raw
camera_info_topic: /recorded_camera/depth/camera_info

支持的策略模式:

mode 投影输出(旋转前) 状态旋转后 shape 默认策略 FOV 默认距离
origin_camera 36 × 48 (36, 48) 45.2° × 58.0616969° 0.2–3.0 m
depth_walk 64 × 36 (64, 36) 89.24° × 58.06° 0.2–2.5 m

这些是策略输入要求,不是物理相机的完整 FOV。状态根据物理相机的 CameraInfo 计算中心 ROI,再缩放到策略尺寸。

5. API 4 Resource

两套策略使用不同的全局 Resource key:

LEGACY_POLICY = ResourceKey[HumanoidGaitDepthPolicyIsaaclab](
    "com.bxi.normal_depth/legacy_policy"
)
ORIGIN_POLICY = ResourceKey[HumanoidGaitOriginCameraPolicyIsaaclab](
    "com.bxi.normal_depth/origin_policy"
)

当前内置 Mod 在启动控制循环前准备两个模型:

context.register_resource(
    LEGACY_POLICY,
    _load_legacy_policy,
    policy="startup",
)
context.register_resource(
    ORIGIN_POLICY,
    _load_origin_policy,
    policy="startup",
)

如果客户动作希望首次进入时才加载,可改为 policy="on_demand"。此时状态必须声明 资源依赖;NormalDepthState 已按 API 4 这样实现:

class NormalDepthState(
    RobotControlState,
    EntryFrameProvider,
    RunningFrameProvider,
):
    def __init__(self, name, state_id, policy, **config):
        super().__init__(name, state_id, resources=(policy,))
        self._policy = policy

ResourceHandle.get() 只读取已经就绪的模型。它不会在 ROS 回调或控制周期中同步加载。

6. 订阅生命周期

状态在 on_bind() 中创建长期订阅,因为进入状态前就必须收到新鲜图像:

def on_bind(self, ctx):
    if not self.depth_image_topic:
        prefix = str(
            ctx.ros_node.get_parameter("/topic_prefix").value
        ).strip("/")
        self.depth_image_topic, self.camera_info_topic = resolve_camera_topics(
            prefix,
            self.camera_name,
        )

    self._depth_subscription = ctx.ros_node.create_subscription(
        Image,
        self.depth_image_topic,
        self.depth_image_callback,
        qos_profile_sensor_data,
    )
    self._camera_info_subscription = ctx.ros_node.create_subscription(
        CameraInfo,
        self.camera_info_topic,
        self.camera_info_callback,
        qos_profile_sensor_data,
    )

实际实现使用深度为 1 的 sensor-data QoS。on_unbind() 对称销毁两个 subscription。 不要在 on_enter() 反复创建订阅,否则刚请求状态时还没有图像,健康检查也无法通过。

7. 用 CameraInfo 生成策略输入

回调流程是:

  1. 按 encoding、is_bigendian 和 step 解码深度图;
  2. 将深度统一转换为米;
  3. 读取对应 CameraInfo 的 fx、fy;
  4. 按策略水平/垂直 FOV 和输出宽高比选择中心 ROI;
  5. 使用最近邻缩放,避免为深度制造不存在的插值表面;
  6. 只对有效像素做距离限幅,无效像素继续保持 0;
  7. 按原策略方向顺时针旋转 90°;
  8. 在锁内替换最新完整数组和递增的 frame id。

核心调用如下:

projected, crop = project_depth(
    depth_meters,
    camera_info,
    self.projection,
)
depth_rotated = np.ascontiguousarray(
    np.rot90(projected, k=-1).astype(np.float32)
)

相机分辨率变化时,只要 Image 与 CameraInfo 同步更新,裁剪会按新内参重新计算;不需要 为每一种分辨率硬编码一套 K/P 数组。

8. 进入健康检查

is_available() 必须非阻塞,只读取回调维护的快照:

def is_available(self, ctx):
    with self._depth_lock:
        depth = self._depth_rotated
        stamp = self._last_depth_time
        camera_info = self._camera_info
    return (
        self.depth_configured
        and camera_info is not None
        and depth is not None
        and stamp is not None
        and time.monotonic() - stamp <= self.depth_timeout_sec
    )

没有 CameraInfo、没有有效图像或图像已超时,状态请求会返回 False,机器人保持当前 状态。force=True 只绕过健康检查,不会补出缺失的深度数据,普通业务不要使用。

9. Transition 能力

进入 normal_depth 使用 first_frame_switch,所以目标状态必须实现 EntryFrameProvider:

def get_entry_frame(self, ctx):
    return self._motor_frame_from_target(ctx, self.policy.output.joints)

切回普通行走使用 dual_running_blend。深度状态作为来源侧提供 RunningFrameProvider:

def sample_running_frame(self, ctx, dt, *, advance):
    if not advance:
        return self._last_running_frame or self.get_entry_frame(ctx)

    depth, frame_id = self._get_depth_for_inference()
    self.get_cmd_vel(ctx)
    ctx.inference_frame.depth = depth
    ctx.inference_frame.depth_frame_id = frame_id
    output = self.policy.step(ctx.inference_frame, dt, advance=True)
    return self._motor_frame_from_target(ctx, output.joints)

advance=False 不能推进策略 history、时间或动作缓存。当前实现返回最近一次真实推理帧, 避免 Transition 预览重复消费深度数据。

10. 相机频率与控制频率

控制循环和相机不需要同频。回调随相机更新完整图像;控制周期按 policy.depth_update_period 选择是否接收最新 frame id。策略可在多个控制周期复用同一张 深度图,但不会把同一帧误认为新的传感器采样。

不要在控制周期里等待下一张图,也不要在持有 _depth_lock 时执行推理。锁只保护引用、 时间戳和 frame id 的短暂复制。

11. 运行期安全退出

状态每周期检查:

  • 姿态超出安全范围:请求 com.bxi.basic_actions/zero_torque;
  • 深度超过 depth_timeout_sec 未更新:请求 com.bxi.basic_actions/normal;
  • 新深度暂不可用:本周期不发布新的策略帧;
  • 输入编码、尺寸或内参非法:记录一次警告并丢弃该帧。

安全请求只发起状态切换,不在回调线程直接发布电机命令。

12. 验证顺序

先确认相机契约:

ros2 topic info /simulation/body_depth_camera/depth/image_rect_raw --verbose
ros2 topic echo /simulation/body_depth_camera/depth/camera_info --once
ros2 topic hz /simulation/body_depth_camera/depth/image_rect_raw

真机把 simulation 换成 hardware。然后检查:

ros2 topic echo /simulation/state_machine_info --once

推荐顺序:

  1. 相机图和 CameraInfo 都持续发布;
  2. 日志中的 image、camera_info 和 post-rotation shape 正确;
  3. 静止仿真进入深度状态;
  4. 遮挡或停止相机,确认自动退回 normal;
  5. 验证 normal 与 normal_depth 的进入、退出 Transition;
  6. 最后在吊架和低速条件下验证真机。

常见故障

现象 优先检查
状态不可进入 CameraInfo、图像新鲜度、逻辑相机名
一直等待 CameraInfo 相机是否发布 /depth/camera_info,话题前缀是否正确
shape 不符合策略 mode、FOV 参数、图像与 CameraInfo 是否属于同一 profile
深度全零 编码、单位、设备量程和 SDK 滤波
真机找不到相机 bxi_depth_camera 配置中的序列号映射
仿真正常、真机失败 比较两端 CameraInfo、安装姿态、深度单位和 frame rate
切换时突跳 检查 entry/running frame 和 Transition profile
首次进入等待模型 资源使用了 policy="on_demand",查看 preparing 状态

最终检查表

  1. 状态不直接依赖 RealSense 或 Orbbec SDK。
  2. 仿真与真机只替换 simulation/hardware 前缀。
  3. 图像与 CameraInfo 成对配置。
  4. Resource 使用 API 4 的 startup/on_demand 策略。
  5. 状态通过 resources=(policy,) 声明模型依赖。
  6. advance=False 不推进策略。
  7. 回调不执行模型推理,控制周期不等待相机。
  8. 图像失联和姿态异常都有明确退出路径。

当前实现以以下文件为准:

src/bxi_example_py_elf3/mods/com.bxi.normal_depth/mod.yaml
src/bxi_example_py_elf3/mods/com.bxi.normal_depth/plugin.py
src/bxi_example_py_elf3/mods/com.bxi.normal_depth/state.py
src/bxi_example_py_elf3/mods/com.bxi.normal_depth/depth_projection.py
src/bxi_example_py_elf3/mods/com.bxi.normal_depth/README.md

手把手 8:把模型从仿真带到真机

Sim2Real 不只是替换 ONNX 路径。当前推荐把模型、动作数据、状态参数和版本约束全部封装进独立 Mod,再按阶段验证。

本页讨论模型和状态如何从仿真迁移到真机。如果目标机器人的状态消息、电机命令、关节 顺序或硬件 SDK 与 VKH6 不同,还必须配合机器人平台适配指南 实现平台边界。

1. 固定策略契约

上线前记录:

  • 关节数量、顺序和默认姿态。
  • 四元数顺序 xyzw/wxyz。
  • 角速度和速度指令的坐标系。
  • observation 归一化、history 长度和控制频率。
  • action scale、kp、kd 和输出含义。
  • 模型的 start/end frame 与动作数据 fps。

这些差异应由强类型 policy 类处理,不要散落到状态逻辑。

2. Mod 资源

mods/com.customer.sim2real/
  mod.yaml
  plugin.py
  state.py
  assets/policy.onnx
from bxi_example_py_elf3.framework.mod_api import ModDefinition, ResourceKey

from .policy import CustomerPolicy
from .state import CustomerWalkState


POLICY = ResourceKey[CustomerPolicy]("com.customer.sim2real/policy")


def _load(context):
    return CustomerPolicy(str(context.asset("assets/policy.onnx")))


def create_mod(context):
    context.register_resource(POLICY, _load, policy="on_demand")
    policy = context.resource(POLICY)
    return ModDefinition(
        state_factories={
            "customer_walk": lambda state: CustomerWalkState(
                state.name,
                state.state_id,
                policy,
            )
        }
    )

在 policy 构造器中验证模型维度、关节数和必需张量,让错误发生在 Resource 准备阶段, 不要推迟到第一个控制周期。

3. 状态模板

class CustomerWalkState(
    RobotControlState, EntryFrameProvider, RunningFrameProvider
):
    def __init__(self, name, state_id, policy):
        super().__init__(name, state_id, resources=(policy,))
        self._policy = policy

    @property
    def policy(self):
        return self._policy.get()

    def on_prepare(self, ctx, from_state):
        ctx.preheat_model(
            self.policy,
            command=self.get_cmd_vel(ctx),
        )

    def get_entry_frame(self, ctx):
        return self._motor_frame_from_target(ctx, self.policy.output.joints)

    def sample_running_frame(self, ctx, dt, *, advance):
        self.get_cmd_vel(ctx)
        output = self.policy.step(ctx.inference_frame, dt, advance=advance)
        return self._motor_frame_from_target(ctx, output.joints)

    def on_update(self, ctx, dt):
        if ctx.is_orientation_unsafe(ctx.current_quat_xyzw):
            ctx.request_state(
                "com.bxi.basic_actions/zero_torque", trigger="safety"
            )
            return
        self._apply_frame(
            ctx, self.sample_running_frame(ctx, dt, advance=True)
        )

4. 保守速度 profile

speed_profiles:
  safe_walk:
    vx_scale: 0.2
    vx_min: -0.1
    vx_max: 0.2
    vy_scale: 0.1
    yaw_scale: 0.15

states:
  customer_walk:
    speed_profile: safe_walk
    manifest:
      label: 客户步态
      priority: 100
      group: Customer
      confirm: true
      confirm_message: 首次真机验证,请使用吊架

速度范围随验证结果逐步放开,不要第一次真机就使用训练上限。

5. 分阶段验证

  1. 离线检查 ONNX 输入输出和默认动作。
  2. 加载 Mod,确认 on_demand 模型保持 unloaded 且清单图通过。
  3. 仿真静止输入,验证关节顺序和四元数。
  4. 仿真小速度,检查方向和限幅。
  5. 验证进入/退出过渡和零力矩安全路由。
  6. 吊架真机、低增益、短时运行。
  7. 逐步提高增益、速度和连续运行时间。

进入/退出 Transition 决定模型与原状态之间如何交接电机帧。真机上必须验证它,因为仿真中不明显的 MIT 命令字段突变,在实机上可能表现为瞬间抽动或冲击。

6. 仿真与真机一致性

  • 相同 Mod 和模型资产。
  • 仅由 launch 改 /topic_prefix 和运行环境。
  • 不在状态里根据“仿真/真机”分叉关节顺序。
  • 记录推理耗时和 inference_timeout_count。
  • 对传感器符号、单位和坐标系做自动断言。

7. 发布和回滚

模型版本跟随 Mod version。高风险客户动作需要从公开树删除时,保护整个 Mod。保留上一个经过真机验证的 Mod 目录;出现问题时替换整个目录并重启控制节点,不在运行中的控制进程里替换模型和状态机。

手把手 3:绑定按键并接入 Mod 路由

本课让键盘、手柄或 CRSF 都能触发 com.example.sin_wave/activate。状态 Mod 只依赖 btn_10=4,不需要知道输入来自哪一种设备。当前内置动作已占用 1/2/3/5/6/7/8/9/10, 因此示例使用空闲值 4;新增动作前仍应检查整棵 Mod 树是否占用了同一槽位和值。

1. Mod 声明事件和 route

events:
  activate:
    slot: btn_10
    value: 4

routes:
  - from: com.bxi.basic_actions/normal
    event: activate
    to: sin_wave
    transition: first_frame_switch

route 决定收到事件后切到哪里;Transition 决定切换期间怎样生成电机帧。 first_frame_switch 会读取目标状态的进入帧并逐步建立控制力,避免位置和增益在一帧内 突变。

2. 增加键盘 source

在 xbox_default.yaml 的 keyboard signals 中增加一个未占用键,例如 u:

keyboard.sin_wave:
  from: keyboard.key
  key: "u"

不要复用当前已经绑定其他动作的数字键。

3. 增加键盘 control

controls:
  keyboard.sin_wave_event:
    type: bool
    inputs:
      - source: keyboard.sin_wave

4. 复用统一的手柄与 CRSF control

默认配置已经把两类设备合并成统一业务 control:

gamepad.trigger.left_event 或 crsf.trigger.left_event -> trigger.left_event
gamepad.b_event            或 crsf.b_event            -> button.b_event
gamepad/crsf shoulder event                             -> shoulder.*_event

因此 output 不应分别判断 gamepad.* 和 crsf.*。统一组合只写一次,两种设备都会生效。

5. 补充 btn_10=4 输出

找到现有的 output: btn_10=4,把键盘分支加入同一个 binding。不要再创建第二个写入同一 字段和值的 binding:

outputs:
  level:
    - output: btn_10=4
      when:
        any:
          - - keyboard.sin_wave_event
          - - trigger.left_event
            - button.b_event
            - released: shoulder.left_event
            - released: shoulder.right_event
            - released: trigger.right_event

组合使用左扳机和 B;未参与组合的右扳机、左右肩键都必须显式为 released。否则按下三键 或四键时,较短组合也会同时满足,可能触发错误动作。

如果改用其他辅助键,规则相同:

按下的辅助键 + 面键 + 其余所有辅助键 released

四个辅助键是:

shoulder.left_event
shoulder.right_event
trigger.left_event
trigger.right_event

6. 验证链路

重新构建并启动 remote_controller 后检查:

ros2 topic echo /motion_commands
ros2 topic echo /simulation/state_machine_info

真机把 simulation 换成 hardware。预期链路是:

物理键
  -> source
  -> 统一 bool control
  -> level output btn_10=4
  -> com.example.sin_wave/activate
  -> 当前 normal 状态的 route
  -> com.example.sin_wave/sin_wave

至少验证以下组合:

  1. 只按左扳机和 B,可以触发。
  2. 同时多按右扳机,不触发该组合。
  3. 同时多按任一肩键,不触发该组合。
  4. 键盘 u 可以触发。
  5. 松开按键后 btn_10 回到 0。

常见问题

  • 消息有值但不切换:当前状态没有该 event 的 route。
  • 完全没有输出:source、control 或 output 名称不一致。
  • 多键同时触发:缺少其他辅助键的 released 条件。
  • 输出冲突:同一字段由多个 binding 写入不同值;检查 conflict_policy 和 binding 顺序。
  • 修改后无效:重新构建并重启 remote_controller。

下一课:自定义过渡。

遥控器输入映射配置

本文只说明 remote_controller 如何把键盘、手柄、CRSF 或其他设备输入映射成统一的 MotionCommands。状态、事件和 route 属于各自 Mod 的 mod.yaml;机器人关节与 IMU 也不经过这份配置。

当前默认配置文件:

src/remote_controller/config/xbox_default.yaml

remote_controller 只在启动时读取一次 YAML,运行期间不会扫描或重新加载配置。修改 src/remote_controller/config/xbox_default.yaml 后,执行:

colcon build --packages-select remote_controller

build 更新 install/ 目录后,重启 remote_controller。YAML 解析失败会使新进程启动失败,并直接报告配置错误。

推荐从上到下按这条线理解:

inputs / sources  ->  curves  ->  controls  ->  outputs  ->  system
设备选择与输入声明       曲线校准     统一控制量      写 MotionCommands   执行系统命令

配置目标是:业务层不要关心具体是 Xbox、键盘、CRSF 还是其他遥控器。业务层只看统一后的 control 和状态机 event。

1. inputs / sources:声明候选设备和输入来源

每个 sources.<group> 都是一个候选输入设备。任意时刻严格只会激活一个设备;sources 同时负责把 driver 产生的 raw source 命名成业务可读 source。

设备选择策略:

inputs:
  selection:
    scan_interval_ms: 100
    promote_stable_ms: 500
  • scan_interval_ms:调用 driver is_available() 的周期,必须大于 0。
  • promote_stable_ms:高优先级设备连续可用多久后才允许抢占,0 表示立即允许。
  • 切换时框架会停止旧驱动、清空旧 signal、发布一次零运动命令、等待新驱动 is_ready(),最后才接受新输入。
  • 切换期间 edge 命令被抑制;必须先松开、再按下 start/stop 等边沿按键才能重新触发。

通用结构:

sources:
  <group_name>:
    type: <driver_type>
    priority: <integer>
    signals:
      <semantic.source.name>:
        from: <raw.source.name>

读法是从左到右:

semantic source 由 raw source 产生

例如:

gamepad.left_y:
  from: js.axis.3

表示:

gamepad.left_y 由 js.axis.3 产生

不要反过来写成 js.axis.3: gamepad.left_y,因为那会让人误解为 raw source 被业务含义反向定义。

1.1 运行时 driver DEBUG

节点参数 --DEBUG 会每秒调用一次每个 input driver 的 debug()。CRSF 会打印最近一帧 CRC 正确的 16 路归一化通道值;joystick 和 keyboard 会打印自己的可用、就绪状态。

ros2 run remote_controller remote_controller --DEBUG --config /path/to/xbox_default.yaml

launch 的自定义参数必须写成 DEBUG:=true:

ros2 launch remote_controller remote_controller.launch.py DEBUG:=true

ros2 launch --debug 只影响 ROS 2 的 launch 系统,不会传递给遥控器 driver。

2. joystick / gamepad source

示例:

sources:
  gamepad:
    type: joystick
    device: /dev/input/by-id/usb-...-joystick
    priority: 50
    ready_timeout_ms: 1000
    loss_timeout_ms: 300
    cooldown_ms: 1000
    signals:
      gamepad.left_y:
        from: js.axis.3
      gamepad.left_x:
        from: js.axis.0
      gamepad.yaw:
        from: js.axis.6
      gamepad.a:
        from: js.button.0
      gamepad.b:
        from: js.button.1

字段:

  • type: joystick 或 type: gamepad:使用 Linux joystick driver。
  • device:设备路径,例如 /dev/input/js0。
  • priority:候选设备优先级,值越大越优先。
  • ready_timeout_ms:启动后等待 driver 进入 is_ready() 的最长时间,默认 1000。
  • loss_timeout_ms:普通 driver 的 is_available() 连续失败多久才判定断连,默认 300。CRSF 这类按有效帧新鲜度自行判定的 driver 会声明并直接使用该值。

  • cooldown_ms:断连或就绪超时后多久不参与重新选择,默认 1000。

  • signals:业务 source 声明。
  • signals.<name>.from:raw source,例如 js.axis.3 或 js.button.0。

driver 行为:

  • js.axis.N 会归一化到 [-1, 1]。
  • js.button.N 按下为 1.0,松开为 0.0。
  • 打开、读取错误或设备拔出会使 driver 变为不可用;设备管理器在 loss_timeout_ms 后做安全切换。

3. keyboard source

示例:

sources:
  keyboard:
    type: keyboard
    poll_timeout_us: 20000
    hold_ms: 200
    stop: space
    signals:
      keyboard.vx:
        from: keyboard.axis
        negative: s
        positive: w
      keyboard.vy:
        from: keyboard.axis
        negative: d
        positive: a
      keyboard.yaw:
        from: keyboard.axis
        negative: e
        positive: q
      keyboard.normal:
        from: keyboard.key
        key: "1"
        hold_ms: 200

字段:

  • type: keyboard:使用终端键盘 driver。
  • poll_timeout_us:轮询终端输入的超时时间,单位微秒。
  • hold_ms:键盘 source 触发后保持多久。键盘终端没有真实 release 事件,所以需要这个字段。
  • stop:清零运动轴的按键,常用 space。
  • from: keyboard.axis:声明键盘模拟轴。
  • negative:按下后输出 -1.0 的键。
  • positive:按下后输出 1.0 的键。
  • from: keyboard.key:声明普通按键。
  • key:触发普通按键 source 的键。
  • signals.<name>.hold_ms:覆盖单个 source 的保持时间。

特殊键名:

space
tab
esc
escape

普通键写单字符:

keyboard.sin_wave:
  from: keyboard.key
  key: "u"

4. CRSF source

type: crsf 已内置。它使用 POSIX 串口(默认 460800, 8N1, 无流控), 解析 CRC-8/DVB-S2 正确的 RC_CHANNELS_PACKED (0x16) 帧,并输出 16 个 归一化通道。设备拔出或停止收到有效帧后可自动重开 /dev/ttyCRSF。

sources:
  crsf:
    type: crsf
    device: /dev/ttyCRSF
    priority: 100
    baud_rate: 460800
    ready_timeout_ms: 1000
    loss_timeout_ms: 300
    cooldown_ms: 1000
    signals:
      crsf.left_x:
        from: crsf.channel.1        # CH1 / 左摇杆 X
      crsf.left_y:
        from: crsf.channel.2        # CH2 / 左摇杆 Y
      crsf.trigger_right:
        from: crsf.channel.3        # CH3 / RT
      crsf.right_x:
        from: crsf.channel.4        # CH4 / 右摇杆 X
      crsf.right_y:
        from: crsf.channel.6        # CH6 / 右摇杆 Y
      crsf.trigger_left:
        from: crsf.channel.7        # CH7 / LT
      crsf.button_group_a:
        from: crsf.channel.8        # CH8 / A/B/X/Y 编码组
      crsf.button_group_b:
        from: crsf.channel.9        # CH9 / LB/RB/Back/Start/D-pad 编码组
  • 默认 xbox_default.yaml 使用 CH1、CH2、CH3、CH4、CH6、CH7、CH8、CH9。CH1/CH2 是左摇杆 X/Y,CH3/CH7 是 RT/LT,CH4/CH6 是右摇杆 X/Y;CH2 在 move.vx 绑定处反向,CH6 使用时也应添加 direction: -1。CH8 是按键组 A: 200/400/600/800 分别代表 A/B/X/Y,992 为空闲;CH9 是按键组 B: 200/400/600/800 分别代表 LB/RB/Back/Start,1180/1380/1580/1780 分别代表 D-pad 上/下/左/右,992 为空闲。

  • CH8/CH9 在默认 YAML 中会先解为 crsf.button_group_a、crsf.button_group_b enum,再通过 inputs[].when 派生 A/B/X/Y/LB/RB/Start/Back 的 bool control。D-pad 左、右 分别以 +1、-1 映射到 CRSF yaw;上、下仍保留为 enum,可按需绑定输出。

  • crsf.channel.1 到 crsf.channel.16 是 driver 写入的原始通道,默认按旧工程的 174..1811 映射并限制到 [-1, 1]。业务含义只能由 YAML 中的语义 source 和 control 决定。

  • baud_rate:可覆盖默认波特率;兼容旧字段名 baudrate。

  • channel_min、channel_max:可选的通道归一化校准值。
  • 未激活时,driver 做非阻塞串口协议 probe;只有近期收到 CRC 正确的通道帧才会 成为可用候选。激活后 loss_timeout_ms 由 CRSF driver 自己按有效帧新鲜度执行, 不会被候选管理器重复计时。

SBUS、UDP/TCP、蓝牙 HID 或其他串口协议仍按同一套 sources -> controls -> outputs 接入,但需要相应 driver。其他标量参数会保存到 InputDeviceConfig.options,由 对应 C++ driver 读取。具体看 自定义遥控器驱动参考。

4.1 signal.timeout_ms:字段过期保护,不是设备断连

只有持续流式协议、且字段可能独立停止更新时才设置:

udp.vx:
  from: udp.vx
  timeout_ms: 500
  failsafe: 0.0

含义是该 raw signal 超过 500 ms 未更新时写入 failsafe。它不会切换设备,也不能替代 driver 的 is_available()。

  • Linux joystick:默认不设置。摇杆静止不产生事件是正常行为,设备级断连由 driver 和 loss_timeout_ms 判断。
  • CRSF:应由 driver 根据“最近一次 CRC 正确完整帧”实现 is_available();不要用每通道 timeout_ms 作为主要断连保护。
  • UDP/TCP:可按协议需要保留,用于某一个字段停止更新的额外保护。

5. curves:曲线、死区和校准

curves 负责输入曲线处理。它可以在 control source 上引用。

expo 曲线:

curves:
  stick:
    type: expo
    deadzone: 0.03
    expo: 0.2
    limit: [-1.0, 1.0]
    calibration:
      input: [-1.0, 0.0, 1.0]
      output: [-1.0, 0.0, 1.0]

字段:

  • type: expo:指数曲线。
  • deadzone:死区,小于等于该绝对值时输出 0。
  • expo:指数强度,范围 [0, 1]。
  • limit: [min, max]:输出限幅。
  • min / max:等价的限幅字段。
  • calibration.input:输入校准点 [min, center, max]。
  • calibration.output:输出校准点 [min, center, max]。
  • calibration.clamp:是否限制输入到校准范围内,默认 true。

分段曲线:

curves:
  three_position_curve:
    type: piecewise
    points:
      - [-1.0, -1.0]
      - [-0.2, 0.0]
      - [0.2, 0.0]
      - [1.0, 1.0]

piecewise 适合非线性旋钮、三档开关的预处理。points 必须按 input 从小到大排序。

6. controls:统一控制量

controls 是配置里最重要的一层。后面的 outputs.when 应该判断 control,而不是直接判断 raw source。

6.1 analog control

controls:
  move.vx:
    type: analog
    mix: max_abs
    inputs:
      - source: gamepad.left_y
        direction: -1
        curve: stick
      - source: keyboard.vx
    deadzone: 0.03
    min: -1.0
    max: 1.0
    alpha: 0.03

字段:

  • type: analog:连续模拟量。
  • inputs:唯一的输入规则列表;旧 source、sources、expr 不再支持。
  • mix: max_abs:取绝对值最大的输入。
  • mix: sum:求和;之后由 control 的 min/max 限制范围。
  • mix: first_active:按顺序取第一个非零输入。
  • direction:方向,-1 表示反向。
  • scale:缩放。
  • offset:偏移。
  • curve:引用 curves 中的曲线。
  • deadzone:control 层死区。
  • min / max:输出范围。
  • alpha:低通滤波系数,1.0 表示不滤波。
  • expo:control 层指数曲线。
  • invert:是否反向。

6.2 bool control

按钮:

controls:
  button.south:
    type: bool
    inputs:
      - source: gamepad.a

模拟轴当按钮:

controls:
  trigger.left:
    type: bool
    threshold: 0.85
    hysteresis: 0.05
    inputs:
      - source: gamepad.trigger_left

字段:

  • threshold:大于阈值时认为按下。
  • hysteresis:迟滞,避免阈值附近抖动。
  • invert:反向。

6.3 enum control

三档开关或多档模式推荐用 enum:

controls:
  switch.group_b:
    type: enum
    default: idle
    hysteresis: 0.03
    inputs:
      - source: crsf.button_group_b
    positions:
      lb:         [-1.0, -0.846]
      rb:         [-0.845, -0.602]
      back:       [-0.601, -0.358]
      start:      [-0.357, -0.118]
      idle:       [-0.117, 0.114]
      dpad_up:    [0.115, 0.351]
      dpad_down:  [0.352, 0.596]
      dpad_left:  [0.597, 0.841]
      dpad_right: [0.842, 1.0]

字段:

  • default:没有匹配区间时使用的值。
  • positions.<value>: [min, max]:枚举值对应的输入范围。
  • hysteresis:当前枚举值保持范围扩展。

判断 enum:

when: [switch.group_b=dpad_right]

或:

when:
  - equals:
      control: switch.group_b
      value: dpad_right

6.4 条件值派生 control

复杂组合键可以先定义成 command.*:

controls:
  command.sin_wave:
    type: bool
    inputs:
      - when:
          any:
            - - trigger.right
              - button.west
              - released: trigger.left
              - released: shoulder.left
              - released: shoulder.right
            - - keyboard.sin_wave
        value: true

再在 outputs 里复用:

outputs:
  edge:
    - output: btn_10=5
      when: [command.sin_wave]

inputs 还可把 enum 直接映射为模拟量,并使用 priority 抢占:

crsf.yaw:
  type: analog
  mix: sum
  inputs:
    - when: [crsf.button_group_b=dpad_left]
      value: 1.0
      priority: 100
    - when: [crsf.button_group_b=dpad_right]
      value: -1.0
      priority: 100

每次只有最高 priority 的激活规则组参与 mix;同组 sum 可让正负值抵消。when 支持递归 all/any/not,并支持 raw_range: {source: ..., min: ..., max: ...}。默认 analog alpha 为 1.0; 只有显式设置才平滑。

如果某个组合只用一次,也可以直接写在 outputs.when 里。

7. outputs:写入 MotionCommands

outputs 是最后一层。

outputs:
  conflict_policy: first_wins
  publish_on_change: true

  analog:
    vel_des.x: move.vx
    vel_des.y: move.vy
    yawdot_des: move.yaw

  edge:
    - output: system.start
      when: [system.start]

  level:
    - output: btn_1=1
      when:
        any:
          - - shoulder.right
            - button.west
            - released: shoulder.left
            - released: trigger.left
            - released: trigger.right
          - - keyboard.normal

顶层字段:

  • conflict_policy: first_wins:同一个 btn_N 被多个 binding 写入不同值时,保留先匹配的。
  • conflict_policy: last_wins:后匹配的覆盖先匹配的。
  • conflict_policy: error:冲突时报错。
  • publish_on_change: true:只有 payload 变化时才发布 MotionCommands。
  • publish_on_change: false:固定频率发布。

7.1 analog

analog 写连续字段,推荐直接写 MotionCommands 字段路径:

outputs:
  analog:
    vel_des.x: move.vx
    vel_des.y: move.vy
    vel_des.z: move.vz
    yawdot_des: move.yaw
    height_des: body.height

当前支持的简写:

vx     -> vel_des.x
vy     -> vel_des.y
vz     -> vel_des.z
yaw    -> yawdot_des
height -> height_des

高级写法:

outputs:
  analog:
    vel_des.x:
      controls: [move.vx, autonomous.vx]
      mix: first_active
      scale: 1.0
      offset: 0.0
      limit: [-1.0, 1.0]

7.2 level

level 是电平输出。条件满足时持续写值,条件不满足时自动回 0。

outputs:
  level:
    - output: btn_1=1
      when: [keyboard.normal]

适合:

  • 按住期间持续有效的按钮。
  • 旧逻辑里需要保持 btn_N=1 的命令。

当前设计不需要 release_outputs。level 每次刷新都会重新计算所有 binding,组合键不满足时对应 btn_N 自然回 0。

7.3 edge

edge 是上升沿输出。条件从 false 变 true 时输出一帧。

outputs:
  edge:
    - output: btn_10=5
      when: [keyboard.sin_wave]

适合:

  • 状态切换。
  • toggle / pause。
  • system.start、system.stop。

对于 btn_N=value,下一帧自动回 0。对于 system.*,只执行一次命令。

8. when 条件语法

单个 control:

when: [keyboard.normal]

多个 control 同时满足:

when:
  - shoulder.right
  - button.west
  - released: shoulder.left
  - released: trigger.left
  - released: trigger.right

辅助键组合必须把未参与组合的其他辅助键全部写成 released,否则三键组合也会命中 两键规则。

任意一组满足:

when:
  any:
    - - shoulder.right
      - button.west
      - released: shoulder.left
      - released: trigger.left
      - released: trigger.right
    - - keyboard.normal

显式 pressed:

when:
  - pressed: button.west

显式 released:

when:
  - button.west
  - released: shoulder.left
  - released: shoulder.right
  - released: trigger.left
  - released: trigger.right

枚举等于:

when:
  - switch.mode=high

范围判断:

when:
  - range:
      control: throttle
      min: 0.2
      max: 1.0

9. system:执行系统命令

outputs.edge 可以触发 system.*:

outputs:
  edge:
    - output: system.start
      when: [system.start]

然后在 system: 下定义命令:

system:
  start:
    - "<prepare_log_or_environment_command>"
    - "<start_robot_stack_command>"

  stop:
    - "<stop_robot_stack_command>"

互斥锁:

system_mutexes:
  launch:
    acquire: start
    release: stop

清零运动输入:

system_reset_motion_after:
  - stop

10. 添加一个新按键的最小流程

目标:把一个新的键盘或手柄输入映射到一个状态机事件。

  1. 在 sources.keyboard.signals 添加:
keyboard.sin_wave:
  from: keyboard.key
  key: "u"
  1. 在 controls 添加:
keyboard.sin_wave:
  type: bool
  inputs:
    - source: keyboard.sin_wave
  1. 在 outputs.edge 添加一个 btn_N=value 输出:
- output: btn_N=value
  when: [keyboard.sin_wave]
  1. 如果这是状态切换,在对应 Mod 的 mod.yaml 中声明匹配该 btn_N=value 的 events,并用 routes 或 actions 消费它。不要把业务事件重新集中到系统 YAML。

相关文档

自定义遥控器驱动参考

本页说明如何接入 SBUS、串口、UDP、TCP、蓝牙或自定义 HID。CRSF 已是内置 driver, 也可作为新协议 driver 的完整参考。当前框架的边界是:

InputDeviceManager 负责选择、抢占、断连和安全切换
InputDriver          负责协议、raw signal、可用性和初始就绪状态
YAML                 负责 source -> control -> output 的业务映射

driver 不应知道 normal、back_flip、btn_10=1 等业务名字。

1. 什么时候需要新 driver

只需改 YAML:换 Linux joystick、改键盘按键、改按钮组合、改曲线或控制映射。

需要新 driver:读取新协议或新传输,例如 SBUS、串口、UDP/TCP、蓝牙或自定义 HID。

2. 先定义设备和 raw signal

每个 YAML sources.<name> 都是候选设备。候选设备严格独占,优先级大的设备会抢占低优先级设备。

内置 CRSF 示例:

inputs:
  selection:
    scan_interval_ms: 100
    promote_stable_ms: 500

sources:
  crsf_remote:
    type: crsf
    device: /dev/ttyCRSF
    priority: 100
    baud_rate: 460800
    ready_timeout_ms: 1000
    loss_timeout_ms: 300
    cooldown_ms: 1000
    signals:
      crsf.left_x:
        from: crsf.channel.1       # CH1 / 左摇杆 X
      crsf.left_y:
        from: crsf.channel.2       # CH2 / 左摇杆 Y
      crsf.trigger_right:
        from: crsf.channel.3       # CH3 / RT
      crsf.right_x:
        from: crsf.channel.4       # CH4 / 右摇杆 X
      crsf.right_y:
        from: crsf.channel.6       # CH6 / 右摇杆 Y
      crsf.trigger_left:
        from: crsf.channel.7       # CH7 / LT
      crsf.button_group_a:
        from: crsf.channel.8       # CH8 / A/B/X/Y 编码组
      crsf.button_group_b:
        from: crsf.channel.9       # CH9 / LB/RB/Back/Start/D-pad 编码组

命名建议:

  • raw signal 使用协议前缀,例如 crsf.channel.1、udp.mode。
  • 轴统一归一化到 [-1, 1];按钮统一为 0.0 / 1.0。
  • CRSF driver 将完整帧中的 16 路通道分别写入 crsf.channel.1 到 crsf.channel.16;默认 YAML 使用 CH1、CH2、CH3、CH4、CH6、CH7 作为连续 Xbox 输入,并把 CH8/CH9 命名为离散编码按键组。CH8 的 200/400/600/800 表示 A/B/X/Y;CH9 的 200/400/600/800 表示 LB/RB/Back/Start,1180/1380/1580/1780 表示 D-pad 上/下/左/右;992 都表示空闲。通道业务含义应留在 YAML controls 中。

  • device 是通用设备路径;baud_rate、port 等标量放在 InputDeviceConfig.options。

之后再在 controls 中引用 crsf.left_x、crsf.button_group_a 等 source。业务输出 不应出现在 driver 中。

3. 文件结构

驱动应放在专用目录,不要再写入已删除的 input_driver.cpp:

include/remote_controller/drivers/
  input_driver.hpp          # InputDriver / InputDriverBase
  driver_registry.hpp       # factory 注册 API

src/drivers/
  driver_registry.cpp
  input_driver_base.cpp
  joystick_input_driver.cpp
  keyboard_input_driver.cpp
  crsf_input_driver.cpp     # 内置 CRSF driver

内置 CRSF driver 已加入 remote_controller_core 的 CMake 源文件列表。

4. 实现 InputDriverBase

通常直接继承 InputDriverBase。它提供线程安全的 set_signal()、日志和 output 分发。driver 还必须实现:

  • is_available():非阻塞。设备管理器每个扫描周期调用它。
  • is_ready():只有在 driver 已收到足够安全的初始状态后才返回 true。
  • start() / stop():启动、停止读取线程。

骨架:

#include "remote_controller/drivers/input_driver.hpp"

#include <atomic>
#include <chrono>
#include <thread>

namespace remote_controller {

class ExampleProtocolInputDriver : public InputDriverBase {
public:
    using InputDriverBase::InputDriverBase;

    ~ExampleProtocolInputDriver() override { stop(); }

    std::string name() const override { return config_.name; }

    bool is_available() override
    {
        // 必须非阻塞。未激活时可做轻量串口/协议 probe;激活后应
        // 根据最近 CRC 正确帧判断健康状态。
        return device_probe_ok() &&
            std::chrono::steady_clock::now() - last_valid_frame_ <
                std::chrono::milliseconds(config_.loss_timeout_ms);
    }

    bool is_ready() const override
    {
        // 一份 CRC 正确的完整通道帧已经写入全部必要 signal。
        return ready_;
    }

    void start() override
    {
        stop();
        stop_flag_ = false;
        ready_ = false;
        thread_ = std::thread(&ExampleProtocolInputDriver::run, this);
    }

    void stop() override
    {
        stop_flag_ = true;
        close_serial();
        if (thread_.joinable()) {
            thread_.join();
        }
        ready_ = false;
    }

private:
    std::thread thread_;
    std::atomic<bool> ready_{false};
    std::chrono::steady_clock::time_point last_valid_frame_{};

    void run()
    {
        while (!stop_flag_) {
            const CrsfFrame frame = read_next_valid_frame();  // 实现协议帧头、长度与 CRC
            if (!frame.valid) {
                continue;
            }

            // 在同一完整帧内更新所有需要的 signal,再声明 ready。
            set_signal("proto.vx", normalize(frame.channel(0)));
            set_signal("proto.vy", normalize(frame.channel(1)));
            set_signal("proto.yaw", normalize(frame.channel(2)));
            set_signal("proto.start", frame.start_pressed ? 1.0 : 0.0);
            set_signal("proto.stop", frame.stop_pressed ? 1.0 : 0.0);
            last_valid_frame_ = std::chrono::steady_clock::now();
            ready_ = true;
        }
    }
};

}  // namespace remote_controller

骨架中 device_probe_ok()、read_next_valid_frame()、close_serial()、ProtocolFrame 和 normalize() 由协议实现提供。读取循环必须用非阻塞 fd 配合 select() / poll(), 每次超时检查 stop_flag_。

对 CRSF,is_available() 不能仅检查 /dev/ttyCRSF 存在。它应以近期 CRC 正确帧为健康依据。由于设备管理器会在激活前调用该函数,driver 可实现轻量、非阻塞的协议 probe 或缓存探测结果。

5. 注册 factory

内置类型 keyboard、joystick、gamepad、crsf 已由 driver_registry.cpp 直接创建,不需要 factory 注册。下面只适用于新的非内置 driver:

remote_controller::register_input_driver_factory(
    "my_protocol",
    [](const remote_controller::InputDeviceConfig &config,
       remote_controller::InputMapper &mapper,
       std::mutex &mapper_lock,
       remote_controller::DriverOutputHandler output_handler,
       remote_controller::DriverLogHandler log_handler) {
        return std::unique_ptr<remote_controller::InputDriver>(
            new remote_controller::MyProtocolInputDriver(
                config,
                mapper,
                mapper_lock,
                std::move(output_handler),
                std::move(log_handler)));
    });

也可以在 driver_registry.cpp 中集中注册,但必须确保注册发生在 InputDeviceManager 建立候选列表之前。未注册类型不会让节点退出:会记录 warning 并使用下一个可用候选设备。

6. 断连与切换契约

设备管理器按以下规则工作:

高优先级候选连续可用 promote_stable_ms
  -> 停止当前设备
  -> 清空旧 signal
  -> 发布一次零运动命令
  -> 启动新 driver
  -> 等待 is_ready()
  -> 允许正常控制

普通 driver 的 is_available() 连续失败 loss_timeout_ms
  -> 同样进入安全切换

因此 driver 应做到:

  • is_available() 只描述设备/协议健康,且绝不阻塞管理器。
  • CRSF 的 is_available() 在未激活时执行非阻塞协议 probe;激活后直接以近期 CRC 正确的 RC_CHANNELS_PACKED 帧判断健康,并声明自己已处理 loss_timeout_ms, 以免管理器重复等待。

  • is_ready() 表示已经获得足够的初始状态,避免切换时把未知按键状态当成按下。

  • 断连后不自行保留旧值;管理器会清理该设备配置的所有 raw signal。
  • edge 命令在切换期间被抑制;用户必须释放后再次按下。

7. timeout_ms 何时使用

signals.*.timeout_ms 只是单个字段的过期保护:字段未更新时写入 failsafe。它不负责候选设备断连和切换。

  • joystick:不设置;静止没有事件是正常的。
  • CRSF:用 is_available() + loss_timeout_ms 判断“没有有效完整帧”;不是 signals.*.timeout_ms。

  • UDP/TCP:当一个字段可能独立停止更新时,可以保留 timeout_ms 作为补充。

8. 验证清单

1. 新 .cpp 已加入 CMake,colcon build 通过。
2. 自定义 YAML type 已在启动前注册 factory;内置 `crsf` 不需要注册。
3. 高优先级设备插入后稳定抢占,日志有明确原因。
4. 拔出或停止有效帧后,在 loss_timeout_ms 后发布一次零运动命令。
5. 新设备没有完整初始帧时,ready_timeout_ms 后回退,不接受控制。
6. 切换后按住的 start/stop 不会误触发;释放再按才会触发。
7. /motion_commands 与 YAML controls/outputs 一致。

相关文档

手把手 6:从零写一个 UDP 自定义遥控器驱动

本课以 UDP 文本包为例,但目标是掌握当前的多设备驱动框架。完整接口说明见 自定义遥控器驱动参考。

示例包:

vx=0.4 vy=0.0 yaw=-0.2 a=1 mode=0.8

目标数据流:

UDP packet
  -> UdpInputDriver
  -> udp.vx / udp.vy / udp.yaw / udp.a / udp.mode
  -> sources / controls / outputs
  -> MotionCommands

1. 定义候选设备

UDP 设备不是“文件是否存在”就能判断在线。建议 driver 根据最近一次格式正确的 UDP 包维护健康时间;is_available() 在活跃期间据此判断。若希望 UDP 在尚未收到包时也被选中,可让 driver 在 is_available() 中非阻塞地创建/轮询 socket,并缓存最近一包。

inputs:
  selection:
    scan_interval_ms: 100
    promote_stable_ms: 500

sources:
  udp_remote:
    type: udp
    priority: 20
    bind: 0.0.0.0
    port: 14550
    ready_timeout_ms: 1000
    loss_timeout_ms: 500
    cooldown_ms: 1000
    signals:
      udp.vx:
        from: udp.vx
        timeout_ms: 500
        failsafe: 0.0
      udp.vy:
        from: udp.vy
        timeout_ms: 500
        failsafe: 0.0
      udp.yaw:
        from: udp.yaw
        timeout_ms: 500
        failsafe: 0.0
      udp.a:
        from: udp.a
      udp.mode:
        from: udp.mode

这里的两个超时不要混淆:

  • loss_timeout_ms:设备级断连。is_available() 连续失败后,管理器清空设备、发布一次零运动命令并切换。
  • signals.*.timeout_ms:字段级保护。仅将过期字段写成 failsafe,不触发设备切换。

UDP 每包包含完整遥控状态时,通常只需要 loss_timeout_ms;timeout_ms 适合字段确实可能独立停更的协议。

2. 接入 controls

controls:
  udp.move.vx:
    type: analog
    inputs:
      - source: udp.vx
    alpha: 0.05

  udp.move.vy:
    type: analog
    inputs:
      - source: udp.vy
    alpha: 0.05

  udp.move.yaw:
    type: analog
    inputs:
      - source: udp.yaw
    alpha: 0.05

  udp.button.a:
    type: bool
    threshold: 0.5
    inputs:
      - source: udp.a

由于候选设备严格独占,也可以直接把 source 写进已有 move.vx 的 sources 列表;只会有当前活动设备在更新其 raw signal。

3. 建立文件

src/remote_controller/src/drivers/udp_input_driver.cpp

并在 CMakeLists.txt 的 remote_controller_core 源文件列表显式加入:

src/drivers/udp_input_driver.cpp

不要创建或修改旧的 src/input_driver.cpp,它已被拆分为 src/drivers/ 中的注册表和具体驱动。

4. 实现最小 driver

#include "remote_controller/drivers/input_driver.hpp"

#include <atomic>
#include <chrono>
#include <thread>

namespace remote_controller {

class UdpInputDriver : public InputDriverBase {
public:
    using InputDriverBase::InputDriverBase;

    std::string name() const override { return config_.name; }

    bool is_available() override
    {
        // 未激活时打开并非阻塞轮询 socket,激活后继续检查最近
        // 一次合法包;不能只看 UDP socket 是否已创建。
        return poll_health_nonblocking();
    }

    bool is_ready() const override { return ready_; }

    void start() override
    {
        stop();
        stop_flag_ = false;
        ready_ = false;
        thread_ = std::thread(&UdpInputDriver::run, this);
    }

    void stop() override
    {
        stop_flag_ = true;
        close_socket();
        if (thread_.joinable()) {
            thread_.join();
        }
        ready_ = false;
    }

private:
    std::thread thread_;
    std::atomic<bool> ready_{false};
    std::chrono::steady_clock::time_point last_valid_packet_{};

    void run()
    {
        while (!stop_flag_) {
            const Packet packet = read_next_valid_packet();
            if (!packet.valid) {
                continue;
            }
            set_signal("udp.vx", packet.vx);
            set_signal("udp.vy", packet.vy);
            set_signal("udp.yaw", packet.yaw);
            set_signal("udp.a", packet.a ? 1.0 : 0.0);
            set_signal("udp.mode", packet.mode);
            last_valid_packet_ = std::chrono::steady_clock::now();
            ready_ = true;
        }
    }
};

}  // namespace remote_controller

read_next_valid_packet() 应使用非阻塞 socket 与 select() / poll()。每次超时检查 stop_flag_;绝不能永久阻塞在 recvfrom()。

设备配置可从 config_ 读取:

const std::string bind = config_.options.at("bind");
const int port = std::stoi(config_.options.at("port"));

实际代码应对缺少 option、端口范围和数据包字段做校验。

5. 注册 factory

在 main.cpp 中、构造 COMPublisher 前注册类型:

remote_controller::register_input_driver_factory(
    "udp",
    [](const remote_controller::InputDeviceConfig &config,
       remote_controller::InputMapper &mapper,
       std::mutex &mapper_lock,
       remote_controller::DriverOutputHandler output_handler,
       remote_controller::DriverLogHandler log_handler) {
        return std::unique_ptr<remote_controller::InputDriver>(
            new remote_controller::UdpInputDriver(
                config, mapper, mapper_lock,
                std::move(output_handler), std::move(log_handler)));
    });

未注册 type: udp 时,节点仅会记录 warning 并回退到下一个候选设备。

6. 编译与验证

colcon build --packages-select remote_controller
source install/setup.bash

观察日志:

input candidate available: udp_remote
starting input candidate: udp_remote
input candidate ready; accepting commands: udp_remote

发包:

printf 'vx=0.4 vy=0.0 yaw=-0.2 a=1 mode=0.8\n' | nc -u -w0 127.0.0.1 14550

再检查:

1. 高优先级 UDP 设备稳定后是否抢占当前设备。
2. 停止合法 UDP 包后,是否在 loss_timeout_ms 后发布一次零运动命令。
3. 恢复数据时,是否在 ready 后才能控制。
4. 切换期间按住的 edge 命令是否必须释放再按才触发。
5. Ctrl+C 是否能在一个 poll 周期内退出。

将 VKBOTS 运控框架接入自己的机器人程序

本文面向希望复用 VKBOTS 的状态机、Mod、Transition、推理和控制调度,但使用自己的 ROS 消息、厂商 SDK、共享内存或 CAN 总线的开发者。

当前 bxi_example_py_elf3/bxi_example_demo.py 只是 VKH6 的 ROS 话题适配层:它采集 VKH6 状态,整理成框架观测,再把框架输出转换成 VKH6 电机命令。它不是运控框架本体。 迁移时应新写一个同等级的平台适配器,不要复制和修改 framework/runtime。

需要保留和替换什么

自己的机器人状态 / IMU / 操控输入
  -> 自己的平台适配器
       startup_step(now)
       snapshot_control_inputs() -> RobotObservation + events
       publish_motor_frame(MotorFrame)
  -> RobotControlRuntime
       ControlScheduler
       RobotControlFramework
       Mod / State / Transition / Inference
  -> 自己的平台适配器
  -> ROS 消息 / SDK / CAN / 下位机
保留 替换或确认
framework/ 下的通用运控框架 状态订阅、SDK 读取和电机发送
RobotControlRuntime 和控制调度 机器人关节布局、硬件顺序和标定
适用于新机器人的 Mod 与状态图 IMU 坐标系、四元数方向和单位
可复用的策略与推理后端 模型是否真的适配目标机构
MotorFrame 完整 MIT 命令契约 上电、使能、看门狗和故障停机

消息转换不能让为另一种机构训练的模型安全工作。只要关节拓扑、默认姿态、传感器语义或 控制频率改变,就必须重新确认策略契约,必要时重新训练模型和调整 Mod 参数。

三类关节布局不要混为一谈

接入新机器人时至少要区分:

Robot Layout      机器人实际返回并最终接收命令的全部关节,例如 31 个
Policy Layout     每个模型在类中声明的 observation/action 关节,例如 29 个
Hardware Layout   无名称硬件接口规定的固定数组顺序,可选

六种布局、29↔31/N 双向映射、Defaults、输出裁剪和 Transition 规则集中说明在 关节布局与映射。

具名状态平台不需要在代码里重复声明 Robot Layout。NamedJointStateSource() 以首个合法 消息的完整名称集合建立它;Framework 首次收到快照时锁定该布局。策略布局不要求与 Robot Layout 等长或同序:JointPolicy 首次绑定时按名称编译索引,之后只使用缓存映射。

平台只需要声明旧策略没有输出的关节应收到什么安全目标:

from bxi_example_py_elf3.framework.joints import (
    JointCommandDefaults,
    JointDefault,
)


MY_COMMAND_DEFAULTS = JointCommandDefaults(
    {
        "left_gripper": JointDefault(position=0.0, kp=20.0, kd=0.5),
        "right_gripper": JointDefault(position=0.0, kp=20.0, kd=0.5),
    }
)

例如 Robot Layout 有 31 个关节而旧模型只输出 29 个,解析器会按名称覆盖 29 个模型目标, 再用这里的两个默认目标形成完整 31 维命令。若默认项缺失,首次绑定会直接失败。反方向 部署时,如果模型输出的关节多于机器人,解析器会在首次绑定该模型布局时发出一次 warning, 按名称只保留当前机器人实际存在的关节;后续控制周期使用缓存映射,不再重复报警或查名称。 新 31 关节模型输出到完整 31 关节机器人时不会读取默认项,也不会发生裁剪。

平台适配器的三个必需方法

RobotControlRuntime 只通过 ControlPlatformAdapter 接触平台:

class ControlPlatformAdapter(Protocol):
    def startup_step(self, now: float) -> bool: ...

    def snapshot_control_inputs(
        self,
    ) -> tuple[RobotObservation, Sequence[str]]: ...

    def publish_motor_frame(self, frame: MotorFrame) -> None: ...
方法 必须保证
startup_step(now) 非阻塞检查状态、使能和硬件就绪;允许开始控制时返回 True
snapshot_control_inputs() 给出同一周期的完整观测,并一次性取走未消费事件
publish_motor_frame(frame) 按 frame.layout 的名称语义转换并立即发送完整命令

这三个方法都运行在控制线程。不能在其中等待 service、睡眠、读取磁盘、创建模型 Session 或大量输出日志;这些耗时会直接占用控制周期。

平台适配器也不应给整个主进程添加 taskset。control_runtime.cpu_affinity: control 会按本机 topology 只绑定控制线程;Mod 独立进程默认使用 shared,需要重计算时在节点 清单声明 scheduling.cpu_affinity: compute。所有平台共用这些用途名称,具体 CPU 编号由框架在 cgroup 允许集合内解析,详见框架控制调度。

输入契约:RobotObservation

当前接口为:

RobotObservation(
    joints=JointStateView(layout, position, velocity),
    quat_xyzw=quat_xyzw,
    quat_wxyz=quat_wxyz,
    omega=omega,
    raw_cmd_vel=raw_cmd_vel,
)
字段 约定
joints.position joints.layout 顺序,弧度,浮点一维数组
joints.velocity 同一顺序,弧度/秒
quat_xyzw (x, y, z, w),shape (4,)
quat_wxyz 同一物理姿态的 (w, x, y, z)
omega 策略约定机身坐标系的角速度,shape (3,)
raw_cmd_vel [vx, vy,yaw_rate],shape (3,),之后再经 speed profile

单位和坐标系不会被框架猜测或自动修正。必须确认 IMU 给出的是 world -> body 还是 body -> world,并处理固定安装旋转。四元数必须有限、归一化且不能是全零值。

事件使用完整名称,例如 com.customer.remote/stand。订阅回调只负责把边沿事件压入 队列;状态机只在控制线程中推进,不能在传感器回调里直接切状态。

输出契约:MotorFrame

框架可能在一个周期返回:

frame.layout  # 本帧完整关节布局
frame.qpos    # p_des, float32, shape=(frame.layout.dof_num,)
frame.vel     # v_des, float32, 同一布局
frame.kp      # kp, float32, 同一布局
frame.kd      # kd, float32, 同一布局
frame.torque  # t_ff, float32, 同一布局

MotorFrame 是完整的 MIT 关节命令,不是具体硬件消息。五个数组始终存在、使用同一布局, 对应关系为:

q_des = frame.qpos
dq_des = frame.vel
kp = frame.kp
kd = frame.kd
tau_ff = frame.torque

状态调用 MotorFrame.create()、MotorFrame.update() 或 RobotControlState._motor_frame() 时可以不传 vel/torque,框架会明确写入等长全 0 数组。 因此默认行为仍是位置 PD,但字段本身不是可选值,也不会复用上一周期的速度或前馈力矩。 Resolver 把局部 State Layout 补成完整 Robot Layout 时,新增关节的 vel/torque 也固定为 0。

只有目标位置的硬件可以只发送 qpos,但这样会丢失 gain ramp 等语义,必须重新验证。 纯力矩执行器应在可靠的底层伺服环中实现 PD、饱和和看门狗,不能把 qpos 当成力矩。

推荐路径:上下游消息都携带关节名

sensor_msgs/JointState 一类消息自带名称,因此消息中的数组顺序可以变化。使用 NamedJointStateSource 后,名称映射只在第一次收到消息或名称顺序变化时重新编译。

下面是一个可以按目标消息字段改造的 ROS 2 骨架。为避免回调和控制线程同时访问同一 数组,示例把“最新回调缓冲”和“本周期快照缓冲”分开;所有对象均长期复用。

from collections import deque
from pathlib import Path
from threading import Event, Lock
import time

import numpy as np
import rclpy
from ament_index_python.packages import get_package_share_directory
from rclpy.executors import MultiThreadedExecutor
from rclpy.node import Node
from sensor_msgs.msg import Imu, JointState

from my_robot_msgs.msg import NamedJointCommand  # 替换成自己的消息

from bxi_example_py_elf3.framework.joints import (
    JointCommandDefaults,
    JointDefault,
    JointStateBuffer,
)
from bxi_example_py_elf3.framework.mod_api import MotorFrame
from bxi_example_py_elf3.framework.platform import (
    NamedJointStateSource,
    RobotControlRuntime,
    RobotObservation,
)
from bxi_example_py_elf3.framework.runtime.state_machine import (
    load_state_machine_config,
)


MY_COMMAND_DEFAULTS = JointCommandDefaults(
    {
        "gripper_joint": JointDefault(position=0.0, kp=15.0, kd=0.4),
    }
)


class MyRobotAdapter(Node):
    def __init__(self) -> None:
        super().__init__("my_bxi_robot_adapter")
        self._lock = Lock()
        self._stopping = Event()
        self._events: deque[str] = deque()

        # 回调写入区:消息名称顺序变化时自动重新编译映射。
        self._latest_joints = NamedJointStateSource()
        self._joint_received = False
        self._imu_received = False
        self._joint_update_at = 0.0
        self._imu_update_at = 0.0
        self._latest_quat_xyzw = np.zeros(4, dtype=np.float64)
        self._latest_quat_wxyz = np.zeros(4, dtype=np.float64)
        self._latest_omega = np.zeros(3, dtype=np.float64)
        self._latest_command = np.zeros(3, dtype=np.float32)

        # 控制周期快照区:对象和数组身份从启动到关闭保持不变。
        self._snapshot_joints: JointStateBuffer | None = None
        self._snapshot_quat_xyzw = np.zeros(4, dtype=np.float64)
        self._snapshot_quat_wxyz = np.zeros(4, dtype=np.float64)
        self._snapshot_omega = np.zeros(3, dtype=np.float64)
        self._snapshot_command = np.zeros(3, dtype=np.float32)
        self._observation: RobotObservation | None = None

        self._joint_sub = self.create_subscription(
            JointState, "/my_robot/joint_states", self._joint_callback, 1
        )
        self._imu_sub = self.create_subscription(
            Imu, "/my_robot/imu", self._imu_callback, 1
        )
        self._command_pub = self.create_publisher(
            NamedJointCommand, "/my_robot/joint_command", 1
        )

        share = Path(get_package_share_directory("bxi_example_py_elf3"))
        config = load_state_machine_config(
            share / "config/elf3_state_machine.yaml"
        )
        self.runtime = RobotControlRuntime(
            config,
            built_in_mod_root=share / "mods",
            command_defaults=MY_COMMAND_DEFAULTS,
            ros_node=self,
            platform=self,
            fatal_callback=self._on_control_fatal,
        )

    def _joint_callback(self, msg: JointState) -> None:
        now = time.monotonic()
        try:
            with self._lock:
                self._latest_joints.update(
                    msg.name,
                    msg.position,
                    msg.velocity,
                    timestamp_ns=time.monotonic_ns(),
                )
                self._joint_received = True
                self._joint_update_at = now
        except (TypeError, ValueError) as exc:
            self.get_logger().error(f"invalid joint state: {exc}")

    def _imu_callback(self, msg: Imu) -> None:
        q = msg.orientation
        norm = float(np.sqrt(q.x*q.x + q.y*q.y + q.z*q.z + q.w*q.w))
        if not np.isfinite(norm) or norm < 1.0e-6:
            self.get_logger().error("invalid IMU quaternion")
            return
        inv_norm = 1.0 / norm
        w = msg.angular_velocity
        now = time.monotonic()
        with self._lock:
            self._latest_quat_xyzw[:] = (
                q.x * inv_norm, q.y * inv_norm, q.z * inv_norm, q.w * inv_norm
            )
            self._latest_quat_wxyz[:] = (
                q.w * inv_norm, q.x * inv_norm, q.y * inv_norm, q.z * inv_norm
            )
            self._latest_omega[:] = (w.x, w.y, w.z)
            self._imu_received = True
            self._imu_update_at = now

    def set_velocity_command(self, vx: float, vy: float, yaw: float) -> None:
        with self._lock:
            self._latest_command[:] = (vx, vy, yaw)

    def push_event(self, full_event_name: str) -> None:
        with self._lock:
            self._events.append(full_event_name)

    # ---------------- ControlPlatformAdapter ----------------

    def startup_step(self, now: float) -> bool:
        with self._lock:
            ready = self._joint_received and self._imu_received
            joint_age = now - self._joint_update_at
            imu_age = now - self._imu_update_at
        if not ready:
            return False
        if joint_age > 0.10 or imu_age > 0.10:
            self._send_safe_command()
            raise RuntimeError(
                f"robot state stale: joint={joint_age:.3f}s, imu={imu_age:.3f}s"
            )
        # 在此轮询异步完成的上电/使能状态,不能阻塞等待。
        return True

    def snapshot_control_inputs(
        self,
    ) -> tuple[RobotObservation, tuple[str, ...]]:
        with self._lock:
            latest = self._latest_joints.view
            if self._snapshot_joints is None:
                self._snapshot_joints = JointStateBuffer(latest.layout)
                self._observation = RobotObservation(
                    joints=self._snapshot_joints.view,
                    quat_xyzw=self._snapshot_quat_xyzw,
                    quat_wxyz=self._snapshot_quat_wxyz,
                    omega=self._snapshot_omega,
                    raw_cmd_vel=self._snapshot_command,
                )
            self._snapshot_joints.update(
                latest.position,
                latest.velocity,
                timestamp_ns=latest.timestamp_ns,
            )
            np.copyto(self._snapshot_quat_xyzw, self._latest_quat_xyzw)
            np.copyto(self._snapshot_quat_wxyz, self._latest_quat_wxyz)
            np.copyto(self._snapshot_omega, self._latest_omega)
            np.copyto(self._snapshot_command, self._latest_command)
            events = tuple(self._events)
            self._events.clear()
        assert self._observation is not None
        return self._observation, events

    def publish_motor_frame(self, frame: MotorFrame) -> None:
        if not (
            np.all(np.isfinite(frame.qpos))
            and np.all(np.isfinite(frame.vel))
            and np.all(np.isfinite(frame.kp))
            and np.all(np.isfinite(frame.kd))
            and np.all(np.isfinite(frame.torque))
        ):
            self._send_safe_command()
            raise RuntimeError("framework produced a non-finite motor frame")

        msg = NamedJointCommand()
        msg.name = frame.layout.names
        msg.position = frame.qpos.tolist()
        msg.velocity = frame.vel.tolist()
        msg.kp = frame.kp.tolist()
        msg.kd = frame.kd.tolist()
        msg.feedforward_torque = frame.torque.tolist()
        self._command_pub.publish(msg)

    def _send_safe_command(self) -> None:
        # 替换成硬件明确支持的阻尼、零力矩或急停命令。
        pass

    def _on_control_fatal(self, message: str) -> None:
        self.get_logger().fatal(message)
        self._send_safe_command()
        self._stopping.set()
        rclpy.try_shutdown()

    def destroy_node(self) -> bool:
        self._stopping.set()
        runtime = getattr(self, "runtime", None)
        if runtime is not None:
            runtime.close()  # 先停控制线程,避免安全命令后又发普通帧。
        self._send_safe_command()
        return super().destroy_node()


def main() -> None:
    rclpy.init()
    node = MyRobotAdapter()
    executor = MultiThreadedExecutor(num_threads=3)
    try:
        executor.add_node(node)
        node.runtime.attach_executor(executor)
        node.runtime.start()
        executor.spin()
    finally:
        node.destroy_node()
        executor.shutdown()
        rclpy.try_shutdown()

上例为了展示接线仍加载 VKH6 状态图。关节名称或机构不兼容的机器人不能直接运行 VKH6 策略;必须换成与自身 Policy Layout 匹配的 Mod、参数和模型。

固定数组硬件:显式重排和标定

有些 SDK 或 CAN 协议只有数组,不携带关节名。这时必须声明 Hardware Layout,并在启动 时编译一次映射。不能因为当前数组“看起来顺序一样”就省略契约。

import numpy as np

from bxi_example_py_elf3.framework.joints import (
    CompiledJointMap,
    JointCalibration,
    JointLayout,
)


HARDWARE_JOINTS = JointLayout(
    ("joint_c", "joint_a", "joint_b"),
    label="vendor fixed order",
)
ROBOT_JOINTS = JointLayout(
    ("joint_a", "joint_b", "joint_c"),
    label="robot semantic order",
)

# source=框架输出,target=硬件顺序;只允许完全相同的关节集合。
robot_to_hardware = CompiledJointMap.compile(
    ROBOT_JOINTS,
    HARDWARE_JOINTS,
    require_exact=True,
)
calibration = JointCalibration(
    HARDWARE_JOINTS,
    direction=np.asarray([1.0, -1.0, 1.0]),
    zero_offset=np.asarray([0.0, 0.10, 0.0]),
)

semantic_q = np.empty(HARDWARE_JOINTS.dof_num, dtype=np.float32)
hardware_q = np.empty(HARDWARE_JOINTS.dof_num, dtype=np.float32)
hardware_kp = np.empty(HARDWARE_JOINTS.dof_num, dtype=np.float32)
hardware_kd = np.empty(HARDWARE_JOINTS.dof_num, dtype=np.float32)


def publish_motor_frame(frame):
    if frame.layout.names != ROBOT_JOINTS.names:
        raise ValueError("unexpected robot layout")
    robot_to_hardware.map_into(frame.qpos, semantic_q)
    calibration.position_to_hardware_into(semantic_q, hardware_q)
    robot_to_hardware.map_into(frame.kp, hardware_kp)
    robot_to_hardware.map_into(frame.kd, hardware_kd)
    vendor_sdk.send_pd(hardware_q, hardware_kp, hardware_kd)

输入做严格逆过程:先将硬件固定顺序数组标定并重排到 ROBOT_JOINTS,再以 JointStateView(ROBOT_JOINTS, ...) 交给 Framework。Framework 会继续按名称映射到各策略 的 observation layout。direction 只能是 +1/-1;zero_offset 和位置使用同一角度单位。

如果直接处理 PolicyOutput.joints 而不是最终 MotorFrame,可使用:

  • NamedJointCommandEncoder:名称消息,默认拒绝不完整目标。
  • FixedOrderJointCommandEncoder:固定顺序消息,缓存索引和输出缓冲。
  • ExactJointTargetAssembler:策略动作关节集合完整、只有顺序不同。
  • PartialJointTargetAssembler:策略只控制子集,同时调用者显式提供完整 fallback。

29 关节策略与更多关节机器人

31 关节状态输入 29 关节策略是允许的,只要 source layout 包含策略 observation layout。 策略自动选择并排列自己需要的关节。

当前 VKH6 适配层会读取 ActuatorStates.name,以首个合法消息的完整名称集合建立 State Layout;后续即使消息顺序变化,也会按名称写入同一稳定缓冲。它不会用消息布局改写策略 契约。policies/joints.py 中的 ELF3_POLICY_JOINTS 固定描述现有模型的 29 维输入 输出;Robot Layout 则保持消息中的完整 N 个关节。

每个状态产生自己的自然 MotorFrame.layout。旧 29 关节状态通过 JointCommandResolver 与平台的 JointCommandDefaults 合成完整 31 维目标;新 31 关节 状态直接覆盖完整布局;任意子集模型也使用同一机制。默认目标按关节名声明,缺一项就失败, 不会默认补零或保持上帧。

Transition 在插值前分别把两端解析到完整 Robot Layout,所以不同关节数的状态可以安全 互相切换。最终传给 publish_motor_frame() 的始终是完整 Robot Layout;如果下游名称消息 本身支持局部目标,也不要在平台边界擅自丢弃框架已补齐的关节。

接入已有非 ROS 程序

三个适配方法不要求电机 I/O 使用 ROS。snapshot_control_inputs() 可以读取厂商 SDK 的 共享状态,publish_motor_frame() 可以调用 SDK 或写 CAN。当前 Framework 仍需要一个 rclpy.node.Node,用于 Mod 子节点、日志和高级 ROS 集成,因此推荐保留最小 Node,即使 电机数据完全不经过 ROS。

如果必须完全移除 ROS,还需要把 ros_node、Mod 子节点和日志抽象成 host services;这 是框架级改造,不能用假的 Node 掩盖。已有程序自己维护硬实时循环时也可以直接调用 RobotControlFramework.update(),但调用方必须承担绝对时间调度、Framework 锁、低频 maintenance_update()、Mod Executor、deadline 统计、异常处理和关闭顺序。一般优先复用 RobotControlRuntime。

性能和线程安全

  1. 在构造或首次布局绑定时创建 Layout、名称映射、标定和所有 NumPy 输出缓冲。
  2. 回调只原地更新“最新值”;控制周期在同一把锁内复制到独立稳定快照。
  3. 不让 Framework 持有随后会被订阅回调并发改写的数组。
  4. 不在控制周期调用 list.index()、创建 Session、读取模型或深拷贝整套对象。
  5. 固定顺序重排使用 np.take(..., out=...);命令补齐使用预编译索引和复用缓冲。
  6. ROS Python 的变长数组字段通常仍需 .tolist();需要更低延迟时优先使用共享内存或 厂商 SDK 暴露的稳定缓冲。

  7. 电机输出只能有一个所有者,不能让旧控制程序与 VKBOTS 同时发送命令。

29 或 31 个关节的单次数组复制通常远小于一次神经网络推理。先保证并发一致性,再通过 benchmark 判断是否需要双缓冲或无锁快照,不要凭感觉移除锁。

安全检查

  • 对输入检查 shape、有限值、时间戳和断流超时。
  • 对输出检查有限值、目标速度、位置软限位、增益范围和发送结果。
  • 上电后先验证零力矩、阻尼、急停、断流看门狗和进程崩溃保护。
  • 看门狗必须位于下位机或硬件侧;“保持最后一帧”不能代替看门狗。
  • 真机首次验证使用吊架、低增益、低速度,并保留独立物理急停。
  • 逐关节验证正方向和零点,不要只依据关节名称判断。

分阶段验收

阶段 电机状态 必须验证
1. 离线 不连接 名称映射、固定顺序、方向和零点可往返
2. 数据旁路 断使能 layout、shape、单位、频率、时间戳和四元数方向
3. 命令观察 断使能 MotorFrame 转换后的目标角、增益和限位
4. 吊架静止 低增益 初始状态、PD brake、急停和断流看门狗
5. 吊架运动 限速 每个关节方向、状态进入退出和 Transition
6. 落地低速 保守 profile 指令方向、推理耗时和 deadline miss
7. 长时间运行 逐步放开 温度、丢包、重启、资源释放和故障恢复

最终检查清单

  • Robot、Policy 和 Hardware Layout 的责任清晰。
  • 所有布局无重复名;缺失关节在启动或首次绑定时立即失败。
  • 额外关节和局部动作有明确控制所有者,不依赖静默补值。
  • 关节方向、零点、单位和输出逆变换经过往返验证。
  • 两种四元数顺序表达同一个姿态,IMU 坐标系与训练一致。
  • RobotObservation 和快照数组长期复用,且不会被回调并发修改。
  • MotorFrame.layout 在发布边界被检查或随名称消息一起发送。
  • 状态断流、控制超时、输出越界和程序退出都会进入硬件安全状态。
  • 真机前已经在目标平台运行推理与控制 benchmark。

相关文档

关节布局与映射

VKBOTS 不把“数组第几个元素”当作跨模块协议。模型、状态、机器人消息和硬件接口都用 JointLayout 声明名称与顺序,名称是关节的语义主键;数字索引只在布局首次绑定时编译。

这套机制同时解决以下部署问题:

  • 31 关节机器人继续运行旧 29 关节策略。
  • 31 关节状态输出部署到只有 29 个执行器的机器人。
  • 模型输入顺序、状态消息顺序和硬件固定顺序不同。
  • 一个状态由模型、话题、IK、轨迹等多个命令源共同组成。
  • Transition 在不同关节数量的状态之间安全插值。

八个布局边界

Incoming Message Layout     状态消息本次携带的名称与顺序
Robot Layout                本次进程中机器人稳定的完整关节集合
Policy Observation Layout   某个策略从 Robot Layout 读取的关节与顺序
Model Observation Layout    实际写入模型输入张量的关节与顺序
Model Action Layout         模型动作输出张量的关节与顺序
Policy Action Layout        策略解码或合成后产生的语义动作关节与顺序
State Output Layout         状态合成后的自然 MotorFrame 布局
Hardware Layout             无名称硬件协议要求的固定数组顺序,可选

它们可以同名同序,也可以完全不同。不要用一个全局“控制关节列表”同时表达这些概念。

当前数据流为:

具名机器人状态(任意消息顺序)
  -> NamedJointStateSource
  -> 稳定 Robot Layout(N)
  -> JointInputBinding 按 Policy Observation Layout 选择(P)
  -> 按 Model Observation Layout 组织输入(M)
  -> 模型推理,返回 Model Action Layout(K)
  -> Policy 按 Policy Action Layout 解码/合成(A)
  -> 可选 JointCommandComposer 合并多个命令源
  -> State Output MotorFrame(S)
  -> JointCommandResolver 映射到 Robot Layout(N)
  -> Transition 在完整 N 维帧上插值
  -> 具名消息直接发布,或映射到 Hardware Layout

P、M、K、A、S 和 N 不要求相等。对直接解码的普通策略,P=M、K=A;局部模型或 带额外程序命令的策略不必相等。

输入:机器人状态到策略观测

具名消息由 NamedJointStateSource 归一化。第一条合法消息建立稳定 Robot Layout;后续消息 即使顺序改变,也会按名称重排到同一个长期 JointStateBuffer。本次进程运行期间关节集合 应保持不变;机器人从 29 改成 31 个物理关节后应重新启动部署进程,让首帧建立新布局。

每个策略用类声明自己的输入和输出契约:

class WalkPolicy(JointPolicy):
    joint_contract = PolicyJointContract(
        observation=WALK_OBSERVATION_JOINTS,
        action=WALK_ACTION_JOINTS,
    )

JointInputBinding 在第一次看到 Robot Layout 时按名称编译 observation 索引:

  • Robot 与 observation 名称同序:直接复用源 view,不复制。
  • Robot 包含更多关节或顺序不同:写入策略长期复用的选择缓冲。
  • Robot 缺少策略必需的观测关节:立即报错,不会伪造位置或速度。

因此 31 关节状态可以安全输入旧 29 关节策略;反过来,如果一个 31 关节模型的 observation 确实需要两个头部关节,29 关节机器人无法仅靠“裁剪模型输出”运行它。必须换模型,或者由 部署者显式实现有物理意义的虚拟观测源。

contract 必须写模型真实使用的顺序。例如 back-flip、forward-flip 和 history motion 的 ONNX metadata 是 Isaac 顺序,类就声明 ELF3_ISAAC_JOINTS;recover 和 normal 模型是另一 套顺序,类声明相应布局。不要先谎称所有策略都是 ELF3_POLICY_JOINTS,再在 _build_input() 里用 ISAAC_TO_MUJOCO 或 MUJOCO_TO_ISAAC 修正。

default_position、kp、kd、action_scale 也不允许成为四组脱离关节名的裸数组。固定 参数使用一张逐关节表,模型 metadata 参数则必须和经过校验的 joint_names 一起绑定:

from bxi_example_py_elf3.framework.joints import JointParameterSet


PARAMETERS = JointParameterSet.from_rows(
    MODEL_JOINTS,
    (
        # name, default_position, kp, kd, action_scale
        ("joint_a", 0.0, 50.0, 2.0, 0.25),
        ("joint_b", 0.1, 40.0, 1.5, 0.20),
    ),
)

class WalkPolicy(JointPolicy):
    joint_contract = PolicyJointContract(
        observation=PARAMETERS.layout,
        action=PARAMETERS.layout,
    )

from_rows() 要求每行名称与 MODEL_JOINTS.names 同序且完整,导入时就能发现漏项、重复项 或顺序错误。加载 metadata 时使用 JointParameterSet.from_arrays(MODEL_JOINTS, ...),但 必须先检查 metadata 的 joint_names 与 MODEL_JOINTS.names 完全一致。若参数来自另一具名 布局,可用 parameters.select(model_layout) 在初始化阶段按名称产生目标参数集。控制周期只 读取已经绑定布局的参数,不做名称查找和换序。

模型输出不等于状态输出

ONNX/RKNN/OpenVINO 返回的是模型张量。Policy 必须知道每个关节字段对应的 Model Action Layout,再把它解码成具名 JointTargetView;它还可以加入策略自身的确定性逻辑。例如 hello 使用的 no-arm 模型按 ELF3_LOWER_BODY_JOINTS 输入和输出 15 个关节,Policy 可以 用默认目标或其他命令源形成完整 29 关节策略输出。

State 还可以继续加入不来自模型的命令:

模型控制15
  + Policy内部控制14
  = Policy Action 29

Policy 29
  + 挥手命令覆盖右臂3
  + 头部话题/IK/轨迹控制2
  = Hello State Output 31

这种合成使用 JointCommandComposer。每个生产者维护自己的 JointTargetBuffer;Composer 只读取当前 position/kp/kd,不关心来源是模型、话题、IK还是公式。普通 Layer 不能与已有 所有者重叠,只有显式 override=True 的 Layer 可以覆盖已有命令。

完整示例见多来源关节命令合成。

输出:状态帧到机器人布局

状态把自然 MotorFrame 交给 ctx.set_motor_target()。JointCommandResolver 按名称处理, 不依赖“前29个”或“最后两个”这样的数组假设。

State Output 与 Robot Layout 的关系 处理方式
名称和顺序完全相同 直接使用状态帧 fast path
关节集合相同但顺序不同 按名称重排到完整 Robot Frame
状态输出少于机器人 用显式 JointCommandDefaults 补齐缺少的硬件关节
状态输出多于机器人 只保留机器人存在的名称,首次绑定该布局时 warning 一次
两边各有独有名称 裁剪状态独有名称,并用 Defaults 补齐机器人独有名称

映射第一次遇到某个 State Output Layout 时编译并缓存。后续周期只执行 NumPy 数组写入, 不会重复查名称或输出 warning。

29 输出到 31 机器人

旧状态只输出 29 个身体关节,而新机器人还有两个头部关节。平台必须声明固定安全兜底:

from bxi_example_py_elf3.framework.joints import (
    JointCommandDefaults,
    JointDefault,
)

ROBOT_COMMAND_DEFAULTS = JointCommandDefaults(
    {
        "neck_y_joint": JointDefault(position=0.0, kp=16.747, kd=1.066),
        "neck_z_joint": JointDefault(position=0.0, kp=16.747, kd=1.066),
    }
)

缺少任一默认项时框架停止该控制周期并说明缺失名称。它不会猜测 position/kp/kd 或沿用 上一帧;MIT 命令的 vel/torque 则按协议明确补 0。

JointCommandDefaults 只表示“该状态没有任何来源控制这个硬件关节时”的固定平台兜底。 话题、IK、正弦轨迹等动态命令应作为 State 的命令 Layer,不能写进 Defaults。

31 输出到 29 机器人

如果状态语义上输出 31 个关节,而机器人只有 29 个,Resolver 保留名称交集并忽略机器人 不存在的两个输出,同时通过 ROS logger 发出一次 warning:

state/policy MotorFrame contains joints that are absent from the robot layout
and will be ignored: ('neck_y_joint', 'neck_z_joint')

这只解决输出投影。模型若在输入侧也依赖缺失关节,仍会在 JointInputBinding 阶段失败。

31 输出到 31 机器人

状态完整输出全部关节时不读取 Defaults,也不发生裁剪。比如新的31关节模型或完成了头部 命令合成的 HelloState,都会直接进入完整布局 fast path。

Transition 中的映射

状态切换时不能直接对两个自然帧的裸数组插值,因为两端可能关节数和顺序不同。 Transition 会先分别执行:

ctx.resolve_motor_frame(natural_from, full_from)
ctx.resolve_motor_frame(natural_to, full_to)

两端都成为完整 Robot Layout 后,才混合 qpos、vel、kp、kd 和 torque。因此:

  • 29 关节状态切到 31 关节状态时,新增关节从平台默认目标平滑进入新状态目标。
  • 31 关节状态切到 29 关节状态时,新增硬件关节平滑回到默认目标。
  • 在 29 关节机器人上,31 关节状态的额外输出在插值前已经被裁剪。
  • advance=False 采样不能推进模型 history、话题消费游标或轨迹相位。

输出到具名消息或固定顺序硬件

最终 Framework 输出已经是完整 Robot Layout。

下游消息携带关节名时直接发送:

publish(
    names=frame.layout.names,
    position=frame.qpos,
    velocity=frame.vel,
    kp=frame.kp,
    kd=frame.kd,
    feedforward_torque=frame.torque,
)

如果 SDK、共享内存或 CAN 协议只有固定数组,必须另外声明 Hardware Layout:

encoder = FixedOrderJointCommandEncoder(HARDWARE_JOINTS)
hardware_target = encoder.encode(named_target)

关节零偏、方向和比例属于 JointCalibration。推荐顺序是先从 Robot Layout 映射到 Hardware Layout,再把语义角度转换成硬件单位。不要把硬件编号写进 Policy 或 State。

常见错误与 Warning

信息 原因 处理
source joint layout is missing joints Robot 状态缺少策略 observation 检查消息名称、模型契约或更换模型
do not cover the complete composer output layout State 声明的输出关节没有命令来源 增加 Layer 或缩小 State Output Layout
ownership conflicts 两个 Layer 未授权地控制同一关节 明确所有者;确需覆盖时设置 override=True
no explicit JointCommandDefaults State 少于 Robot,且硬件关节没有兜底 在平台层增加安全 JointDefault
will be ignored State 输出了 Robot 不存在的关节 确认跨机器人部署符合预期;该布局只警告一次
robot joint layout changed after startup Runtime 接收到不同的稳定 Robot Layout 停止控制并重新建立部署布局

性能约束与验证

  • JointLayout 在类定义、准备阶段或首帧创建,不在控制周期创建。
  • observation、Layer、Resolver 和 Hardware 映射只在布局首次出现时编译。
  • 所有输入、选择、合成和最终输出缓冲长期复用。
  • 控制周期不执行 list.index()、字典名称查找、深拷贝或数组创建。
  • 相同布局走零复制或直接帧 fast path。
  • Warning 只在新布局首次编译时输出,不进入稳定热路径。

一键测量观测选择、命令补齐、输出裁剪、多来源合成、重排和 fast path:

python3 tools/benchmark/joint_mapping_benchmark.py

当前测试还覆盖 29→31、31→29、任意顺序、缺省项失败、所有权冲突以及输出缓冲复用。

多来源关节命令合成

一个状态的最终关节命令不一定全部来自模型。常见来源包括策略推理、ROS 话题、IK、遥操作、 固定姿态、公式轨迹和安全控制器。框架把“命令如何产生”与“命令如何合并”分开:生产者只 维护自己的具名 JointTargetView,JointCommandComposer 只负责合成。

Composer 之后如何把 State Output 适配到 29、31 或任意 N 关节机器人,见 关节布局与映射。

模型 / 话题 / IK / 轨迹 / 状态逻辑
              -> 多个 JointTargetView
              -> JointCommandComposer
              -> 状态自然 MotorFrame(N)
              -> JointCommandResolver
              -> 当前机器人 MotorFrame(M)

最小示例

下面的状态以 29 关节策略为基础,额外接入两个头部关节。头部缓冲可以由任意生产者更新。

from bxi_example_py_elf3.framework.mod_api import (
    JointCommandComposer,
    JointCommandLayer,
    JointLayout,
    JointTargetBuffer,
)

HEAD_JOINTS = JointLayout(("neck_y_joint", "neck_z_joint"))
STATE_OUTPUT_JOINTS = JointLayout(
    (*POLICY_JOINTS.names, *HEAD_JOINTS.names)
)

self.head_command = JointTargetBuffer(HEAD_JOINTS)
self.head_command.kp[:] = (16.747, 16.747)
self.head_command.kd[:] = (1.066, 1.066)

self.composer = JointCommandComposer(
    STATE_OUTPUT_JOINTS,
    (
        JointCommandLayer("policy", self.policy.output.joints),
        JointCommandLayer("head", self.head_command.view),
    ),
)

控制周期只更新来源缓冲并合成:

self.head_command.position[:] = latest_head_target
frame = self.composer.compose()
ctx.set_motor_target(frame)

compose() 每次返回同一个长期 MotorFrame。来源布局、输出索引和所有权仅在 Composer 构造时检查和编译。

覆盖现有控制源

挥手状态通常需要覆盖基础策略的部分手臂关节。覆盖必须显式声明:

self.composer = JointCommandComposer(
    STATE_OUTPUT_JOINTS,
    (
        JointCommandLayer("policy", self.policy.output.joints),
        JointCommandLayer("wave", self.wave_command.view, override=True),
        JointCommandLayer("head", self.head_command.view),
    ),
)

构造阶段遵守以下规则:

  1. 输出布局中的每个关节必须至少被一个 Layer 覆盖。
  2. Layer 不得包含输出布局以外的关节。
  3. 两个普通 Layer 不得拥有同一个关节。
  4. 后置 Layer 只有设置 override=True 才能替换已有所有者。
  5. 每个来源必须提供完整的 position、kp 和 kd,Composer 不猜控制增益。

这些检查使拼写错误、遗漏关节和意外抢占在状态进入控制循环前失败。

话题和其他异步来源

Composer 不直接依赖 ROS。状态可以订阅话题,也可以从 Mod Resource、共享内存或 SDK 获取 目标,但不能让 callback 在 Composer 读取时同时改写同一数组。推荐的数据流是:

异步 callback -> 带锁或双缓冲的最新快照
控制周期      -> 把完整快照写入状态 JointTargetBuffer
              -> composer.compose()

状态必须显式决定来源超时后的行为,例如保持最后有效目标、切换固定目标或请求安全状态。 Composer 不会隐式沿用其他 Layer、补零或修改所有权。

与机器人关节数量的关系

Composer 的输出是状态语义,不应根据当前硬件静默改变。例如一个动作语义上控制 31 个关节, 它在 29 关节机器人上仍可输出 31 关节 MotorFrame;最终 Resolver 按名称保留机器人存在的 29 个关节,并对裁掉的两个输出发出一次 warning。

反方向,如果状态只输出 29 个关节而机器人有 31 个,Resolver 会要求平台为另外两个关节 提供 JointCommandDefaults。动态话题或轨迹属于状态命令来源,不能放进固定 Defaults。

性能约束

  • Layer 和 JointTargetBuffer 在准备阶段创建,不能每周期创建。
  • 来源数组使用 float32 并原地更新。
  • Composer 缓存名称映射和输出 MotorFrame。
  • compose() 不执行名称查找、日志输出或模型调用。
  • advance=False 的 Transition 采样不得推进来源的时间、history 或相位。

本地性能可用以下命令验证:

python3 tools/benchmark/joint_mapping_benchmark.py

运行时关节命令覆盖

VKH6 平台适配器提供一个具名关节 override 话题,用于调试新增关节、临时接入头部控制器, 或在不修改现有 29 自由度策略的情况下覆盖最终电机命令。它发生在状态输出已经解析成完整 Robot Layout 之后、ActuatorCmds 发布之前:

当前 State / Transition 的 MotorFrame
  -> JointCommandResolver 补齐完整 Robot Layout
  -> actuators_cmds_override 按名称覆盖指定关节
  -> /simulation|hardware/actuators_cmds

Override 不会切换、暂停或重置状态机。当前状态和策略仍在后台正常运行;未被点名的关节继续 使用状态机本周期的输出。

话题与消息

环境 输入话题
MuJoCo 仿真 /simulation/actuators_cmds_override
真机 /hardware/actuators_cmds_override

消息类型是 communication/msg/ActuatorCmds。每个数组都按 actuators_name 的顺序解释:

消息字段 MIT 控制量 单位/要求
actuators_name 关节语义主键 名称非空、不能重复,且必须存在于当前 Robot Layout
pos p_des rad;长度必须与名称数量相同
vel v_des rad/s;建议显式发送,空数组按全 0 处理
kp kp 非负;长度必须与名称数量相同
kd kd 非负;长度必须与名称数量相同
torque t_ff N·m;建议显式发送,空数组按全 0 处理

pos/kp/kd 不能省略。所有数值必须有限,数组长度错误、未知或重复关节名、NaN/Inf、负增益 都会使整条消息被原子拒绝,不会只应用其中一部分。

MotorFrame 内部和最终输出始终持有完整的五个 MIT 字段。旧状态只提供 qpos/kp/kd 时,框架会为 vel/torque 写入等长的 float32 全 0 数组;它们不是 None, 也不会沿用上一个周期的值。部分布局解析到完整 Robot Layout 时,缺失硬件关节的 vel/torque 同样为 0。

生命周期和安全规则

  • 固定断流超时为 0.2 秒。发布端必须持续刷新,推荐 20–50 Hz。
  • 消息停止或主动释放后,之前覆盖的五个 MIT 字段在 0.2 秒内插值回当前状态输出。
  • 空 actuators_name 且所有命令数组也为空,表示主动释放。
  • com.bxi.basic_actions/zero_torque 优先级更高,该状态下禁止 override。
  • 首个合法机器人关节状态尚未建立 Robot Layout 时,override 会被忽略。
  • 真机首次测试必须断使能或上吊架,并使用保守位置、增益和前馈力矩。

超时与释放插值是调试保护,不替代硬件急停、CAN 看门狗、关节限位或底层力矩饱和。

覆盖两个头部关节

启动仿真并进入 normal 后,下面的命令以 20 Hz 覆盖头部偏航和俯仰关节:

ros2 topic pub -r 20 \
  /simulation/actuators_cmds_override \
  communication/msg/ActuatorCmds \
  "{actuators_name: [head_z_joint, head_y_joint], pos: [0.35, -0.25], vel: [0.0, 0.0], kp: [16.747, 16.747], kd: [1.066, 1.066], torque: [0.0, 0.0]}"

这里 head_z_joint=0.35 rad 约为 20°,head_y_joint=-0.25 rad 约为 -14°。两者都在当前 MuJoCo 模型声明的关节范围内。按 Ctrl+C 停止发布后会触发断流释放。

也可以发送一次空消息立即请求释放:

ros2 topic pub --once \
  /simulation/actuators_cmds_override \
  communication/msg/ActuatorCmds \
  "{}"

真机使用完全相同的消息,只把话题前缀换成 /hardware/:

/hardware/actuators_cmds_override

与 State 内部命令合成的区别

长期产品功能应优先在 RobotControlState 内使用 JointCommandComposer,明确模型、IK、轨迹 或 ROS 输入各自拥有的关节,并让命令参与状态生命周期。平台 override 更适合:

  • 快速验证新增执行器和关节方向;
  • 临时验证外部控制器输出;
  • 在不改策略的情况下定位 29/31 自由度映射问题;
  • 维护和诊断工具。

需要随 Mod 启停、参与 Transition 或进入状态图的控制逻辑,不应长期依赖全局 override 话题。

框架控制调度

RobotControlRuntime 使用独立的绝对时间线程,以固定 50 Hz 时间轴调用 RobotControlFramework.update()。它同时拥有 Framework 生命周期、低频 Mod 维护、线程安全、调度统计和逐条超时告警。ROS 平台适配器只负责输入快照、启动步骤和 电机帧输出,不再通过 ROS Timer 驱动动作或维护 Framework。

配置位于 config/elf3_state_machine.yaml 的 control_runtime 分段:

control_runtime:
  period_sec: 0.02
  compute_budget_sec: 0.002
  deadline_tolerance_sec: 0.001
  maintenance_hz: 5.0
  statistics_interval_sec: 60.0
  deadline_warning_interval_sec: 1.0
  maintenance_guard_sec: 0.005
  python_switch_interval_sec: 0.001
  spin_wait_us: -1
  cpu_affinity: control
  realtime_priority: 0
  • period_sec:统一控制周期,所有状态和过渡共用。
  • compute_budget_sec:单轮控制计算的目标耗时预算。它只用于统计预算超限, 不会改变 20 ms 推理释放时间轴;硬截止时间始终是本轮释放后的下一个周期。

  • deadline_tolerance_sec:释放唤醒或完成时间超过对应截止点后的额外容差。

  • cpu_affinity:控制线程使用的跨平台 CPU 角色,默认 control。数字和数字列表仅保留 给旧配置及诊断,不建议 Mod 或平台配置写死核号。

  • realtime_priority:0 表示普通调度,1..99 尝试启用 SCHED_FIFO;权限不足时记录警告并继续使用普通调度。

  • maintenance_hz:Runtime 自有低频线程的 Mod 进程监管频率,不进入 50 Hz 控制路径。

  • statistics_interval_sec:周期性 INFO 调度统计的输出间隔。

  • deadline_warning_interval_sec:逐轮时间异常的合并告警间隔。默认 1 秒, 无论这段时间内出现多少异常,最多输出一条汇总 WARNING。

  • maintenance_guard_sec:距离下一次控制唤醒不足该时间时,跳过本轮 状态快照或 Mod 维护,避免反向阻塞控制线程。

  • python_switch_interval_sec:Python GIL 切换间隔。默认 1 ms,降低 ROS Python 回调造成的控制线程唤醒长尾。

  • spin_wait_us:末段忙等时长,单位微秒。-1 表示关闭;非负值表示先正常 睡眠,在距离绝对释放点剩余该时长时切换为忙等。例如 200 表示最后 200 微秒忙等。该值必须小于一个控制周期;忙等会短暂占用一个 CPU 核心并 持有 Python GIL,建议只配置数百微秒并配合控制线程绑核使用。

控制线程以每 20 ms 一个绝对释放点调用一次 Framework;完成时间不会被用来推导下一次 释放点,因此推理耗时的短期波动不会形成累计漂移。启动阶段也沿用同一时间轴。 单轮轻微越过下一释放点时,下一轮会立即补上并在后续短周期恢复原时间轴;只有已经 跨过完整的额外释放点时才计为跳过,避免无谓地少执行一次推理。 带历史观测的策略在状态准备阶段直接用当前观测填充历史缓冲,仅执行一次预热推理; 不会再在一个控制周期内集中执行 history_len * 2 次推理。

statistics_interval_sec 只控制 INFO 统计摘要的输出周期。摘要包含唤醒延迟、 完整控制周期耗时,以及自上次成功输出以来的控制周期、预算超限、deadline miss 和 跳过周期增量。

每次 deadline miss 都由控制线程轻量放入队列,再由现有 maintenance 线程合并统计, 不会在 50 Hz 控制线程内执行日志 I/O。默认每秒最多打印一条汇总 WARNING,分别给出 调度唤醒延迟超限次数、周期完成截止超限次数和最大值,并根据异常类型给出初步判定。 一次输出失败会保留汇总,并在后续维护周期重试。deadline miss 不自动切换状态。 状态信息话题的 control_timing 字段提供累计计数和最后一次 miss。

时间统计日志使用正式、统一的中文技术术语。时序异常汇总说明调度唤醒延迟、周期执行 耗时、周期完成截止超限及初步判定;周期性能统计给出异常比例、预算超限次数、跳过周期 数、P99 指标和最大值。

Runtime 和 Scheduler 的 INFO、WARNING、ERROR 使用彼此独立的 Python 调用位置, 兼容 rclpy 对同一日志调用位置固定 severity 的要求;进入高负载状态后从 INFO 切换为 WARNING 不会再被 ROS 日志系统拒绝。

control_runtime 在构造 RobotControlFramework 前从系统配置中移除,因此不会 参与状态图或 Mod 配置合并。仿真、真机以及未来的非 ROS 平台适配器共用同一运行时。

跨平台 CPU 角色

框架只公开一组稳定的用途名称,RK3588、x86、Jetson 和后续平台使用相同标识:

角色 含义
control 控制循环专用的一个最高性能逻辑 CPU;它所在的整个物理核不再分给 shared
compute 除控制物理核外的其他最高性能核;适合推理、视觉和重计算节点
background 效率较低的核;适合日志、设备管理和低频服务
shared 排除控制物理核后的所有可用 CPU;独立 Mod 进程的默认值
all 当前进程受 cgroup/systemd/taskset 约束后仍允许使用的全部 CPU
inherit 不额外缩小框架启动时的允许集合,主要用于旧配置兼容

启动时框架先读取 sched_getaffinity(),因此不会突破容器、cgroup、systemd 或外部 taskset 的限制;再读取 Linux CPU topology 的 thread_siblings_list,避免只保留 同一物理核的另一个 SMT 线程。性能分组优先使用 cpu_capacity,没有时依次使用 cpuinfo_max_freq、scaling_max_freq;无法区分大小核的平台按同构 CPU 处理。实际解析 结果会以一条 CPU affinity roles: ... INFO 日志输出。

如果机器只有一个可用物理核,shared/compute/background 会安全退化为当前允许集合, 此时无法实现控制核隔离,但程序仍可运行。显式数字或列表只要包含 cgroup 之外的 CPU, 框架就会在启动阶段报出请求集合和实际允许集合,而不是静默忽略。

控制线程仅绑定 control 解析出的 CPU,不再给整个 ROS 主进程设置 launch taskset。 Mod 独立进程由专用生成线程创建;该线程在调用 Popen 前切换到节点目标角色,使 Python、C++、ROS executable、普通 command 及其后代从创建瞬间继承正确 affinity。 这避免状态切换从已绑核控制线程启动节点时,节点短暂或永久困在控制核上。

bxi_example_py_elf3_mjlab 保持原有调度,不受这些参数影响。

相关文档

日志系统

框架为每个 Framework 组件、Mod、State 和 Mod Node 生成稳定的 ROS logger 身份。 Mod 不需要在清单中重复声明名称,身份直接来自已有的 Mod ID、State 名和 Node 名。

Logger 命名

<main-node>.fw.runtime
<main-node>.fw.scheduler
<main-node>.fw.state_machine
<main-node>.com.bxi.normal_depth
<main-node>.com.bxi.normal_depth.state.normal_depth
<main-node>.com.example.device.node.sensor_bridge

这些是真实的 ROS child logger 名称,可在终端和 /rosout 中识别,也可按 scope 设置 等级。外层 launch 仍可能显示 [bxi_example_py_elf3_demo-2],那是 launch Action 的输出来源;内层 ROS logger 名称才是框架组件身份。

配置仍使用完整逻辑 scope:framework.* 和 mod.*。运行时只把显示名称缩短为 fw.*,并移除 mod. 前缀;不要把终端里看到的短名称原样复制到 logging.levels。

State 日志 API

Mod API 4.0 只保留一个状态日志入口:

class MyState(RobotControlState):
    def on_bind(self, ctx):
        self.logger.info("状态资源已绑定")

    def on_update(self, ctx, dt):
        if self.sensor_failed:
            self.logger.error("传感器不可用")

logger 在 on_bind() 之前由框架注入。不要使用 ctx.ros_node.get_logger() 记录状态 日志,否则会退回主节点身份。ctx.ros_node 只用于创建 subscription、publisher、 service 和 timer。

等级配置

logging:
  default_level: info
  levels:
    framework.scheduler: warning
    framework.state_machine: info
    mod.com.bxi.normal_depth: debug
    mod.com.example.device.node.sensor_bridge: info
  subprocess:
    max_line_bytes: 16384
    max_lines_per_sec: 200

levels 采用最长前缀匹配。上例的 mod.com.bxi.normal_depth 同时影响该 Mod 的 State 和 Node,除非后面再写更具体的 scope。支持 debug、info、warning、 error、fatal。

独立进程输出

Mod Node 的 stdout/stderr 由一个非控制线程统一排空,每行附加来源:

[com.example.device/sensor_bridge:out] Device ready
[com.example.device/sensor_bridge:err] Traceback (most recent call last):

这个机制对 Python、C/C++、ROS executable、普通 command 和厂商 SDK 一致。框架向 子进程注入 BXI_MOD_ID、BXI_NODE_ID、BXI_LOG_SCOPE 和 PYTHONUNBUFFERED=1。子进程无需理解这些变量。

max_line_bytes 防止无换行输出无限增长。max_lines_per_sec 是每个 Node、每条 stream 的独立限制;超额内容会被持续读取但不再写入终端,下一个窗口输出丢弃数量, 因此不会因 pipe 填满反向卡住子进程。

规则

  • State 使用 self.logger。
  • ROS Node 使用自己的 self.get_logger()。
  • Framework 内部使用对应 framework.* logger。
  • 只在 ROS logger 建立之前的 launch 检查、独立 CLI 工具和子进程原始输出中允许 print()。

  • 不在 50 Hz 控制路径连续输出日志;持续信号使用统计或状态快照。

Mod 公共 API

Mod 的状态、Resource 和 Transition 集成代码应依赖 bxi_example_py_elf3.framework.mod_api;策略实现还可以依赖公开的 bxi_example_py_elf3.framework.inference。framework.runtime 是控制器内部实现,不保证跨版本兼容。

当前 API 版本为 4.0.0。Mod 清单应声明 api: ">=4,<5"。状态统一使用 self.logger,已删除 ctx.get_logger();旧 Mod 必须迁移,框架不保留双轨日志入口。

最常用入口

from bxi_example_py_elf3.framework.mod_api import (
    ModDefinition,
    ModLoadContext,
    JointCommandComposer,
    JointCommandLayer,
    JointTargetBuffer,
    MotorFrame,
    PoseState,
    ProceduralState,
    PolicyState,
    ResourceHandle,
    ResourceKey,
    ResourcePolicy,
    ResourceStatus,
    RobotControlState,
)
模块 用途
mod_api.state StateBehavior、RobotControlState
mod_api.states Pose、Procedural、Policy、MotionReplay 等渐进式基类
mod_api.frame MotorFrame 和电机帧数组类型
mod_api.composition 任意具名关节命令来源的合成和所有权检查
mod_api.resource Resource key、handle 和加载上下文
mod_api.mod Mod 定义、加载上下文和状态构建参数
mod_api.transition 状态帧能力、Transition 配置和插件接口
mod_api.context 状态与 Transition 使用的控制器 Protocol
mod_api.geometry 四元数和重力方向等通用计算

控制上下文

公开生命周期使用 RobotControlContext,不再依赖具体的 BxiExample 类。当前由 RobotControlFramework 实现这份能力契约;状态只面向契约编程,因此 ROS/硬件适配层可以改变而不迫使客户 Mod 跟着修改。

能力 主要成员
本周期观测 robot_joints、current_quat_xyzw/wxyz、current_omega
速度命令 current_raw_cmd_vel、current_cmd_vel、speed_profiles
机器人结构 robot_layout,由首个完整状态快照建立
最近完整输出 last_motor_frame
输出与切换 set_motor_target()、resolve_motor_frame()、request_state()
模型与安全 preheat_model()、is_orientation_unsafe()
运行信息 生命周期参数 dt,以及上下文中的 loop_count
日志 状态自身的 self.logger
ROS 高级出口 ctx.ros_node

关节状态统一从 ctx.robot_joints.position/velocity 读取;推理策略使用 ctx.inference_frame,由策略契约自动选取关节。on_bind() 发生在首个机器人状态之前, 不要在其中读取 robot_layout。普通可切换状态应在 on_prepare() 创建依赖布局的映射和 缓冲,这样名称校验与内存申请不会落入控制周期热路径;没有 prepare 阶段的组件才在首次 on_enter()、on_update() 或 Transition 启动时惰性创建并缓存。

目标姿态和 kp/kd 属于状态输出语义,不属于控制上下文。每个状态按自己的自然 MotorFrame.layout 输出 29、31 或任意 N 个关节;Framework 在 set_motor_target() 中按名称 解析成完整 Robot Layout。需要最近完整命令时读取 ctx.last_motor_frame。

MotorFrame 使用完整 MIT 字段:qpos/vel/kp/kd/torque 分别对应 p_des/v_des/kp/kd/t_ff,五个 float32 数组始终存在且与 layout 等长。现有状态只传 qpos/kp/kd 即可,未传的 vel/torque 会在每次构造或更新时写成全 0,不会保留旧缓冲值。

RobotControlState.is_available(ctx) 是进入前的非阻塞健康检查,默认返回 True。状态机只有 在目标可用时才准备 Transition。request_state() 返回请求是否被接受:True 表示已开始、 已排队或正在准备 Resource,不表示 Transition 已完成;False 表示目标当前不可用或目标 Mod 节点启动失败, 且未开始切换。

request_state(..., force=True) 可在明确的维护/诊断场景绕过 is_available(),默认关闭。 它不绕过状态名、Transition、节点启动和状态生命周期错误,不应作为普通切换的默认选项。

API 4 的状态可以通过构造函数声明进入前必须就绪的资源:

class MotionState(RobotControlState):
    def __init__(self, name, state_id, policy):
        super().__init__(name, state_id, resources=(policy,))
        self._policy_handle = policy

目标状态的资源尚未就绪时,request_state() 会异步请求资源并返回 True,状态机进入 preparing,当前状态继续控制机器人。资源就绪后才调用目标状态的 on_prepare() 并创建 Transition;加载失败则保留当前状态并记录失败原因。force=True 不会绕过资源准备。

一个状态的关节命令来自多个生产者时,使用 JointCommandComposer。生产者可以是模型、 话题快照、IK、轨迹或任何状态逻辑;Composer 只读取其长期复用的 JointTargetView,不参与 生产者生命周期。输出覆盖关系、完整性和名称映射在构造时编译,详见 多来源关节命令合成。

自定义 Transition 若要混合不同布局,必须先为两端分别创建 MotorFrame.empty(ctx.robot_layout),再调用 ctx.resolve_motor_frame(source, output);不能 直接对两个自然帧的数组做插值。

需要创建自定义 ROS subscription、service 或 timer 时,使用高级出口:

def on_bind(self, ctx):
    node = ctx.ros_node
    self.subscription = node.create_subscription(...)

状态日志不能从 ros_node 取主节点 logger,统一使用:

def on_enter(self, ctx):
    self.logger.info("动作已启动")

框架在 on_bind() 之前注入 logger,名称自动包含 Mod ID 和本地状态名。完整 命名、等级配置和子进程输出规则见日志系统。

在 on_unbind() 中销毁自己创建的 ROS 实体。

这是显式的平台扩展点:使用它的 Mod 会依赖 ROS,而只使用观测、事件、Resource 和 MotorFrame 的 Mod 不会与 BxiExample 或具体硬件绑定。

Transition 能力

from bxi_example_py_elf3.framework.mod_api.transition import (
    EntryFrameProvider,
    RunningFrameProvider,
)

EntryFrameProvider 提供目标状态的稳定进入帧,供 first_frame_switch 一类过渡使用;RunningFrameProvider 允许过渡采样两端的实时电机帧,供双状态混合使用。普通状态不需要主动实现无关能力。

导入边界

旧版 bxi_example_py_elf3.utils.* 扩展入口已经移除。Mod 必须从 bxi_example_py_elf3.framework.mod_api 导入公共类型;这样使用了框架内部实现的代码会立即失败,而不会形成难以维护的隐式依赖。

mod_api 导入本身不会创建 ROS 节点、加载 ONNX Runtime 或扫描 Mod,因此可以单独用于 IDE 补全、静态检查和离线单元测试。

Resource 准备策略

资源注册支持两种代码侧策略:

context.register_resource(POLICY, load_policy, policy="startup")
context.register_resource(CLIP, load_clip, policy="on_demand")

startup 在所有 Mod 注册完成后、控制循环启动前由资源工作线程准备;它是默认值, 适合初始状态或启动时必须验证的模型。on_demand 在第一次请求需要它的状态时异步准备, 适合不常进入且加载开销较大的动作。

ResourceHandle.get() 只读取已经 ready 的实例,不会发起加载,也不会阻塞控制线程。 需要自行观察资源时可读取 handle.status、handle.error,或调用非阻塞的 handle.request();普通状态优先通过 resources=(handle,) 让状态机管理准备流程。 策略属于资源工厂的运行语义,因此不写入 mod.yaml。

相关文档

Mod 系统

Mod 是当前状态侧的最小部署单元。一个目录同时携带清单、Python 代码和资产,可以在节点启动时被发现、校验、加载和整体移除。

目录结构

com.example.wave/
  mod.yaml
  state.py
  plugin.py       # 仅资源/自定义扩展需要
  assets/
    wave.onnx

内置根目录是安装包的 share/bxi_example_py_elf3/mods/。系统配置中的 mod_paths 可追加客户目录,例如 /opt/bxi/mods。根目录本身是 Mod 或其任意子目录包含 mod.yaml 都可被发现。

最小清单

schema: 1
id: com.example.wave
name: 挥手示例
version: 1.0.0
api: ">=4,<5"
enable: true
entrypoint: null
visibility: public
requires:
  - id: com.bxi.basic_actions
    version: ">=1,<2"
conflicts: []
python_exports: []
runtime_requirements:
  python: []
  ros: []
  system: []

events:
  activate:
    slot: btn_10
    value: 11

states:
  wave:
    factory: state:WaveState
    label: 挥手示例
    priority: 100
    group: Customer
    icon: waving_hand

routes:
  - from: com.bxi.basic_actions/normal
    event: activate
    to: wave
    transition: soft_switch
  - from: wave
    event: com.bxi.basic_actions/normal
    to: com.bxi.basic_actions/normal
    transition: dual_running_blend

route 决定状态切换的方向,transition 决定切换期间如何生成电机帧。之所以把两者分开,是因为同一对状态可能需要不同的安全切换方式:直接替换不连续的 MIT 命令字段可能产生突跳,而保持、增益渐变或双状态混合可以分别适配不同动作。

描述 Mod 的 schema/id/name/version/api/enable/entrypoint/visibility/requires/conflicts/python_exports/runtime_requirements 必须全部显式填写。entrypoint: null 表示每个状态使用 factory: module:Class 的约定式加载;高级插件必须明确写出 entrypoint: plugin:create_mod,框架不会根据目录中是否存在 plugin.py 猜测入口。简写的 label/priority/index/group/icon/confirm/confirm_message 会归一化到内部 manifest,完整写法继续兼容。

跨 Mod 使用基础状态和事件时,应声明依赖:

requires:
  - id: com.bxi.basic_actions
    version: ">=1,<2"

启用和禁用

要临时关闭整个 Mod,把显式的 enable 改为 false:

enable: false

enable 只能是 YAML 布尔值 true/false,不能写成字符串,也不能省略。

禁用后,该 Mod 的状态、事件、routes、actions、nodes、资源、Transition 和 Python exports 都不会进入运行时。启用的 Mod 如果依赖已禁用 Mod,加载器会明确报错。修改 enable 后需要重启控制节点。

启动日志会分别列出已启用和已禁用的 Mod。

入口插件

只有需要 Resource、自定义 Transition 导入或依赖注入时才需要入口插件:

from bxi_example_py_elf3.framework.mod_api import ModDefinition, ModLoadContext

from .state import WaveState


def create_mod(context: ModLoadContext) -> ModDefinition:
    return ModDefinition(
        state_factories={
            "wave": lambda state: WaveState(state.name, state.state_id),
        }
    )

states 声明和 state_factories 的键必须完全相同。工厂在状态机构建阶段调用,不应自行修改全局状态。

状态参数

约定类可声明 dataclass Params,框架会自动强类型构造:

from dataclasses import dataclass

from bxi_example_py_elf3.framework.mod_api import ProceduralState


@dataclass(frozen=True)
class WaveParams:
    amplitude: float = 0.3
    loop: bool = False

class WaveState(ProceduralState[WaveParams]):
    Params = WaveParams

高级显式工厂仍可逐字段读取:

清单:

states:
  wave:
    params:
      amplitude: 0.4
      loop: true

工厂:

state_factories = {
    "wave": lambda state: WaveState(
        state.name,
        state.state_id,
        amplitude=state.float_param("amplitude", 0.3),
        loop=state.bool_param("loop", False),
    )
}

还可使用 int_param()、string_param() 和 param()。工厂返回后框架会调用 finish();未消费或类型错误的参数会阻止加载。

资源准备策略

资源键必须是全局命名:

from bxi_example_py_elf3.framework.mod_api import ResourceKey, ResourceLoadContext

POLICY = ResourceKey[WavePolicy]("com.example.wave/policy")


def _load_policy(context: ResourceLoadContext) -> WavePolicy:
    return WavePolicy(str(context.asset("assets/wave.onnx")))


def create_mod(context: ModLoadContext) -> ModDefinition:
    context.register_resource(POLICY, _load_policy, policy="startup")
    policy = context.resource(POLICY)
    return ModDefinition(
        state_factories={
            "wave": lambda state: WaveState(state.name, state.state_id, policy),
        }
    )

policy="startup" 在所有 Mod 完成注册后、控制循环启动前准备资源,也是默认策略; policy="on_demand" 在第一次请求需要它的状态时由后台工作线程异步准备。 两种方式都会缓存实例,context.resource() 始终只返回 handle。 ResourceHandle.get() 只读取 ready 实例,不负责触发加载或等待。 context.asset() 只允许访问当前 Mod 的 assets/ 内存在的文件。状态应通过 super().__init__(..., resources=(policy,)) 声明依赖,让状态机在进入前等待资源。 startup 准备失败会阻止框架启动,on_demand 失败则保留当前状态并拒绝该次切换。

共享资源可以由一个无状态 Mod 提供,使用方通过 requires 依赖它。

清单贡献

一个 Mod 可以贡献:

  • states
  • events
  • routes
  • actions
  • nodes
  • speed_profiles
  • transition_profiles
  • python_exports
  • runtime_requirements
  • runtime_profiles

本地状态、事件和 profile 会自动加 id/ 前缀。系统级 transition profile(如 soft_switch)保持全局名称。

独立后台能力放在 nodes,不需要塞进某个状态的 on_bind()。in_process 节点共享主 Executor;process 节点由框架作为子进程启动、监控并有限重启。节点代码和资产仍随整个 Mod 安装、禁用和删除。

python_exports 用于把 Mod 内的顶层 Python 包临时加入导入路径。导出的目录必须包含 __init__.py,不同 Mod 不得导出同名包。节点关闭 ModRuntime 时会移除对应模块和路径。

runtime_requirements 声明 Python import、ROS package 和系统动态库依赖。缺失的 Mod 或节点会进入 unavailable,检查不会自动安装软件。Mod 自带依赖按平台放在 vendor/python/<平台-Python ABI> 和 vendor/lib/<平台>,跨平台纯 Python 包可放在 vendor/python/common。运行时只注入当前平台兼容目录,然后才回退宿主环境;其他架构的 bundle 会被忽略并产生明确警告。

runtime_profiles 是按节点选择的可选上限:简单 Mod 不声明时继续使用宿主环境;轻量 依赖可使用 Vendor;需要把 Python、C++ 程序和厂商用户态动态库随整个 Mod 目录迁移时 使用 Portable。Portable 只支持独立进程,不改变状态类和主控制进程的 Python 环境。

依赖和版本

框架公开独立的 Mod API 版本,当前为 4.0.0。每个 Mod 用 api 声明可兼容的框架 API 范围:

api: ">=4,<5"

requires 支持字符串和带版本约束的对象:

requires:
  - com.example.common
  - id: com.bxi.basic_actions
    version: ">=1,<2"

Mod 版本必须是数字点格式;api 和 requires[].version 使用相同的 逗号分隔比较约束。加载器进行拓扑排序,并拒绝框架 API 不兼容、缺失依赖、 版本不匹配和依赖环。

Mod 冲突

conflicts 是显式的 Mod id 列表,没有冲突时也要写空列表:

conflicts:
  - com.example.legacy_wave

声明是单向书写、双向生效的:只要任意一方声明冲突,双方同时启用就会在加载任何 Mod 代码前报错。冲突对象未安装或处于禁用状态时不影响当前 Mod;Mod 不能与自身冲突。

校验规则

节点启动时会检查:

  • 描述头的 12 个字段全部存在、无未知顶层字段,schema 为 1,api 与当前框架兼容,name、id 和版本合法。
  • enable 是布尔值,且启用 Mod 不依赖已禁用 Mod。
  • 同时启用的 Mod 不命中任意一方的 conflicts 声明。
  • entrypoint 文件和函数存在,返回 ModDefinition。
  • 依赖完整且版本匹配。
  • 清单状态与工厂一一对应。
  • 本地名称、资源键、事件槽位和字段类型合法。
  • route 的源、事件和目标存在,action 的源和事件存在且包含非空的 manifest.label;两者字段不混用。
  • node entrypoint 可调用,execution/lifecycle 合法,State 生命周期引用的状态存在。
  • 同一状态同一事件没有重复的 route/action。
  • 同一状态下不会有可同时触发的遥控输入冲突。
  • 所有事件至少被一条 route 或 action 使用。
  • 初始状态存在,speed profile 引用有效。

普通状态只需配置整数 manifest.priority,数值越大越靠前;没有配置时默认为 0。加载器按 priority 降序排列,同一 priority 再按完整状态名升序排列,从 0 开始生成唯一的 UI index,因此 Mod 的发现顺序不会影响界面顺序。

manifest.index 是高级固定位置选项,通常不要配置。显式 index 必须是非负整数,加载器会先保留这些位置,再把自动排序的状态填入其余位置;两个状态显式声明相同 index 会直接阻止启动。

状态内部的 id 与 UI manifest.index 不同:未显式配置 states.<name>.id 时,state id 根据完整状态名计算稳定 CRC32;真正 CRC 冲突时才要求显式指定。

当前内置布局

mods/
  com.bxi.basic_actions/   # 11 个基础动作状态和共享模型
  com.bxi.back_flip/       # protected
  com.bxi.forward_flip/    # public
  com.bxi.ballet/          # protected

基础包的事件名采用 com.bxi.basic_actions/<action>。三个独立包仍使用自己的 activate 事件。

发布属性

visibility: protected

运行时会正常加载 protected Mod;该字段供公开发布工具使用。发布工具按完整目录删除保护 Mod,并验证公开 Mod 不依赖被删除的功能。详见 发布保护。

YAML 字段参考

项目存在三类 YAML:遥控器映射、状态机系统配置和 Mod 清单。

1. 遥控器 YAML

主文件:

src/remote_controller/config/xbox_default.yaml

顶层结构:

inputs:
  selection: {}
sources: {}
curves: {}
controls: {}
outputs: {}
system: {}
system_mutexes: {}
system_reset_motion_after: []

inputs.selection

字段 含义
scan_interval_ms 扫描候选设备的周期
promote_stable_ms 高优先级设备持续可用多久后允许抢占

sources

每个 source group 声明一个候选设备:

sources:
  gamepad:
    type: joystick
    device: /dev/input/jsBattleDragon
    priority: 50
    ready_timeout_ms: 1000
    loss_timeout_ms: 300
    cooldown_ms: 1000
    signals:
      gamepad.left_y:
        from: js.axis.3

内置 type 包含 joystick、keyboard 和 crsf。自定义类型需注册输入驱动工厂。

通用字段:type、priority、ready_timeout_ms、loss_timeout_ms、cooldown_ms、signals。设备专有字段由对应 driver 解析。

curves

curves:
  stick:
    type: expo
    deadzone: 0.03
    expo: 0.0
    limit: [-1.0, 1.0]
    calibration:
      input: [-1.0, 0.0, 1.0]
      output: [-1.0, 0.0, 1.0]

controls

支持 analog、bool 和 enum。control 把多个设备输入统一成业务控制量,输入规则可带 source、direction、curve、when、value 等字段。条件支持 pressed、released、equals、范围以及 all/any 组合。

完整语法和实例见遥控器输入映射配置。

outputs

outputs:
  conflict_policy: first_wins
  publish_on_change: true
  analog:
    vx: move.vx
  edge:
    - output: btn_10=11
      when:
        any:
          - - keyboard.wave_event
          - - gamepad.a_event

conflict_policy 可为 first_wins、last_wins 或 error。publish_on_change 控制是否仅在消息变化时发布。analog 连续写值,level 保持条件结果,edge 只在进入条件时产生脉冲;最终字段写入 MotionCommands。 示例值 11 是客户扩展示意,不是默认绑定;实际使用前需与所有已启用 Mod 的事件一起 检查,避免同一来源状态下出现相同槽位和值的多个目标。

2. 状态机系统 YAML

主文件:

src/bxi_example_py_elf3/config/elf3_state_machine.yaml
字段 必需 含义
initial_state 是 完整初始状态名
mod_paths 否 额外 Mod 搜索根列表
graph.validate 否 是否验证状态图
graph.export.dot 否 DOT 导出路径
graph.export.mermaid 否 Mermaid 导出路径
default_transition 否 未指定边的默认过渡
transition_profiles 否 系统共享过渡 profile
logging 否 Framework、Mod、State、Node 日志等级和子进程输出限制
control_runtime 否 控制周期、计算预算、维护频率、绑核和实时优先级

states、remote_events 和 speed_profiles 由 Mod 合成,不应写入此文件。

control_runtime 的完整字段和实时权限要求见框架控制调度。这里的 周期配置是所有平台适配器共享的运行时设置,不应复制进单个 Mod。

logging

logging:
  default_level: info
  levels:
    framework.scheduler: warning
    mod.com.bxi.normal_depth: debug
  subprocess:
    max_line_bytes: 16384
    max_lines_per_sec: 200

levels 按最长 scope 前缀匹配,可用等级为 debug/info/warning/error/fatal。 常用 scope 为 framework、mod.<mod-id>、mod.<mod-id>.state.<state> 和 mod.<mod-id>.node.<node>。子进程每行字节上限和每秒行数上限由 subprocess 配置。详见日志系统。

内置过渡类型

Transition 是源状态与目标状态之间的切换策略,决定切换期间怎样生成完整 MIT 电机帧。它的主要作用是处理两边输出不连续的问题,避免直接换帧造成突跳;instant 表示明确选择不做中间处理。

  • instant
  • hold
  • entry_gain_ramp
  • running_blend
  • sequence

各字段见 自定义过渡 和 双状态运行混合。

3. mod.yaml

安全预设占位符

mod.yaml 的任意字符串值都可以使用带 bxi. 命名空间的固定占位符。展开发生在 YAML 安全解析之后、Mod 校验和插件导入之前,每次加载清单只计算一次。映射键不参与展开。

states:
  demo:
    manifest:
      confirm_message: >-
        当前平台:${bxi.system.name} ${bxi.system.release}
        ${bxi.system.machine}
占位符 内容示例
${bxi.system.name} Linux
${bxi.system.release} 当前内核版本
${bxi.system.machine} x86_64、aarch64
${bxi.system.hostname} 当前主机名
${bxi.system.ip} 默认路由选用的本机 IPv4 地址
${bxi.python.version} 当前 Python 版本
${bxi.runtime.platform} Mod 运行平台标签,如 linux-x86_64
${bxi.runtime.python_tag} 平台与 CPython ABI 组合标签

这不是模板语言,也不执行命令。$(uname)、反引号和 ${HOME} 会保持原文;未知的 ${bxi.…} 会直接阻止加载,以便尽早发现拼写错误。要原样显示一个 VKBOTS 占位符,在开头 使用双美元符号,例如 $${bxi.system.name} 最终显示为 ${bxi.system.name}。

新增框架预设只需在 framework/runtime/mod_placeholders.py 的固定 provider 注册表中增加 一项。Provider 只能返回进程或平台元数据,禁止调用 Shell、执行清单提供的命令或求值表达式。

${bxi.system.ip} 通过本机 UDP socket 查询内核为默认路由选择的源地址,不会发送探测包。 无默认路由时依次回退到主机名解析得到的首个非回环 IPv4 和 127.0.0.1。机器人存在多张 网卡时,它表示当前默认出口使用的地址,不是所有接口地址列表。

顶层字段

字段 必需 含义
schema 是 当前固定为 1
id 是 全局唯一、带命名空间的 Mod id
name 是 面向用户的非空 Mod 名称
version 是 数字点版本,如 1.0.0
api 是 兼容的框架 Mod API 版本范围,如 ">=4,<5"
enable 是 是否启用此 Mod,必须是布尔值
entrypoint 是 高级插件的 module:function;约定式加载显式写 null
visibility 是 public 或发布工具识别的 protected
requires 是 Mod 依赖及版本约束;没有依赖时写 []
conflicts 是 不能同时启用的 Mod id 列表;没有冲突时写 []
python_exports 是 暂时导出的顶层 Python 包;没有时写 []
runtime_requirements 是 Python、ROS 和系统动态库依赖;三类均须显式填写
runtime_profiles 否 节点可选的 Host、Vendor 或 Portable 进程运行环境
events 否 遥控槽位到事件的映射
speed_profiles 否 Mod 私有速度 profile
transition_profiles 否 Mod 私有过渡 profile
states 否 本地状态声明;资源 Mod 可省略或使用 {}
routes 否 状态图中的状态切换边
actions 否 不切换状态的事件 action
nodes 否 Mod 内置的 Python ROS 节点

描述 Mod 身份和装载行为的以上 12 个字段必须全部显式填写,加载器也会拒绝未知顶层字段。例如约定式公共 Mod 的头部为:

schema: 1
id: com.example.wave
name: 挥手示例
version: 1.0.0
api: ">=4,<5"
enable: true
entrypoint: null
visibility: public
requires: []
conflicts: []
python_exports: []
runtime_requirements:
  python: []
  ros: []
  system: []

requires

requires:
  - com.example.shared
  - id: com.bxi.basic_actions
    version: ">=1,<2"

api 和 requires[].version 使用相同的逗号分隔约束语法,支持 ==、!=、>=、<=、> 和 <。当前框架公开的 Mod API 版本是 4.0.0;加载器会在导入任何 Mod 代码前检查兼容性。

conflicts

conflicts:
  - com.example.legacy_wave

冲突声明只需由一方给出;如果两个 Mod 都处于启用状态,加载器会在执行任何 Mod 代码前拒绝启动。未安装或已禁用的冲突对象不影响加载。Mod 不能声明与自身冲突。

python_exports

python_exports:
  - customer_common

Mod 根目录必须存在 customer_common/__init__.py。导出名必须是合法且全局唯一的 Python 包名。

runtime_requirements

requires 只表示 Mod 之间的依赖;Python 模块、ROS 包和系统动态库写入 runtime_requirements:

runtime_requirements:
  python:
    - import: numpy
  ros:
    - package: sensor_msgs
  system:
    - library: realsense2

当前版本不比较依赖版本,也不会自动执行 pip、apt 或 rosdep。Python 依赖会在隔离子进程中执行真实 import;ROS 包和系统动态库检查可发现性。检查顺序为当前平台 vendor 优先、跨平台纯 Python vendor 其次、宿主环境最后:

mods/com.example.camera/
  vendor/
    python/
      linux-x86_64-cpython-310/  # OS + CPU + Python ABI
      linux-aarch64-cpython-310/
      common/                    # 仅放跨平台纯 Python 包
    lib/
      linux-x86_64/              # OS + CPU
      linux-aarch64/

目录标签由运行时自动生成。不匹配当前 OS、CPU 或 Python ABI 的目录不会加入 PYTHONPATH/LD_LIBRARY_PATH。若只有其他平台的 vendor,框架会显式警告并尝试宿主依赖;当前平台 vendor 存在但真实 import 失败时会直接标记为 unavailable,不会静默回退并掩盖损坏的 bundle。旧的 vendor/python/<package> 和 vendor/lib/<library> 平铺格式不会加载。

缺少顶层依赖时,整个 Mod 以 unavailable 状态发布且不执行其 Python entrypoint。其他不依赖它的 Mod 继续加载;启用的 Mod 若通过 requires 强依赖它,框架会用完整依赖链拒绝启动。

构建机应使用非 --symlink-install 的发布安装树。部署该 install/ 后,可以直接将完整 Mod 目录复制到 share/bxi_example_py_elf3/mods/,重启进程即可发现,无需在目标机器重新执行 colcon build。一个 Mod 可以同时携带多个目标目录;目标机只会选择匹配项。更新时应完整替换 Mod 目录,不能覆盖合并,否则旧平台文件可能残留。

普通非 symlink 安装会保留 vendor/ 内的相对符号链接,避免同一版本化动态库因 libname.so、SONAME 和完整版本名被展开成多份二进制。vendor bundle 应附带许可证、来源版本和目标 Python ABI/CPU 架构说明;com.bxi.normal_depth/vendor/README.md 是完整示例。

资源准备策略不属于 YAML。插件注册资源时使用 context.register_resource(..., policy="startup") 或 policy="on_demand";这样资源 工厂与准备策略保持在同一处代码中。默认是 startup。使用 on_demand 的状态必须把 对应 handle 放入 RobotControlState(..., resources=(handle,)),由状态机在切换前异步准备。

runtime_profiles

runtime_profiles 是可选能力;没有该字段的 Mod 继续使用宿主环境。Profile 可写成单个 candidate,或显式给出有序 fallback:

runtime_profiles:
  host_only:
    mode: host

  bundled_sdk:
    mode: vendor

  portable_sdk:
    candidates:
      - mode: portable
        root: runtime/{platform}
        python: python/bin/python3
        executable_paths: [bin, python/bin]
        library_paths: [lib, python/lib]
        isolated: true
      - mode: host
  • host 不要求 Mod 携带环境,由用户自行安装 pip/apt/ROS 依赖。
  • vendor 使用现有 vendor/python/<平台-Python ABI>、vendor/python/common 和 vendor/lib/<平台>。

  • portable 从 Mod 内相对 root 原地运行;python 可选,C++ 等原生进程可以只使用 executable_paths 和 library_paths。

  • {platform} 和 {python_tag} 由框架展开。绝对路径、.. 和逃出 Mod/runtime 根的 符号链接会被拒绝。

  • Portable 默认 isolated: true,且只允许 execution: process。

  • fallback 只跳过完全不存在的 candidate;已存在但损坏的 Portable 环境不会降级。

节点通过 runtime_profile: portable_sdk 引用。command 脚本可使用 interpreter: bundled-python 直接选择 Portable profile 声明的解释器。节点状态快照会 发布 runtime_profile、runtime_mode 和实际 runtime_root,方便确认最终选择。

events

events:
  activate:
    slot: btn_10
    value: 11
  any_change:
    slot: btn_9

slot 必须是合法标识符,value 若存在必须是整数。事件必须至少被一条 route 或 action 使用。

states

states:
  wave:
    factory: state:WaveState
    id: 12345
    label: 示例
    priority: 100
    group: Customer
    icon: waves
    confirm: true
    confirm_message: 请确认安全
    speed_profile: walk
    params:
      amplitude: 0.4

factory: module:Class 用于 entrypoint: null 的约定加载。状态 id 是可选 int32。priority 是界面顺序优先级,必须是整数,数值越大越靠前,默认 0;相同 priority 按完整状态名升序排列。加载器据此自动生成非负、唯一的 manifest.index。

index 仍可作为高级固定位置选项显式配置;两个显式 index 重复会报错退出。label/priority/index/group/icon/confirm/confirm_message 均可直接写,也可放在 manifest 中,但不能同时给出冲突值。params 的类型和允许字段由类的 dataclass Params 或显式插件工厂决定。

routes

routes:
  - from: com.bxi.basic_actions/normal
    event: activate
    to: wave
    transition: soft_switch

  - from: wave
    event: stop
    to: com.bxi.basic_actions/zero_torque
    transition:
      profile: safe_exit
      duration: 0.5
    delay: 0.2

字段:from、event、to、transition、delay。每条 route 都必须包含 to,不能包含 action。

actions

actions:
  - from: wave
    event: toggle_pause
    action: toggle_pause
    manifest:
      label: 暂停/继续

字段:from、event、action、manifest。manifest.label 是必需的非空字符串;action 只调用当前状态的 action handler,不发生状态切换,也不能配置 to/transition/delay。

加载器会规范化 from/event,并把 action 元数据发布到 state_machine_info.graph.actions[]。与状态快照相同,manifest 字段会在发布对象中展开,例如上例发布为 {from: ..., event: ..., action: toggle_pause, label: 暂停/继续}。

nodes

nodes:
  detector:
    entrypoint: detector_node:create_node
    execution: process
    scheduling:
      cpu_affinity: shared
    lifecycle: state
    states:
      - avoidance
    manifest:
      label: 障碍物检测器
    runtime_requirements:
      python:
        - import: onnxruntime
      ros:
        - package: sensor_msgs
      system: []
    params:
      output_topic: /perception/obstacles
    restart:
      max_attempts: 3
      delay: 1.0
      non_retryable_exit_codes: [78]

entrypoint 必须指向 Mod 目录中的 Python module:function。工厂接收公共 API NodeBuildContext 并返回 rclpy.node.Node:

from bxi_example_py_elf3.framework.mod_api import NodeBuildContext


def create_node(context: NodeBuildContext):
    return DetectorNode(
        context.node_name,
        output_topic=str(context.params["output_topic"]),
    )
  • execution 可为 in_process(默认,加入控制器的 MultiThreadedExecutor)或 process(独立 Python 子进程)。
  • scheduling.cpu_affinity 仅用于 execution: process,接受统一角色 control、 compute、background、shared、all、inherit;默认 shared。兼容数字和数字 列表,但跨平台 Mod 不应依赖具体核号。in_process 声明该字段会被拒绝。

  • lifecycle 可为 mod(默认,Mod 启用期间常驻)或 state。

  • lifecycle: state 必须给出非空 states;框架在目标状态 on_prepare() 前启动节点,在过渡取消或离开最后一个关联状态后停止。多个状态共享一个节点时使用引用计数。
  • manifest.label 必须是非空字符串;params 原样传给 NodeBuildContext。
  • 节点级 runtime_requirements 可选;依赖缺失时节点状态为 unavailable,模块不会被导入,也不会进入重启循环,Mod 的 route、action、state 和其他节点仍可使用。
  • restart 控制独立进程异常退出后的有限重启,默认最多 3 次、间隔 1.0 秒。 non_retryable_exit_codes 是可选的 1–255 整数列表;命中时直接标记故障且不再重启。 它只应用于确定性配置错误,不应包含一般运行时崩溃使用的退出码。

  • runtime 支持 python(默认)、executable、ros 和 command。command 是不 自动追加 --ros-args 的普通 Mod 内命令,必须使用 execution: process。

  • runtime_profile 可选引用顶层运行环境;Portable 必须使用 execution: process。

  • depends_on 声明节点依赖;框架按依赖顺序启动并逆序关闭。局部名称自动限定到当前 Mod,未知依赖和依赖环会在加载阶段报错。

  • shutdown 可配置 signal、terminate_after 和 kill_after。默认先发 SIGTERM,3 秒后发 SIGKILL;也可配置成 SIGINT → SIGTERM → SIGKILL。

节点状态发布在 state_machine_info.nodes[],Mod 状态发布在 state_machine_info.mods[]。依赖缺失使用 unavailable;依赖满足但节点运行后异常退出使用 faulted。Mod 生命周期节点的普通启动异常仍会使框架启动失败并回滚;State 生命周期节点的普通启动异常会取消本次状态切换并保留当前状态。

独立进程会依次使用当前 Mod 的 vendor/python/<平台-Python ABI>、vendor/python/common 和宿主 Python,并只把 vendor/lib/<平台> 加入动态库路径。in_process 也支持匹配平台的 vendor,但框架会显式警告:导入模块和原生符号属于整个控制进程,不能可靠卸载,并可能与其他 Mod 发生版本或符号冲突;需要原生依赖隔离时应优先使用 execution: process。

普通命令节点还支持以下专用字段:

nodes:
  bridge:
    runtime: command
    entrypoint: scripts/bridge.py
    interpreter: "${BRIDGE_PYTHON:-python3}"
    lifecycle: state
    states: [run]
    arguments: [--port, "${BRIDGE_PORT:-5557}"]
    cwd: .
    environment:
      PYTHONUNBUFFERED: "1"
      LD_LIBRARY_PATH:
        prepend: ["${SDK_ROOT:-/opt/sdk}/lib"]
        existing_only: true
    depends_on: [manager]
    shutdown:
      signal: SIGINT
      terminate_after: 3.0
      kill_after: 5.0
    manifest:
      label: 普通命令桥

entrypoint 和 cwd 只能位于 Mod 内。interpreter、arguments 和环境值支持 $NAME、${NAME}、${NAME:-default},但不会通过 shell 执行。框架注入 BXI_MOD_ROOT。environment 的字符串形式是直接赋值;映射形式支持 set、 unset、prepend、append、separator 和 existing_only。unset: true 会从 子进程环境中删除该变量,且不能与赋值或拼接同时使用。command 不允许非空 params、namespace、remappings。

nodes 适合由 Mod 自己拥有生命周期的感知、通信或设备辅助进程。当前 com.bxi.normal_depth 不再通过该字段启动 RealSense;真机相机由独立 bxi_depth_camera 包管理,深度状态订阅标准的 /<simulation|hardware>/body_depth_camera/depth/image_rect_raw 和 camera_info。

speed_profiles

speed_profiles:
  walk:
    vx_scale: 1.0
    vx_min: -1.0
    vx_max: 1.0
    vy_scale: 0.5
    yaw_scale: 1.5

transition_profiles

与系统 profile 结构相同,但运行时自动命名为 mod-id/local-name。

4. 名称限定规则

  • 不含 / 的 state、event、node state reference、speed profile 和 Mod transition profile 名称属于当前 Mod。
  • 包含 / 的值视为完整名称。
  • 资源键始终必须显式写完整命名空间。
  • 跨 Mod 引用应同时出现在 requires 中。

完整加载和校验行为见 Mod 系统。

状态机基础配置

当前状态图由两部分合成:

  1. config/elf3_state_machine.yaml:系统级配置。
  2. 每个 Mod 的 mod.yaml:状态、事件、速度、私有过渡 profile、路由、action 和可选内置节点。

不要再把 states 或 remote_events 写进系统 YAML;加载器会用 Mod 贡献重新生成这些字段。

状态图中的 route 决定“什么事件把哪个状态切到哪个状态”,Transition 则决定“切换期间每个控制周期如何生成电机帧”。两个状态的 MIT 命令字段可能不连续,直接切换可能使机器人突然动作,因此系统提供保持、进入增益渐变和双状态运行混合等过渡;只有明确需要立即切换时,例如进入安全断力状态,才使用 instant。

系统 YAML

initial_state: com.bxi.basic_actions/zero_torque

mod_paths:
  - /opt/bxi/mods

graph:
  validate: true
  export:
    dot: /tmp/elf3_state_machine.dot
    mermaid: /tmp/elf3_state_machine.mmd

default_transition: instant

transition_profiles:
  instant:
    type: instant

  soft_switch:
    type: hold
    duration: 0.02

  first_frame_switch:
    type: sequence
    steps:
      - type: hold
        duration: 0.02
      - type: entry_gain_ramp
        duration: 1.0
        kp_from: zero
        kd_from: target

  dual_running_blend:
    type: running_blend
    duration: 0.3
    curve: smoothstep
    sample_from: true
    sample_to: true
    advance_from: true
    advance_to: true

当前共享 profile 使用 advance_from: true、advance_to: true,在过渡期间让两端都提供 实时动态输出。两个状态会在同一控制周期内串行采样,不需要并行线程。目标状态必须保证 Transition 最后一帧与正式 on_enter() 后第一帧连续;若目标进入时会重置 history 或时间轴, 应在该 route 覆盖 advance_to: false,让目标只做无副作用预览。只有来源动作已经结束、 无法继续提供有效运行帧时,才设置 sample_from: false,改用过渡开始前的最后电机帧。

initial_state 必须使用完整状态名。mod_paths 只追加搜索根;安装包内置 mods/ 始终扫描。 初始状态依赖的资源必须使用 policy="startup",因为启动时没有可继续控制机器人的来源 状态。普通目标状态可以使用 on_demand:请求后状态机发布 preparing,保持当前状态, 资源就绪后再开始 Transition。

Mod 事件

events:
  activate:
    slot: btn_10
    value: 11
  toggle_pause:
    slot: btn_9
    value: 1

运行时名称分别为 mod-id/activate 和 mod-id/toggle_pause。value 省略时表示槽位任意变化;通常推荐明确 value。

Mod 状态

states:
  wave:
    id: 12345                 # 可选;默认由完整名称稳定计算
    manifest:
      label: 波浪动作
      priority: 100
      group: Customer
      icon: waves
      confirm: true
      confirm_message: 请确认周围安全
    speed_profile: walk
    params:
      amplitude: 0.4

manifest.priority 控制界面顺序:数值越大越靠前,默认 0;相同值按完整状态名升序排列。框架自动生成唯一 index,它与状态机 id 无关。只有必须固定绝对位置时才显式写非负 manifest.index,重复的显式 index 会阻止启动。params 必须由工厂的 StateBuildContext 完整消费。

速度 profile

speed_profiles:
  walk:
    vx_scale: 1.0
    vx_min: -1.0
    vx_max: 1.0
    vy_scale: 0.5
    yaw_scale: 1.5

状态写 speed_profile: walk 时会自动解析成当前 Mod 的 mod-id/walk。状态代码通过 self.get_cmd_vel(ctx) 获取处理后的速度。

路由

所有边放在 routes,不写进 states.*.transitions:

routes:
  - from: com.bxi.basic_actions/normal
    event: activate
    to: wave
    transition: soft_switch

  - from: wave
    event: com.bxi.basic_actions/normal
    to: com.bxi.basic_actions/normal
    transition:
      profile: dual_running_blend
      duration: 0.8

  - from: wave
    event: stop
    to: com.bxi.basic_actions/zero_torque
    delay: 0.2

规则:

  • 本地 from/event/to 自动限定到当前 Mod。
  • 包含 / 的值视为完整名称。
  • 一条 route 必须包含 to,不能包含 action。
  • transition 可为 profile 名、内联对象或 {profile: ..., 覆盖字段...}。
  • first_frame_switch 的共享默认 ramp 是 1.0s。需要更快切换的路由应使用 {profile: first_frame_switch, steps: [...]} 完整覆盖 steps;列表不会按下标深度合并。内置 normal_depth 进入路由把 ramp 显式覆盖为 0.02s。
  • 同一源状态和同一事件只能有一条 route 或 action。

Action

不切换状态的事件处理单独放在 actions,不混入 routes:

actions:
  - from: wave
    event: toggle_pause
    action: toggle_pause
    manifest:
      label: 暂停/继续

from/event 的命名空间规则与 route 相同。每条 action 必须包含 action 和非空的 manifest.label,不能包含 to/transition/delay;触发后状态机调用当前状态的 action handler。

状态机信息会在 graph.actions[] 发布规范化后的 from/event/action 和展开的 manifest,消费端可直接读取 label 显示操作名称。

Mod 私有过渡 profile

transition_profiles:
  wave_entry:
    type: entry_gain_ramp
    duration: 0.6
    kp_from: zero
    kd_from: target

运行时名称是 mod-id/wave_entry。当前 Mod route 中写 transition: wave_entry 会自动解析;其他 Mod 使用时写完整名称并声明依赖。

图验证和导出

graph.validate: true 会在启动阶段验证目标、事件、过渡能力和图结构。导出文件可用于排查不可达状态或错误边:

sed -n '1,120p' /tmp/elf3_state_machine.mmd
dot -Tsvg /tmp/elf3_state_machine.dot -o /tmp/elf3_state_machine.svg

完整示例

当前最完整的生产示例是:

src/bxi_example_py_elf3/config/elf3_state_machine.yaml
src/bxi_example_py_elf3/mods/com.bxi.basic_actions/mod.yaml

字段全集见 YAML 字段参考,Mod 加载规则见 Mod 系统。

架构总览

当前架构把平台适配、控制框架、动作实现和模型资产分层。BxiExample 只处理 ROS 和硬件边界;RobotControlFramework 拥有 Mod、状态、Transition、Context 和状态机。状态侧的部署单元是 Mod,不再依赖中央状态类文件。

当前 bxi_example_demo.py 是 VKH6 的一个平台适配实现,不是框架本体。需要接入其他 机器人消息、SDK 或硬件总线时,请按机器人平台适配指南 实现新的 ControlPlatformAdapter,不要把硬件差异写进状态机或策略公共运行时。

总数据流

手柄 / 键盘 / CRSF / 自定义设备
  -> InputDeviceManager
  -> InputDriver
  -> sources -> controls -> outputs
  -> communication/msg/MotionCommands
  -> BxiExample 的 ROS subscription
  -> BxiExample 按消息关节名采集 RobotObservation 并排队 raw events
  -> RobotControlRuntime 的独立控制线程
       -> BxiExample.snapshot_control_inputs()
       -> 首帧建立完整 Robot Layout
       -> RobotControlFramework 内的 RemoteEventAdapter / RobotStateMachine
       -> 可选 JointCommandComposer 合并模型、话题、IK、轨迹等命令源
       -> RobotControlState 输出自己的 29/31/N 自然 MotorFrame
       -> JointCommandResolver 补齐完整 Robot Layout
       -> Transition 在完整布局上插值
       -> BxiExample.publish_motor_frame()
       -> 可选 actuators_cmds_override 按名称覆盖最终命令
  -> BxiExample 将 MotorFrame 转换为 ActuatorCmds
  -> 机器人硬件

这条边界的核心约定很简单:平台每周期给框架一份完整观测和事件,框架返回最终电机帧。框架不创建硬件消息,不发布电机话题,也不负责机器人 reset。因此更换消息类型、总线或硬件平台时,状态图和 Mod 不需要跟着改。

当 route 要求切换状态时,RobotStateMachine 会在源状态和目标状态之间执行 Transition。它负责切换期间的电机帧,避免两边 MIT 命令字段不连续时直接换帧产生突跳;完成后目标 RobotControlState 才接管正常更新。

配置和代码的加载流:

elf3_state_machine.yaml(系统配置)
  + 内置 mods/
  + mod_paths 中的客户 Mod
  -> 发现 mod.yaml
  -> 校验依赖并排序
  -> 加载 entrypoint
  -> 注册 startup/on-demand 资源、状态工厂和 Python 节点
  -> 合成 states/events/routes/actions/nodes/profiles
  -> 构建 RobotStateMachine
  -> 按 Mod/State 生命周期管理节点

文件分层

src/remote_controller/
  config/xbox_default.yaml
  include/remote_controller/
  src/

src/bxi_example_py_elf3/
  config/elf3_state_machine.yaml       # 系统级配置
  mods/
    com.bxi.basic_actions/
      mod.yaml                         # 状态图贡献
      plugin.py                        # 工厂和资源注册
      *_state.py                       # 状态实现
      assets/                          # 该 Mod 私有资产
    com.bxi.back_flip/
    com.bxi.forward_flip/
    com.bxi.ballet/
    com.bxi.normal_depth/
      depth.py                       # 深度行走 Mod 私有策略
  bxi_example_py_elf3/
    framework/                       # 与 ELF3 部署代码分离的可移植运控框架
      inference/                     # 后端、历史帧、策略契约和推理运行时
      joints/                        # 具名布局、默认目标、解析器、映射与标定
      platform/                      # 机器人接入协议、关节 I/O 和控制 Runtime
      mod_api/                       # 面向 Mod 作者的公共 API
      runtime/                       # 状态机、加载器、调度器和控制内核
      transitions/                   # 通用 Transition
    policies/                        # ELF3 内置推理策略
      joints.py                     # 模型关节契约与策略内部顺序
      normal.py
      amp.py
      beyondmimic.py
    bxi_example_demo.py             # ELF3 ROS 适配层及平台默认目标
    bxi_example_mjlab.py            # 原 MJLab 示例入口

运行时对象

对象 责任
RobotControlRuntime 持有控制调度器、Framework、维护线程和平台适配边界
RobotControlFramework 接收 RobotObservation/events,推进状态机并返回 MotorFrame
ModRuntime 保存合成配置、状态工厂、资源管理器、已加载 Mod 和动态模块
ResourceManager 注册、异步准备、缓存、报告状态并关闭资源
StateBuildContext 为状态工厂提供名称、稳定 state id 和强类型参数读取
RobotStateMachine 处理事件、延迟、过渡、状态生命周期和图导出
RemoteEventAdapter 把 MotionCommands 槽位变化转成 Mod 事件
JointCommandComposer 在状态内部合并多个具名命令源,检查覆盖所有权并复用输出帧
JointCommandResolver 将状态自然输出按名称解析成完整 Robot Layout;映射仅编译一次

Robot Layout 不再由固定的 29 关节常量传给 Runtime。具名消息的首个合法完整快照决定当前 机器人是 29、31 还是 N 个关节;策略类自己的 PolicyJointContract 仍固定模型输入输出, 二者互不改写。旧模型缺失的新增关节由平台 JointCommandDefaults 显式提供目标。 模型输出维度也不等于状态输出维度:状态可用 JointCommandComposer 把模型目标与话题、 IK、轨迹或其他控制器合成,再把自然输出交给 Resolver 适配实际机器人。 完整的输入选择、输出补齐/裁剪、Transition 和固定顺序硬件规则见 关节布局与映射。

Mod 只能依赖 bxi_example_py_elf3.framework.mod_api;BxiExample 通过 framework.platform.RobotControlRuntime 使用运控内核,不再自己组装调度器、loader、 状态和状态机。项目不保留旧路径的兼容转发模块,错误依赖会在开发阶段直接暴露。

命名空间

Mod 清单中的本地名称会自动限定:

Mod id:       com.example.wave
state:        wave
event:        activate
resource:     com.example.wave/policy

运行时状态:  com.example.wave/wave
运行时事件:  com.example.wave/activate

同一 Mod 内的 from: wave、to: wave 和 event: activate 会自动限定。跨 Mod 引用必须写完整名称,并通过 requires 声明依赖。

修改边界

新增动作:

  • 新建或扩展一个 Mod。
  • 在 mod.yaml 声明状态、事件、路由和 action。
  • 简单状态用 factory: module:Class;需要资源和扩展注册时再由 plugin.py 返回工厂。
  • 模型放进该 Mod 的 assets/ 并注册资源。
  • 在遥控器 YAML 中输出清单所使用的 btn_N=value。

新增过渡:

  • 框架通用过渡放入 framework/transitions/。
  • 业务专用过渡放在对应 Mod 中,并由 ModDefinition.transition_plugins 显式注册。
  • profile 可放系统 YAML;Mod 私有 profile 放 mod.yaml,会自动加命名空间。

新增输入协议:

  • 先判断是否仅靠遥控器 YAML 能完成。
  • 必须读新设备时再实现 InputDriverBase 和工厂。
  • Driver 只产生 raw signal,不直接写状态名。

公开发布:

  • 在要整体移除的 Mod 清单中设置 visibility: protected。
  • tools/sanitize_release.py 删除整个目录并验证保留 Mod 的依赖闭包。

下一步

框架底层运行原理

本页按启动和每帧执行顺序描述当前实现。

1. remote_controller

读取 YAML
  -> 校验 sources/controls/outputs
  -> 注册并创建候选 InputDriver
  -> InputDeviceManager 周期探测
  -> 选择唯一活动设备
  -> InputMapper 计算 controls
  -> MotionCommandsAdapter 写消息
  -> 发布 motion_commands

设备选择考虑 priority、ready_timeout_ms、loss_timeout_ms、cooldown_ms 以及全局扫描/稳定时间。Driver 只生产 raw signal,业务组合留在 YAML。

edge 只在条件由 false 变 true 时触发;level 持续反映条件;analog 每帧写连续值。

2. 平台适配层与框架启动

BxiExample
  -> 读取 ROS 参数和系统状态机 YAML
  -> 创建 ROS subscription / publisher / service client
  -> 实现 ControlPlatformAdapter 的三个平台方法
  -> 创建 RobotControlRuntime

RobotControlRuntime
  -> 创建 RobotControlFramework
       -> load_mod_runtime()
       -> build_robot_states()
       -> 绑定状态并创建 RobotStateMachine
       -> 创建 RemoteEventAdapter
  -> 创建 ControlScheduler 和低频维护线程

BxiExample 不再持有 ModRuntime、状态实例或状态机,也不再代理 set_motor_target()、request_state() 和模型预热等框架能力。这些由 RobotControlFramework 作为 RobotControlContext 的实现统一提供。BxiExample 只实现启动检查、观测快照和电机帧发送,具体迁移方法见机器人平台适配指南。

RobotControlRuntime 通过 ControlPlatformAdapter 隔离传感器和电机总线,同时保留一条直接的每周期调用路径。控制时钟由独立的 ControlScheduler 管理,不由 ROS Timer 驱动。

3. Mod 动态模块

每个清单先校验 schema、id、版本和 API。依赖拓扑排序后,入口模块或 factory: module:Class 引用以由 Mod id 确定的私有包名导入,使相对 import 可用并隔离不同 Mod 的模块命名空间。

加载失败会关闭新资源、移除动态模块、恢复过渡插件注册,并撤销 Python exports 和对应的 sys.path 修改。

4. 配置合成

系统 YAML 先复制为 base config,mod_paths 不进入最终状态机配置。随后按依赖顺序合成:

  • states
  • remote_events
  • speed_profiles
  • Mod transition_profiles
  • routes/actions 生成的 states.*.transitions.on_event
  • nodes 生成的 Python 节点规格

所有本地名称在这一阶段限定为 mod-id/local-name。输入冲突、未使用事件、未知目标、priority/index、profile 和 initial state 都在返回运行时前校验。

5. 状态构建

构建器不再扫描类。它遍历合成状态:

  1. 使用显式 id,或对完整名称计算 CRC32 int31。
  2. 创建 StateBuildContext。
  3. 调用显式 Mod factory,或由类的 dataclass Params 生成约定 factory。
  4. 拒绝未知参数。
  5. 设置 speed profile 和 manifest。

6. ResourceManager

注册时保存 key、owner、Mod 根、factory 和 startup/on_demand 策略。资源工作线程负责 实际构造:startup 在控制循环开始前统一准备,on_demand 在状态机第一次请求需要它的 目标状态时准备。ResourceHandle.get() 只返回 ready 实例,不发起加载,也不等待。 context.asset() 负责限定资产必须位于本 Mod 的 assets/。关闭运行时会等待正在准备的 资源,并逆序调用已创建实例的 close()。

7. 每个控制周期

RobotControlRuntime 到达绝对时间释放点
  -> 调用 BxiExample.snapshot_control_inputs()
       -> 在同一把观测锁内更新长期复用的 JointStateBuffer 和传感器缓冲
       -> 返回稳定 RobotObservation 并取出已排队 events
  -> framework.update(observation, events, dt)
       -> 更新 RobotControlContext 的当前周期快照
       -> state_machine.update(dt, events)
       -> Transition 或当前状态生成最终 MotorFrame
  -> 调用 BxiExample.publish_motor_frame()
       -> 按名称应用仍在有效期内的 actuators_cmds_override
       -> 把 MotorFrame 写入 ActuatorCmds 并发布
  -> BxiExample 按频率发布 state_machine_info

RobotObservation.joints 是带 JointLayout 的 JointStateView。平台适配层长期持有观测和 数组,每周期只原地更新;它们不能引用生命周期不确定的 ROS 消息内存。Framework 首次看到 输入布局时编译名称映射,之后只执行数组映射。框架返回 MotorFrame | None,其中 MotorFrame.layout 明确输出关节语义;有输出时由平台适配层决定如何发送,没有输出时不发 新的电机命令。

8. 状态切换

Transition 是状态机在源状态和目标状态之间创建的一次切换 Session。它在目标状态正式进入前暂时负责每周期的电机输出,用来处理两边 MIT 命令字段不连续时的保持、增益渐变或帧混合;instant Session 则立即完成。

请求目标状态
  -> 检查 is_available()
  -> 检查 required_resources
       -> unloaded:异步 request,记录 preparing,当前状态继续运行
       -> loading:继续等待
       -> failed:取消请求并报告资源错误
       -> ready:继续
  -> 准备目标状态需要的 Mod Node
  -> target.on_prepare(ctx, source)
  -> plan.validate_states(source, target)
  -> session = plan.create_session(...)

每帧:session.update(ctx, dt)

完成:
source.on_exit(ctx)
current = target
target.on_enter(ctx)

活动过渡被中断或 Session 抛错时调用目标 on_prepare_cancel(),当前状态仍是源状态。

9. action

mod.yaml 顶层 actions 生成只含 action 的事件规则,不切换状态。每条 action 必须声明非空的 manifest.label。状态机先查全局 handler,再调用当前状态的 on_action(ctx, name);都未处理会报错。

10. 图验证和状态信息

状态机验证未知目标、未声明事件、过渡能力、不可达状态和无出边状态。DOT/Mermaid 导出来自同一合成配置。

状态信息话题包含当前状态、pending、preparing、active transition、本周期事件以及 states、actions、profiles 和 remote events 快照。preparing.resources[] 给出目标状态资源 的 id、status 和错误。graph.actions[] 中的 manifest 会像 state manifest 一样展开, label 可直接用于界面显示。

Mod 节点状态位于顶层 nodes[]。进程内节点加入主 MultiThreadedExecutor;独立进程节点由 runner 加载同一个 Mod entrypoint。State 生命周期节点在目标状态准备前启动,过渡取消时回收,切换完成后释放源状态不再需要的节点。

11. 固定运行时

Mod、资源、动态模块和状态图只在节点启动时构建。启动失败会清理已经创建的资源、模块和注册项;启动成功后运行时保持不变。修改系统 YAML、Mod 或资产后必须重启节点,控制循环不扫描文件,也不动态替换状态机。

12. 扩展边界

  • 新动作:Mod 状态 + 工厂 + 清单。
  • 新模型:Mod 资源工厂。
  • 新业务过渡:Mod 的 ModDefinition.transition_plugins 显式注册。
  • 新后台 ROS 节点:Mod nodes + Python NodeBuildContext 工厂。
  • 新通用过渡:framework/transitions/。
  • 新设备:InputDriverBase 工厂。
  • 新消息适配:MotionCommandsAdapter。

13. 公共 API 边界

客户 Mod 只导入 bxi_example_py_elf3.framework.mod_api。framework/runtime 保存 RobotControlFramework、Mod loader、ResourceManager、状态构建器、状态机和 Transition 注册/编译逻辑。公开生命周期使用 RobotControlContext Protocol,不直接绑定 BxiExample。旧包路径已移除,不提供兼容转发层。

ctx.ros_node 是为必须创建 ROS subscription、service 或 timer 的高阶 Mod 保留的显式逃生口。普通状态不应使用它;一旦使用,该 Mod 就是主动选择 ROS 集成,而不是框架的主控制链路依赖 ROS。

相关文档

高级配置范式

以下片段均基于当前 Mod 架构。

下面出现的 Transition 都是在 route 已决定目标状态后,负责切换期间电机输出的策略。它用于处理源、目标状态之间可能不连续的 MIT 命令字段;没有合适过渡时直接换帧,机器人可能突然动作。

最小跨 Mod 切换

requires:
  - id: com.bxi.basic_actions
    version: ">=1,<2"

events:
  activate:
    slot: btn_10
    value: 11

states:
  custom:
    manifest:
      label: 自定义
      priority: 100

routes:
  - from: com.bxi.basic_actions/normal
    event: activate
    to: custom
  - from: custom
    event: com.bxi.basic_actions/normal
    to: com.bxi.basic_actions/normal

同一事件支持多种设备

状态侧只声明一个槽位:

events:
  activate:
    slot: btn_10
    value: 11

遥控器 YAML 可让键盘、手柄和 CRSF 的不同 control 都输出 btn_10=11。状态 Mod 无需知道输入设备。示例值 11 不是默认绑定;部署前应在整棵 Mod 树中确认槽位和值唯一,再增加对应 output。

延迟切换

routes:
  - from: custom
    event: stop
    to: com.bxi.basic_actions/zero_torque
    delay: 0.2

新 event 到来可覆盖 pending transition;安全事件应使用立即路由。

状态内部 action

events:
  toggle_pause:
    slot: btn_9
    value: 1
actions:
  - from: custom
    event: toggle_pause
    action: toggle_pause
    manifest:
      label: 暂停/继续

状态的 on_action() 返回 true 表示已处理。

单次覆盖过渡

transition:
  profile: dual_running_blend
  duration: 1.0
  curve: smootherstep
  sample_from: false

Mod 私有过渡

transition_profiles:
  safe_entry:
    type: sequence
    steps:
      - type: hold
        duration: 0.02
      - type: entry_gain_ramp
        duration: 0.8
        kp_from: zero
        kd_from: target

运行时 profile 名自动变为 mod-id/safe_entry。

共享资源 Mod

资源提供者可使用:

schema: 1
id: com.example.shared_policy
name: 共享策略资源
version: 1.0.0
api: ">=4,<5"
enable: true
entrypoint: plugin:create_mod
visibility: public
requires: []
conflicts: []
python_exports: []
runtime_requirements:
  python: []
  ros: []
  system: []
states: {}

消费 Mod 通过 requires 依赖它,并使用相同完整 ResourceKey。公开资源 Mod 不应依赖 protected 功能。

客户 Mod 外置部署

系统 YAML:

mod_paths:
  - /opt/bxi/mods

客户包可独立复制到该目录,无需修改 ROS Python 包。id 必须避免与内置 Mod 重复。

Python 公共包导出

python_exports:
  - customer_common

适合多个 Mod 共享纯 Python helper。目录必须包含 __init__.py,导出名全局唯一。更简单的共享资源优先使用资源 Mod。

高危动作发布保护

visibility: protected

保护整包而不是列类名、模型键和路径。公开 Mod 若引用它,sanitizer 会拒绝生成。

index 规划

普通状态使用 manifest.priority 排序,由框架生成唯一 index。只有外部协议确实要求固定 位置时才显式声明 manifest.index,并在整棵状态树中保证唯一;两个显式 index 重复会 直接阻止启动,不会自动向后重排。

工程检查清单

  1. 所有跨 Mod 引用都有 requires。
  2. 资源路径均在所属 assets/。
  3. 参数由 StateBuildContext 强类型消费。
  4. action 有 handler,事件至少有一条 route 或 action。
  5. running_blend 的 advance 语义正确。
  6. on_bind/on_unbind 和资源 close() 对称。
  7. 修改 Mod 后重启节点,验证成功加载以及错误配置能在启动阶段明确失败。
  8. 发布前运行 sanitizer --self-check。

发布保护与公开版同步

当前发布保护以完整 Mod 为单位。工具不再删除 Python class、中央 YAML 片段或单个模型文件。

标记保护 Mod

schema: 1
id: com.example.dangerous_action
name: 高风险动作
version: 1.0.0
api: ">=4,<5"
enable: true
entrypoint: plugin:create_mod
visibility: protected
requires: []
conflicts: []
python_exports: []
runtime_requirements:
  python: []
  ros: []
  system: []

运行时仍正常加载;visibility 由发布工具解释。该字段必须显式填写。当前内置保护 Mod 是 com.bxi.back_flip、com.bxi.ballet 和 com.bxi.normal_depth;com.bxi.forward_flip 当前是 public。

生成公开树

python3 tools/sanitize_release.py \
  --out /tmp/public_release \
  --self-check

临时额外排除公开 Mod:

python3 tools/sanitize_release.py \
  --exclude com.example.customer_feature \
  --out /tmp/public_release

额外根可通过重复 --mod-root 指定。

工具行为

  1. 从 Mod 根递归发现清单。
  2. 读取显式 requires。
  3. 从跨 Mod routes.from/to/event、actions.from/event 和 nodes.states 推导隐式依赖。
  4. 收集 protected 和命令行排除项。
  5. 验证公开 Mod 依赖闭包不包含要删除的 Mod。
  6. 复制仓库并忽略版本库、Wiki、构建目录和缓存。
  7. 删除被保护 Mod 的完整目录和私有同步工具。
  8. --self-check 重新发现输出 Mod,确认集合准确。

公开 Mod 依赖保护 Mod 时会直接失败。应调整依赖方向或把共享资源拆成 public 的无状态资源 Mod。

GitHub Action

.github/workflows/sync_public_main.yml 在 dev push 或手动触发时生成并自检公开树,同步到 public/main-sync,创建/更新面向 main 的 PR 并尝试合并。

仓库 secret PUBLIC_RELEASE_TOKEN 需要 Contents、Pull requests 和 Workflows 写权限。

本地检查

find /tmp/public_release/src/bxi_example_py_elf3/mods -name mod.yaml -print
test ! -d /tmp/public_release/src/bxi_example_py_elf3/mods/com.bxi.back_flip
test ! -d /tmp/public_release/src/bxi_example_py_elf3/mods/com.bxi.ballet

基础动作包必须完整保留;工具不会从一个 Mod 内裁剪个别状态。

从 0f90a49 迁移到当前 Mod 架构

本页总结 0f90a49c539e0efcec0d6fbc481f634890742c78 之后影响使用方的主要变化。

从 Mod API 3 迁移到 API 4

当前框架公开 MOD_API_VERSION = "4.0.0",清单必须改为:

api: ">=4,<5"

API 4 把模型加载从控制生命周期中移到异步 Resource 准备流程:

API 3 API 4
loading="eager" policy="startup"
loading="lazy" policy="on_demand"
handle.get() 首次调用时同步加载 handle.get() 只读取已经 ready 的实例
状态在 on_prepare() 才发现模型未加载 状态构造时用 resources=(handle,) 声明依赖
PolicyState.create_policy() Resource factory 创建策略,构造函数接收 handle

自定义核心状态应这样声明资源:

class MotionState(RobotControlState):
    def __init__(self, name, state_id, policy):
        super().__init__(name, state_id, resources=(policy,))
        self._policy_handle = policy

PolicyState 和 MotionReplayState 在接收 handle 后会自动声明依赖。请求一个使用 on_demand 资源的状态时,状态机会保持当前状态、异步准备资源,并在 state_machine_info.preparing 中发布进度;就绪后才调用目标状态的 on_prepare()。

ctx.preheat_model() 的速度参数现在统一为 command=...,不再接受 with_cmd_vel 或 cmd_vel。运行时显示 logger 也缩短为 fw.* 和 <mod-id>.*,但 logging.levels 配置仍使用逻辑 scope framework.* 与 mod.*。

已删除的入口

以下旧入口不再存在:

bxi_example_py_elf3/robot_states.py
config/release_protection.yaml
data/isaaclab_model/
data/mjlab_model/

中央状态 YAML 中的 states、remote_events 和 speed_profiles 也不再作为配置源。

新的对应关系

旧方式 当前方式
在中央文件添加 State class 在 Mod 目录添加状态模块
构建器扫描所有 State 子类 plugin.py 返回显式 state_factories
中央 YAML 声明状态和边 mod.yaml 声明 states/events/routes/actions
模型挂在 ctx 动态属性 ResourceKey + ResourceHandle
模型放 data/*_model 模型放所属 Mod 的 assets/
按单个类/模型做发布删除 visibility: protected 删除整个 Mod
热重载中央状态模块 不再支持运行时重载;修改后重启控制节点

状态名变化

基础动作已经合并到:

com.bxi.basic_actions

例如:

旧:com.bxi.normal/normal
新:com.bxi.basic_actions/normal

旧:com.bxi.zero_torque/zero_torque
新:com.bxi.basic_actions/zero_torque

基础事件也变为动作名:

com.bxi.basic_actions/normal
com.bxi.basic_actions/zero_torque
com.bxi.basic_actions/dance

后空翻、前空翻和芭蕾舞仍是独立 Mod,其入口事件是各自的 activate。

迁移一个旧状态

  1. 创建 mods/com.example.action/。
  2. 把状态类移到 state.py。
  3. 把模型和动作数据移到 assets/。
  4. 创建 plugin.py,注册资源并返回状态工厂。
  5. 显式填写 schema/id/name/version/api/enable/entrypoint/visibility/requires/conflicts/python_exports/runtime_requirements;没有内容的列表写 [],runtime_requirements 的 python/ros/system 三类都要显式填写。
  6. 把中央 YAML 的状态、事件和边改写为 mod.yaml 的 states/events/routes/actions。
  7. 跨包引用改成完整名称并写入 requires,不能共存的 Mod 写入 conflicts。
  8. 遥控器输出槽位可以保持不变。

完整模板见 手把手自定义状态 和 模型动作 Mod。

发布迁移

旧的类名、模型键和路径删除清单全部移除。现在只需在高危 Mod 中写:

visibility: protected

然后运行:

python3 tools/sanitize_release.py --out /tmp/public_release --self-check

工具会检查跨 Mod route 推导出的依赖和显式 requires,防止公开 Mod 依赖被删除 Mod。

运行时更新方式

/hot_reload 参数已经删除。系统 YAML、Mod 清单、状态代码、Transition 或模型资产发生变化后,需要重启控制节点。所有发现、依赖排序、资源注册和状态图校验都在启动阶段完成;运行期间不扫描文件,也不替换状态机对象。

状态显示顺序

普通 Mod 不再手工维护 manifest.index,改为声明整数 manifest.priority:数值越大越靠前,相同 priority 按完整状态名升序排列,框架自动生成唯一 index。确实需要固定位置时仍可显式声明非负 index,但两个显式 index 重复会直接终止启动。

重映射

本文档正在建设中。 这里将记录控制指令与关节映射的自定义配置指南。

其他

本文档正在建设中。 这里将记录其他系统工具、固件升级指南以及常见问题解答 (FAQ)。